My Best Tips for Photographing Snow
My Best Tips for Photographing Snow
As a landscape photographer, if there’s one thing I look forward to the most when the season turns cold, it’s the snow. As I’m writing this from Boston where last year we received a crippling amount of the white and fluffy (if you live in the city, then you know it’s never white and rarely fluffy), I still find myself just as excited about the first snowfall as I was when I was a kid: only for many different reasons.
Snow can add layers of interest and texture to any environment, allowing you to expand your creative horizons. After a fresh snowfall, I look at what was once a stark and barren landscape with a refreshed vision. While I do enjoy photographing what is often referred to as “stick season”, the snow reinvigorates my inspiration to create during the winter months.
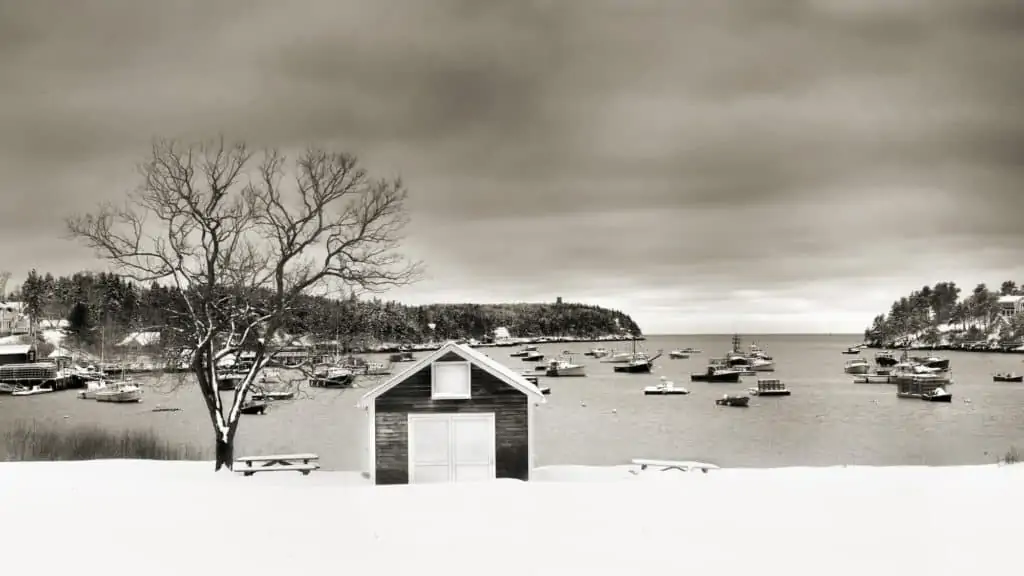
I’m particularly fond of black and white format with snow. You can greatly expand your tonal range, which provides some much-needed highlights against the bland landscape. Texture is also greatly affected by the snow, turning brush and dirt into a blanket of smooth transitions and interesting curvature.
However (you knew there was a “however” coming), photographing snow can be a challenge. It requires a specialized workflow to 1) obtain proper exposure and color, and 2) photograph snow as it falls. With the right tools and knowledge, you can easily overcome this landscape hurdle.
Why does my snow come out grey?
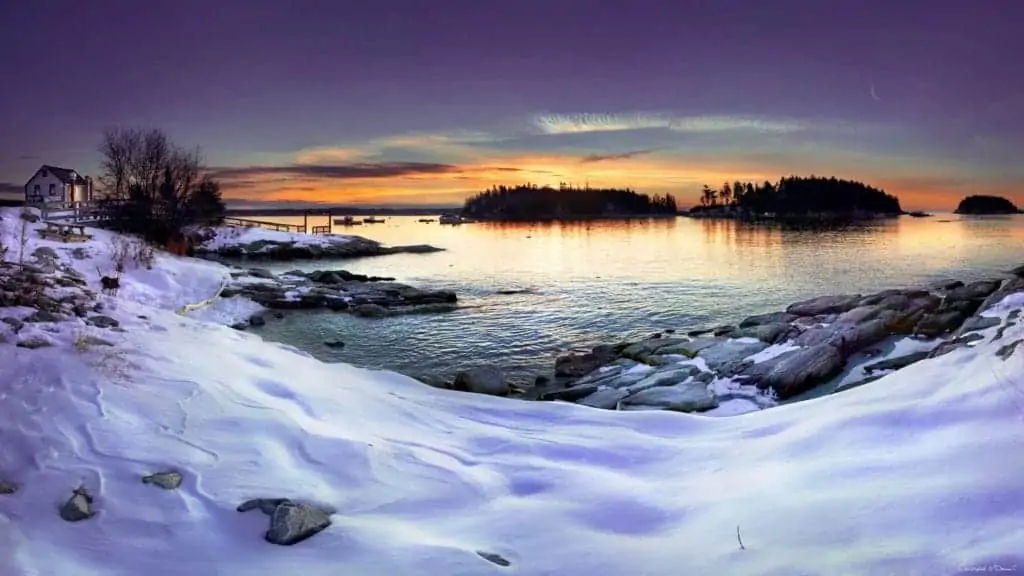
This is something that I get asked ALL the time – why does my snow look dirty and grey when it was brightly white in person? The answer is simple: you’re underexposing your scene.
Now when you’re photographing snow, it’s good to retain some shadow in order to provide texture and depth…if you overexpose, you’ll lose all variation and will be left with an uninteresting white blanket.
The red flag you’re looking for is whether or not your snow is just varying shades of grey with no pure white point; if that’s the case, then you need to shoot a bit more to the right.
Not sure if you’re underexposing the scene? Check your histogram in the field: if your tones are bunched up to the left-hand side (right image below), then you need to open up your aperture or slow down your shutter speed to let in more light. Ideally, your histogram should look like the bottom-left image here – most gathered in the last third of your histogram, but with no (or very little) tones hitting the right edge.

One exposure is not always enough.
In order to make sure that there are no blown highlights or crushed shadows (in other words, ALL of the detail has been captured), you’ll sometimes have to use HDR techniques; this means to bracket off your scene and combine the best details of multiple exposures into one photograph.
This is especially true for high-contrast landscapes – i.e. when you’re photographing the golden hours. The sun can reflect off of the snow and produce some intense peaks and valleys of your value scale, so you may not be able to capture all of your tones with just one photo.
And that is where HDR comes in. This incredible workflow allows you to throw away the limitations of your camera and capture every crisp detail of your highlights and shadows – which will help you achieve that perfect balance between natural-looking snow and recovering the full tonal range.
HDR is not a form of “cheating”, nor does it mean you are creating an unnatural photo. It’s a simple (yet extremely powerful) recovery method that you can use when your camera just isn’t capable of photographing every highlight and shadow. It’s also a lot of fun 🙂
I’ve put together a very helpful (and totally free) HDR field guide that will walk you through the ENTIRE in-the-field workflow so you can capture your brackets the right way. The quality of your HDR images entirely depends on how accurate your brackets are, so taking successful brackets in the field is absolutely the most important step.

Click here to download your free field guide.
Photographing Snowfall
When trying to photograph any moving subject, your shutter speed plays a very important part – and falling snow is no exception.
The faster your shutter speed, the more defined and crisp your snowflakes will appear. Conversely, the slower your shutter speed, the smoother and streakier (yes that is a real word) those flakes will look. Now whether you want sharp or smooth snowflakes is entirely dependent on your creative intent – but knowing how to obtain either one of these effects is important knowledge to have as a landscape photographer.
Now the exact shutter speed you need can vary greatly. Not only are you working with the exposure triangle (shutter speed, aperture, and ISO), but you need to take your environment into consideration: the speed at which your snow is falling, amount of available light, and your focal length (longer lenses require more light).
It’s a delicate balancing act, but one you must master as a landscape photographer since we rarely have control over these elements in the field.
Usually, the biggest challenge us photographers face when working with falling snow is a lack of available light. Snow typically falls under an overcast sky, and you may find it difficult to get a shutter speed fast enough to freeze those flakes in motion.
Here’s a side-by-side comparison showing how much difference your shutter speed can make in rendering those falling snowflakes (click to enlarge).
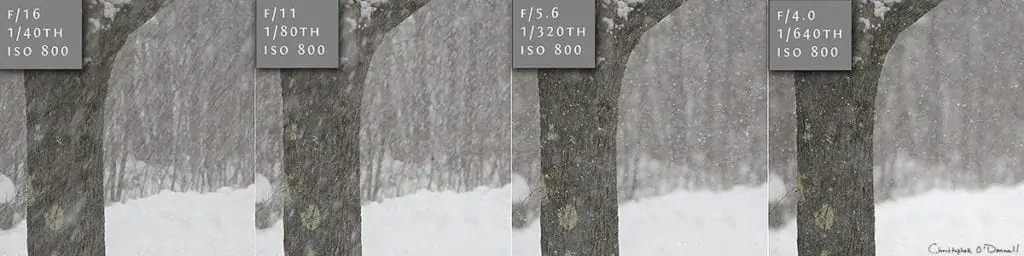
For the images above, I used a 300mm prime lens and set my focus on the tree, which was about 50 feet away. I started out with an ISO of 100, but none of the shutter speeds were fast enough to stop the snowfall. So for this image set, we’re working with an ISO of 800.
In this side-by-side comparison, you can see that as my aperture widened, the snowfall looks quite differently. Since a wider aperture means more light is let in through the lens, I can increase my shutter speed to compensate.
If I were to choose one image to use, I would select the f/5.6 aperture – it’s fast enough to render the falling snow without streaks, but my depth of field isn’t TOO shallow where I lose many flakes as they are thrown out of focus (like in the 1/640th frame).
If you need to increase your shutter speed, you have some options. Change to a shorter focal length, increase your ISO, and/or widen your aperture (like in the example images above).
Like with most creative choices in photography, the changes you make will adversely affect another. Increasing your ISO will produce digital noise and soften your focus, widening your aperture will create a more shallow depth of field, and shorter focal lengths will exaggerate your distances. Consider this balancing act as all part of your photography fun 🙂
Creating layers of snowflakes.
Once of the reasons why I love to photograph during a snowfall is the ability to create layers with my camera. By choosing a longer focal length (and a wide aperture), I can simultaneously compact my distances and increase the size of those falling flakes.
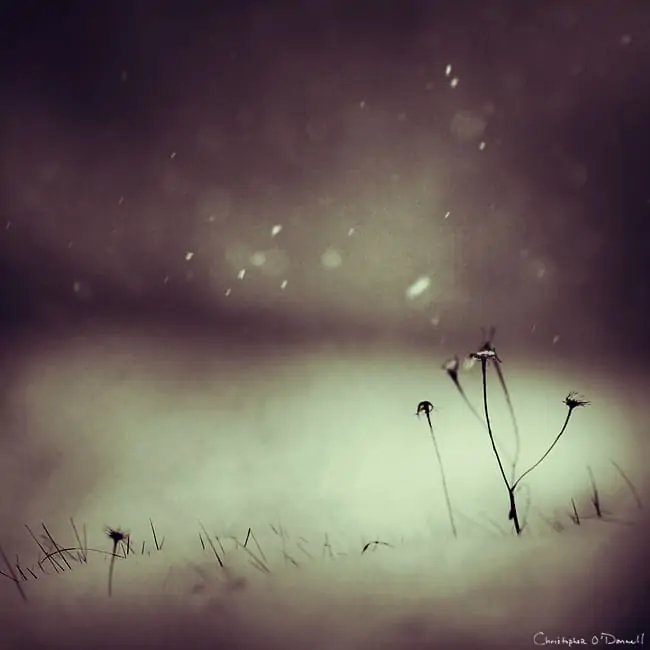
The longer your focal length is, the more shallow your depth of field will become for a given aperture – which is illustrated in the photo above. I used a 300mm lens here, which gave me multiple layers of snowflakes at various sizes. At f/4, I was able to use a rather small aperture to create some soft bokeh (although f/4 is pretty large in the scope of photography, it’s considered small for creating a super thin slice of focus like in this photo). This added texture and depth to a very light snowfall; if I had used a deeper depth of field and/or a wider lens, the snowflake interest would have been much less recognizable.
Thanks for reading…and remember to download the HDR field guide!