Working with Layers in Photoshop: A Beginner’s Guide
Working with Layers in Photoshop: A Beginner’s Guide
Layers are a powerhouse tool in Photoshop, and one of the core strengths that this program has over Lightroom.
However, the concept of layers can be difficult to grasp…so I’ve put together this extensive (yet easy-to-follow) guide that explains what layers are and how they work to enhance your photographs.
For landscape photography, there are four basic building blocks of Photoshop (with layers being one of them) that all processing techniques rely on.
Once you learn how layers work, techniques that seem too advanced beyond your skills (such as exposure blending, sky replacements, focus stacking, color grading, and so much more) will suddenly make perfect sense.
Layers are very simple to understand…it just requires a small shift in thinking about how you work in Photoshop; a different perspective for it to all finally “click”. And I will show you exactly how to do that in this tutorial.
I’ve been processing with Photoshop since 2006, so I can tell you this with much confidence: when you know how layers work in Photoshop, you’re already way ahead of the learning curve. Most techniques in Photoshop are based on the non-destructive workflow that layers can provide…so it’s absolutely crucial that you are comfortable using layers if you want to create high-quality, extraordinary landscape photographs.
If you prefer to learn visually (which I highly recommend for anything Photoshop), you can download my free video course below. This five-part course also comes with practice files and a helpful PDF cheatsheet, so you can get hands-on with layers right away.
Now let’s get to the tutorial! Whether you prefer to watch or read, I’ve got you covered below.
What are Layers Exactly?
In the simplest, most basic explanation possible: layers allow you to separate each and every change you make to your photograph. This will not only protect your photo from any permanent changes, but it allows you to make changes to your adjustments independent from the image itself.
You can move layers around, change their appearance, remove or hide them, add another layer…and that’s just the beginning. They also give you an incredible amount of precise control over your processing that just isn’t possible with simpler programs like Lightroom. This means that your adjustments have fewer surprises and unwanted side effects so you can more easily (and accurately) make changes to your image.
Now the control station for your layers is the layer palette outlined in the screenshot below. This is where all your layers will be housed and is where you make changes to your layers. Right now, there’s only one layer in the palette but we will be adding additional layers soon.
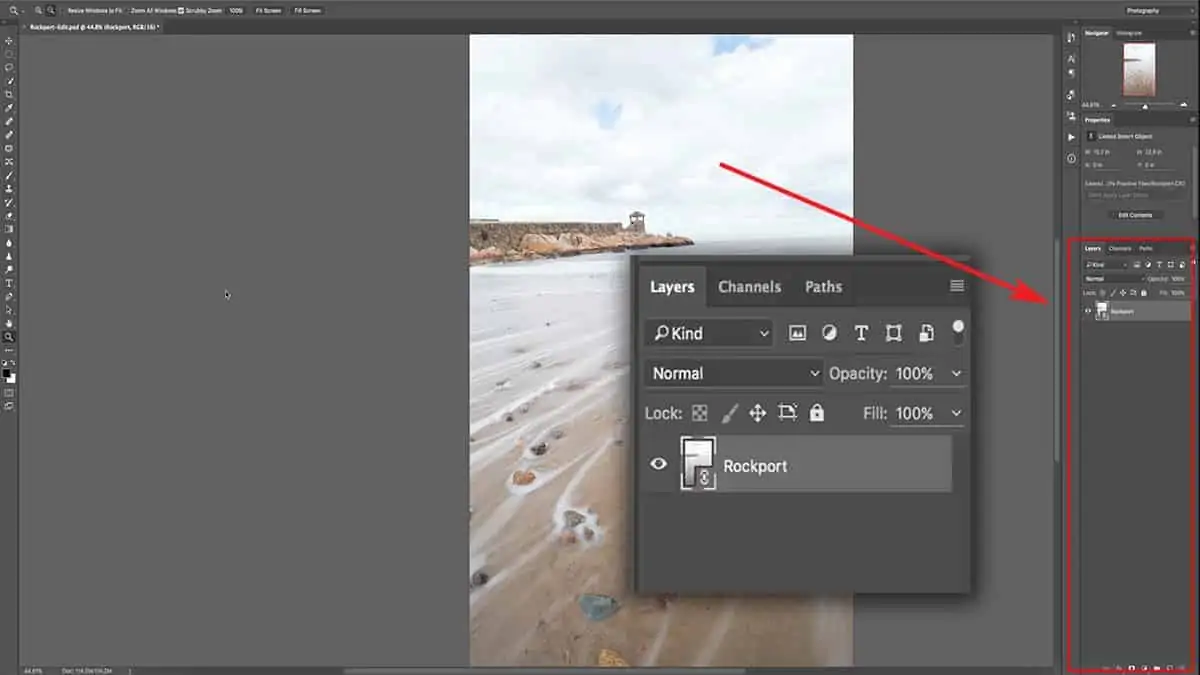
If for any reason the layers palette is not visible, simply go to the top menu and click on Windows > Layers or press F7 on your keyboard.
Whenever you open an image in Photoshop, whether directly or sent over from Lightroom, your photo will always be on its own separate layer…and it will be the first layer in your palette like seen in the screenshot above.
The term “layers” can be taken quite literally: it simply means that you are able to layer – or rather “stack” – your adjustments either on top or underneath your photo – which is your base layer. How your image will look will depend on the opacity, or the transparency, of these layers and also how they interact with each other.
How to Add a New Layer
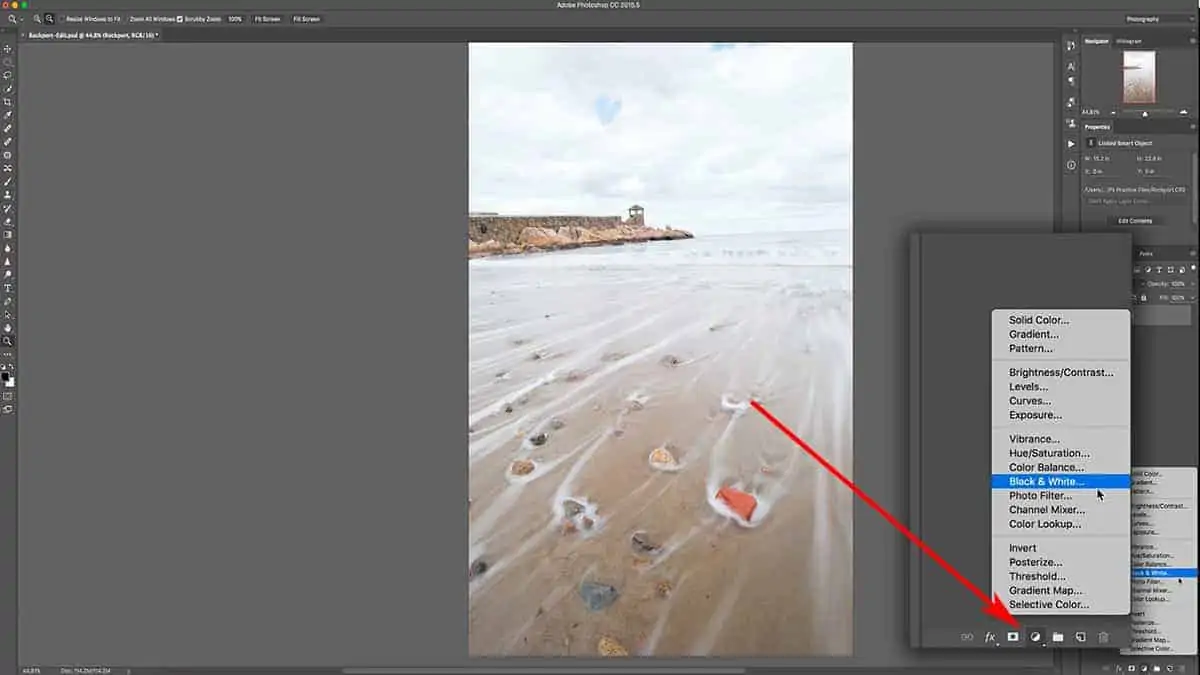
So the first step to visualizing how this all works is to add an adjustment layer on top of our photo here. Don’t worry about what adjustment layers are if you’re not familiar with them; just focus on understanding the concept of layers first.
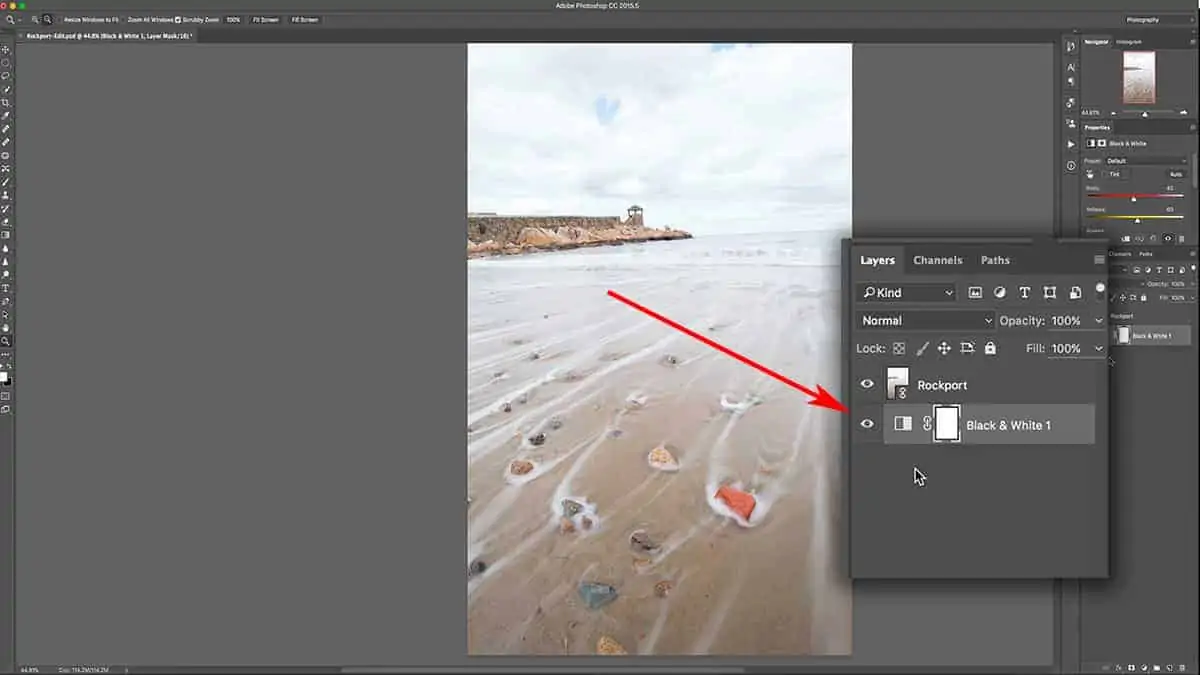
Go down to the bottom of your layers palette and click on the Add Adjustment Layer icon (as pointed to in the screenshot below) and add a new Black and White adjustment layer.
You can see that we have two different layers now: the bottom being our base layer which contains our photo, and the top layer being the new black and white adjustment layer we just added. This separate layer is applying a black and white “filter”, which gives the appearance of a black and white image.
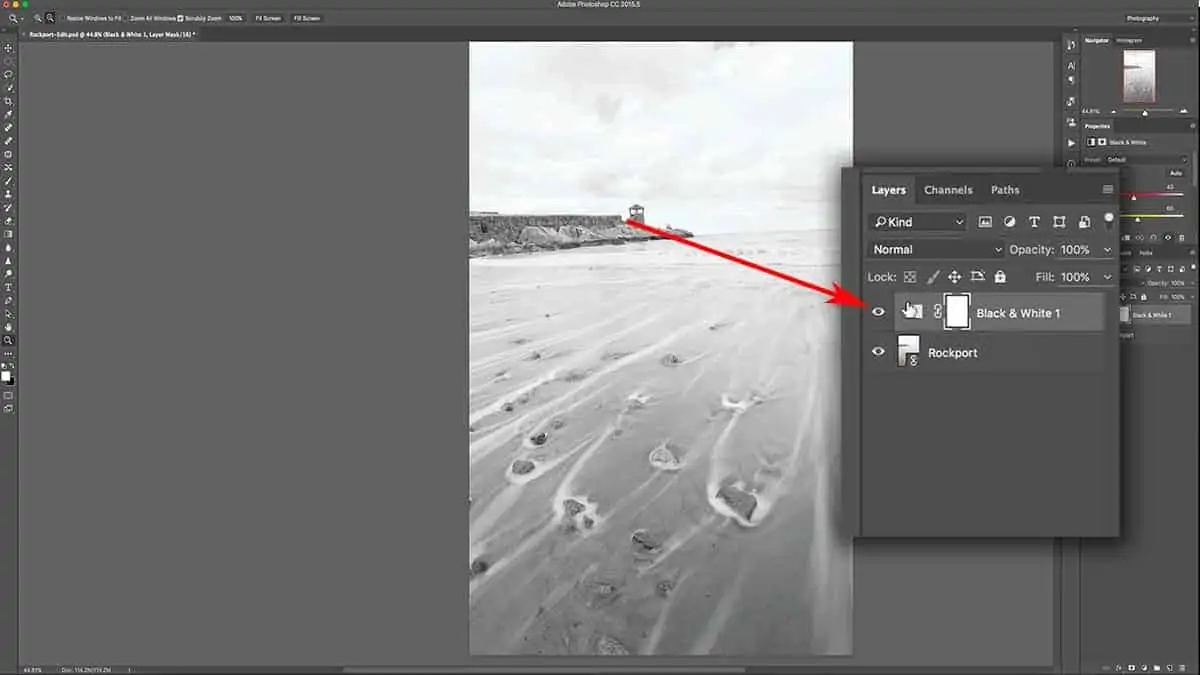
However, since this adjustment is on a separate layer, the black and white conversion is not permanent. I can remove, hide, or adjust this black and white adjustment at any time while retaining full access to the original photo.
Now if I click and drag this black and white adjustment layer to be underneath my photo layer, you can see that the effect is now gone and we are looking at the original image. The photo layer is now completely blocking the effect of the black and white adjustment because it is the top layer in the layers palette, which will hide whatever is underneath it.
Layers are Like Glass
The best analogy I can think of for layers is to imagine each layer is a piece of glass that you can stack on top of one another. You can paint on that piece of glass, move it around, take it away and bring it back…but it’s entirely independent of all the other pieces of glass (or layers).
First, I’m going to remove the black and white adjustment layer and start fresh to demonstrate this.
The layer you see in the layers palette is entirely covered with the image itself, so if you think of the “glass” analogy again…what we’ve done here is “paste” the entire photo on this piece of glass, like you would with a decal. You can’t see through the glass or any content underneath it since it’s completely covered with the image. This is why the black and white adjustment disappeared when we placed that layer underneath the photo layer.
Let’s add another layer to the image, this time it will just be an empty layer. If you go to the bottom of your layers palette, click on the “Create a New Layer” icon which will add an empty layer on top of our image layer.
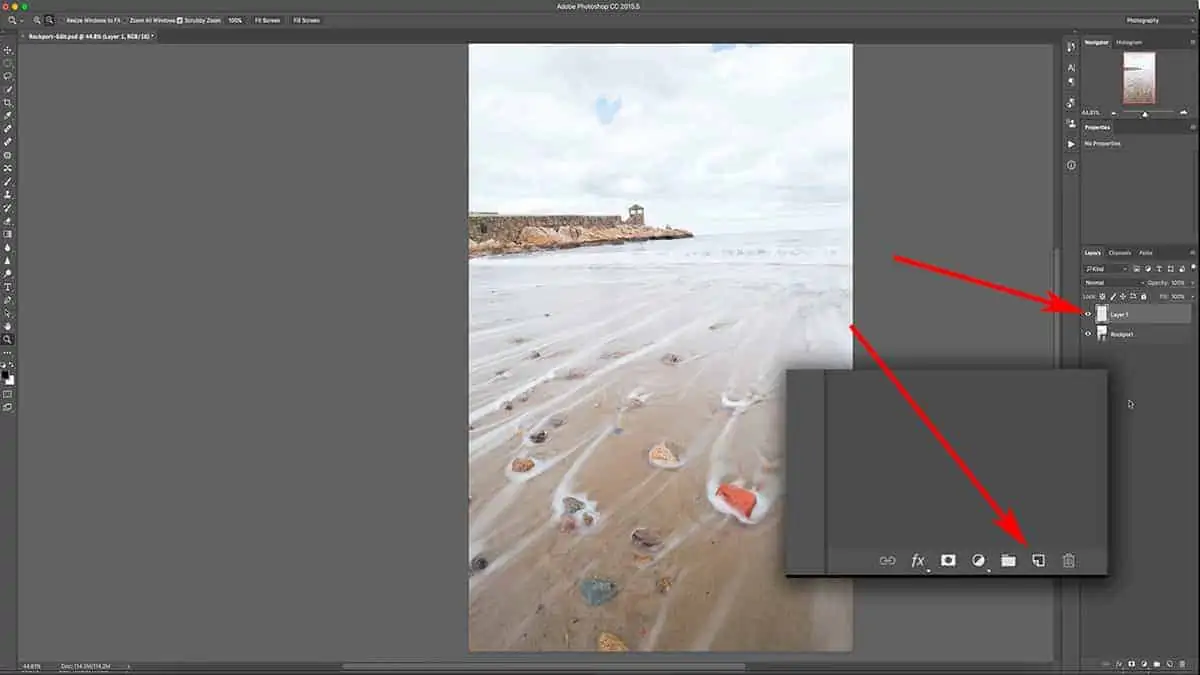
So although we can tell we have a new layer by looking at the palette here, our image looks exactly the same; nothing has changed. This is because our new layer doesn’t have any content attached to it yet. In other words, it’s completely empty.
That is reflected in the new layer thumbnail I’m pointing to in the above screenshot; it’s totally transparent.
Going back to the glass analogy: it’s just like putting a completely clear piece of glass on top of our photo. It’s 100% transparent, so the image looks exactly the same.
So let’s paint onto this layer (or piece of glass) to further illustrate how layers can interact with each other.
Select your paint bucket tool in the tools palette, and make sure your foreground color is set to black. Select the new blank layer by clicking on it once (a properly selected layer will be highlighted in a lighter grey in the layers palette, as seen in the screenshot below).
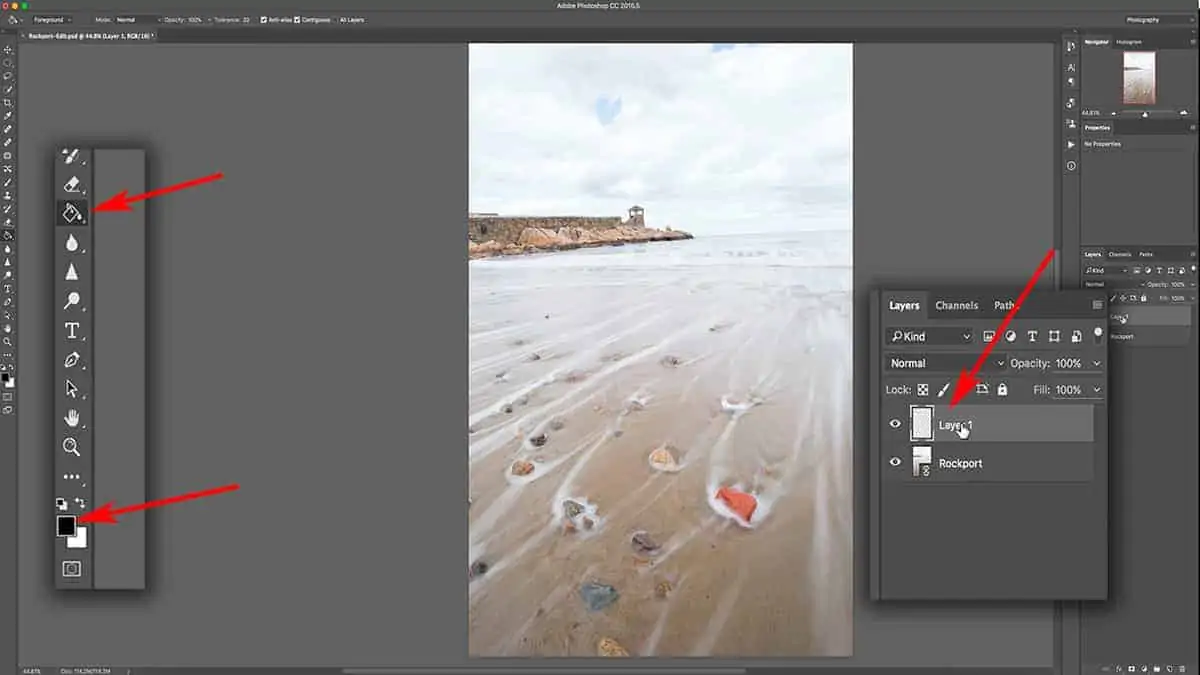
Ensuring that the correct layer is selected and active is very important…because if you alter a different layer by mistake, the results will not be what you expect. Checking your active layer will soon become second nature, so don’t become frustrated if you forget.
So now that my blank layer is selected and active, I’m just going to click once onto the canvas to fill it with black.
Going back to that glass analogy: we have the bottom layer – or piece of glass – which contains the photo pasted onto it. We then stacked a new, clear piece of glass on top and covered it completely with black.
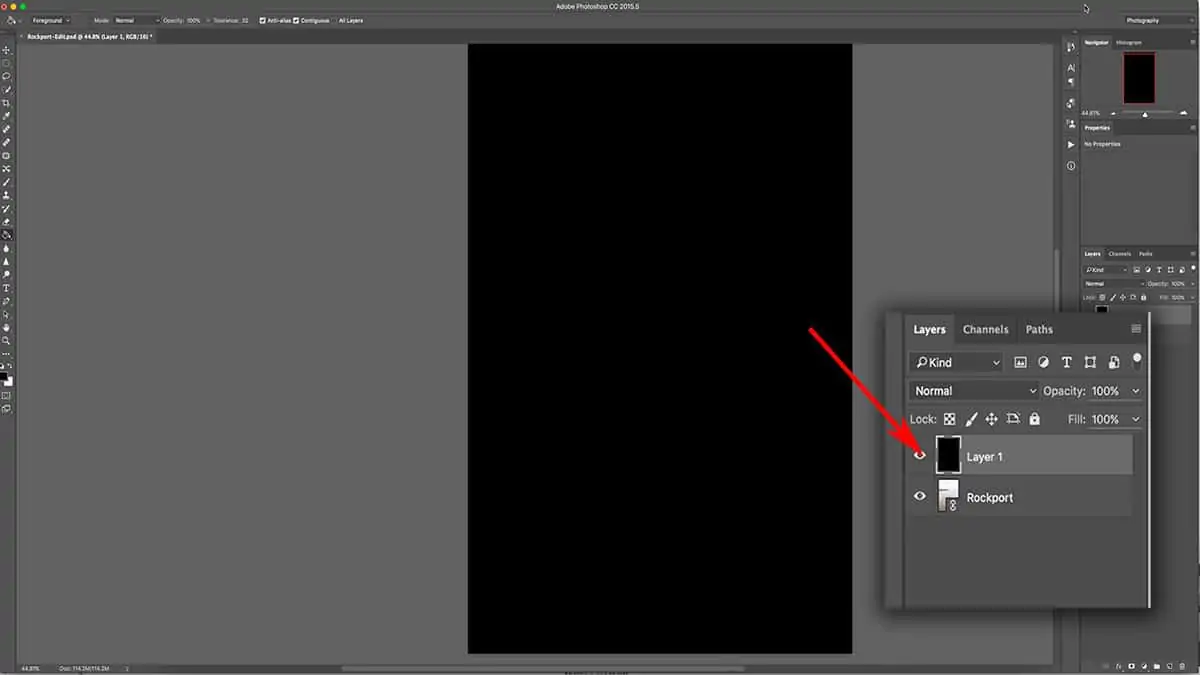
This new black overlay layer 100% independent of the photo layer underneath: I can pick up this layer (or piece of glass) and take it away, reduce the transparency, move it around…but it will always remain separate from my photo because is not bonded to it in any way.
[cboxarea id=”cbox-7fsz7Q6rf38cujKU”]
Interacting with Layers
The next topic is how to interact with your layers…how to move, reorganize, delete and transform your layers. These are essential concepts as they allow you to customize layers to fit the content of your image.
The first thing I’m going to do is rename the layer, which is a good habit to get into. When you start adding multiple layers to your image, it’s easy to lose track of what those layers do… especially when you revisit older work. Your future self will thank you for spending a few extra moments now to rename your layers as simple and straightforward as possible.
All you need to do is double-click on the layer name in the palette and it will turn into a text field. By default, it’s labeled Layer 1 since this is the first layer we’ve added to the image.
Simply type in your desired name (for this layer, I’ll rename it “Black overlay”) and press Enter.
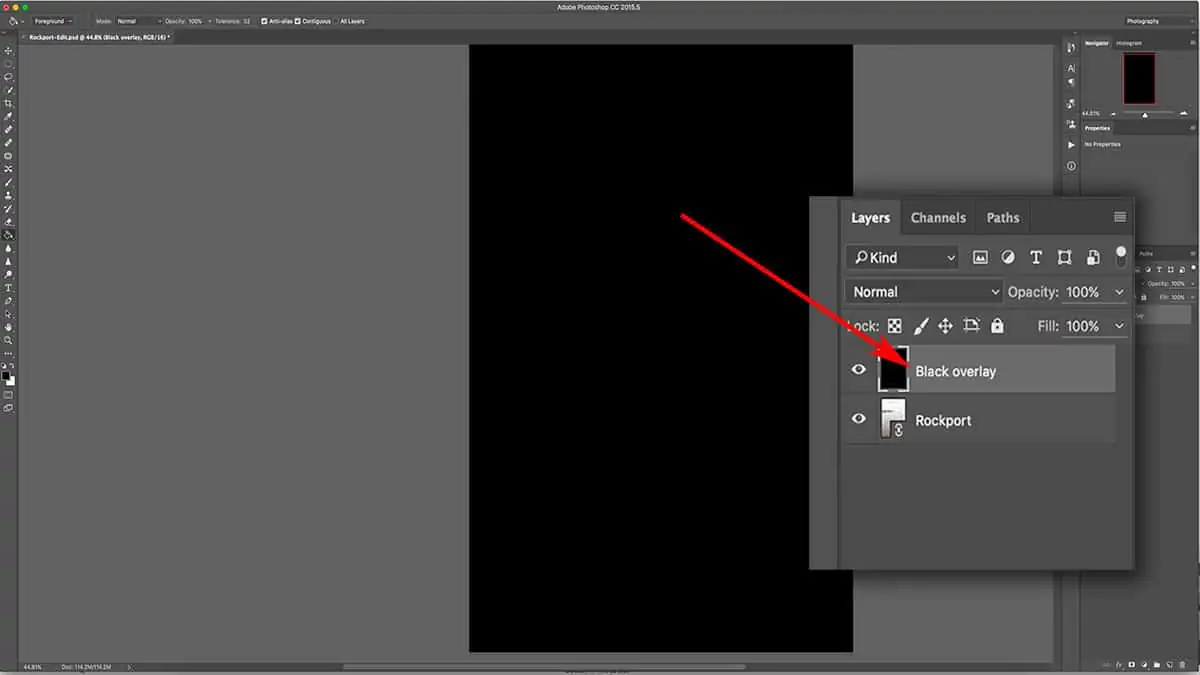
Usually, you can tell what a layer does to your image by simply looking at the thumbnail. As you can see above, this layer thumbnail is completely black…which reflects that you see on the canvas. However, some adjustments will not display their changes in the thumbnail…so it’s helpful to rename your layers in order to keep track of your processing.
Another thing you can do with your layers is to add them to a group, which works much like a folder on your computer. It allows you to group similar layers together and collapse them so you can clean up your palette and work in a less cluttered environment. There are other creative reasons why you would want to add your layers to a group, but we’ll get into that in a later tutorial on luminosity masks.
To add layers to a new group: first, select all the layers you want in that group by CMD + clicking on them in the palette. Then, click the “Create a new group” icon at the bottom of the palette.
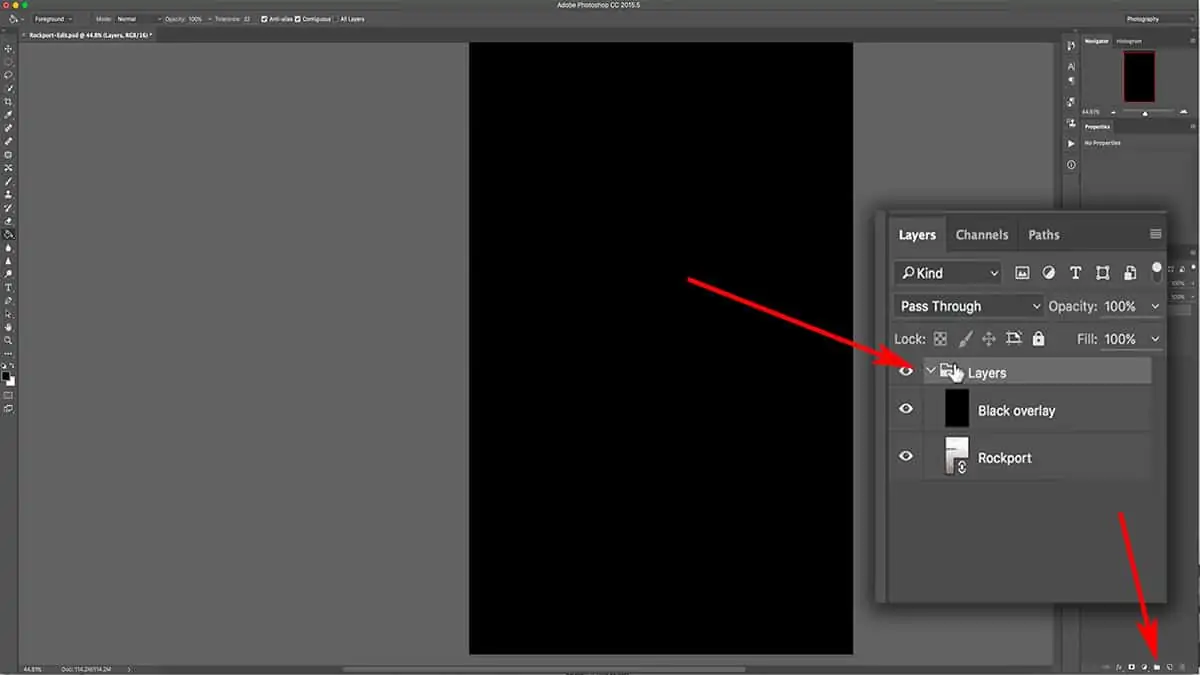
I’m just going to rename this group by double-clicking on the word “group” and entering the word “Layers” since that is what we’re working on here.
Later on in your processing, let’s say you have 20 layers inside of this group…but your palette looks quite overwhelming, which makes it difficult to see which layer you want to work with. You can simply click on that little arrow next to the group to collapse it and temporarily hide all of the layers contained by that specific group…allowing you focus clearly on layers outside of that group.
Moving Layers
Let’s click on the black overlay layer so that it’s selected, and move it by first pressing V to activate the move tool, and then click + hold anywhere on your image and move your mouse to drag that layer around. As you move your mouse, parts of the photo underneath become visible since the black overlay layer no longer lines up perfectly with the image.
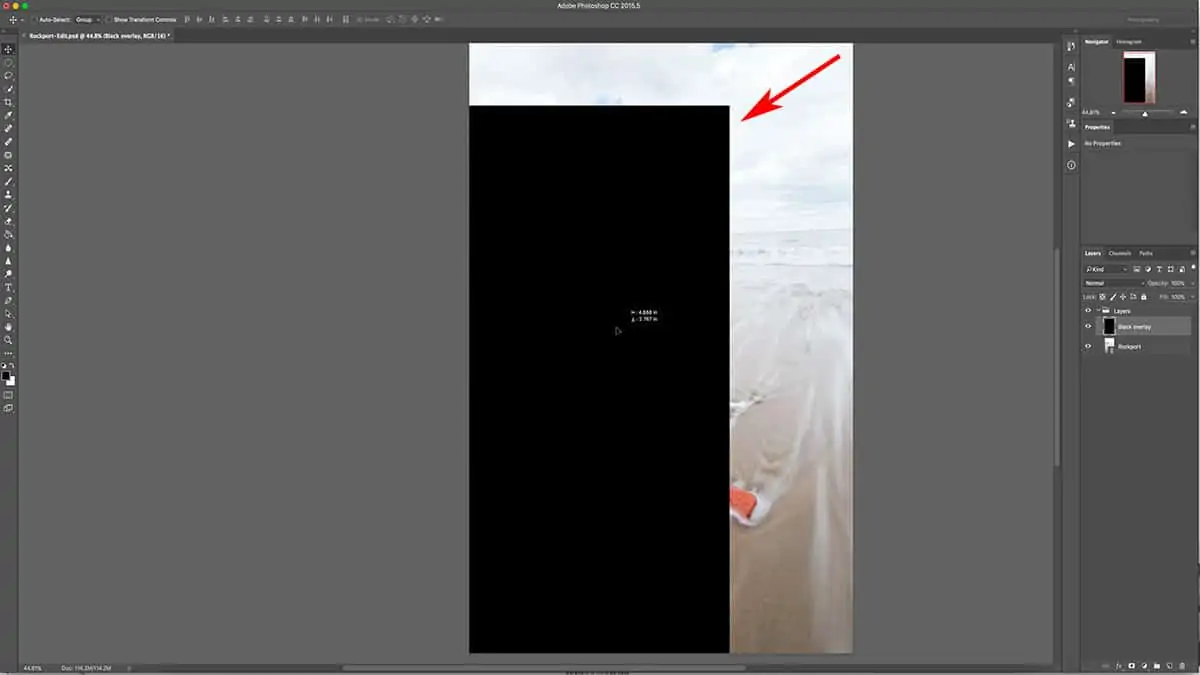
Again with the glass analogy: it’s like taking that piece of glass with black paint on it and moving it off of your image a bit so that it no longer covers it completely.
The important part here is to make sure that only your black overlay layer is selected and active by clicking on it once in the palette. I know that only this layer is selected since it is the only layer in the palette with the lighter grey background. If both layers were selected, then both the image and the black overlay would move in sync with one another.
Transforming a Layer
Another way you can manipulate your layer is to transform it…which will allow you to stretch, shrink, and otherwise resize a layer without affecting other layers in your document.
With the black overlay layer selected, press CMD + T to activate your transform tool. Now the transform tool has a few advanced features which I will be covering in a different tutorial…but its basic function is to simply stretch or shrink your layer by length and/or width.
With the transform tool active, go down to the bottom right corner of the image and click + hold the anchor point (small box) and drag it upwards to the top left corner. Doing this will shrink your layer since you are compacting the distances between each anchor point (dragging one closer to the other).
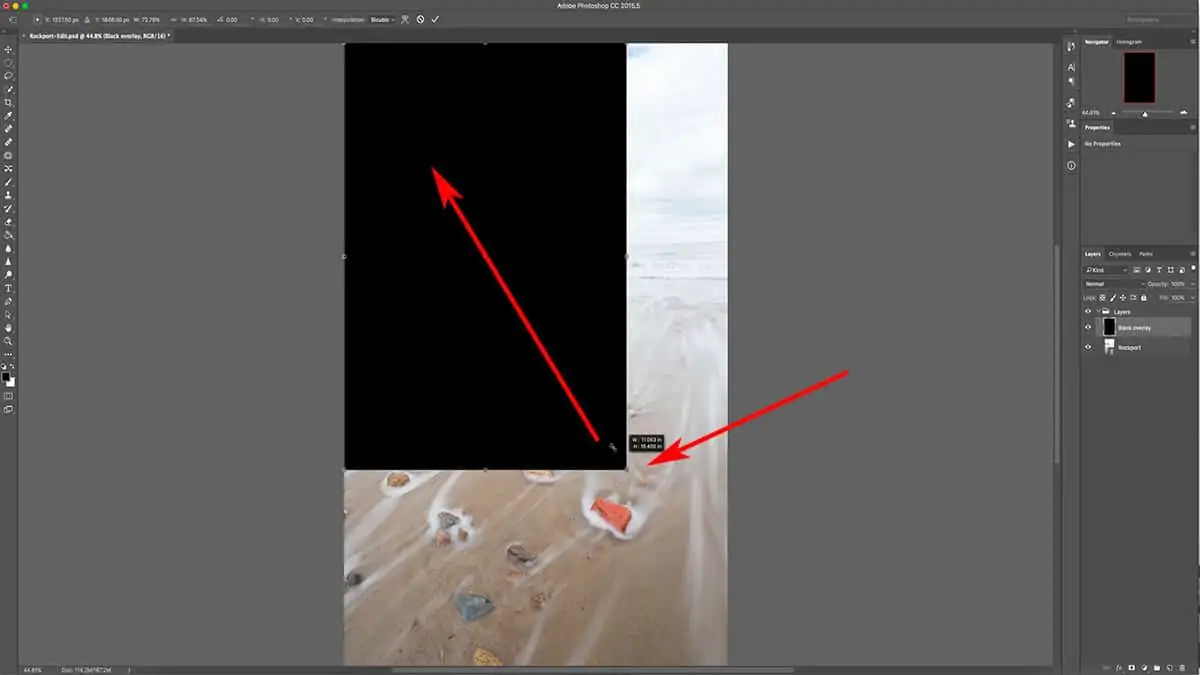
Once you’ve finished transforming this layer, you can click on the newly resized black overlay and move it around like you did in the previous step. You can also rotate this layer by placing your mouse outside of the canvas until it turns into two opposing arrows, click + hold to “grab” the layer, and then drag your mouse left or right to rotate.
To confirm the changes to your layer, press the Enter key or click the checkbox in the top menu…otherwise your work in the transform tool will not be set.
Being able to transform your layer like this is an incredible feature, especially for composites. For example, if you were adding clouds to a flat and uninteresting sky, you would need to move and manipulate the size of that layer in order to fit the confines of your cloudless sky.
I’m going to press the cancel button in the top menu (circle with a line through it) to remove these changes since they were for demonstrative purposes only.
Reordering Layers
You can also change the order of your layers in the palette, which I quickly demonstrated at the beginning of this tutorial. This is a feature you will use often with layers so it’s important to know how this works.
All you need to do is click + hold any layer in the palette (either click on the layer thumbnail or the name), and drag it above or below another layer, then release the mouse to confirm its placement.
For this image, I’m going to place the black overlay layer underneath my photo layer, which will completely hide the effects of the black overlay since the photo is now on top of it.
Now if you ever wanted to duplicate a layer, that’s simple as well. Simply click + hold your layer like you just did in the previous step, but instead…you’re going to drag it all the way down to the bottom of your layers palette until you’re hovering over the “create a new layer” icon, and then release your mouse.
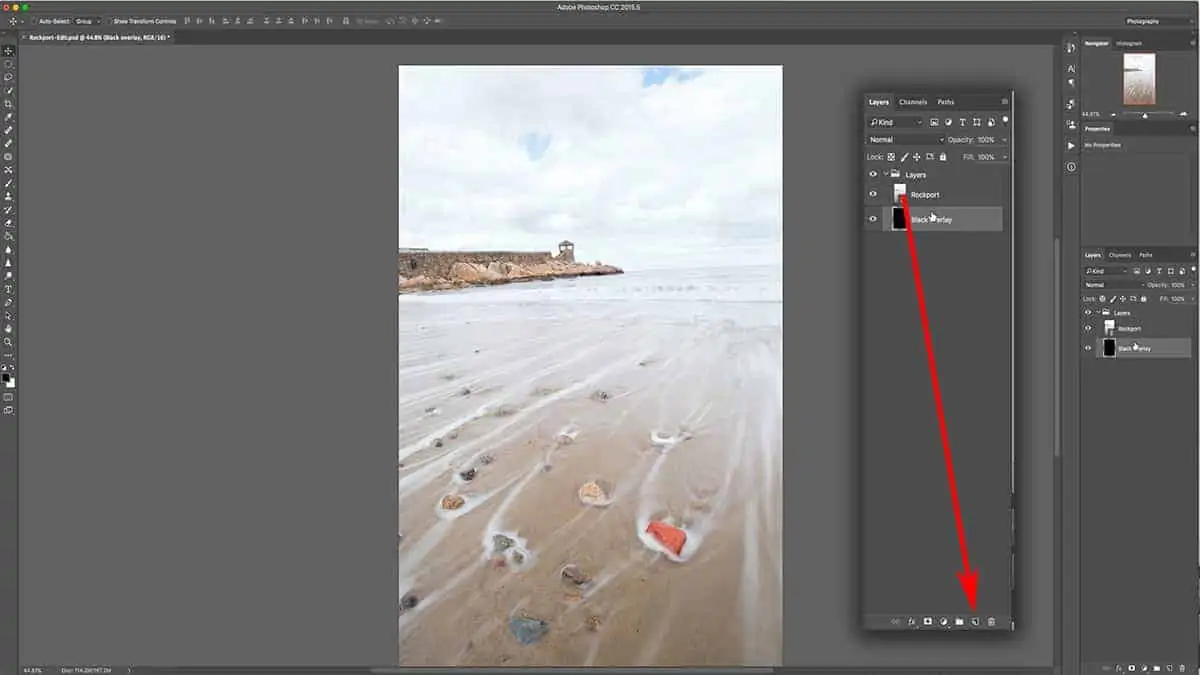
This tells Photoshop to create a new layer…but with the content of the layer you are dragging onto it. By default, Photoshop will place this new layer directly on top of its source (the one you just copied).
Deleting a Layer
I’m not going to use this duplicate layer, so let’s delete it. You can do this by either clicking + dragging your layer to the bottom of the palette (like we just did in the previous step) until it hovers over the trash can, or simply select the layer(s) you want to delete and click on the trash can.
That is going to wrap up this tutorial on the basic functions of layers in Photoshop! Now that you know how layers function, it’s time to learn how they can actually benefit your workflow.
In the next tutorial, we’re going to focus on the second principle of Photoshop by working with layer masks. They hold the key to customizing an adjustment to the unique colors and values of your landscape…and is the stepping stone to understanding the most powerful tool in Photoshop for landscape photographers: luminosity masks.
>> Click here for the next tutorial on layer masks <<
Don’t forget…download your free course: Layers for Photographers!
Related Products
Related Products
-

Light and Shadow
$ 129.00Learn how to expertly sculpt light and shadow in both Lightroom and Photoshop. In my brand-new program, Light…
Add to cart -

HDR Field Guide
$ 0.00A necessary part of landscape photography is to capture the full dynamic range of the natural light, which…
Add to cart -
Darkroom Foundations
$ 0.00Lightroom and Photoshop were designed to be simple programs to master, although it may not always seem like…
Add to cart