How Layer Masks Work in Photoshop
Layers are your control station for image processing in Photoshop. However, in order to unlock the full power of layers and reap the ultimate rewards…you need to also use layer masks so you can tailor adjustments to the content of your image. In this comprehensive tutorial, I’ll explain layer masks in very simple terms so you can incorporate them into your workflow today.
Here’s the shortest definition of layer masks I can come up with: Layer masks allow you to take any adjustment or layer and customize its appearance to compliment your image.
This very simple concept is one of the most powerful features of Photoshop. Masks allow you to create 100% custom adjustments that hug every nook and cranny of your mountains, trees, ocean…targeting the exact areas you want to adjust while ignoring areas you want to be excluded.
For example: let’s say you have a seascape image and you want to add more blue to your sky, but not the water as it’s already a deep, rich blue. Masks allow you to do that easily and non-destructively…and are the key difference between an average shot and a masterful landscape photograph expertly processed to the highest quality.
They’re also a mandatory prerequisite if you want to learn more advanced workflows I will be showing you later…such as exposure blending, luminosity masks, and color grading.
If you prefer to learn visually (which I highly recommend for anything Photoshop), you can download my free video course below. This five-part course also comes with practice files and a helpful PDF cheatsheet, so you can get hands-on with layers right away.
What are Layer Masks?
Let’s say that you want to increase the saturation of your image, which will affect your entire photo by a set amount. The result may look good in some areas of your image where the colors were originally flat, but now some areas which already had enough color are overly saturated.
In the screenshot below, you can see that the saturation increase looks natural and pleasing, except for the red rock in the foreground…which now looks distracting and has lost some detail.
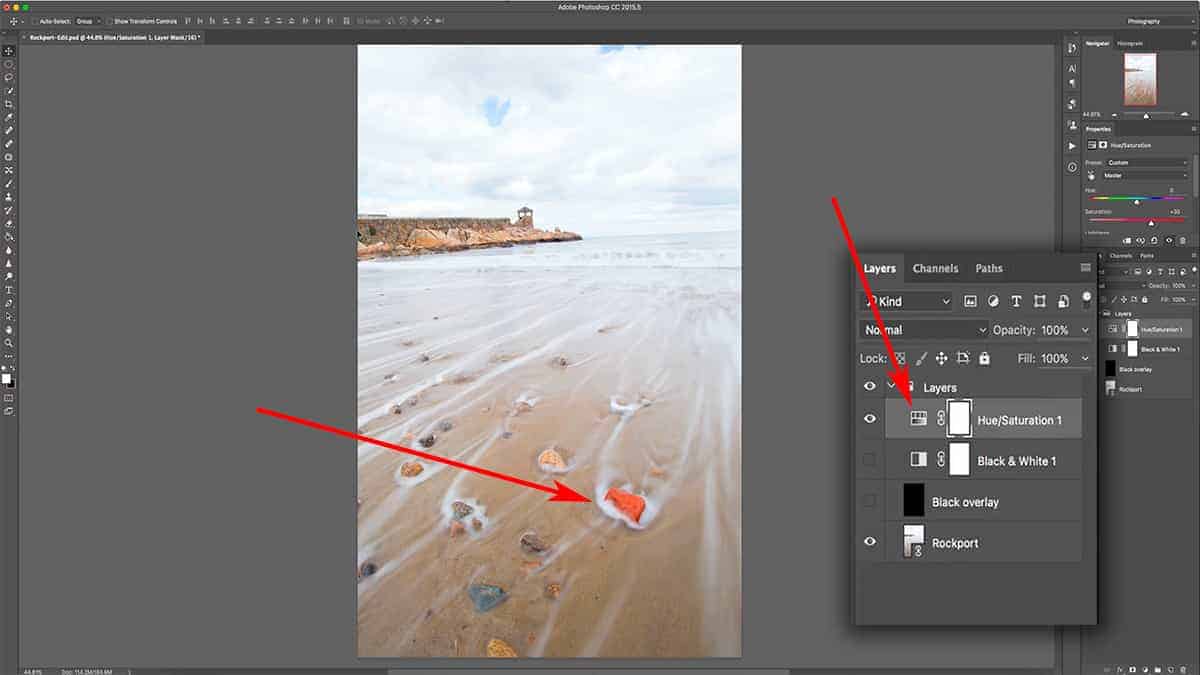
So now we’re stuck with an image where the saturation looks good in some parts….but a bit too strong in other parts and needs to be scaled back. This is where layer masks can help you tailor an adjustment like this to the content of your photo.
In other words, a mask will allow you to dictate exactly where you want a layer or an adjustment to be visible, and where you want it hidden. For this image, I want it visible everywhere but the red rock in the foreground.
You know that layer opacity – or transparency – can be adjusted, which will render a layer partially visible so that you can see layers underneath to some degree.
If you don’t know what layer opacity is, make sure to read through my “What are Layers?” tutorial first.
Instead of adjusting the opacity of the entire layer, what we can do is add a layer mask and control the transparency of specific areas in your image. The benefit of using a layer mask instead of adjusting the opacity slider is that you can have different levels of transparency throughout the image.
So the for example image here, I can have the saturation layer 100% visible for all areas except for the oversaturated red rock.
In other words, I can use the mask to scale back on the strength of that saturation – or rather, the transparency – so it’s not as heavily saturated as the rest of my image.
Adding a Layer Mask
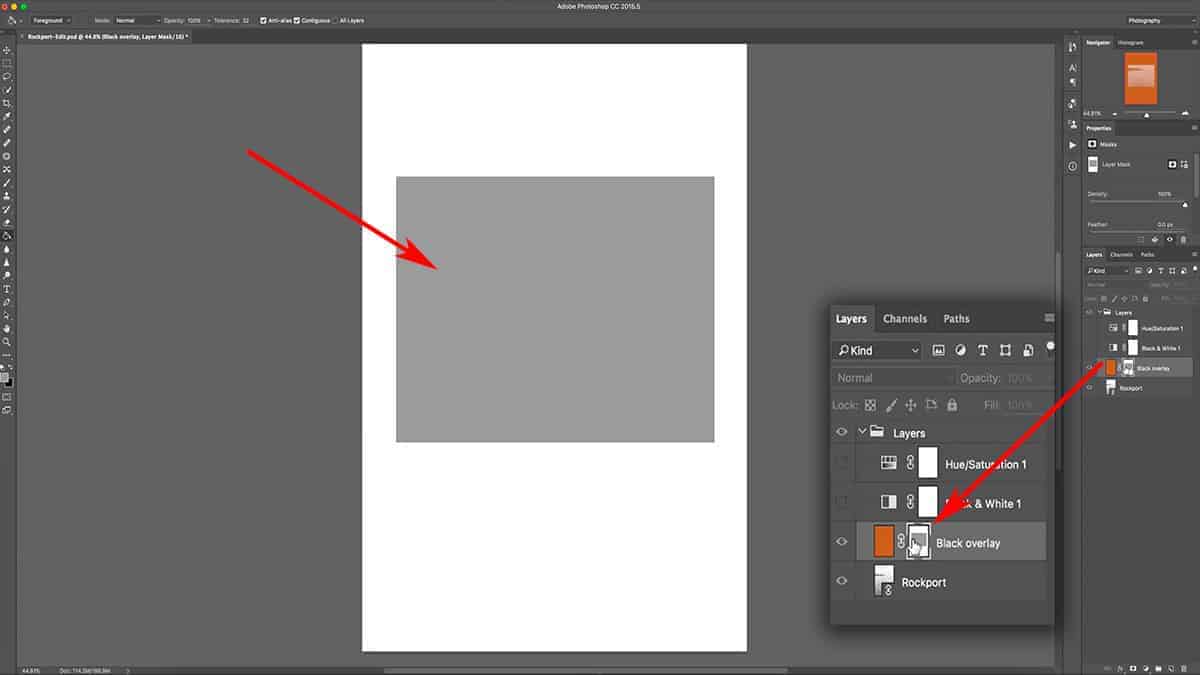
To demonstrate how this works, let’s add new layer completely filled with a color like we did in the previous tutorial on layers. However, instead of filling this layer with black, we’re going to use orange. I’m going to make sure this layer is on top so that it completely covers the photo.
Next, let’s add a layer mask to this orange layer by clicking the “Add Layer Mask” icon at the bottom of the layers palette. It looks like a white square with a hole in the middle.
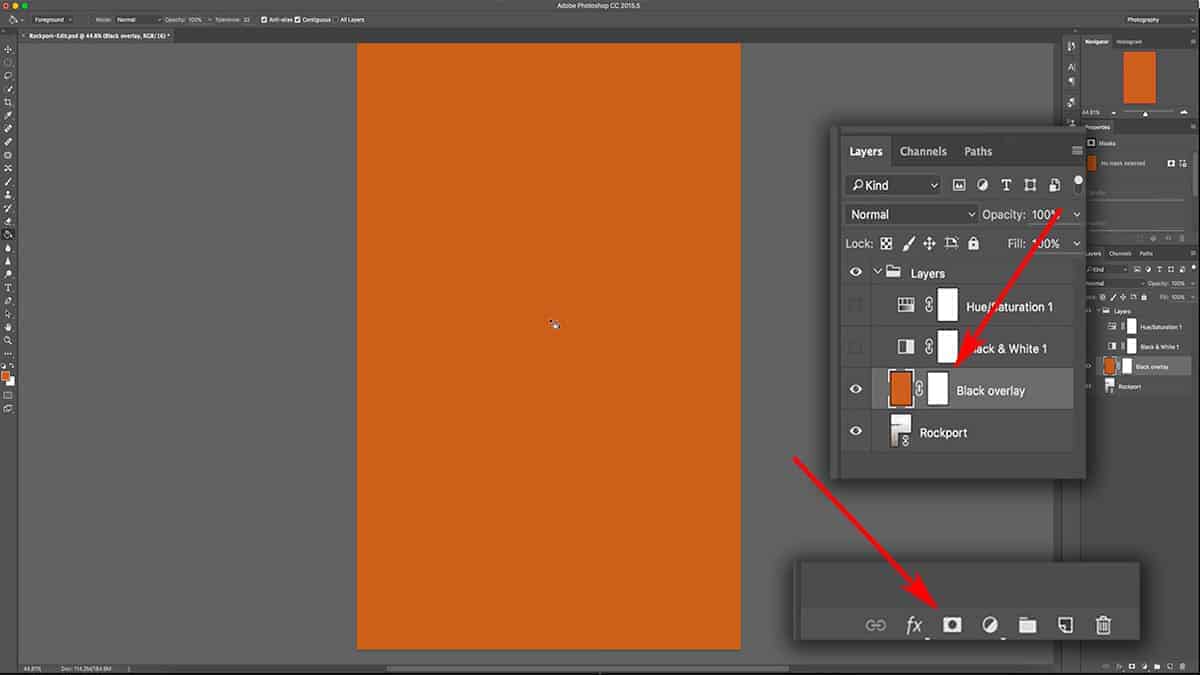
I know that I’ve added a layer mask successfully since I can see a little link icon between the layer and the mask, which means that any adjustment I make to this mask will affect the layer it’s attached to.
Now nothing has changed with the image yet since we haven’t done anything to the layer mask; we simply added one. The mask still needs your instructions on how it should interact with your layers.
Here’s how a layer mask works to control the transparency of the layer it’s attached to: you fill this layer with content (by using your brush tool, paint bucket, selection tools, etc.) to control the visibility of your layer. You can add white, black, or any shade of grey in between…which will tell Photoshop how transparent you want those particular areas of your layer to be.
If you add pure black to your layer mask, the layer becomes 100% hidden.
If you add pure white to your mask, the layer becomes 100% visible.
If you add any shade of grey to your mask, the layer will be transparent by a certain percentage depending on how light or dark your grey is.
When you add a fresh layer mask to your layer, the default state is 100% white. This is why we could still see the entire orange fill layer at full opacity when we added a mask.
However, if I filled this layer mask with 100% black, the orange fill layer would be completely hidden and we would see the original photo layer underneath.
Let’s do that right now. Make sure your layer mask is selected by clicking on the mask thumbnail (there will be a white border around the mask if it is properly selected). Press CMD + I which will tell Photoshop to invert the content of the layer mask; since it is 100% white, the inverse is 100% black.
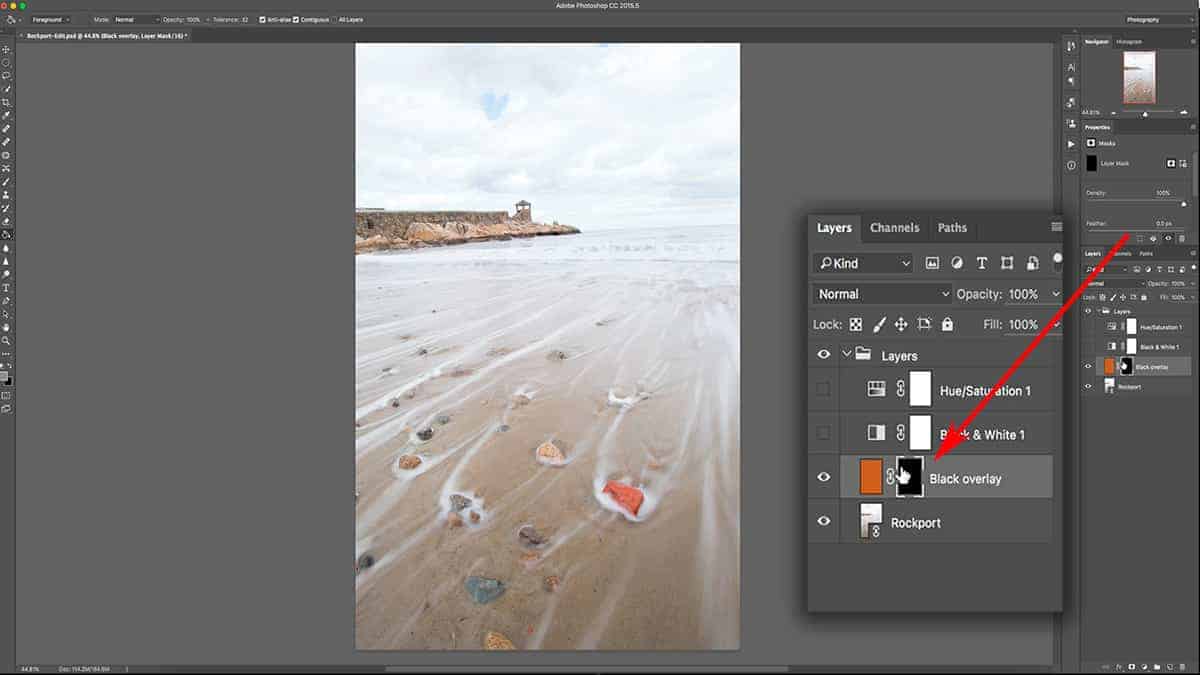
Although the orange fill layer is still here, it is 100% hidden thanks to the pure black layer mask.
A good way to remember how a layer mask works is to not think of painting black, white, or grey onto the mask…but rather visualize light and shadow.
When you shine a light on something (add white), it becomes visible…and when you cast a shadow over something (add black), it becomes less visible.
Now apply this mindset to a layer mask: when you add white to your layer mask, you are shining a light onto your layer…making it more visible. When you add black to your mask, you are casting a shadow…which will hide your layer.
Working with Grey on a Layer Mask
So far, we’ve only discussed adding pure black and white to a layer mask…but what happens when you apply a shade of grey; a tone that is somewhere in between pure black and white on the value scale?
Here’s the “big picture” point: the opacity of your layer is in direct relation to the shade of grey you use on your layer mask.
For example, if you add 50% grey to the layer mask (which is the midpoint between white and black on the value scale), then your layer will only be 50% visible.
Now if this seems confusing at all, don’t worry. It’s difficult to understand layer masks without visual aids, so we’ll go over a couple examples of layer masking.
Select the layer mask and press CMD + I to invert it back to white, so that the orange fill layer is 100% visible again.
Then select your rectangular marquee tool, and create a rectangle selection by clicking and dragging onto your layer.
Lastly, make sure that your layer mask (and not the layer itself) is selected by clicking on the thumbnail in the layers palette…then click Edit > Fill. From the “Contents” drop-down menu, select 50% grey, and click OK.
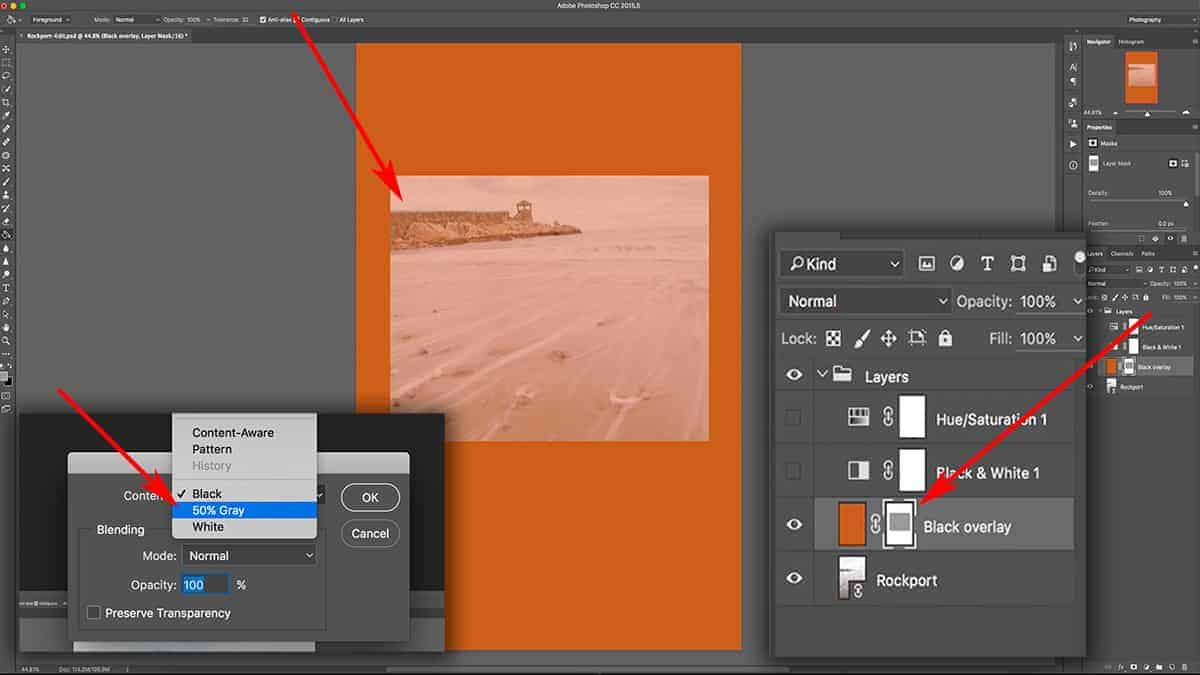
This will fill that rectangle with 50% grey…and since your layer mask is selected in the layers palette, it will apply this fill directly to the mask itself. If you look at the layer mask thumbnail, you can see the grey box has been added.
With this 50% grey box on our layer mask, we can now see the photo underneath…but it’s not at full opacity. This is in direct relation to the shade of grey we added to the mask. Since we added 50% grey, we can only see 50% of the underlying layer.
In other words, the layer we applied this layer mask to is now only 50% visible just where we added the grey to…which allows us to see whatever is underneath this layer.
Displaying a Layer Mask
When working with masks, it’s very difficult to see what your mask actually looks like just by the thumbnail. In order to accurately customize a mask to the unique content of your image, you’ll often need to reference your actual mask.
To bring up a layer mask, simply ALT + click onto the layer mask thumbnail in the layers palette. This will display the mask separate from the layer.
So now we are looking at the actual layer mask on our canvas: it’s 100% white, which means the orange fill layer is 100% visible…except for the 50% grey box that we added in the previous step which is allowing the layer underneath to be particularly visible.
Now to go back to your image and turn off this mask preview, simply ALT + click on the layer mask thumbnail again or click on any other layer in the palette.
I’m going to add one more box to the layer mask here so you can really visualize how a mask interacts with your layers.
Let’s go back to the rectangular marquee tool, and drag another rectangle onto the canvas….this time, making sure to overlap onto both the pure orange area and the partially transparent area.
Next, make sure your layer mask is selected by clicking on the thumbnail in the layers palette. A white border will appear around the layer mask when it’s correctly selected, indicating that anything you do will only affect the mask and not the layer itself.
Next, go up to Edit > Fill and choose Black as your Content color, and click OK.
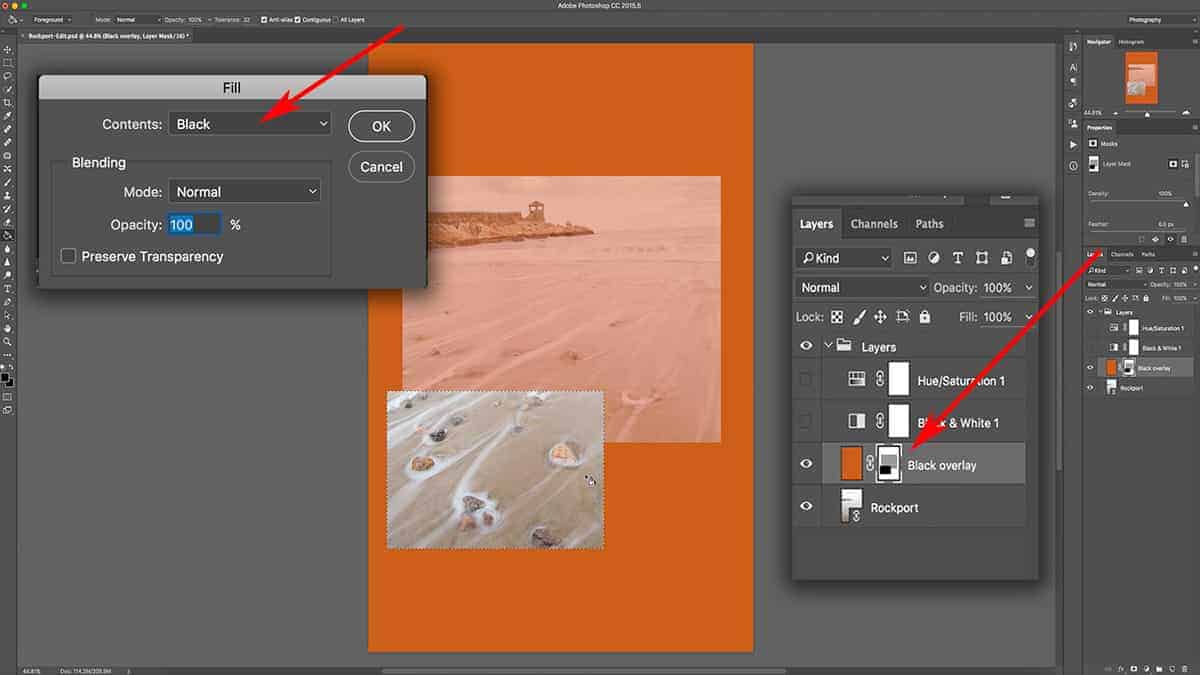
What we’ve done here is add pure black to the layer mask inside of this rectangle, which will render your layer 100% transparent…allowing any layers underneath to be seen at full opacity.
Let’s take a quick look at the mask itself.
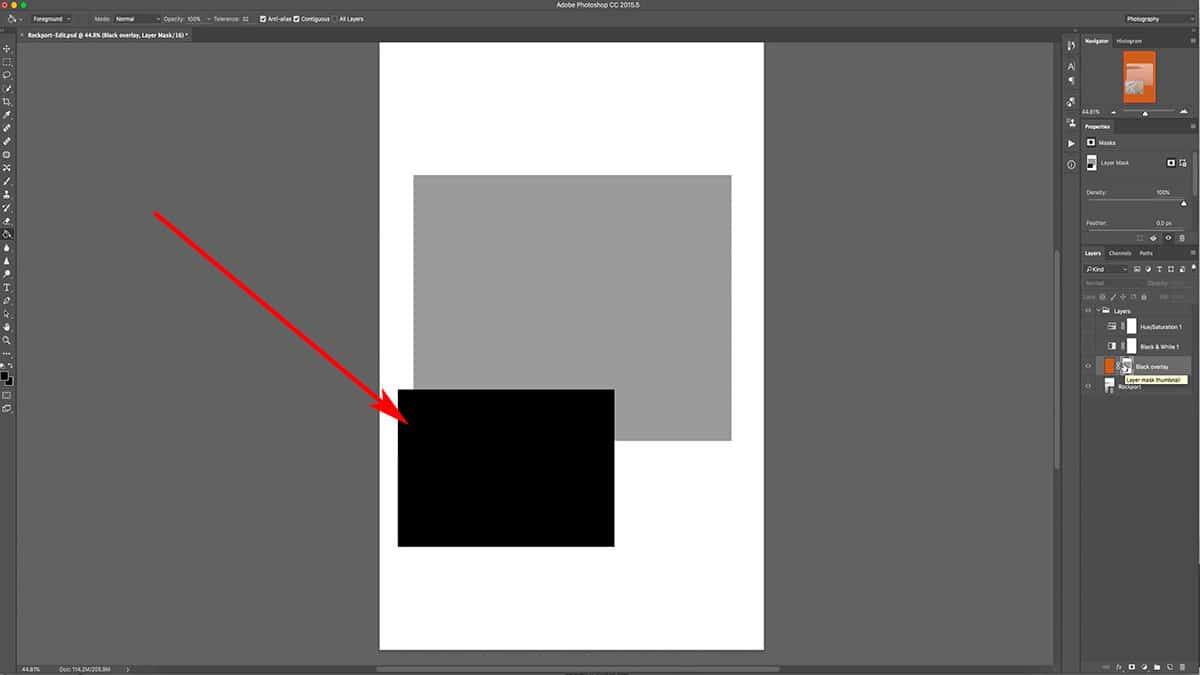
We have the background at 100% white, which renders your layer at 100% opacity…
then we have the 50% grey box we added a few steps back, which reduces the opacity of your layer to 50% (and will correlate to whatever percentage value of grey you choose)…
and finally, we have the pure black box which is like adding a temporary hole to your layer, allowing any content underneath to be seen at full opacity.
Now the real reason we use layer masks is that they are completely reversible. If you were to try and replicate this with your actual layer, you would have to delete the actual content…which is a permanent change. So by using a layer mask instead, you can retain a non-destructive workflow that is so crucial to image processing.
Why do Layer Masks Matter?
So at this point, you may be wondering: why would I ever want to cut holes in my layer like this? What’s the point of using masks at all?
I understand if it’s difficult to see the actual benefits of using layer masks in your workflow.
Most likely, you’ll never want to actually add rectangles like this to your image; this isn’t a “real world” way to actually use layer masks, especially for landscape photographers. I simply wanted to demonstrate the power of layer masks and this is the best way to visualize how they work. Trust me: you’ll definitely be using layer masks when working with multiple layers in Photoshop. As you’ll soon learn, layer masks are essential (not optional) when using more advanced processing techniques…such as exposure blending, luminosity masks, dodging and burning, and so on.
How photographers actually use layer masks is quite different than what I’ve demonstrated in this tutorial. Going back to the beginning of this lesson when I added that saturation increase: remember how overly saturated that red rock was? By adding a layer mask to that saturation adjustment layer…I can take my brush tool, load it with a shade of grey, and brush over just that rock to reduce the opacity (or the strength) of that saturation.
So the layer mask allows me to pinpoint exactly how transparent – or strong – an adjustment is without affecting other areas of my photo. It’s very powerful, and we’ve barely scratched the surface. We’ll go over how to use the brush tool with layer masks in the next lesson.
Before that though, let’s go over a few other basics of layer masks.
Disabling a Layer Mask
To temporarily hide a layer, all you need to do is click the “eye” next to the layer thumbnail in the palette, which will also hide the layer mask since it is attached to the layer. Oftentimes, you’ll want to disable – or hide – a layer mask separately from the layer in order to see the “before and after” effects of your mask work.
Hold down the shift key and click once on the layer mask, which will temporarily hide the mask itself. You’ll notice a red X through the layer mask, telling you it is disabled. To bring it back, simply shift + click on the mask again.
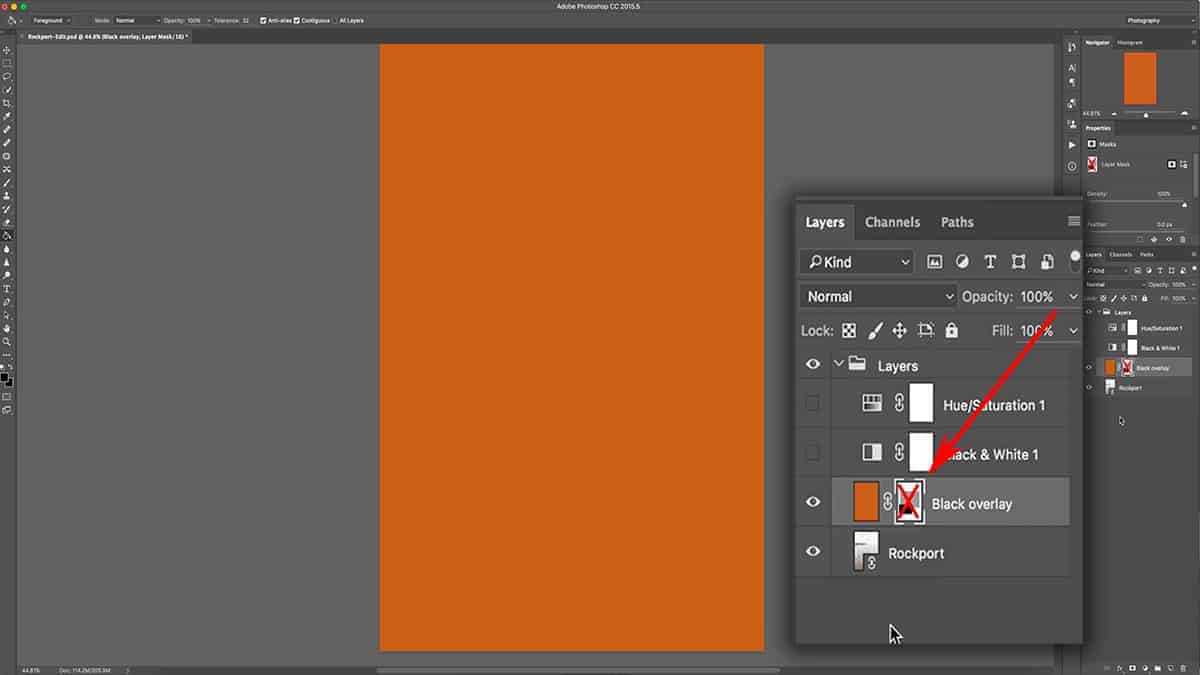
For our image here, disabling the mask brought the orange fill layer back at full opacity – as if we had no mask at all. This allows you to see your layer without any interference from the mask (in order to evaluate its effects) instead of deleting the mask itself.
Deleting a Layer Mask
Now if you want to actually delete a layer mask permanently, you can do that too. Simply click on your layer mask and hold, then drag it down to the bottom of your layers palette until you’re hoving over your trash can, and then release the mouse. This works just like deleting a layer.
You need to make sure you are clicking on the layer mask thumbnail and not the layer thumbnail. If you delete the layer, it will delete both the layer and the mask since the mask is attached.
That is going to wrap up this tutorial on the basic functions of layer masks in Photoshop. In the next tutorial, we’ll take this fundamental knowledge and see how it works in practice. We’ll use the brush tool to control the saturation level of different parts of an image.
>> Click here for the next tutorial on the brush tool <<
Don’t forget…download the free Photoshop course: Layers for Photographers.
Working with Layers in Photoshop: A Beginner’s Guide
Layers are a powerhouse tool in Photoshop, and one of the core strengths that this program has over Lightroom.
However, the concept of layers can be difficult to grasp…so I’ve put together this extensive (yet easy-to-follow) guide that explains what layers are and how they work to enhance your photographs.
For landscape photography, there are four basic building blocks of Photoshop (with layers being one of them) that all processing techniques rely on.
Once you learn how layers work, techniques that seem too advanced beyond your skills (such as exposure blending, sky replacements, focus stacking, color grading, and so much more) will suddenly make perfect sense.
Layers are very simple to understand…it just requires a small shift in thinking about how you work in Photoshop; a different perspective for it to all finally “click”. And I will show you exactly how to do that in this tutorial.
I’ve been processing with Photoshop since 2006, so I can tell you this with much confidence: when you know how layers work in Photoshop, you’re already way ahead of the learning curve. Most techniques in Photoshop are based on the non-destructive workflow that layers can provide…so it’s absolutely crucial that you are comfortable using layers if you want to create high-quality, extraordinary landscape photographs.
If you prefer to learn visually (which I highly recommend for anything Photoshop), you can download my free video course below. This five-part course also comes with practice files and a helpful PDF cheatsheet, so you can get hands-on with layers right away.
Now let’s get to the tutorial! Whether you prefer to watch or read, I’ve got you covered below.
What are Layers Exactly?
In the simplest, most basic explanation possible: layers allow you to separate each and every change you make to your photograph. This will not only protect your photo from any permanent changes, but it allows you to make changes to your adjustments independent from the image itself.
You can move layers around, change their appearance, remove or hide them, add another layer…and that’s just the beginning. They also give you an incredible amount of precise control over your processing that just isn’t possible with simpler programs like Lightroom. This means that your adjustments have fewer surprises and unwanted side effects so you can more easily (and accurately) make changes to your image.
Now the control station for your layers is the layer palette outlined in the screenshot below. This is where all your layers will be housed and is where you make changes to your layers. Right now, there’s only one layer in the palette but we will be adding additional layers soon.
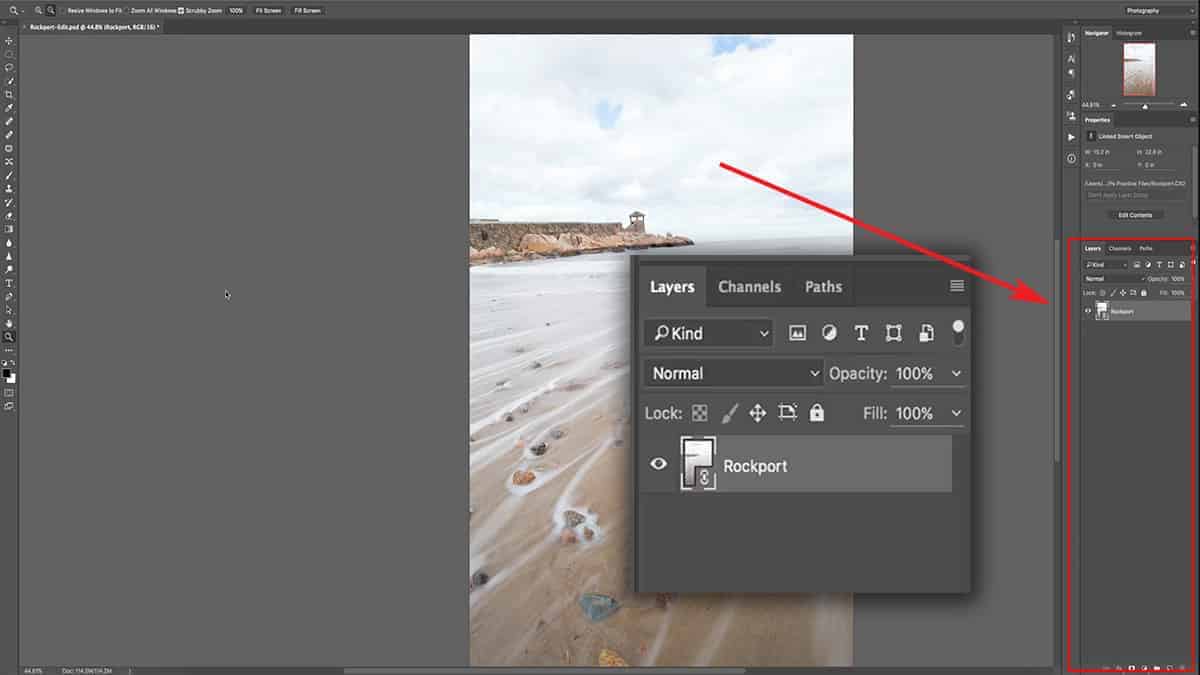
If for any reason the layers palette is not visible, simply go to the top menu and click on Windows > Layers or press F7 on your keyboard.
Whenever you open an image in Photoshop, whether directly or sent over from Lightroom, your photo will always be on its own separate layer…and it will be the first layer in your palette like seen in the screenshot above.
The term “layers” can be taken quite literally: it simply means that you are able to layer – or rather “stack” – your adjustments either on top or underneath your photo – which is your base layer. How your image will look will depend on the opacity, or the transparency, of these layers and also how they interact with each other.
How to Add a New Layer
So the first step to visualizing how this all works is to add an adjustment layer on top of our photo here. Don’t worry about what adjustment layers are if you’re not familiar with them; just focus on understanding the concept of layers first.
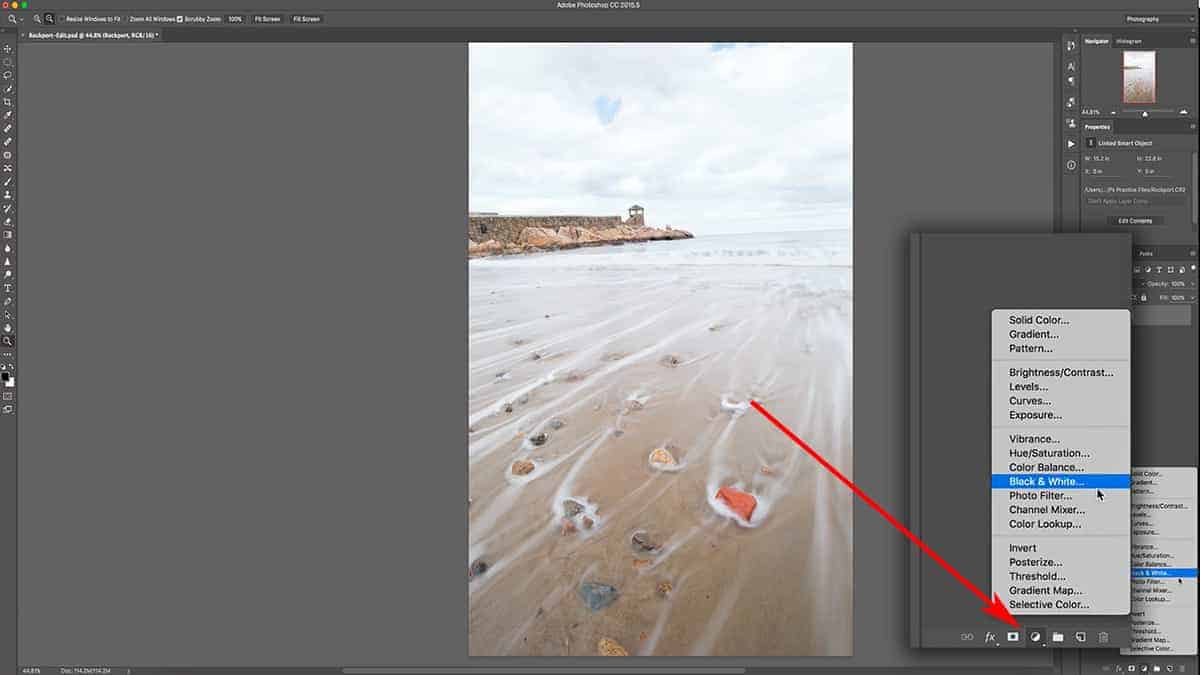
Go down to the bottom of your layers palette and click on the Add Adjustment Layer icon (as pointed to in the screenshot below) and add a new Black and White adjustment layer.
You can see that we have two different layers now: the bottom being our base layer which contains our photo, and the top layer being the new black and white adjustment layer we just added. This separate layer is applying a black and white “filter”, which gives the appearance of a black and white image.
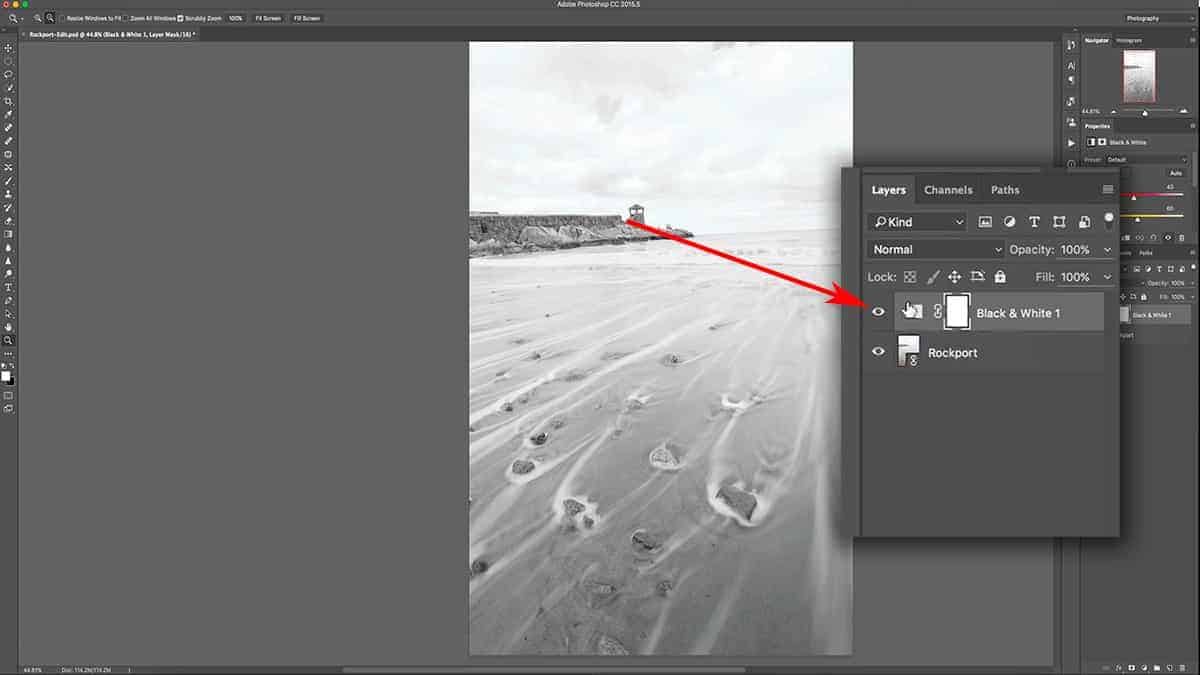
However, since this adjustment is on a separate layer, the black and white conversion is not permanent. I can remove, hide, or adjust this black and white adjustment at any time while retaining full access to the original photo.
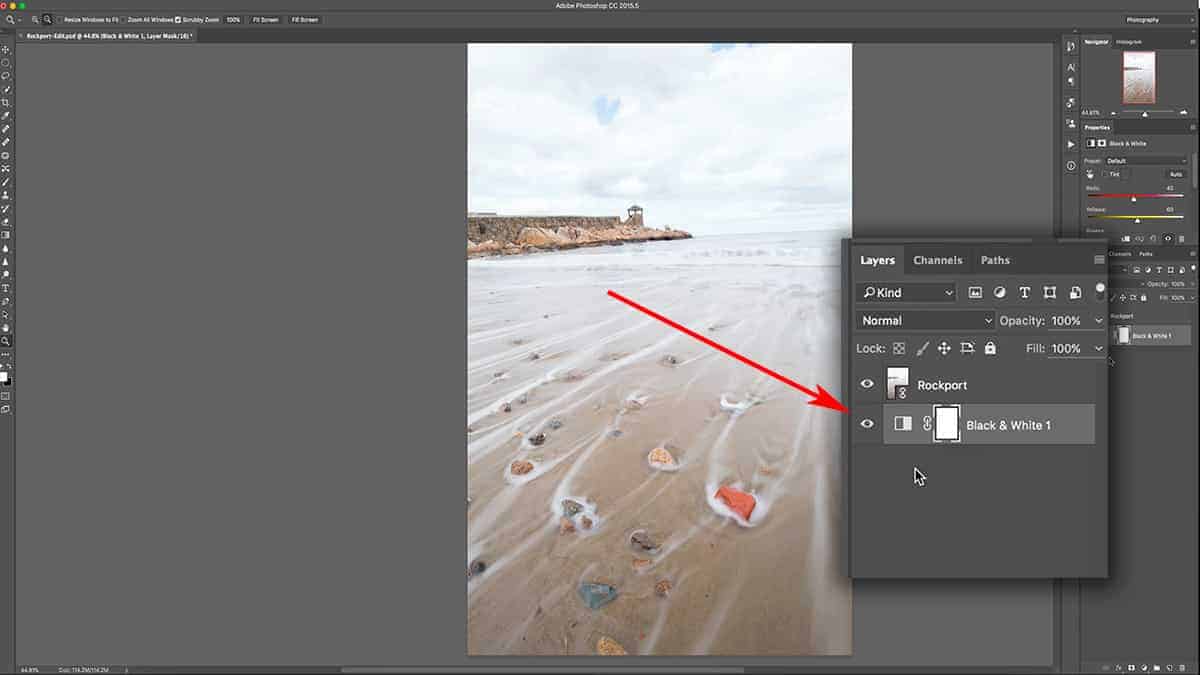
Now if I click and drag this black and white adjustment layer to be underneath my photo layer, you can see that the effect is now gone and we are looking at the original image. The photo layer is now completely blocking the effect of the black and white adjustment because it is the top layer in the layers palette, which will hide whatever is underneath it.
Layers are Like Glass
The best analogy I can think of for layers is to imagine each layer is a piece of glass that you can stack on top of one another. You can paint on that piece of glass, move it around, take it away and bring it back…but it’s entirely independent of all the other pieces of glass (or layers).
First, I’m going to remove the black and white adjustment layer and start fresh to demonstrate this.
The layer you see in the layers palette is entirely covered with the image itself, so if you think of the “glass” analogy again…what we’ve done here is “paste” the entire photo on this piece of glass, like you would with a decal. You can’t see through the glass or any content underneath it since it’s completely covered with the image. This is why the black and white adjustment disappeared when we placed that layer underneath the photo layer.
Let’s add another layer to the image, this time it will just be an empty layer. If you go to the bottom of your layers palette, click on the “Create a New Layer” icon which will add an empty layer on top of our image layer.
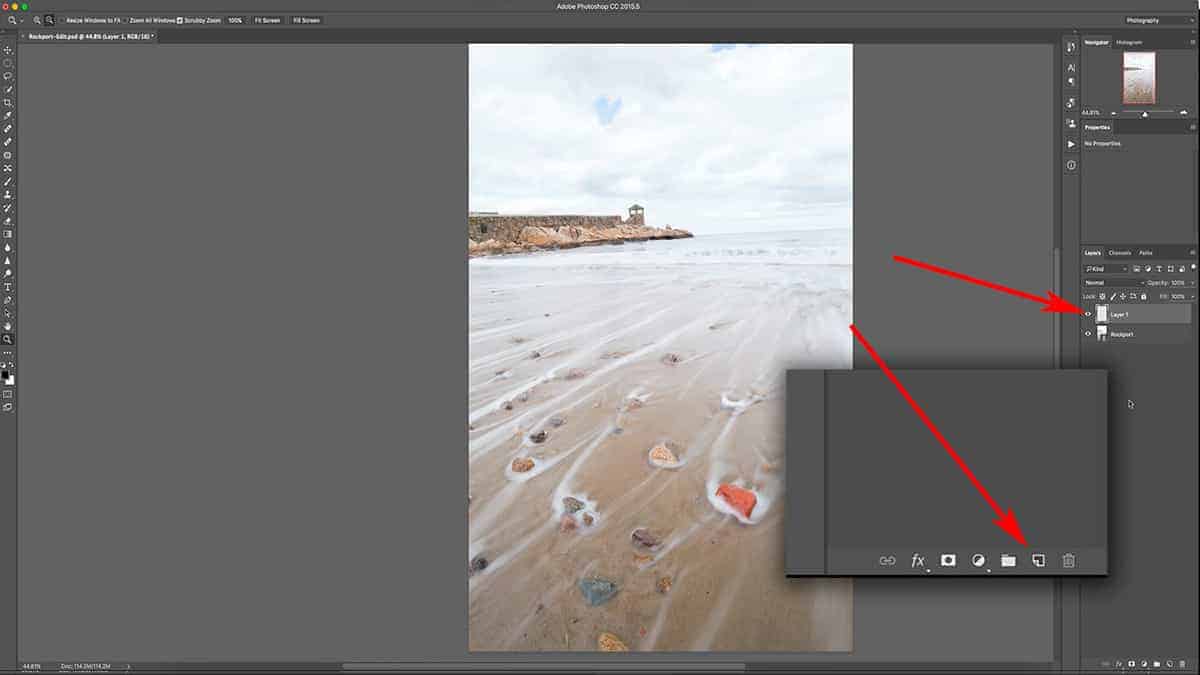
So although we can tell we have a new layer by looking at the palette here, our image looks exactly the same; nothing has changed. This is because our new layer doesn’t have any content attached to it yet. In other words, it’s completely empty.
That is reflected in the new layer thumbnail I’m pointing to in the above screenshot; it’s totally transparent.
Going back to the glass analogy: it’s just like putting a completely clear piece of glass on top of our photo. It’s 100% transparent, so the image looks exactly the same.
So let’s paint onto this layer (or piece of glass) to further illustrate how layers can interact with each other.
Select your paint bucket tool in the tools palette, and make sure your foreground color is set to black. Select the new blank layer by clicking on it once (a properly selected layer will be highlighted in a lighter grey in the layers palette, as seen in the screenshot below).
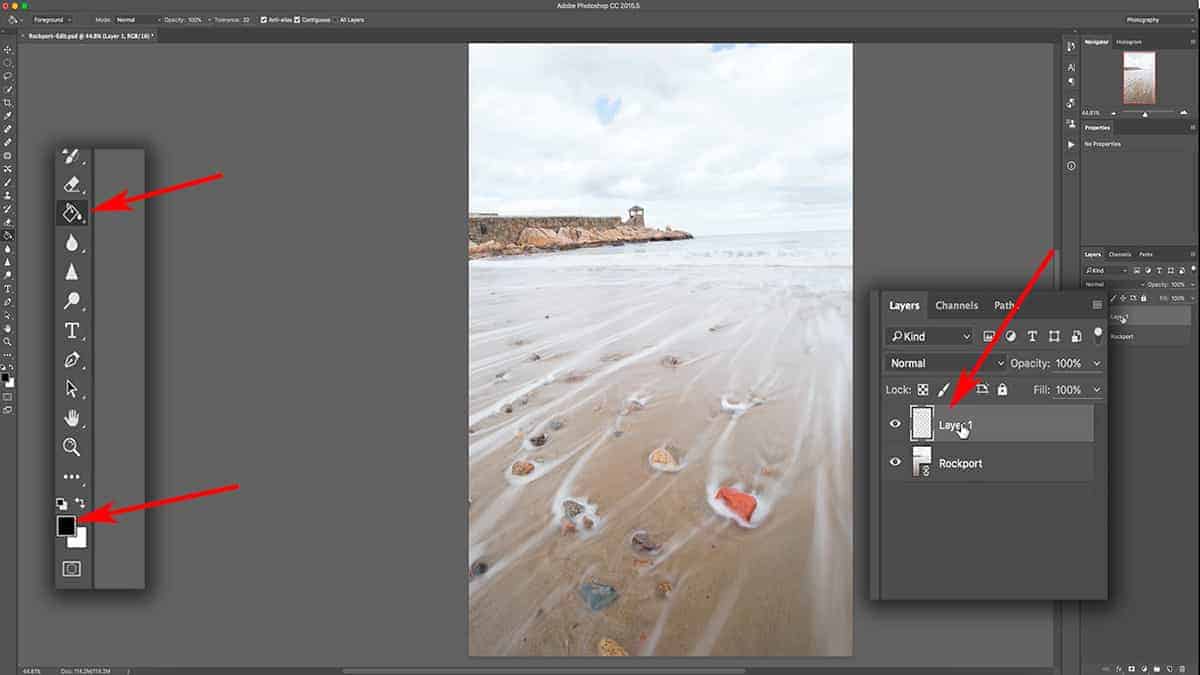
Ensuring that the correct layer is selected and active is very important…because if you alter a different layer by mistake, the results will not be what you expect. Checking your active layer will soon become second nature, so don’t become frustrated if you forget.
So now that my blank layer is selected and active, I’m just going to click once onto the canvas to fill it with black.
Going back to that glass analogy: we have the bottom layer – or piece of glass – which contains the photo pasted onto it. We then stacked a new, clear piece of glass on top and covered it completely with black.
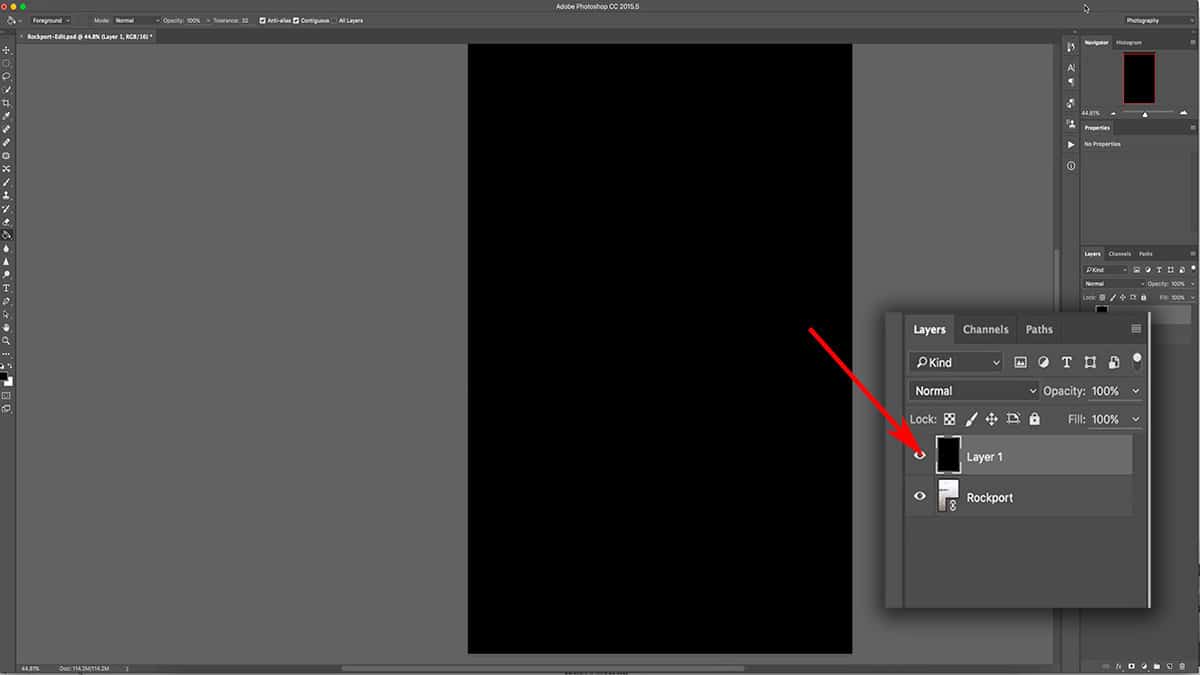
This new black overlay layer 100% independent of the photo layer underneath: I can pick up this layer (or piece of glass) and take it away, reduce the transparency, move it around…but it will always remain separate from my photo because is not bonded to it in any way.
[cboxarea id=”cbox-7fsz7Q6rf38cujKU”]
Interacting with Layers
The next topic is how to interact with your layers…how to move, reorganize, delete and transform your layers. These are essential concepts as they allow you to customize layers to fit the content of your image.
The first thing I’m going to do is rename the layer, which is a good habit to get into. When you start adding multiple layers to your image, it’s easy to lose track of what those layers do… especially when you revisit older work. Your future self will thank you for spending a few extra moments now to rename your layers as simple and straightforward as possible.
All you need to do is double-click on the layer name in the palette and it will turn into a text field. By default, it’s labeled Layer 1 since this is the first layer we’ve added to the image.
Simply type in your desired name (for this layer, I’ll rename it “Black overlay”) and press Enter.
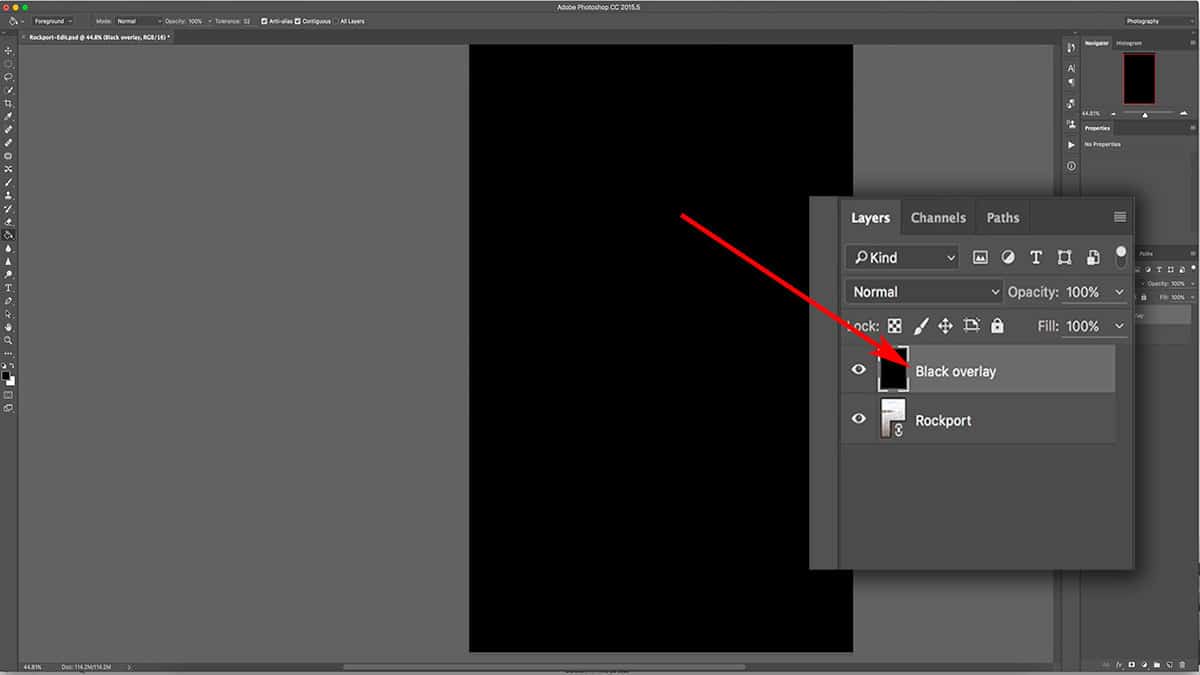
Usually, you can tell what a layer does to your image by simply looking at the thumbnail. As you can see above, this layer thumbnail is completely black…which reflects that you see on the canvas. However, some adjustments will not display their changes in the thumbnail…so it’s helpful to rename your layers in order to keep track of your processing.
Another thing you can do with your layers is to add them to a group, which works much like a folder on your computer. It allows you to group similar layers together and collapse them so you can clean up your palette and work in a less cluttered environment. There are other creative reasons why you would want to add your layers to a group, but we’ll get into that in a later tutorial on luminosity masks.
To add layers to a new group: first, select all the layers you want in that group by CMD + clicking on them in the palette. Then, click the “Create a new group” icon at the bottom of the palette.
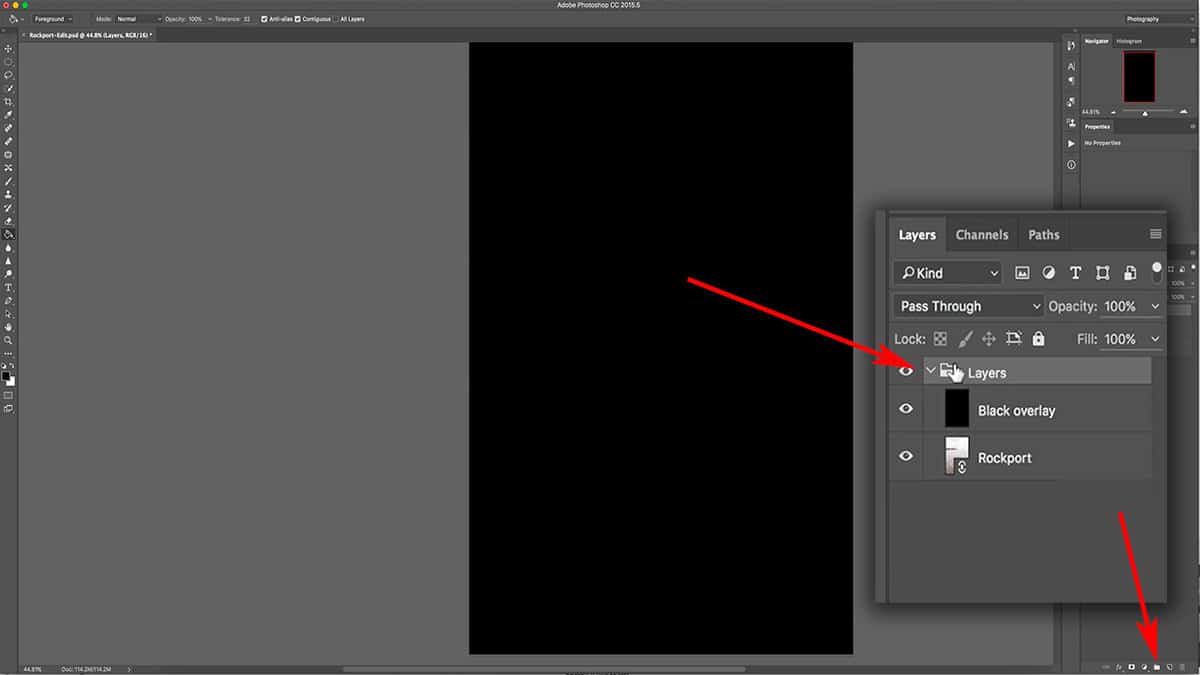
I’m just going to rename this group by double-clicking on the word “group” and entering the word “Layers” since that is what we’re working on here.
Later on in your processing, let’s say you have 20 layers inside of this group…but your palette looks quite overwhelming, which makes it difficult to see which layer you want to work with. You can simply click on that little arrow next to the group to collapse it and temporarily hide all of the layers contained by that specific group…allowing you focus clearly on layers outside of that group.
Moving Layers
Let’s click on the black overlay layer so that it’s selected, and move it by first pressing V to activate the move tool, and then click + hold anywhere on your image and move your mouse to drag that layer around. As you move your mouse, parts of the photo underneath become visible since the black overlay layer no longer lines up perfectly with the image.
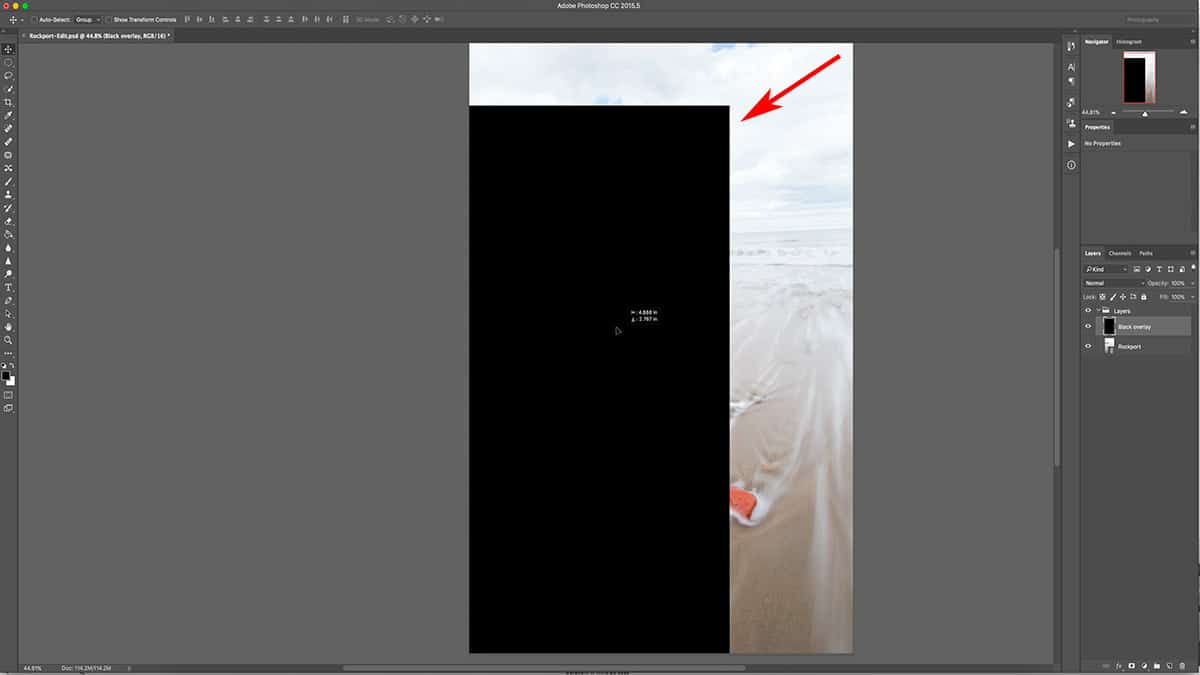
Again with the glass analogy: it’s like taking that piece of glass with black paint on it and moving it off of your image a bit so that it no longer covers it completely.
The important part here is to make sure that only your black overlay layer is selected and active by clicking on it once in the palette. I know that only this layer is selected since it is the only layer in the palette with the lighter grey background. If both layers were selected, then both the image and the black overlay would move in sync with one another.
Transforming a Layer
Another way you can manipulate your layer is to transform it…which will allow you to stretch, shrink, and otherwise resize a layer without affecting other layers in your document.
With the black overlay layer selected, press CMD + T to activate your transform tool. Now the transform tool has a few advanced features which I will be covering in a different tutorial…but its basic function is to simply stretch or shrink your layer by length and/or width.
With the transform tool active, go down to the bottom right corner of the image and click + hold the anchor point (small box) and drag it upwards to the top left corner. Doing this will shrink your layer since you are compacting the distances between each anchor point (dragging one closer to the other).
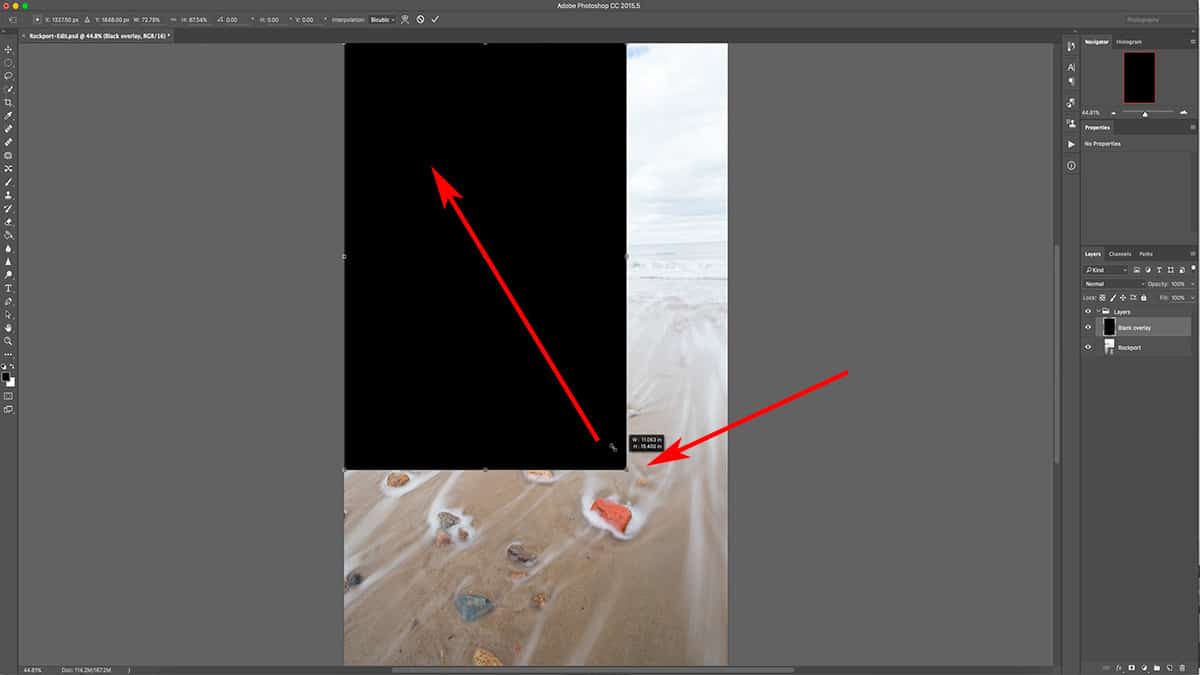
Once you’ve finished transforming this layer, you can click on the newly resized black overlay and move it around like you did in the previous step. You can also rotate this layer by placing your mouse outside of the canvas until it turns into two opposing arrows, click + hold to “grab” the layer, and then drag your mouse left or right to rotate.
To confirm the changes to your layer, press the Enter key or click the checkbox in the top menu…otherwise your work in the transform tool will not be set.
Being able to transform your layer like this is an incredible feature, especially for composites. For example, if you were adding clouds to a flat and uninteresting sky, you would need to move and manipulate the size of that layer in order to fit the confines of your cloudless sky.
I’m going to press the cancel button in the top menu (circle with a line through it) to remove these changes since they were for demonstrative purposes only.
Reordering Layers
You can also change the order of your layers in the palette, which I quickly demonstrated at the beginning of this tutorial. This is a feature you will use often with layers so it’s important to know how this works.
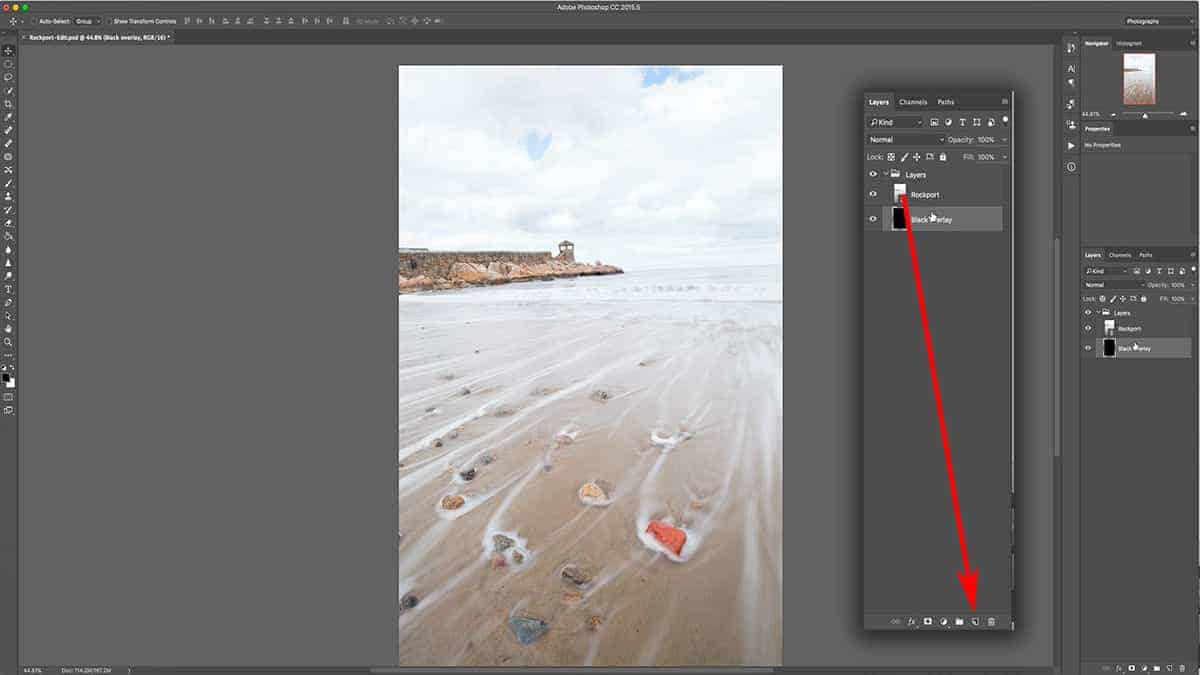
All you need to do is click + hold any layer in the palette (either click on the layer thumbnail or the name), and drag it above or below another layer, then release the mouse to confirm its placement.
For this image, I’m going to place the black overlay layer underneath my photo layer, which will completely hide the effects of the black overlay since the photo is now on top of it.
Now if you ever wanted to duplicate a layer, that’s simple as well. Simply click + hold your layer like you just did in the previous step, but instead…you’re going to drag it all the way down to the bottom of your layers palette until you’re hovering over the “create a new layer” icon, and then release your mouse.
This tells Photoshop to create a new layer…but with the content of the layer you are dragging onto it. By default, Photoshop will place this new layer directly on top of its source (the one you just copied).
Deleting a Layer
I’m not going to use this duplicate layer, so let’s delete it. You can do this by either clicking + dragging your layer to the bottom of the palette (like we just did in the previous step) until it hovers over the trash can, or simply select the layer(s) you want to delete and click on the trash can.
That is going to wrap up this tutorial on the basic functions of layers in Photoshop! Now that you know how layers function, it’s time to learn how they can actually benefit your workflow.
In the next tutorial, we’re going to focus on the second principle of Photoshop by working with layer masks. They hold the key to customizing an adjustment to the unique colors and values of your landscape…and is the stepping stone to understanding the most powerful tool in Photoshop for landscape photographers: luminosity masks.
>> Click here for the next tutorial on layer masks <<
Don’t forget…download your free course: Layers for Photographers!
Accessing your Account
Welcome to creativeRAW! Thank you for signing up, and I’m thrilled that you are here. Let’s get you up and running so you can jump right into your first lesson 🙂
Creating your Account
If you don’t have a creativeRAW account already, you’ll need to set your password to access your lessons. In a few minutes, you should receive an email with a special link to set a password and complete the account creation.
If you did not receive that email, then you already have an account and password set up on creativeRAW. At this point, you can either log in or reset your password.
After you click on that special link, you’ll be prompted to set up a new password:
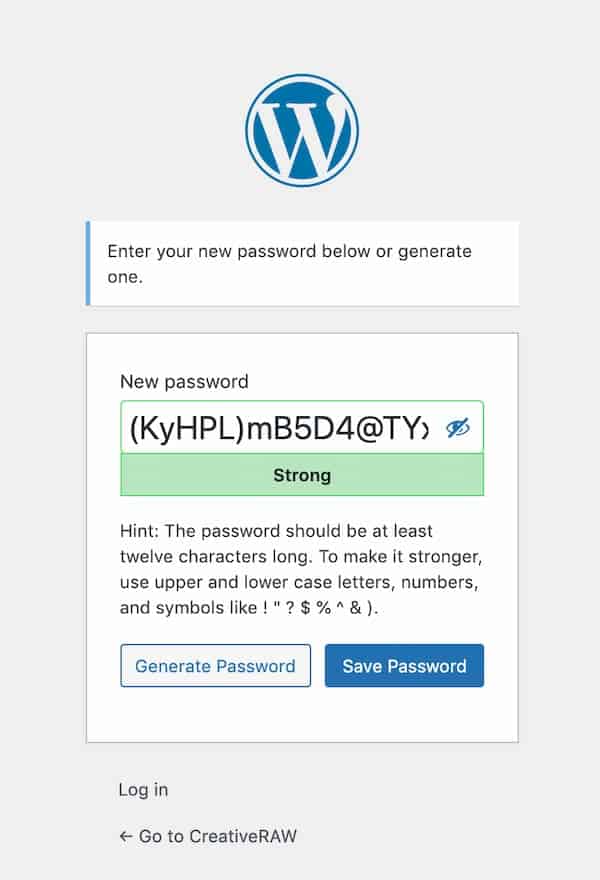
The website will generate a difficult password for you automatically. If you decide to enter your own password, the website will rank its strength as you type to help you gauge the security. Ideally, you’ll want a strong password here.
If your password is especially weak, you’ll have to confirm that by ticking the “Confirm use of weak password” box:
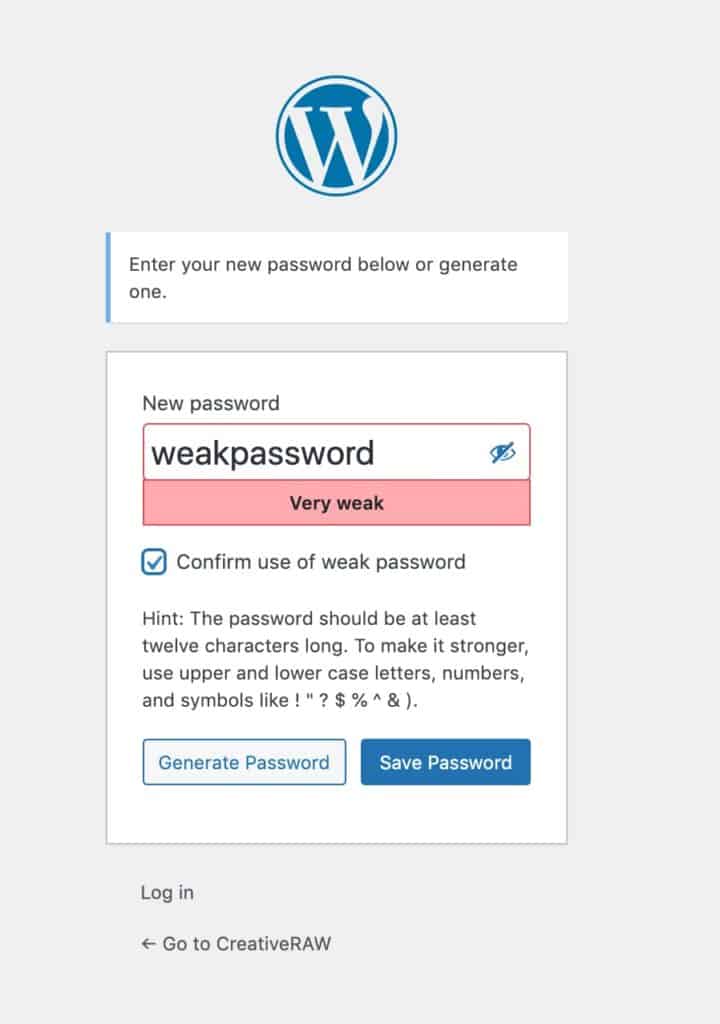
Add numbers, capital letters, and/or unique characters to make your password harder to guess.
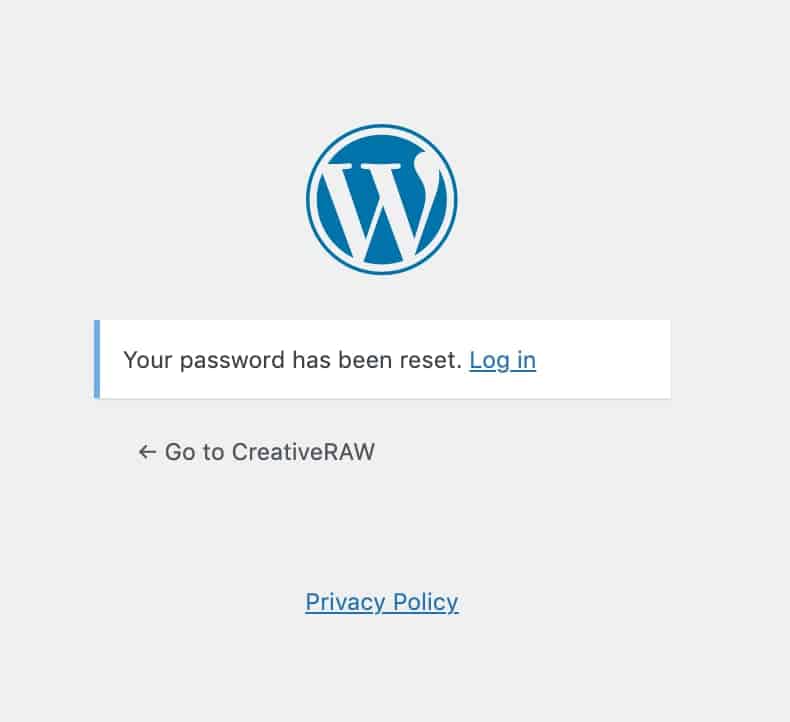
Once finished, click “Save Password”. You’ll then be given the option to log in directly from this page:
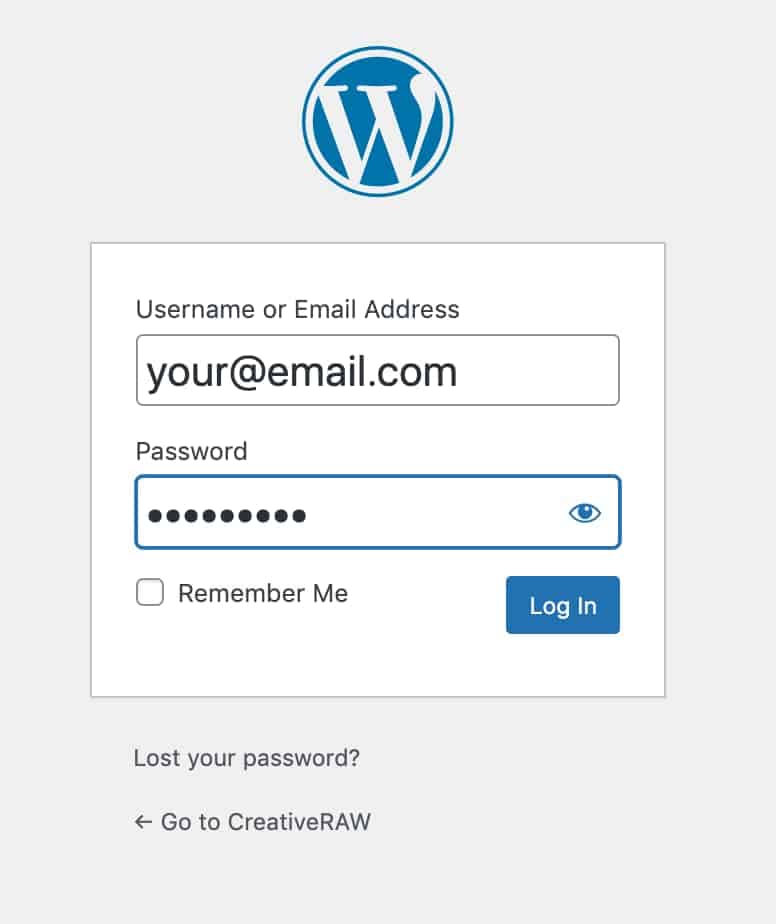
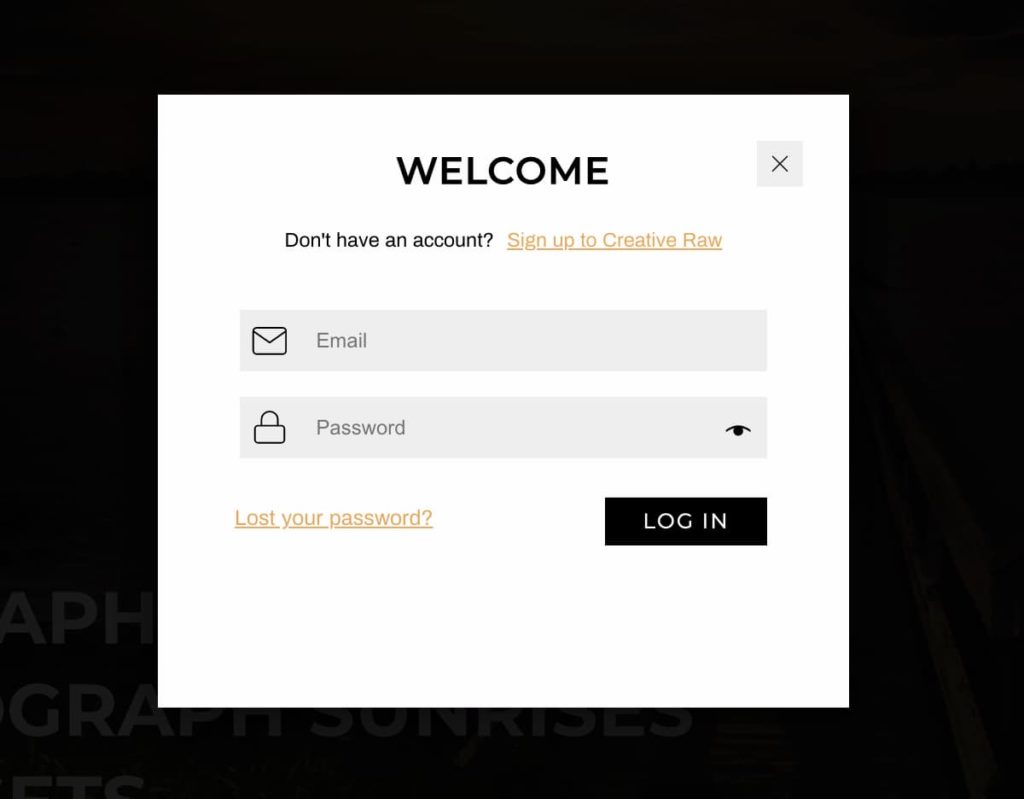
Click “Log in”, then enter your email address and password:
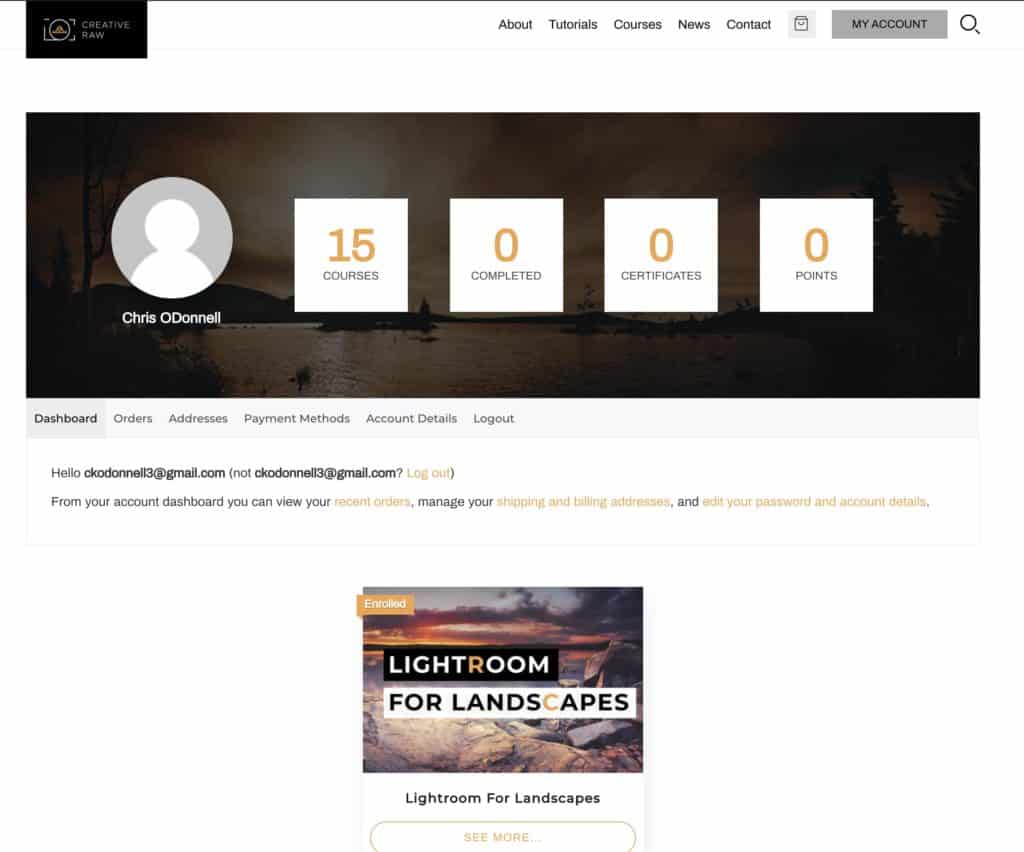
You’ll then be redirected to your account “Dashboard” and can start your course(s) by selecting them:
Logging In
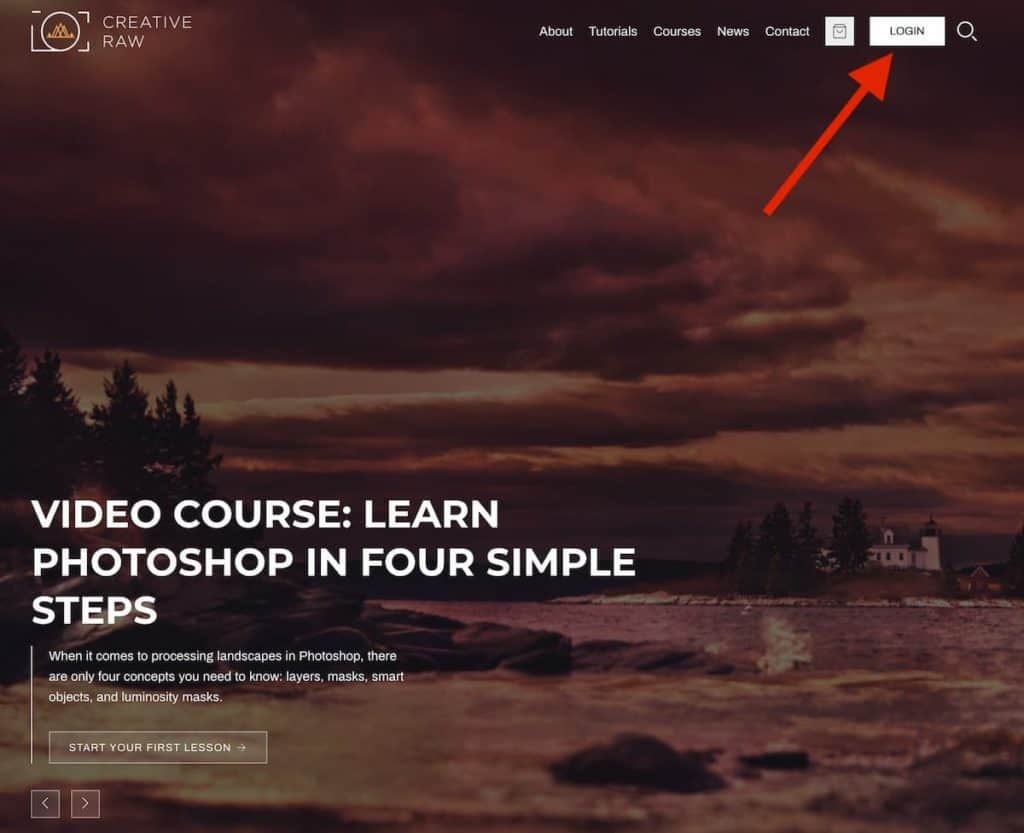
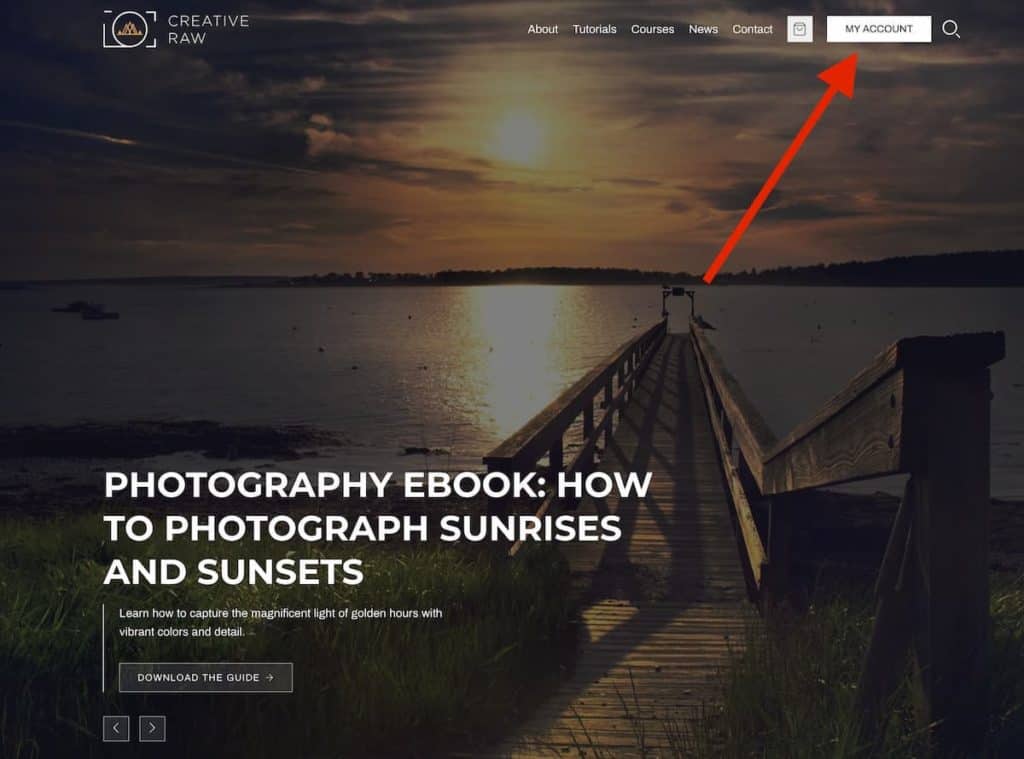
After your account has been created, you can now log in from any page on the website by clicking on the “LOGIN” button in the top-right corner:
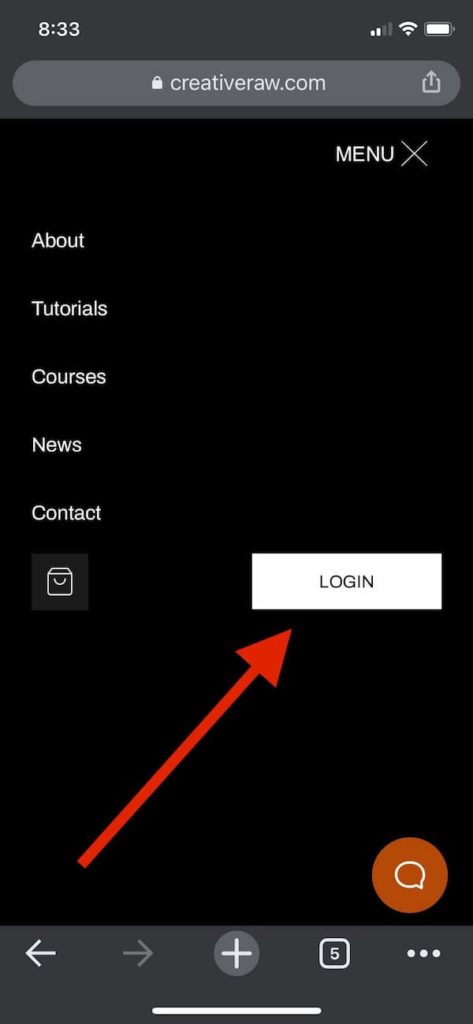
Mobile users will need to first click the “hamburger” button to toggle the menu, then click “LOGIN”:

Next, enter your email address and password, and click LOG IN.
Once submitted, you’ll notice that the LOGIN button in the top-right corner has now changed to MY ACCOUNT. Click that to access your Dashboard and courses:
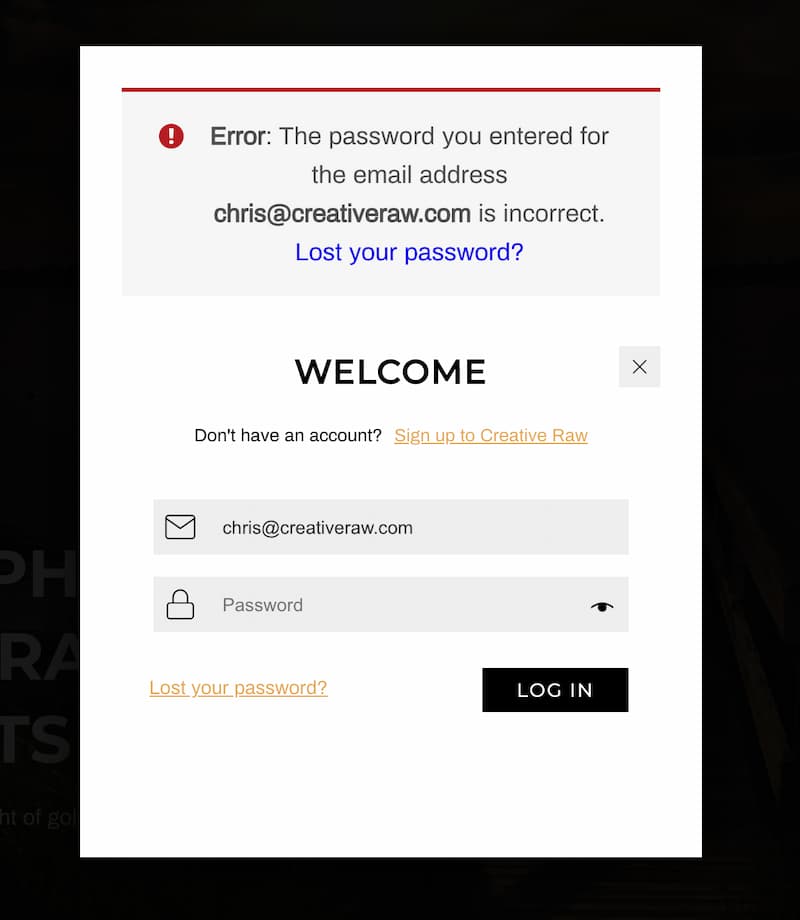
If your email address or password is NOT correct, the button will not change to MY ACCOUNT. If you click the LOGIN button again, there will be more information as to why you weren’t able to log in:
Changing your Password
If you’re already logged in, the easiest way to change your password is right from the Dashboard.
From the Dashboard, click Account Details:

Enter your current password to confirm it’s you, then your new password twice:
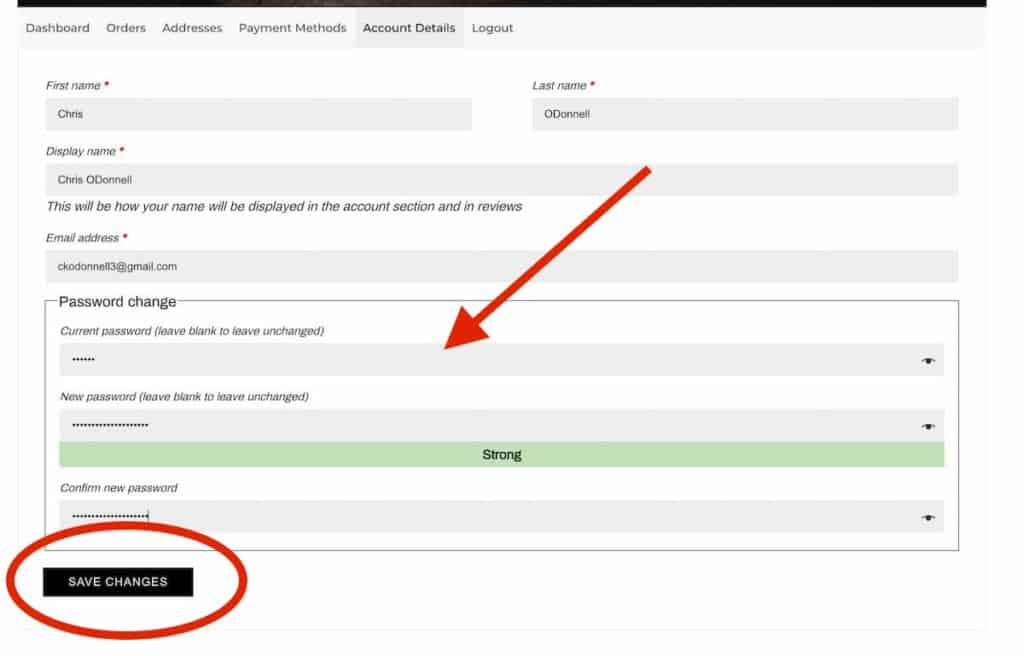
Note that it will not let you set a new password if the system deems it not secure.
When finished, press Save Changes. The next time you log in, make sure to use your new password! You will also receive an email confirmation of the change.
Resetting a Lost Password
If you forgot your password, you can use the password recovery method to set a new one.
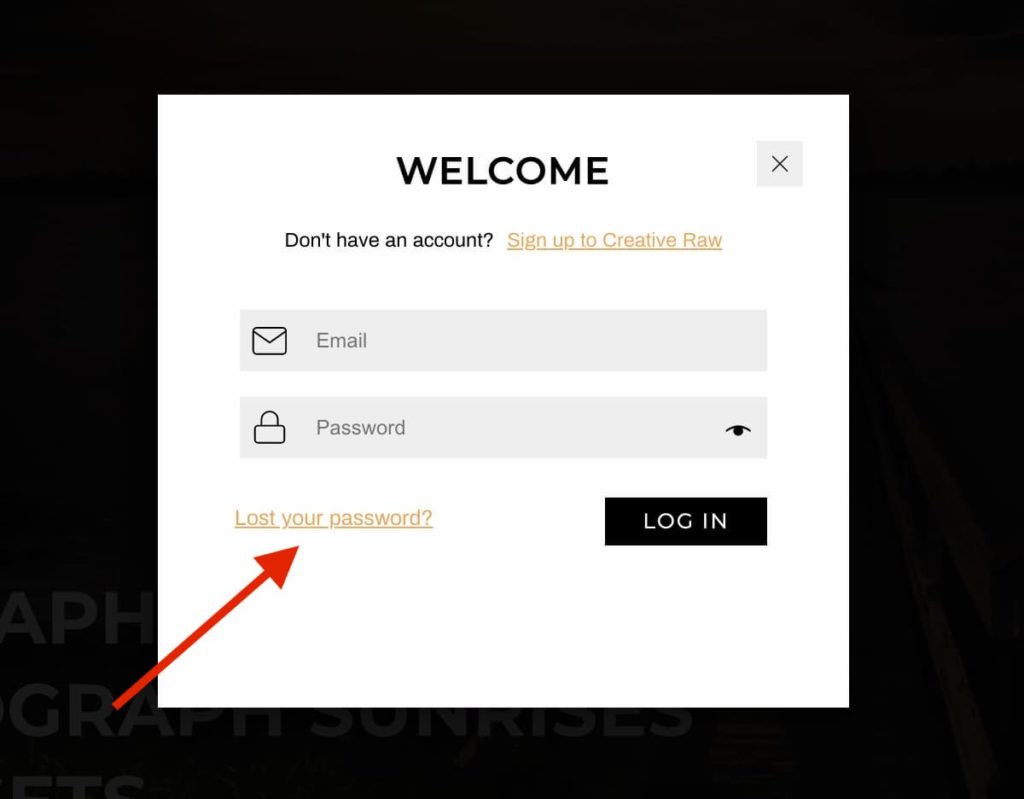
From any page on the site, click LOGIN to bring up the login window. Then, click “Lost your password?”:
Next, enter the email address associated with your account to be emailed a password reset link:

This will send you an email with the subject “Password Reset Request”. This email contains a time-sensitive link that will allow you to reset your password. Click that link, and you’ll be sent to the reset form where you can enter your new password:
Once you’ve typed in your new password, click Save. Then, click the LOGIN button in the top-right corner. If your password was changed successfully, you should see a confirmation at the top of the Login window:

Make sure to use your new password when you log in! You’ll also receive an email confirmation when the password is changed successfully.
The Difference Between “Editing” and “Processing” in Photoshop
When I first began exploring the wondrous world of Photoshop, my “workflow” was a convoluted mess. Although I was learning different tools and techniques, steadily expanding my creative processing tool belt through my own trial and errors…each processing session became longer and more frustrating.
Here’s a typical scenario during my early days in Photoshop that you may find familiar:
STEP 1: Make initial raw edits in ACR and open up the image in Photoshop, and add a bit of saturation and contrast. However, shadows are now crushed…so you need to bring back some of that detail.
STEP 2: Jump back to ACR and recover more tones in the shadows, then bring the image back into Photoshop and continue your work.
STEP 3: Further evaluation tells you that the yellow hues in your sky could use a shift towards red….which is when you see how noisy the sky actually is. Also, this color shift now makes your dust spots very prominent….which you really didn’t notice at first.
At this point, it feels like you are taking two steps back for every one step forward…and each editing session seems longer and more overwhelming.
Before I established a structure for my workflow, I was feeling the overwhelm myself. The amount of processing does not bother me; I actually love spending time in Photoshop and look forward to the challenge of enhancing my images and expressing the creative vision I have for them.
This was the frustrating part: it always seemed like I was taking an unnecessarily long and convoluted route to the results I wanted. I would make an adjustment, but that would introduce two new “problems” that needed to be fixed.
This constant ping-pong back and forth became exhausting….and randomly jumping around with no real direction or structure was not making Photoshop a fun place to be.
If this sounds familiar, you are definitely not alone here…
I’ve received countless emails over the years from landscape photographers who have the exact same problem….and I love answering them since I know a VERY simple trick that will greatly speed up your workflow and make Lightroom and Photoshop much less frustrating.
The best part: it’s a method you can implement right now.
Editing vs. Processing
I soon realized that my processing techniques could be segmented into two distinct categories: corrective and creative. This separation became increasingly important as my processing skills evolved and my workflow became more advanced.
Techniques that purify or otherwise “fix” your images are corrective in nature (editing). This includes noise removal, sharpening, recovering detail (clipped shadows or highlights), correcting exposure, etc.
Techniques that correct your image have a structured “left-brain” approach, tend to be methodical in their execution, and are used to improve and refine your raw file before you get into the “creative” stage.
In contrast, techniques that strengthen the vision you have for an image are creative in nature (processing). These skills take a “right-brain” approach and are free-flowing and easily amendable…such as color grading, dodging and burning, or atmospheric enhancements (light painting, the Orton effect, or adding sun glows).
When I divided my digital darkroom techniques into these two distinct categories (editing vs. processing), I made a mental shift that completely transformed my workflow in Photoshop. It gave me the direction and structure I needed, and virtually eliminated all feelings of overwhelm and frustration that was constricting my creative vision.
Most importantly, this new mindset made my time in Photoshop much more enjoyable…and I found myself actually looking forward to enhancing my image because I was now having fun.
Let’s dive a bit further into how this works…
The Editing Stage
I perform the majority of my edits as soon as I import my image, and always before any creative processing. My focus for the editing stage is to create the best possible canvas for my photograph….to clean any impurities so that I can apply my creative processing with greater ease and without distractions.
Methods such as white balance adjustments, exposure correcting, panoramic stitching, clone stamping, and dust/spot removal would fall under the editing category.
To first clean, then create….allows me to concentrate more intently on one goal as opposed to switching back and forth from corrective mode (left-brain) to creative mode (right-brain).
At the end of the editing phase, I have created a solid base to build my image upon…much like how a contractor will lay a foundation before building a structure.
This makes it much easier to apply my color and tonal shifts later without being distracted by blown highlights, excess noise, dust spots and other impurities.
In other words, the photo is primed and ready…making it easier for me to materialize my creative vision and express the experience I had in the field.
The Processing Stage
The processing of a photo always comes after the editing and is where I can create freely without interruptions.
At this point, my photo is much like an unfinished painting – the canvas has been primed and the underpainting has been applied, but it’s rather boring and unfulfilling. My creativity hasn’t been infused yet….and there’s still a story for me to tell through my processing.
Color shifts, dodging & burning, and tonal adjustments are examples of the processing phase. This categorization allows me to focus more intently on creative techniques and loosen up my workflow….as I’ve already been through the methodical, rigid editing phase.
Why this method works so well….
Whether you use Lightroom or Photoshop (or hopefully, you use both like me)…. this mental shift to compartmentalize your workflow will make your processing much clearer, simpler, and a lot more fun.
Without this structure, you’ll be performing your edits as they come up….and this interruption can distract you from your creative vision and cause unnecessary detours….which can ultimately change the outcome of your final image.
For example, trying to correct for lens distortion or cloning out distracting eyesores after you have already applied your dodging and burning will completely alter the quality of your carefully applied shifts and adjustments.
A new crop or image rotation can throw off the balance of your focal points…
Correcting blown highlights after your color and tonal adjustments may affect the purity and hue…
Situations like this force you to either reprocess the image (wasting time) or settle with the altered result (unfulfilling to your creativity).
Either way, it’s a demoralizing and unnecessary side effect that can be easily avoided.
However, don’t think of editing and processing as two opposing workflows…but rather stages in the digital darkroom that work together cohesively and contribute to your final image.
For example…one goal of the editing phase is to pull in as much detail as possible from the raw file, which will give you more creative freedom. Processing an image that already has the correct exposure – meaning that there are no blown highlights or blocked shadows – allows me to use a wider spectrum of creative techniques that otherwise would not be possible if I had damaged pixels.
So in other words…my editing techniques directly influence my processing techniques, and vice versa.
Another example is noise removal: certain creative processing techniques (such as color grading) can enhance the appearance of noise…so by eliminating that noise at the beginning of your workflow, you are avoiding future frustrations and wasted time.
This also improves your in-the-field workflow
Photographers have told me that once their darkroom workflow became simpler and more streamlined, they found themselves looking at their subjects with a new perspective.
Scenes that you may have previously disregarded due to uninteresting light or stagnant atmosphere now draw your attention because you know what is possible in Photoshop once you bring those images home.
With this new perspective, you’re encouraged to look at landscapes longer, explore new vantage points, and pursue a variety of creative methods with your camera that you can later enhance through the darkroom.
By following this simple guideline and making that mental shift to separate your editing from your processing….you’ll find yourself having more fun in the darkroom instead of feeling overwhelmed.
The courses inside of the creativeRAW Lifetime Membership program are structured this very same way….to “purify the canvas” before any creative work. This is by far the easiest, yet most powerful change I made to my darkroom workflow…and has paved the way for years of fun in Photoshop.
I encourage you to make a list right now and separate your editing techniques from your processing. I guarantee that you’ll see a great improvement!
Three Steps to Strengthening your Creative Workflow
Lightroom and Photoshop are supposed to be fun programs to use…and the first step to a simpler, more enjoyable darkroom workflow is to put in the work and learn exactly how they function. That’s the plain and simple truth.
However, it can be quite daunting to simply begin processing with a purpose…to instantly become “creative” with your craft and translate an abstract concept into a tangible photograph.
This can be exponentially more difficult when presented with a creative tool (like Lightroom and Photoshop) that, at first glance, seems very overwhelming.
Creating with a vision and purpose is very different than simply knowing HOW to use a processing tool. You can learn the textbook skills for Lightroom and Photoshop, but in order to truly express your creativity and manifest an image that represents your unique vision…a deeper connection needs to develop between you and your photograph.
The starting point that directs you towards your own creative path can be vague at best, so I have some very simple guidelines that I encourage creativeRAW members to follow…and has helped many landscape photographers find their way to processing images with clear intent and direction.
These are the same steps I took when I first began my own creative journey in landscape photography. I have the benefit of hindsight, so I broke down the development of my processing workflow into three distinct steps.
Step 1: Truly commit yourself to learning the tools of your craft.
I know this sounds incredibly obvious, but many photographers never actually “commit” themselves to learning the tools of their craft…and they are truly missing out.
Lightroom and Photoshop can be intimidating programs for beginners (and even intermediate users)…so it’s just easier to put off taking that first step “until tomorrow”…but as you know, “tomorrow never comes”.
Actually, these programs are VERY easy to learn…and were specifically designed to be user-friendly (otherwise, who would purchase them?).
They’re overwhelming not because these programs are overly-complicated….it’s because no one is showing you the proper way to use them (in layman’s terms) and providing expert guidance along every step of the way.
So the best thing you can do RIGHT now if you are truly dedicated to enhancing your craft and becoming a better photographer is to commit yourself to learning…and hold yourself accountable.
As corny as it sounds, taking that first step is truly the most difficult part of this process.
After that, each small tip you learn or new discovery you make will have a snowball effect on your skills…and after a couple hours, days, and then a week…you will be so far ahead of where you started.
Just start small. Don’t focus on the big picture (i.e. “I am going to be a Photoshop master!”) because that will overwhelm you.
Instead, set small, achievable goals (i.e. “Today, I am going to learn what adjustment layers are!”) and you will be well on your way to darkroom mastery.
It’s about having the confidence to start your creative journey and to follow through the process of learning…because that is the only way you’re going to master Lightroom and Photoshop and find more creative fulfillment in your photography.
Programs, courses, presets and actions that offer magical shortcuts around a proper education (i.e. “Become a Lightroom master in 30 minutes!”) are nothing but empty promises…and I think deep down, you already knew that.
This is why some presets and actions can be harmful to your photographic journey. They make it so easy to use them as a “creative crutch” and procrastinate…but in reality, you’re doing yourself a disservice by delaying your creative development.
The best investment you can make today is in your future self…so make the commitment to learn something new RIGHT NOW that is going to help your processing TOMORROW.
Here’s a simple goal: set out to learn one new tool or technique every single day…or at least every time you open up Lightroom or Photoshop. Never close out these programs without taking a new bit of knowledge with you.
It’s simple, attainable, and will snowball into a wealth of knowledge.
TAKE ACTION: Learn the four building blocks of Photoshop.
Advanced Photoshop workflows such as exposure blending, dodging and burning, or color grading may seem daunting at first glance….but in reality, they are incredibly simple workflows to execute once you learn the four basic principles of Photoshop.
I see many photographers get overwhelmed with the thought of anything advanced in Photoshop, but all techniques rely on these four tools…with the only difference being the degree and scope of their usage depending on what you want to accomplish.
These principles are:
- Layers
- Masks
- Smart Objects
- Luminosity Masks
I love analogies so let’s use one right here: imagine building a house. They come in all different sizes, styles, and finishes….but (most) are constructed using the same basic framework: foundation, frame, electric, plumbing, etc. That’s a lot like how image processing in Photoshop relies on these four basic principles.
Once you learn how they function, you’ve already made a huge leap in your darkroom mastery…and Photoshop becomes a place of fun creativity instead of confusion and overwhelm.
I know how important these concepts are to your Photoshop learning…which is why I’ve created free lessons that teach you these principles in an easy-to-follow, sensical way.
Step 2: Enhance your craft and creative vision.
Knowing HOW to process a photograph may get you a decent photograph. Knowing skills like:
- How to properly enhance your tones, or…
- How to apply color theories to create a harmonious balance of your hues, or…
- How to dodge and burn to direct the light and shadow of your image…
…are invaluable to have as a landscape photographer.
However, without a strong connection to your image, you will find the digital darkroom to be a shallow experience.
Processing without a creative vision becomes tiresome and boring…and without an imagination, your portfolio will look no different than the plethora of other landscape photographs out there today.
Textbook skill alone will only get you so far with image processing….your photos still require something very important that no one else can replicate, and that’s your unique creative vision.
This is probably the biggest mental hurdle that photographers encounter: how to develop your own creative processing techniques that represent YOUR unique vision and expression.
And the only reason why it’s a “hurdle” is that we tend to overcomplicate the process.
In reality, it’s quite simple to enhance your craft and strengthen your creative vision once you know the technical building blocks of Photoshop.
Photographers often think that there’s going to be a creative epiphany after years of experience…or that some people are naturally gifted with artistic skills that can’t be taught.
Thankfully, that’s not true at all.
You can establish a strong, creative connection to your work immediately – right now – and be able to express that visually through processing.
And just like with your commitment to learning the technical skills of Lightroom and Photoshop…this is easier when you start with small, manageable steps.
TAKE ACTION: Connect deeper with your photography through identification.
The creative connection between you and your photography can be established in a number of different ways…and on many different levels. That initial spark which ignites your creative passion can very simple; all you need is a starting point to steer you in the right direction.
First, identify your vision by recalling the emotions you felt in the field when taking the photo. Connect yourself to that very moment and write down a few simple words that represent what you felt: “warm” and “peaceful”….or perhaps “abrasive” or “foreboding”.
This is a simple, yet powerful starting point that will help you decide which direction to steer your image towards …or at the very least, where NOT to take your image and begin narrowing down the possibilities.
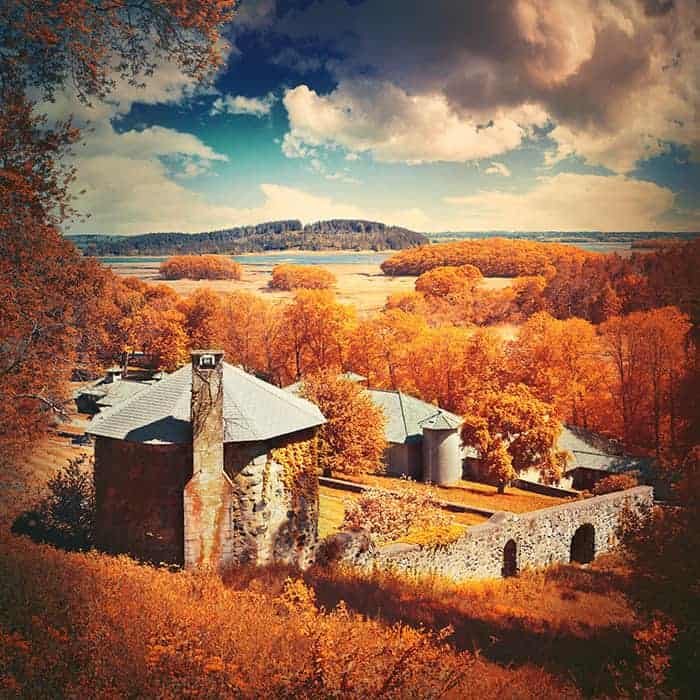
For example, let’s take one of my images here from a color grading course inside the creativeRAW Lifetime Membership program. I remember how great it was to feel the warm springtime sun after a long and dreary winter…and this very simple emotion directed my entire processing of this photograph.
In other words, my abstract experience in the field directed my processing….and set me off in a creative direction that I otherwise would not have thought of.
Step 3: Materialize that vision through Lightroom and Photoshop.
After you identify a few key emotions or feelings that represent your photograph, it’s time to combine that creative connection with your technical skills and let that lead your processing.
This marriage of vision and skill is what I consider your “craft”.
Your creative connection is like a thesis for the image: the general atmosphere and environment that guides your processing. Once that’s been established, it’s time to strengthen that by:
(1) Identify the qualities that you like about your image (i.e. golden hour light or incredible cloud texture).
(2) Minimize/remove any distractions (i.e. blown highlights or unpleasant focal points).
(3) Enhance those good qualities using your technical skills….all the while remaining true to your creative connection.
Using the same example image above: I really enjoyed the fantastic texture of the stone turret and wanted to enhance that with an autumn color palette. When I cross-referenced that with my thesis for the image (my creative vision)…I made intentional choices in tone and color that brought my image closer to representing that warm feeling of the sun.
So for me, the experience I had when taking a photo will dictate what the end result will look like…and the path to the final image is never clear beforehand. It develops organically as I am processing the image.
Realizing that knowledge should only compliment your vision – not dictate it – will allow your creativity to flow and flourish.
Technical know-how should give your creativity protective boundaries to work within, but not control it…and is why I teach you how to process “non-destructively” as it allows you to create without limitations, but within an environment that protects your image from damage.
Why you Should Always Auto Bracket a Landscape for Exposure Blending
Have you ever photographed a beautiful landscape only to find that your images rarely represent the stunning scene you witnessed? Most likely, the amount of light you photographed was too much for your camera to reign in with just one shutter speed. Don’t worry though…there’s a very easy fix for this (and it doesn’t require any additional gear).
With exposure blending, you can overcome the limitations of your camera sensor and create an accurate photograph of the tones, light, and detail that you saw in the field. By simply auto bracketing your landscape (in other words, capture multiple shutter speeds of the same scene), you can create extraordinary photographs that explode with detail…instead of a washed out sky, dark and muddy shadows, or a disappointing combination of the two.
Your camera sensor (the digital equivalent to a negative) is limited to one aperture and one shutter speed across the same frame, so it’s difficult to capture a scene with a dynamic tonal range without some areas falling outside of your selected exposure, which produce blown highlights and/or crushed shadows. Since we can not manipulate the natural light, we have to rely on our camera skills to bring back all that lost detail by following these two easy steps:
1. Auto bracket your landscape in the field…firing off multiple exposures to capture the full dynamic range.
2. Blending the best parts of those brackets together in Photoshop into one final photograph.
Many photographers are familiar with this process (and if you’re not – don’t worry because I’ll be showing you this process in my full tutorial here). However, some think that auto bracketing is not a necessary step to capture the full dynamic range….and you can simply pull all of the detail out of a single raw file.
While camera sensors have definitely advanced by leaps and bounds over the years…they are still not able to capture the brightest highlights and darkest shadows of large tonal ranges in one exposure (think sunrises, sunsets, or other situations with direct sunlight). So for the highest quality landscape photographs, you still need to auto bracket your scene in the field so that you’re working with the full dynamic range of light.
In this tutorial, we’ll go over what auto bracketing is, how to capture multiple exposures in the field, and explore the incredible level of image quality when you take the time to auto bracket your landscape.
What Exactly is Auto Bracketing?
Our eyes can absorb a wider dynamic range than a camera sensor is capable of capturing, so we are often disappointed by the lack of detail in our landscape photographs. In order to capture the full tonal range of a scene that extends outside of what your sensor can render, and more accurately represent what you actually saw…you’ll need to combine different shutter speeds together.
The number of exposures you need depends on how large your tonal range is, but typically you’ll have one exposure metered for your highlights (a faster shutter speed to limit light), one for your shadows (a slower shutter speed to let more light in for the darker areas – such as your foreground), and one as your base exposure (the average metering between your highlights and shadows).
The base exposure is quite important since the detail here will help to ease the transition between your brightest and darkest areas, creating a more natural and balanced exposure blend.
This is where the term “bracketing” comes in since you’re creating a bracket that encapsulates your entire tonal range, from brightest to darkest…which will capture all of your image detail by eliminating any crushed shadows and blown highlights.
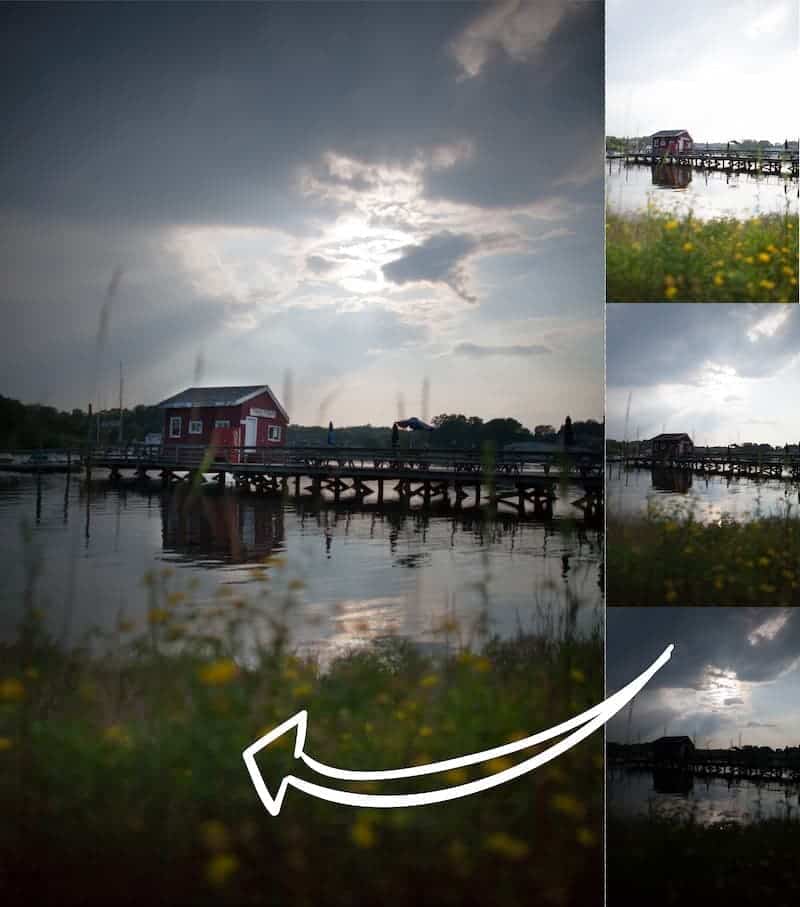
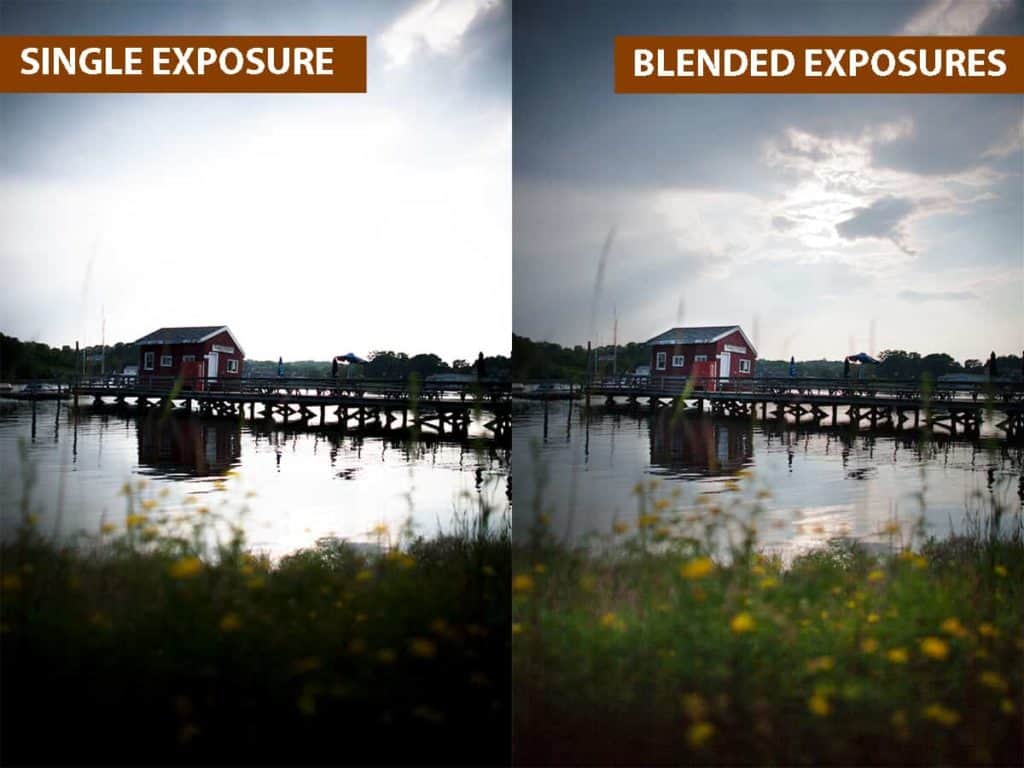
In the example above, the shadow detail from the shadow recovery bracket (top-right, EV+2) has been blended into the foreground of our base photograph (middle-right, EV 0). Additionally, the highlight detail from the highlight recovery bracket (bottom-right, EV-2) was blended into the sky of our base photograph.
The resulting exposure-blended image (left) is now completely free of clipped detail and has more vibrant, natural colors.
In the past, most camera sensors were pretty limited on how much detail they can capture in one frame…so you had to capture five brackets in increments of one-stop each. However, most newer camera models have a much wider dynamic range…which means you can get away with only photographing three brackets in increments of two full stops (as seen above).
NOTE: Exposure blending can also be referred to as “HDR blending” in the sense that we’re expanding the tonal range and creating a (H)igh (D)ynamic (R)ange photograph…however blending your brackets together manually will create a much more natural looking image instead of relying on third-party software like Photomatix to perform the blending for us. For more information on what makes a “good” and “bad” HDR landscape, see my HDR blending article here.
With exposure blending, you have much more control over the end result by manually choosing exactly where you want to blend your exposures together, and at what strength you want that blend to be. It’s a method that is entirely customizable to your scene, which will produce a more pleasing result.
The need to bracket a scene in order to capture the entire tonal range is quite common…and is why camera manufacturers have made it easy to photograph the same subject at different exposures. “Auto bracketing” is a fantastic feature available on most DSLRs, which allows you to take multiple exposures automatically without having to change your shutter speed manually. Simply tell your camera how many brackets to take and at what increments, and the camera will do the rest.
The amount of stops between each exposure can be adjusted depending on your scene, and for most situations three different exposure values (EV) capturing a four-stop range will be sufficient: your base exposure (EV +/-0), an exposure to recover blown highlights (EV -2), and another to recover any crushed shadows (EV +2).
So that is what auto bracketing is…but how exactly does this method give us a better quality image than taking a single photograph and bringing down the highlights and pumping up the shadows in the digital darkroom? Many photographers see auto bracketing as a longer road to the same destination…but like most things in photography, those shortcuts come at a price. Auto bracketing will still give you the best blending results without sacrificing quality.
In order to understand why this is true, you first must learn why raw format gives you a superior image quality.
What is Raw Format?
Your exposure blending capabilities depend greatly on the quality of your brackets; a simple image format will give you basic results. However, the more data you have to work with, the more detailed and comprehensive your results will be when you blend your brackets together. This is especially important for expansive tonal ranges which require a more robust format to capture all of your detail.
In other words, the best exposure blend begins with the strongest foundation to build your image upon..and that foundation is raw format.
A raw file is the digital equivalent of a film negative before it is printed onto paper; it’s the “raw” state of your image that you can’t really use as a photo, but all the information you need to create a photo is there. You can’t upload a raw file to your website or email it to others without special viewing software, but you can take that raw file and turn it into a universal format (such as TIFF or JPG) once you have finished with your processing.
There are many specific benefits of raw format over JPG, which I go over more thoroughly in my HDR Field Guide…but it all comes down to a higher-quality image as you are working in the pure, uncompressed state of your photograph, which is essential for exposure blending.
The Advantages of Raw Format and a Higher Bit Depth
A raw file is notable for its enormous color depth (also known as bit depth) when compared to the more universal JPG.
With a raw image, you are working with a minimum of 12-bits (usually 16), which translates to 4,096 tones for each of the three color channels (red, green, and blue). However, JPG is limited to 8-bits, which gives you only 256 tones for each channel. Technically, raw format is immensely superior to JPG as there is much more data contained for each color channel.
While 4,096 tones for each channel may seem excessive, consider this: the more data you have to work with, the easier it is to maintain color integrity. When blending different exposures together, this becomes extremely important as you may need to call on that extra data to recover your crushed shadows and blown highlights.
If you have the ability to use a more sophisticated format, it makes sense to use it as exposure blending is entirely dependent on recovering as much detail as possible.
It’s like having an insurance policy on your photographs…you may not always need it, but when you do it can be a lifesaver.
For the purpose of exposure blending, this additional data gives you an enormous advantage over JPG when adjusting your exposure, and will also reduce processing artifacts (such as pixelation/posterization and added noise) later on if you decide to process your image further after blending (such as dodging and burning or color grading).
Let’s see how the expanded color depth of raw format can benefit your processing in Photoshop…
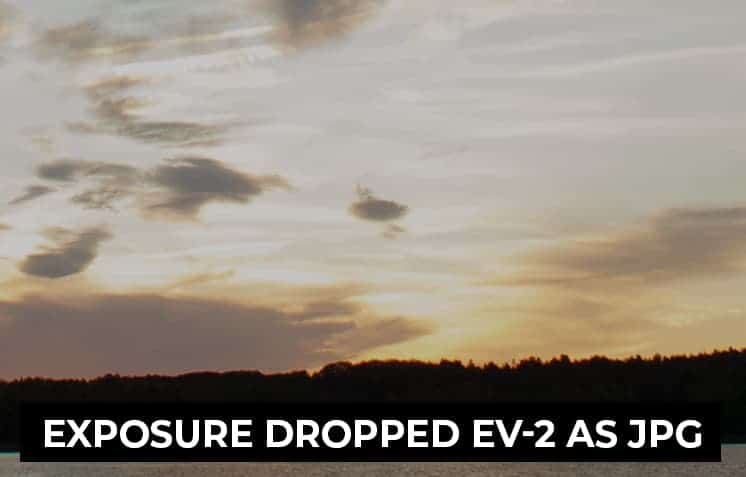
This sunset image was originally overexposed for the sky…and as a result, important cloud detail was lost to blown highlights. To reverse this, I need to reduce my exposure and bring back that lost sky interest.
When I work in JPG mode and reduce the exposure by two full stops (top), not much detail has been recovered since an 8-bit file has a very limited range to work with.
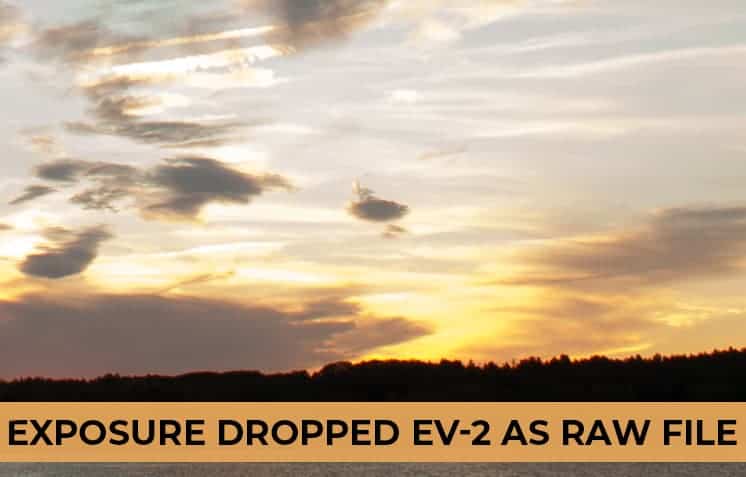
However, when I use a raw file of the same exact photograph (bottom), which is uncompressed, you can see how much more hidden detail is recovered when I adjust the exposure down by two full stops.
There are many other benefits to raw format, but the additional leeway in your exposure recovery is by far the most important…especially when auto bracketing for exposure blending.
Why bother auto bracketing when you can use raw format instead?
With raw being such a versatile format, why is there a need to auto bracket at all when you can simply create multiple exposures from one raw file and blend those together?
It would save time spent on setting up a tripod, taking three (or more) images, and also save on disk space. Isn’t raw a magical exposure recovery tool?
While this may seem like a promising idea….raw format does have its limitations. It’s always best to capture the optimal exposure for a scene in-camera simply because you’ll have more data in a correctly exposed image than one that has been adjusted artificially, even when it’s in raw format.
The more data that is rendered onto your sensor, the more detail your image will have. The recovery capabilities of RAW format should not be a replacement for bracketing a scene, and here we can see why.
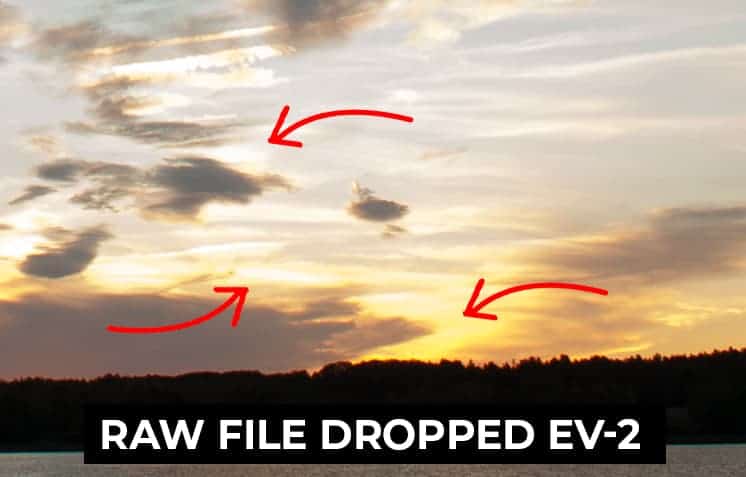
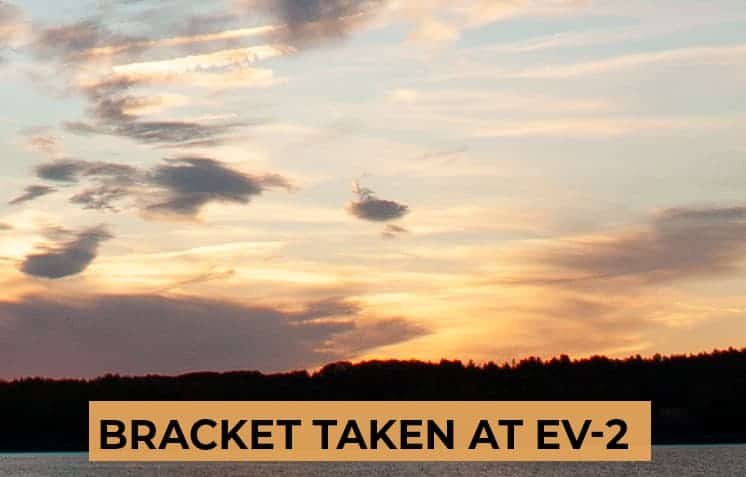
The top image is the same example used in the previous image: a raw file that has been reduced by two full stops in processing. The bottom frame is the same exact scene, but is a bracket that was captured two stops less in-camera…so no exposure adjustment was needed in ACR. When you compare the cloud detail between each example, you can see how much more data was recovered around the sun by bracketing.
So capturing an exposure that has been adjusted in the field with bracketing vs. adjusting a raw file by the same number of stops will always give you a higher quality photograph.
If it’s better to auto bracket than adjust a raw file, why not auto bracket in JPG format?
Although raw format cannot replace auto-bracketing, it’s still a file format that has many benefits over JPG and should be used when you bracket. Not only is there more data in raw format, but you’ll greatly increase your tonal range for editing beyond what you’ve set with your brackets.
If you auto bracket in JPG format, you’ll typically be taking three images: your base image, one taken two stops faster, and another two stops slower, for a total range of four stops.
One substantial benefit to bracketing a scene in raw format is that you can adjust the exposure of a raw file +/- by two full stops in ACR before the quality begins to deteriorate. So when you auto bracket a landscape with three exposures in increments of two stops…this will give you an additional four full stops of a recovery buffer (two stops for your longest bracket and two stops for your shortest bracket), which brings your tonal recovery range up to eight full stops!
So not only will you have less noise, less pixelation, and better color purity with raw format…but as an added bonus you’ll really increase your tonal range for editing in case you need it.
Should I bracket my scene if no detail is being clipped?
If bracketing provides cleaner detail and purer colors, should you bracket a scene where there is no actual damage to the detail (the pixels are not outside of the captured dynamic range)…but will require some brighter shadows/darker highlights?
Usually, yes!
Even if the detail is not actually being clipped, you usually can recover better texture, more accurate colors, and sharper, cleaner detail from a blended file vs. adjusting the highlights and shadows of the actual raw file.
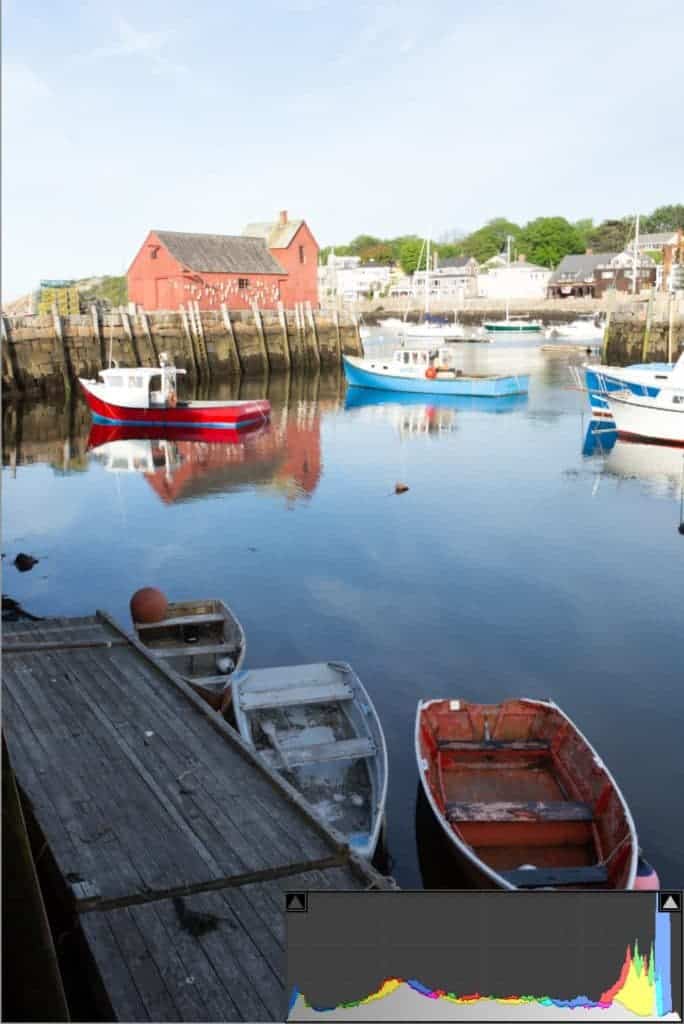
In the image below, the base exposure (EV +/-0) contains no blown highlights or crushed shadows. Almost, but the pixels are not actually touching the edge of the histogram…which means I should be able to pull that detail back into the photograph.
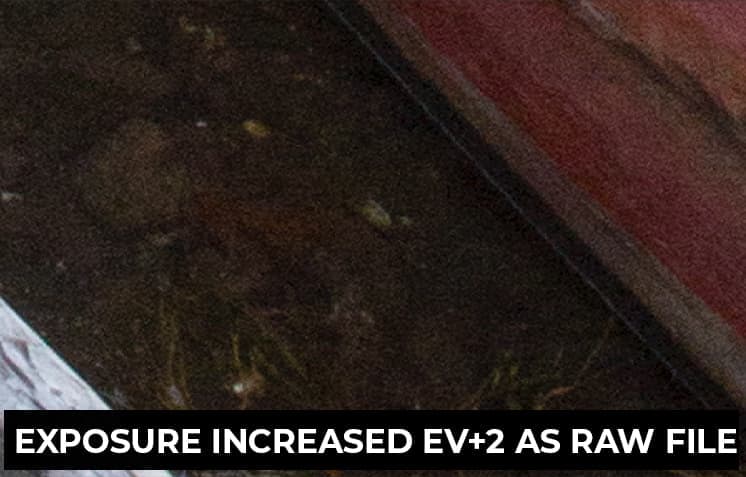
However, let’s take a closer look at the shadows in the bottom-right corner. When I increase the exposure by two full stops and compare it to an actual bracket taken two stops faster in the field, the difference is quite noticeable.

Let’s do the same test for the highlights. You can see that when we increase the base raw file by 2 stops, the highlights have less detail and more contrast than the bracket taken in the field at EV-2.
Note: When recovering detail, you actually want LESS contrast and more variation in the lightness value between your pixels. Contrast is added later in processing.
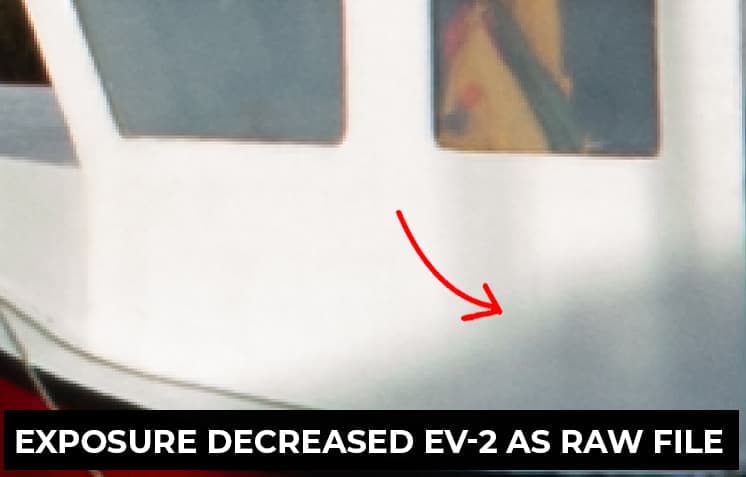

In particular, you can see that the white paint is much brighter in the adjusted raw file, and the gradient in the bottom-right corner is more blotchy with a greenish aberration than the actual bracket captured in the field.
Even though this camera has an advertised “12-stop” dynamic range, and is rated as having an 8-stop dynamic range of “high” quality….the difference in texture, color, and contrast is already apparent with only a 2-stop adjustment.
Even though it’s a marginal difference, there is one…and will only be exasperated as you push the limits to the dynamic range of your camera sensor. Ultimately, it’s up to you to decide how much detail you want to sacrifice in exchange for a simpler workflow.
Here’s the take-away…
Blending exposures using one raw file is best for those candid shots where you didn’t have enough time to set up a tripod but need to correct some blown highlights, or simply want to brighten/ darken small parts of your image – like in wedding or action photography. It’s a fantastic way to save an otherwise unusable photo.
However, if you have the time and ability to auto bracket your landscape for exposure blending…this method will always give you the highest quality output with the largest tonal range.
Exposure blending and bracketing are not just for combining bright skies with dark foregrounds; you can use it in many different ways as part of a non-destructive workflow.
You can recover blown highlights in water reflections, bring back detail lost to the shadow of a tree, or blend a brighter foreground with a darker background (like under stormy, overcast skies).
Another popular use of this technique is to blend different long exposures together – for example, blending an extended exposure that captures moving clouds with an image that shows stationary grass that would otherwise be windswept if taken at the same shutter speed as the sky. The options are endless for this incredible workflow.
Now that you know the great importance of auto bracketing for exposure blending, it’s time to go over the in-camera workflow; the process I go through to capture those bracketed images to later blend in process.
I’ve put together a free eBook that walks you through the entire bracketing process in the field. You’ll find many HDR tips in this guide that will give you extraordinary brackets for exposure blending…such as how to stabilize your camera for sharp focus, the specific gear I use to auto bracket, and of course the actual step-by-step workflow for setting up and executing your brackets.
If haven’t grabbed this guide already, you can download it right now by clicking the button below!
[fl_builder_insert_layout slug=”hdr-optin”]