How Layer Masks Work in Photoshop
How Layer Masks Work in Photoshop
Layers are your control station for image processing in Photoshop. However, in order to unlock the full power of layers and reap the ultimate rewards…you need to also use layer masks so you can tailor adjustments to the content of your image. In this comprehensive tutorial, I’ll explain layer masks in very simple terms so you can incorporate them into your workflow today.
Here’s the shortest definition of layer masks I can come up with: Layer masks allow you to take any adjustment or layer and customize its appearance to compliment your image.
This very simple concept is one of the most powerful features of Photoshop. Masks allow you to create 100% custom adjustments that hug every nook and cranny of your mountains, trees, ocean…targeting the exact areas you want to adjust while ignoring areas you want to be excluded.
For example: let’s say you have a seascape image and you want to add more blue to your sky, but not the water as it’s already a deep, rich blue. Masks allow you to do that easily and non-destructively…and are the key difference between an average shot and a masterful landscape photograph expertly processed to the highest quality.
They’re also a mandatory prerequisite if you want to learn more advanced workflows I will be showing you later…such as exposure blending, luminosity masks, and color grading.
If you prefer to learn visually (which I highly recommend for anything Photoshop), you can download my free video course below. This five-part course also comes with practice files and a helpful PDF cheatsheet, so you can get hands-on with layers right away.
What are Layer Masks?
Let’s say that you want to increase the saturation of your image, which will affect your entire photo by a set amount. The result may look good in some areas of your image where the colors were originally flat, but now some areas which already had enough color are overly saturated.
In the screenshot below, you can see that the saturation increase looks natural and pleasing, except for the red rock in the foreground…which now looks distracting and has lost some detail.
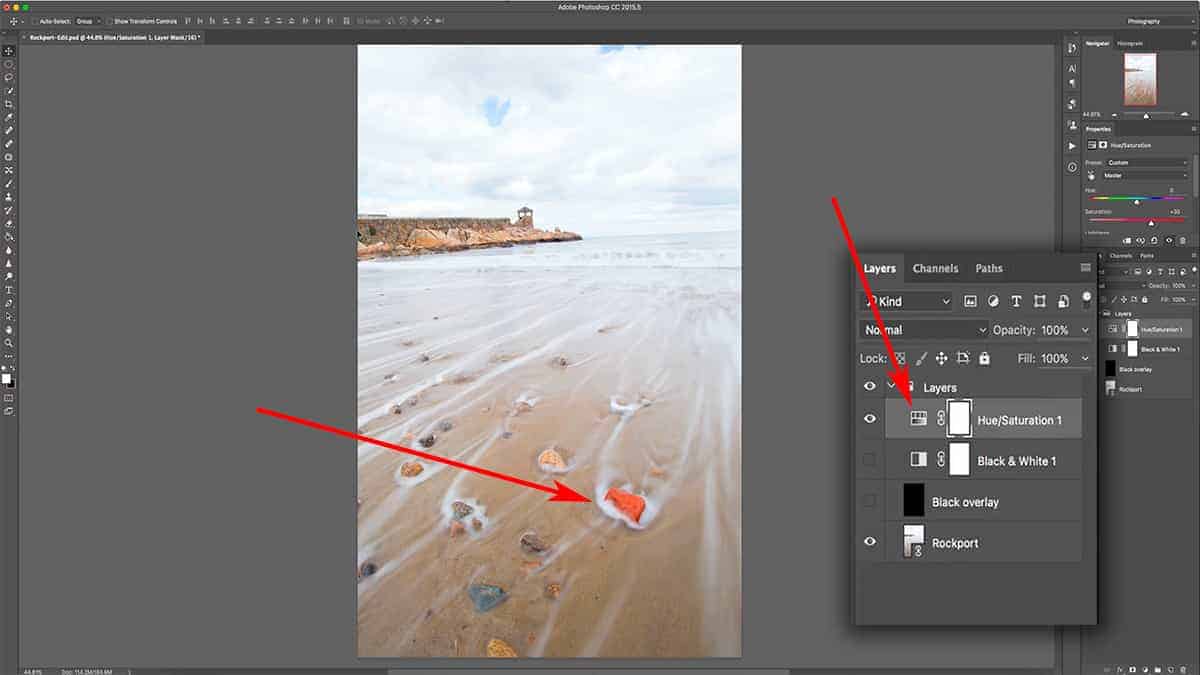
So now we’re stuck with an image where the saturation looks good in some parts….but a bit too strong in other parts and needs to be scaled back. This is where layer masks can help you tailor an adjustment like this to the content of your photo.
In other words, a mask will allow you to dictate exactly where you want a layer or an adjustment to be visible, and where you want it hidden. For this image, I want it visible everywhere but the red rock in the foreground.
You know that layer opacity – or transparency – can be adjusted, which will render a layer partially visible so that you can see layers underneath to some degree.
If you don’t know what layer opacity is, make sure to read through my “What are Layers?” tutorial first.
Instead of adjusting the opacity of the entire layer, what we can do is add a layer mask and control the transparency of specific areas in your image. The benefit of using a layer mask instead of adjusting the opacity slider is that you can have different levels of transparency throughout the image.
So the for example image here, I can have the saturation layer 100% visible for all areas except for the oversaturated red rock.
In other words, I can use the mask to scale back on the strength of that saturation – or rather, the transparency – so it’s not as heavily saturated as the rest of my image.
Adding a Layer Mask
To demonstrate how this works, let’s add new layer completely filled with a color like we did in the previous tutorial on layers. However, instead of filling this layer with black, we’re going to use orange. I’m going to make sure this layer is on top so that it completely covers the photo.
Next, let’s add a layer mask to this orange layer by clicking the “Add Layer Mask” icon at the bottom of the layers palette. It looks like a white square with a hole in the middle.
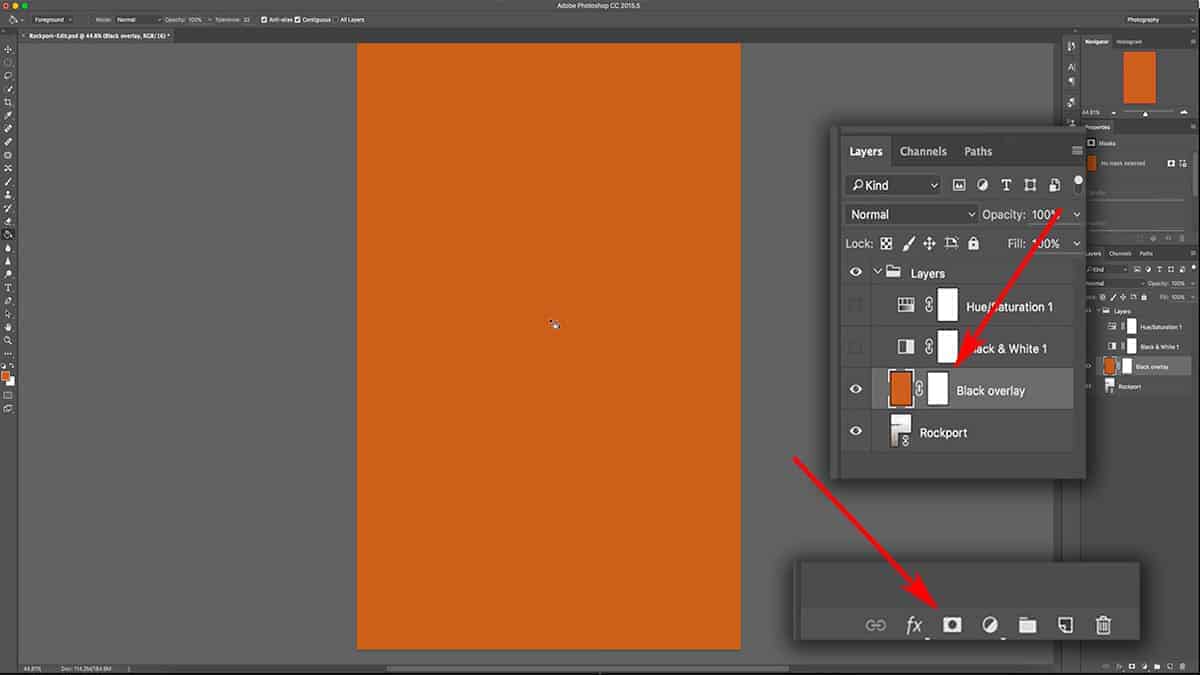
I know that I’ve added a layer mask successfully since I can see a little link icon between the layer and the mask, which means that any adjustment I make to this mask will affect the layer it’s attached to.
Now nothing has changed with the image yet since we haven’t done anything to the layer mask; we simply added one. The mask still needs your instructions on how it should interact with your layers.
Here’s how a layer mask works to control the transparency of the layer it’s attached to: you fill this layer with content (by using your brush tool, paint bucket, selection tools, etc.) to control the visibility of your layer. You can add white, black, or any shade of grey in between…which will tell Photoshop how transparent you want those particular areas of your layer to be.
If you add pure black to your layer mask, the layer becomes 100% hidden.
If you add pure white to your mask, the layer becomes 100% visible.
If you add any shade of grey to your mask, the layer will be transparent by a certain percentage depending on how light or dark your grey is.
When you add a fresh layer mask to your layer, the default state is 100% white. This is why we could still see the entire orange fill layer at full opacity when we added a mask.
However, if I filled this layer mask with 100% black, the orange fill layer would be completely hidden and we would see the original photo layer underneath.
Let’s do that right now. Make sure your layer mask is selected by clicking on the mask thumbnail (there will be a white border around the mask if it is properly selected). Press CMD + I which will tell Photoshop to invert the content of the layer mask; since it is 100% white, the inverse is 100% black.
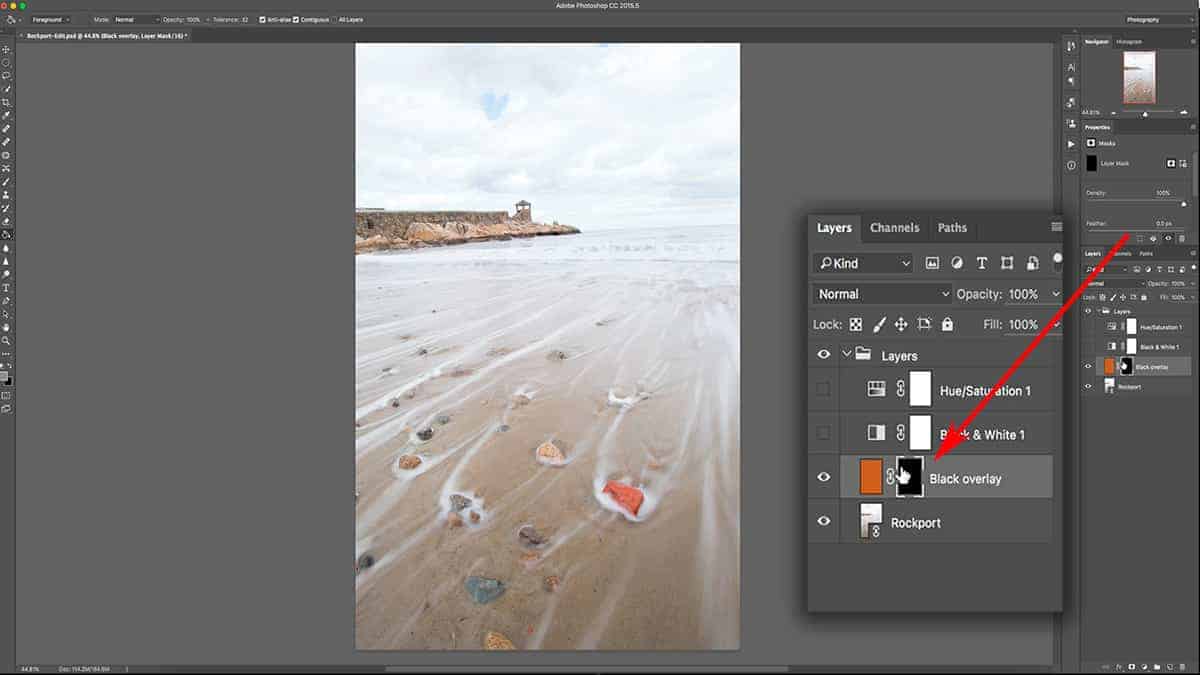
Although the orange fill layer is still here, it is 100% hidden thanks to the pure black layer mask.
A good way to remember how a layer mask works is to not think of painting black, white, or grey onto the mask…but rather visualize light and shadow.
When you shine a light on something (add white), it becomes visible…and when you cast a shadow over something (add black), it becomes less visible.
Now apply this mindset to a layer mask: when you add white to your layer mask, you are shining a light onto your layer…making it more visible. When you add black to your mask, you are casting a shadow…which will hide your layer.
Working with Grey on a Layer Mask
So far, we’ve only discussed adding pure black and white to a layer mask…but what happens when you apply a shade of grey; a tone that is somewhere in between pure black and white on the value scale?
Here’s the “big picture” point: the opacity of your layer is in direct relation to the shade of grey you use on your layer mask.
For example, if you add 50% grey to the layer mask (which is the midpoint between white and black on the value scale), then your layer will only be 50% visible.
Now if this seems confusing at all, don’t worry. It’s difficult to understand layer masks without visual aids, so we’ll go over a couple examples of layer masking.
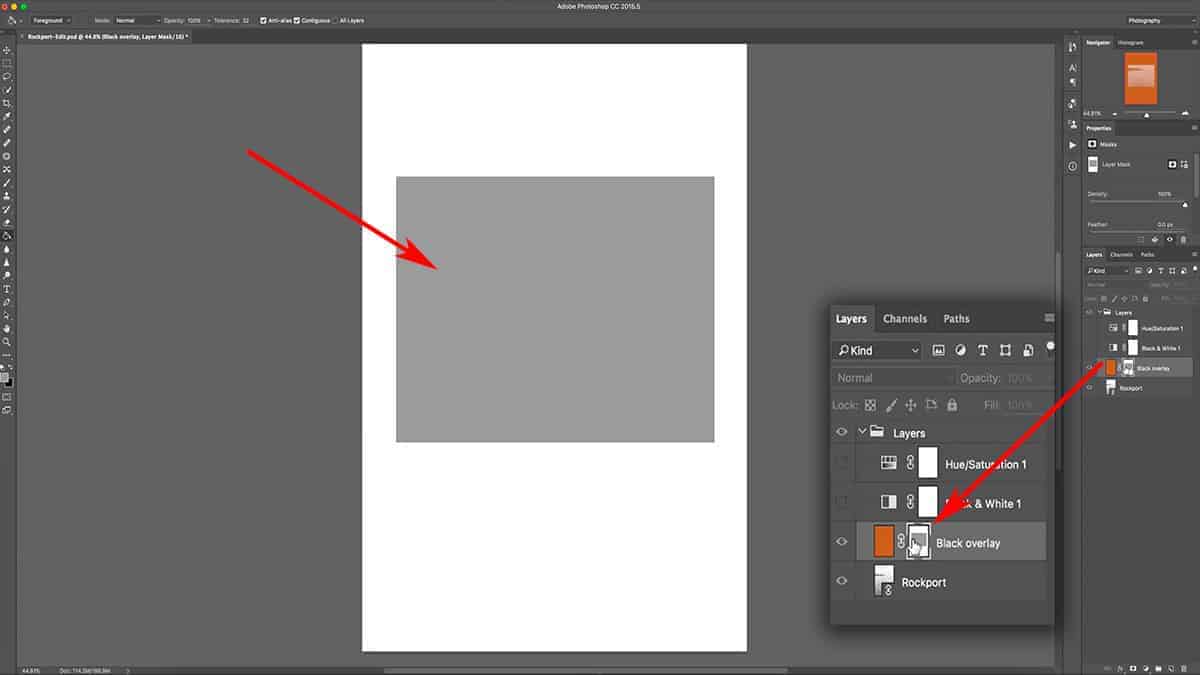
Select the layer mask and press CMD + I to invert it back to white, so that the orange fill layer is 100% visible again.
Then select your rectangular marquee tool, and create a rectangle selection by clicking and dragging onto your layer.
Lastly, make sure that your layer mask (and not the layer itself) is selected by clicking on the thumbnail in the layers palette…then click Edit > Fill. From the “Contents” drop-down menu, select 50% grey, and click OK.
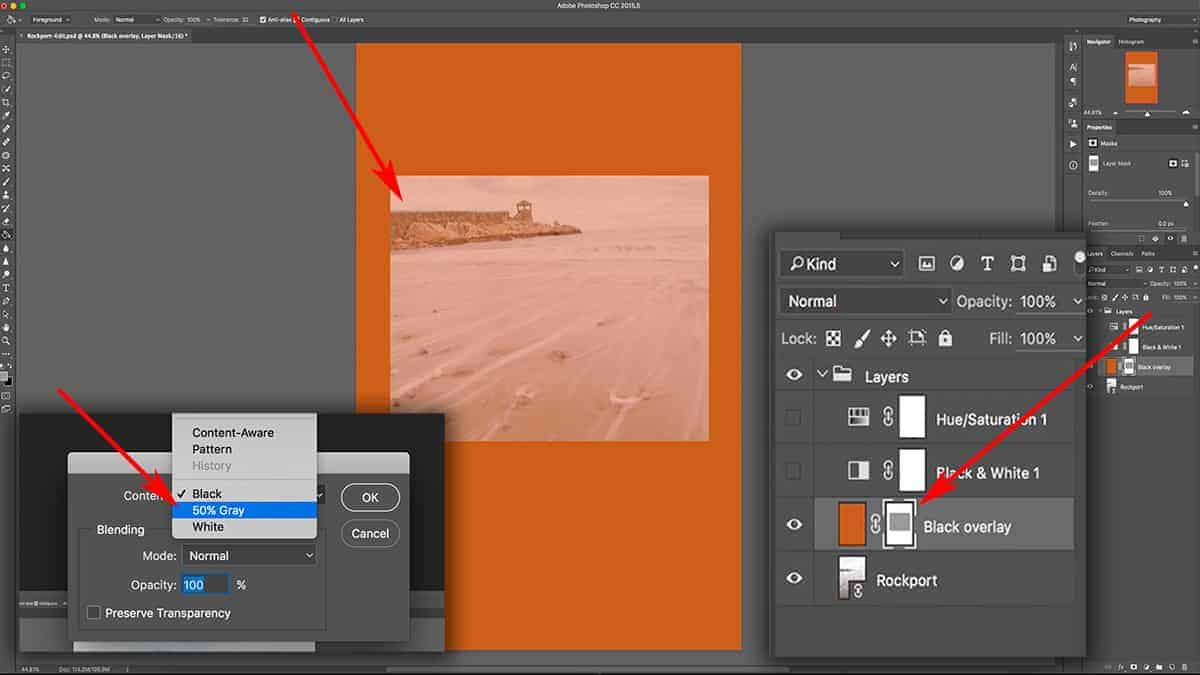
This will fill that rectangle with 50% grey…and since your layer mask is selected in the layers palette, it will apply this fill directly to the mask itself. If you look at the layer mask thumbnail, you can see the grey box has been added.
With this 50% grey box on our layer mask, we can now see the photo underneath…but it’s not at full opacity. This is in direct relation to the shade of grey we added to the mask. Since we added 50% grey, we can only see 50% of the underlying layer.
In other words, the layer we applied this layer mask to is now only 50% visible just where we added the grey to…which allows us to see whatever is underneath this layer.
Displaying a Layer Mask
When working with masks, it’s very difficult to see what your mask actually looks like just by the thumbnail. In order to accurately customize a mask to the unique content of your image, you’ll often need to reference your actual mask.
To bring up a layer mask, simply ALT + click onto the layer mask thumbnail in the layers palette. This will display the mask separate from the layer.
So now we are looking at the actual layer mask on our canvas: it’s 100% white, which means the orange fill layer is 100% visible…except for the 50% grey box that we added in the previous step which is allowing the layer underneath to be particularly visible.
Now to go back to your image and turn off this mask preview, simply ALT + click on the layer mask thumbnail again or click on any other layer in the palette.
I’m going to add one more box to the layer mask here so you can really visualize how a mask interacts with your layers.
Let’s go back to the rectangular marquee tool, and drag another rectangle onto the canvas….this time, making sure to overlap onto both the pure orange area and the partially transparent area.
Next, make sure your layer mask is selected by clicking on the thumbnail in the layers palette. A white border will appear around the layer mask when it’s correctly selected, indicating that anything you do will only affect the mask and not the layer itself.
Next, go up to Edit > Fill and choose Black as your Content color, and click OK.
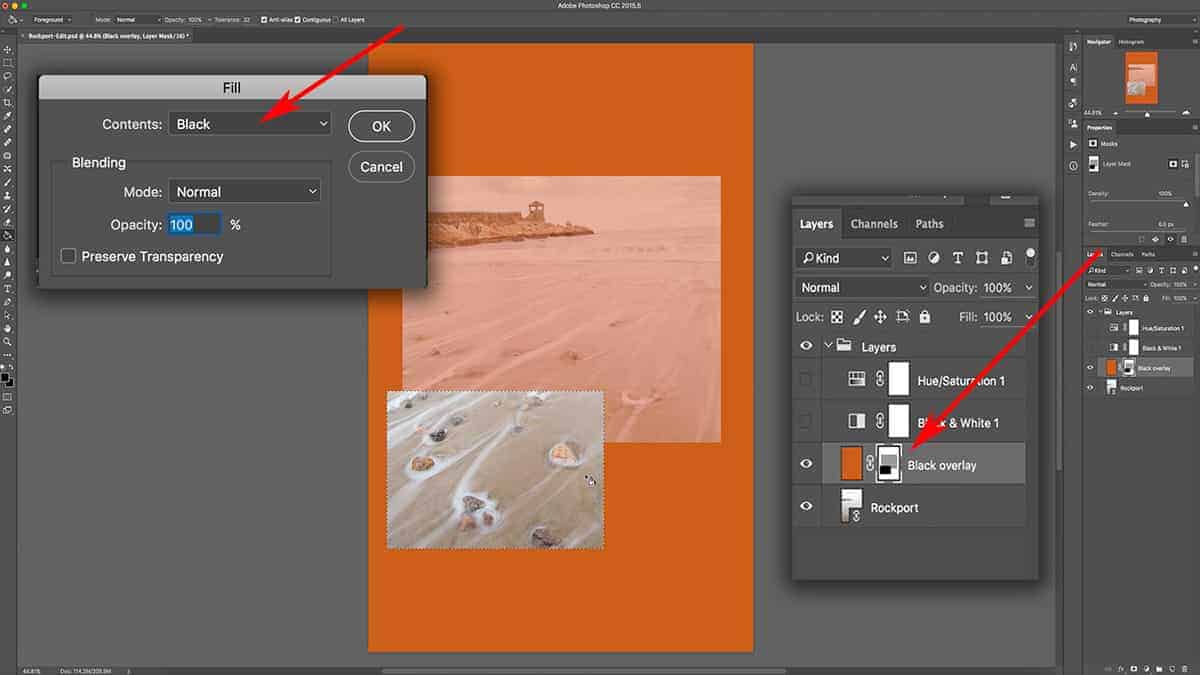
What we’ve done here is add pure black to the layer mask inside of this rectangle, which will render your layer 100% transparent…allowing any layers underneath to be seen at full opacity.
Let’s take a quick look at the mask itself.
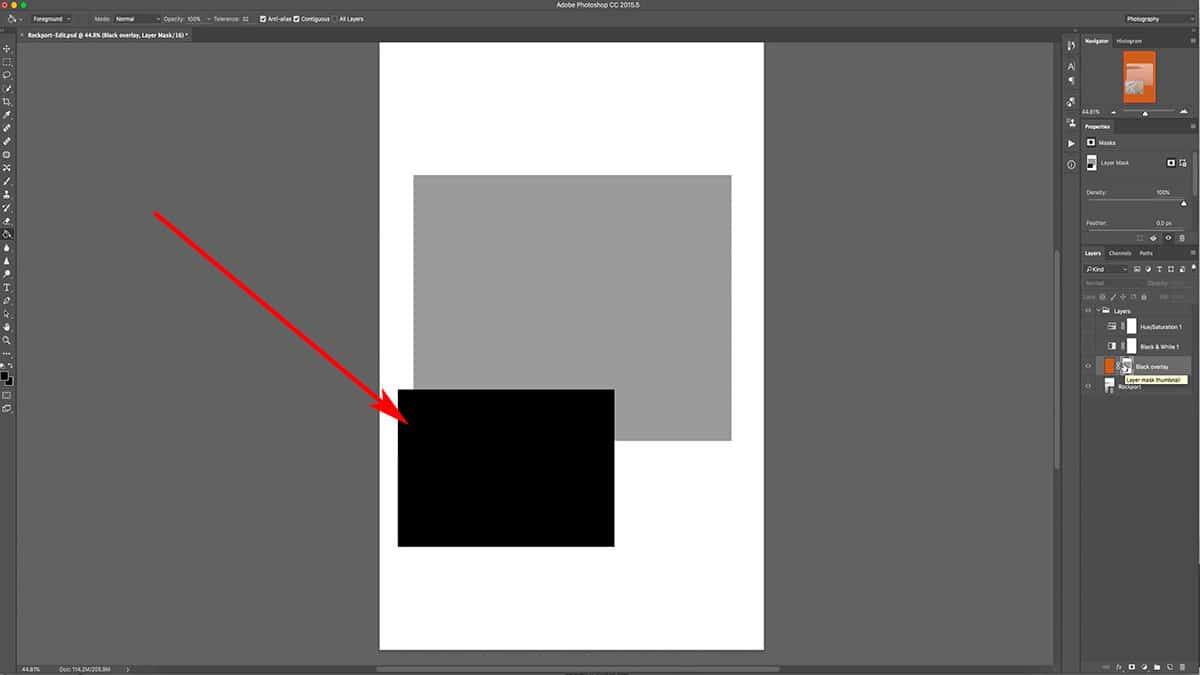
We have the background at 100% white, which renders your layer at 100% opacity…
then we have the 50% grey box we added a few steps back, which reduces the opacity of your layer to 50% (and will correlate to whatever percentage value of grey you choose)…
and finally, we have the pure black box which is like adding a temporary hole to your layer, allowing any content underneath to be seen at full opacity.
Now the real reason we use layer masks is that they are completely reversible. If you were to try and replicate this with your actual layer, you would have to delete the actual content…which is a permanent change. So by using a layer mask instead, you can retain a non-destructive workflow that is so crucial to image processing.
Why do Layer Masks Matter?
So at this point, you may be wondering: why would I ever want to cut holes in my layer like this? What’s the point of using masks at all?
I understand if it’s difficult to see the actual benefits of using layer masks in your workflow.
Most likely, you’ll never want to actually add rectangles like this to your image; this isn’t a “real world” way to actually use layer masks, especially for landscape photographers. I simply wanted to demonstrate the power of layer masks and this is the best way to visualize how they work. Trust me: you’ll definitely be using layer masks when working with multiple layers in Photoshop. As you’ll soon learn, layer masks are essential (not optional) when using more advanced processing techniques…such as exposure blending, luminosity masks, dodging and burning, and so on.
How photographers actually use layer masks is quite different than what I’ve demonstrated in this tutorial. Going back to the beginning of this lesson when I added that saturation increase: remember how overly saturated that red rock was? By adding a layer mask to that saturation adjustment layer…I can take my brush tool, load it with a shade of grey, and brush over just that rock to reduce the opacity (or the strength) of that saturation.
So the layer mask allows me to pinpoint exactly how transparent – or strong – an adjustment is without affecting other areas of my photo. It’s very powerful, and we’ve barely scratched the surface. We’ll go over how to use the brush tool with layer masks in the next lesson.
Before that though, let’s go over a few other basics of layer masks.
Disabling a Layer Mask
To temporarily hide a layer, all you need to do is click the “eye” next to the layer thumbnail in the palette, which will also hide the layer mask since it is attached to the layer. Oftentimes, you’ll want to disable – or hide – a layer mask separately from the layer in order to see the “before and after” effects of your mask work.
Hold down the shift key and click once on the layer mask, which will temporarily hide the mask itself. You’ll notice a red X through the layer mask, telling you it is disabled. To bring it back, simply shift + click on the mask again.
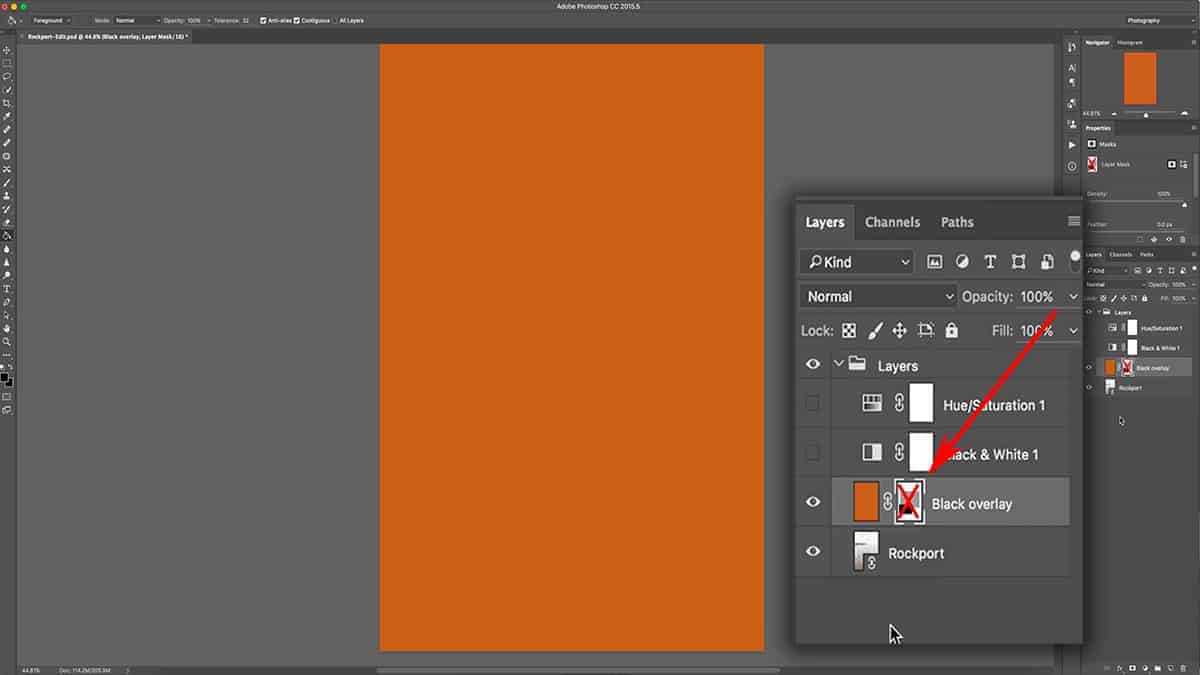
For our image here, disabling the mask brought the orange fill layer back at full opacity – as if we had no mask at all. This allows you to see your layer without any interference from the mask (in order to evaluate its effects) instead of deleting the mask itself.
Deleting a Layer Mask
Now if you want to actually delete a layer mask permanently, you can do that too. Simply click on your layer mask and hold, then drag it down to the bottom of your layers palette until you’re hoving over your trash can, and then release the mouse. This works just like deleting a layer.
You need to make sure you are clicking on the layer mask thumbnail and not the layer thumbnail. If you delete the layer, it will delete both the layer and the mask since the mask is attached.
That is going to wrap up this tutorial on the basic functions of layer masks in Photoshop. In the next tutorial, we’ll take this fundamental knowledge and see how it works in practice. We’ll use the brush tool to control the saturation level of different parts of an image.
>> Click here for the next tutorial on the brush tool <<
Don’t forget…download the free Photoshop course: Layers for Photographers.
Related Products
Related Products
-
Darkroom Foundations
$ 0.00Lightroom and Photoshop were designed to be simple programs to master, although it may not always seem like…
Add to cart -

Golden Hours eBook
$ 19.00Learn how to capture the extraordinary light of sunrises and sunsets with this free eBook. I'll show you…
Add to cart -
Photoshop Dark Processing
$ 79.00Learn how photographers create a dark, moody atmosphere in their landscapes! If you’re searching for something new, exciting,…
Add to cart