How to Autobracket for Exposure Blending
How to Autobracket for Exposure Blending
One of the most important landscape photography techniques you can learn is how to blend exposures, and that starts with autobracketing in the field the correct way. This will give you that necessary solid foundation to blend your exposures together later in Photoshop, and recreate the extraordinary scene you witnessed in person.
The more detail your brackets have, the more accurate your blend will be…which, in turn, affects the quality of your final image. You can’t conjure up an extraordinary photograph in Lightroom and Photoshop, you can only improve upon an already-great image…and that starts with your brackets.
With that in mind, I’m going to show you the step-by-step workflow for bracketing in the field so that you can capture an outstanding landscape image with a complete tonal range, like this one:

I’ll also explain how to bracket your images manually for those instances where autobracketing is too limiting for your environment.
Table of Contents
- 1. When Should I Bracket a Landscape Photograph?
- 2. Setting up the Camera for Bracketing
- 3. Setting up the Autobracketing Feature
- 4. Taking and Reviewing the Brackets
- 5. Manual Bracketing for Exposure Blending
- 6. Blending the Brackets Together in Lightroom and Photoshop
When Should I Bracket a Landscape Photograph?
As explained in the introduction to exposure blending, most landscape photographs require some degree of blending in order to accurately capture all of the detail you saw when taking it. Bracketing refers to the actual process of capturing those different shutter speeds in a quick and accurate way.
Deciding when to bracket your landscape entirely depends on:
- The dynamic capability of your camera sensor: how well it can handle blown-out highlights, and what is your acceptable level of quality from recovering that detail hidden away in the raw file?
- The dynamic range of your landscape: is the range of light outside of your acceptable level of quality?
- The content of your photograph: how easy will it be to capture different shutter speeds in the field, and then blend them together in Photoshop?
#1: The Dynamic Capability of Your Sensor
As explained in this article here, you’re still going to get the best possible detail and color from a raw file taken at a different shutter speed in the field vs. artificially recovering that detail in Lightroom or Photoshop – even if you’re recovering in raw format.
But sometimes, that difference is minuscule and not noticeable to the untrained eye, so it may be easier to simply take one raw file and brighten the shadows and/or darken the highlights with your local adjustment tools.
How wide this range is of “unnoticeable” difference in quality will vary depending on the camera sensor. Obviously, newer and higher-end cameras will perform better, thus reducing how often you’ll have to bracket a landscape in order to capture all of the detail.
This is an issue with camera manufacturers who tote a “14-stop dynamic range sensor”. Yes, you CAN adjust a single raw file within that 14-stop range, but it doesn’t mean you should. The quality of highlights and shadows will always be better when you actually take that image at a different shutter speed in the field as opposed to artificially adjusting a raw file in Lightroom/ACR.
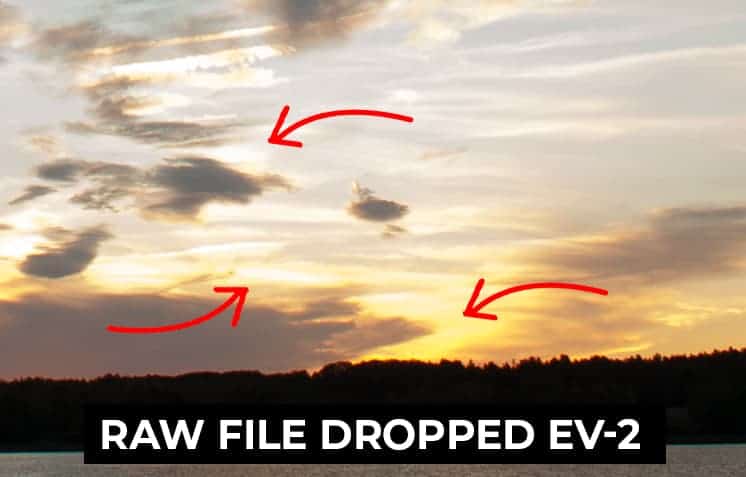

In the example above, you can see that the bracket not only has more local contrast and texture in the sunlit clouds, but the color hue and purity are also more accurate in the bracket compared to the raw file adjusted in ACR.
There is just no comparison, and the quality difference becomes exponentially more noticeable the more you adjust the exposure in post-processing.
How Much Detail Can my Camera Sensor Actually Recover?
You can perform your own tests to see how many stops you can accurately recover highlights by:
- Photograph a sunrise/sunset at the base exposure (evaluative metering).
- Then photograph the same scene with a faster shutter speed (darker) in one-stop increments.
- Import all your images into Lightroom, drop your base exposure by one full stop, and compare the highlight detail to the actual image that was taken one-stop faster.
- Repeat step 3 for the remaining images until the quality difference between your base exposure and your bracket is unacceptable.
After this test, you will generally know your “buffer zone” in the field and can more quickly decide whether or not bracketing will noticeably improve the quality of your final image.
Exposing to the Right (ETTR)
I’m only discussing highlight recovery performance here because when you’re photographing a dynamic range that is outside the capability of a single raw file, you want to expose for the shadows.
In other words, if you’re working with a single raw file, you want your base exposure to be a bit brighter than your evaluative metering so that your shadows are brightened up natively (which, in turn, will expose your highlights even more).
Here’s the issue…
When your shadows are underexposed and you recover them artificially in Lightroom or Photoshop ACR, that typically gives you a lot of noise, aberration, blotchy colors, and otherwise very poor results.
The example below is a close-up of deep shadows in the water. You can see how much more noise is added to the image when the exposure is brought up two full stops in Lightroom compared to the bracket that was taken two stops slower in the field.
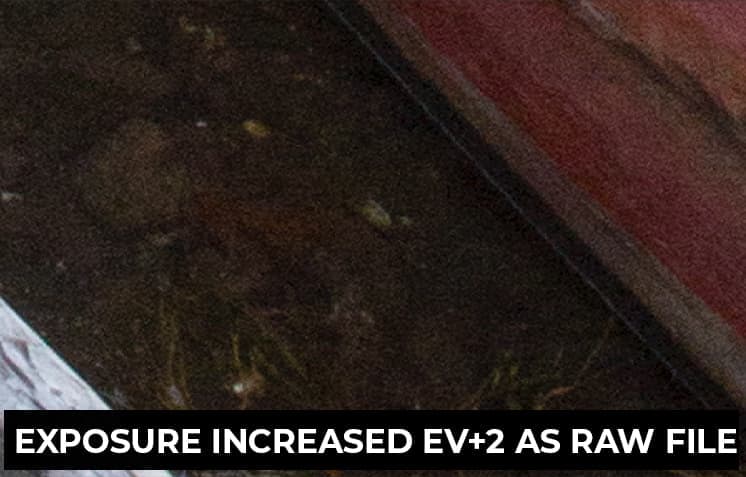

However, camera sensors tend to perform better at recovering blown highlights, so that gives you a bit of leeway when trying to bring back detail in a single raw file. This concept is referred to as “Exposing to the right”, or ETTR.
When working with a single raw file that has a dynamic range outside of your sensor’s capability, it’s ideal to increase your exposure time by a stop or two over what the evaluative exposure is for that scene in order to capture more detail in your shadows (if needed).
You can then bring your highlights back down in post-processing, which will result in a higher-quality image than trying to bring up those shadows.
While the first image below may appear to be the “ideal” exposure for this scene based on the histogram and also what you can see visually, you should actually be aiming for the second, brighter exposure (taken one-stop longer). This will give you cleaner shadow detail, more accurate colors, and an overall higher-quality final image.
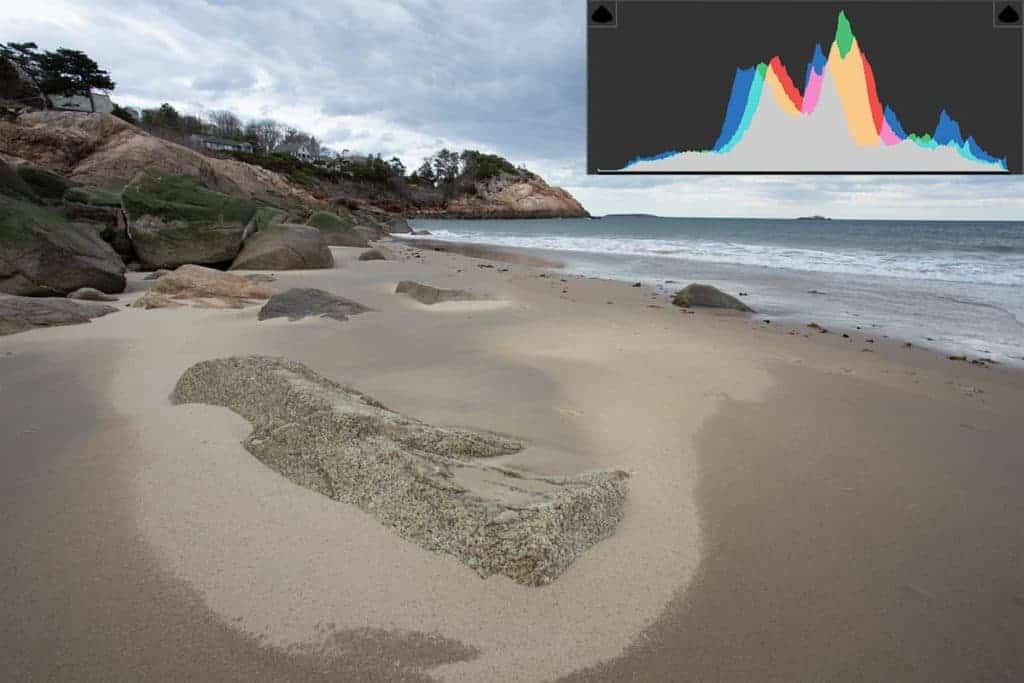
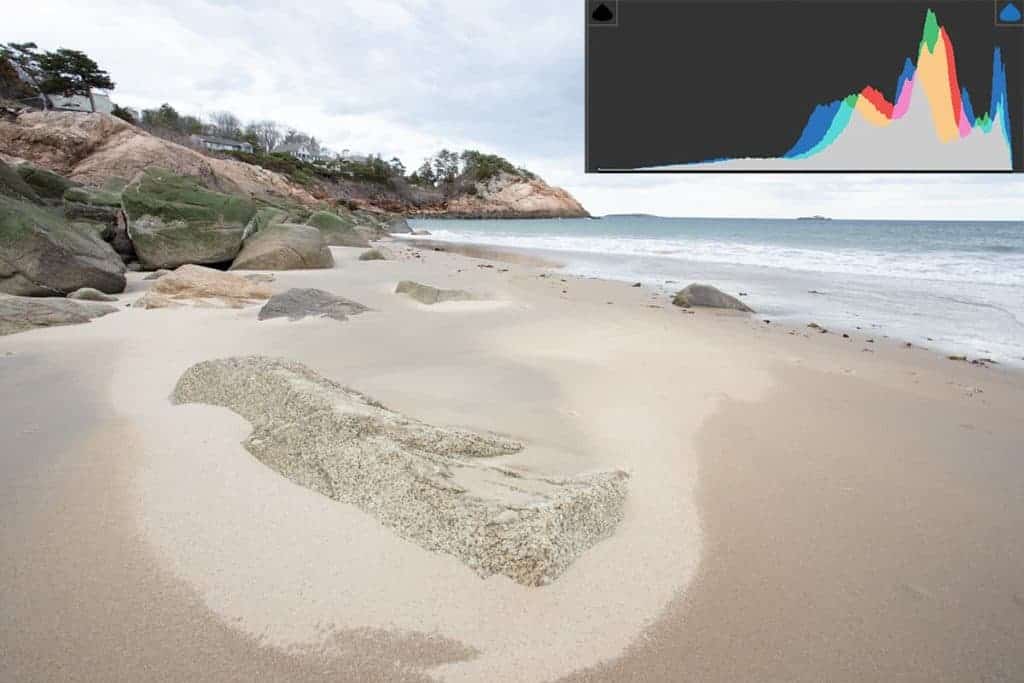
Modern cameras make this process easy by simply adjusting your exposure compensation by a stop over whatever your base, evaluative metering is. That way, you don’t need to perform any calculations in the field as your camera will automatically adjust the shutter speed for you.
#2: The Dynamic Range of Your Landscape
There is a difference between the actual recovery capabilities of your camera sensor and what YOU consider to be an acceptable level of image quality. This will entirely depend on your personal taste and your creative goals.
For example: If your photography is mainly for sharing on social media or “just for fun”, then you may have more leeway in the quality of your detail, and thus less likely to go through the added effort of bracketing…perhaps saving it for only scenes with a very large dynamic range.
However, if you take your portfolio seriously and often print in a large-scale format, then you are more likely to autobracket and blend a landscape…even if the dynamic range that is only marginally outside the capability of your sensor.
While the choice is yours entirely, I want to make sure that you are aware that the “acceptable” level of quality is entirely up to you.
Personally, I almost always go through the effort of bracketing and blending, even if the difference is entirely unnoticeable. I get great satisfaction knowing that the photograph I am creating is of the highest quality possible.
Use Exposure Compensation for a Rough Exposure Estimate
A quick way to evaluate a landscape to see whether or not you MIGHT need to bracket is to use your live view and exposure compensation feature. If you don’t have live view capabilities, you can just take a photo and review it.
The first step is to switch into aperture priority mode and meter your landscape by pre-focusing. When looking at your live view, you may see tones bunched up on either side of your in-camera histogram. This is a sign that you may need to bracket in order to pull in more detail.
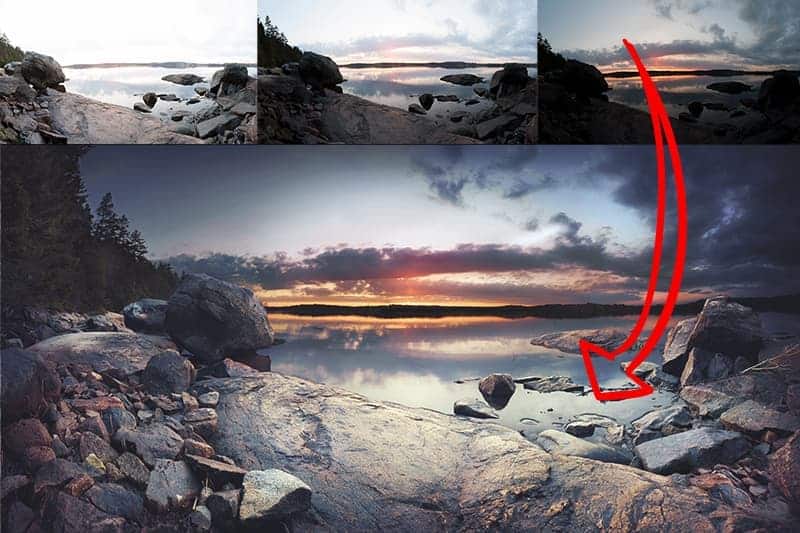
In the example below, the first image (your base evaluative exposure) shows that the highlights are quite overexposed. This is confirmed in the histogram in the bottom-left corner…telling me I should consider bracketing to recover that great sky detail that I see in person.
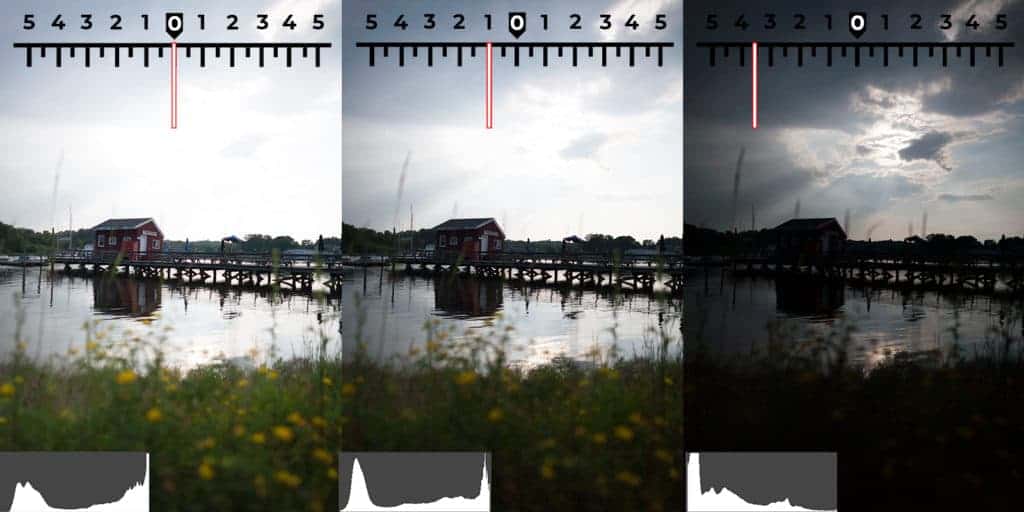
Next, use your exposure compensation feature to either increase or decrease the current exposure until all detail within that tonal group has been recovered.
In the middle image above, I adjusted my exposure compensation down by one full stop to reduce the amount of light hitting the sensor. After reviewing the detail and the histogram, I decided this was not enough to recover the highlight properly.
I kept reducing my exposure until all highlights were recovered, keeping an eye on my histogram to confirm when the tones move away from the histogram wall. If your camera has clipped pixel indicators, turn those on to help guide your exposure compensation.
Once your detail has been recovered fully, see how many stop you’ve compensated your exposure by. If it’s more than 1 full stop, then you probably need to bracket that scene. For the last image above, I had to reduce my exposure by 3.5 stops until all that excellent cloud detail and light was pulled back into the photograph.
This scene definitely needs to be bracketed as the dynamic range is far too large to be properly contained in a single raw file.
#3: The Content of the Landscape
This qualification will be easier to determine once you become more comfortable with bracketing and blending Photoshop…
But sometimes, the content of your landscape may make it too difficult to blend your brackets together.
If you have moving subjects between each frame that cross the threshold over where you want to blend exposures, the level of ghosting may be outside of your current Photoshop capabilities.
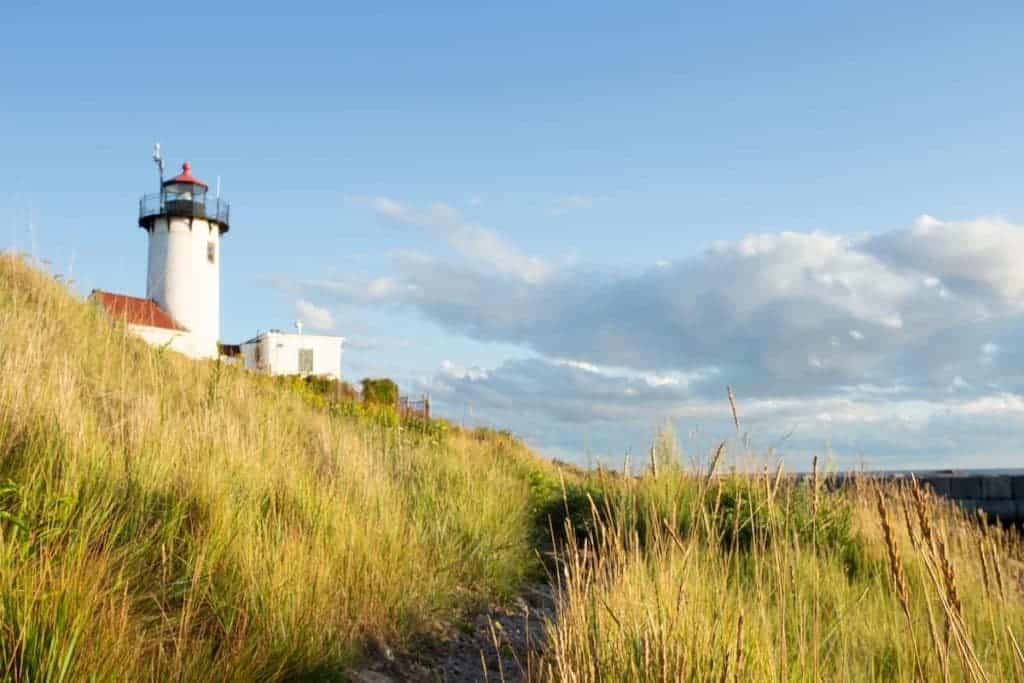
For example, grass and trees blowing in the wind against the sky can be quite challenging to mask around manually, so it may be a better idea to simply capture one frame (exposed to the right) and deal with the chip in image quality.
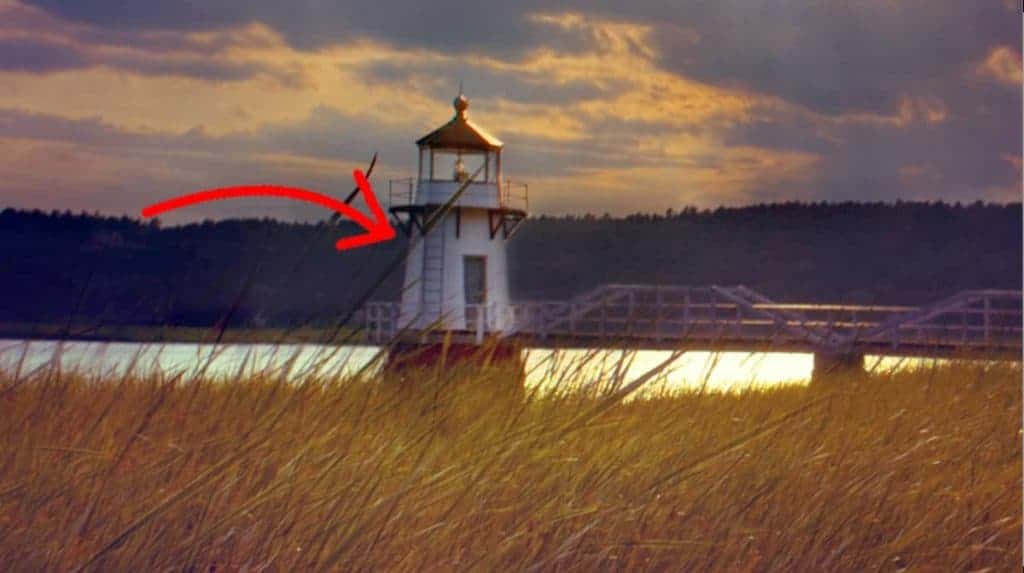
In the image above, you can see that the foreground grass covering the lighthouse, which was of a different exposure, is semi-transparent and quite distracting. While this is a fixable issue in Photoshop, I should have lifted my camera higher in the field so that the grass did not cross that threshold…allowing me to blend both frames together without issue.
Alternatively, you can increase your ISO to bump up that shutter speed to freeze any movement, while maintaining your current light level. While you typically want to keep your ISO as low as possible to avoid digital noise, sometimes it’s worth a bit of noise if it means you’ll have a better time blending your brackets together in Photoshop.
It all depends on your level of Photoshop literacy. These challenges can be an easy fix if you know the proper workflow to correct them, which will give you more time in the field to capture the exact perspective and composition you want.
The more confident and competent you are with the digital darkroom, the more possibilities open up for your photography – both in the field and on the computer.
This issue comes up often with long exposures. Sometimes, there may be a good amount of time between each frame…and if enough time passes, your subjects may move around and make your blending a bit more difficult.
Misaligned brackets are also quite common with exposure blending. Even if you take every possible precaution to stabilize your mount…a strong gust of wind may come along, or you may inadvertently bump into your tripod.
Unintentional camera movement will happen…and once those brackets move out of place, that makes the blending process more challenging. Again, this is completely fixable in Photoshop, so deciding whether or not to bracket is (almost) entirely subjective to how comfortable you are with the blending process.
And sometimes, you simply don’t have enough time to set up your camera for bracketing! Landscape photography is ever-changing, and that change can happen quickly. If you’re racing the fading light, it’s best to capture the scene before it disappears….and then, if you still have time, bracket what you see.
My Recommendation
Personally, I would always try to bracket your landscape if time allows since it’s much better to have that extra detail in those additional frames than to not have them at all. You’ll never get the chance to photograph this scene again, so why waste the opportunity?
If you decide that the blending process is too challenging once you come back home, you still have your base exposure to work from. And as your Photoshop skills advance, you’ll be grateful to have the brackets once you are knowledgeable enough to overcome the blending challenges.
I’ve helped many students in my Darkroom for Landscapes program blend brackets that they took years ago, but never knew how. Going through the extra effort to bracket in the field was a great investment for them as they can now go back and create the images they were hoping to.
Even if you don’t think you need to bracket, I suggest doing it anyways (if time allows) just to have that data if you require it. Sometimes, you may need to exposure blend only a very small portion of your scene…such as reflections in the water, clouds surrounding the immediate area around the sun, or deep shadows in crevices of rocks. This is usually unnoticeable on such a small LCD screen, and your in-camera histogram may not appear to show any clipped detail.
And as explained here, even if there is no clipped detail in your image, it can still benefit from bracketing to give you more leeway when adjusting your highlights and shadows.
Why Not Just Use a GND filter?
At first glance, it would seem that using a GND filter in the field is a much easier way to overcome the limitations of your camera sensor. While this filter can be helpful, rarely does it give you the same level of quality and accuracy as bracketing and blending. This is explained fully here.
Setting up the Camera for Bracketing
1. The Tripod
Now that you’ve decided to bracket, let’s go over the typical workflow for setting your camera up.
It’s very important that you have a sturdy tripod – one that’s capable of withstanding the weight of your camera, lens, and your tripod head. Solid legs with a good grip are imperative to not only hold your camera in place, but to make sure it stays there when you change your settings, adjust your focus, or if a strong wind comes along.
Even the slightest movement can alter your alignment, making it more difficult to exposure blend in Photoshop…so always check (and double-check) that all your knobs and levers are tight and secure. I can’ tell you know many brackets have been misaligned due to the camera slowly sagging because my tripod head knobs were not locked into place!
Make sure you go through your typical workflow for securing your mount as if you were setting up for a long exposure: lock your mirror if your camera is not mirrorless, turn off any lens vibration reduction/image stabilization, etc.
Also note that your longest exposure for shadow recovery will often spill outside of the minimum shutter speed for sharp photos while handheld (especially since we are typically photographing with a small aperture), so a tripod is necessary for tack-sharp images as well.
2. Focus and Drive Mode
Next, place your camera on your tripod and check (again) that it’s securely fastened. Compose your frame as normally, and set your focus. Take a few test shots and zoom in on your LCD screen to confirm that your point of focus is exactly where you want it to be.
This becomes more important when working with a shallow depth of field and/or when your camera lens is close to your foreground elements.
For bracketing, I prefer to turn OFF autofocusing altogether as opposed to using back-button focus. Since I am not recomposing my frame here, I find it more secure to simply turn my focus off once it is set. This saves me an extra step in my workflow, and thus reduces the chance for human error.
The goal here is to change the amount of light that the sensor picks up (or rather, how bright or dark your photo is), and that is best achieved by changing the shutter speed.
Switch into aperture priority mode so that your camera will only change your shutter speed to alter the exposure and NOT your aperture – otherwise, you’ll have an inconsistent depth of field, making it near-impossible to exposure blend accurately.
Changing the ISO between brackets will change the amount of noise in your photo, which will look bad when blending. Refer to my guide on the exposure triangle for further reading on how shutter speed, aperture, and ISO work together to control how much light your photo has.
If autobracketing, make sure to set your drive to continuous (or burst) mode. This will ensure that as little time as possible passes between each bracket, thus reducing the chance that any movement between your frames is picked up.
And, of course, make sure you are shooting in raw format!
3. Get a Remote Cable Release
The simple act of pressing the shutter button or browsing through your camera settings can inadvertently move your camera, and cause misaligned brackets. A remote cable release separates you from the camera when you press the shutter and helps to mitigate that risk.
Alternatively, you can use your in-camera timer so that your hand is not actually touching the camera when the shutter goes off, but this delay becomes tiresome after a while.
A corded remote release is relatively inexpensive, and more reliable than a wireless remote.
Setting up Camera Autobracketing
Once your camera is mounted and ready, you can take advantage of the auto exposure bracketing feature of your camera (AEB) to capture your sequential frames.
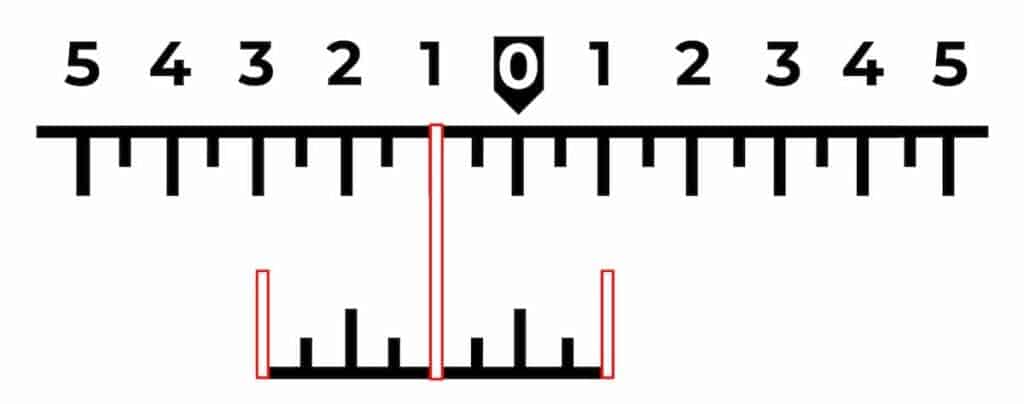
Follow the instructions in your camera manual to enable your autobracketing feature. This is usually a simple process with a few menu clicks to bring up a menu looking similar to the graphic below.
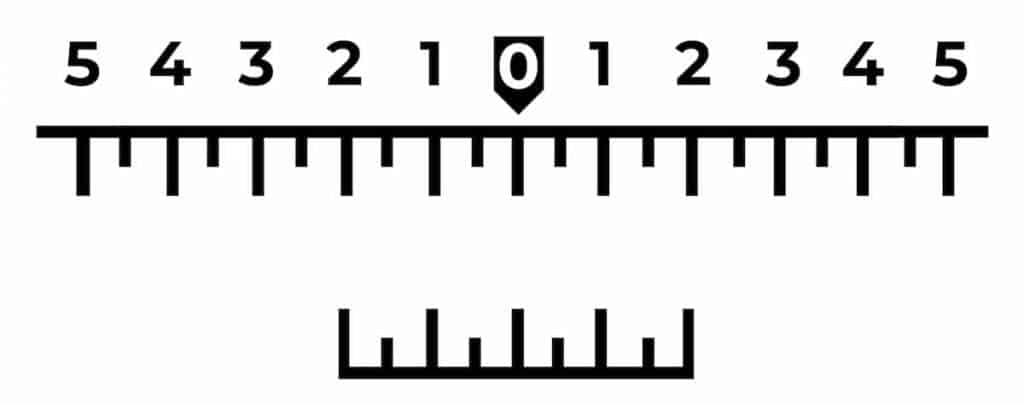
The numbers in the top scale represent full-stop adjustments to exposure, and the smaller lines represent half-stop adjustments. The bottom scale represents your selected bracketing range.
“0” is your base exposure and is set at (1) whatever shutter speed the camera chooses to photograph at based on your metering, or (2) your inputted shutter speed.
Remember: you’re in aperture priority mode, so only the shutter speed changes between your brackets.
The actual value of “0” will change depending on whether your camera selects a new shutter speed or you change it manually, but it will always refer to your current settings.
The numbers to the left and right of “0” refer to how many stops faster or slower your brackets will be compared to the base exposure.
The next step here is to select the RANGE and FREQUENCY of your bracketing.
Bracketing Range and Frequency
The “range” refers to how many stops of light you want to encapsulate. In other words, how many stops are between your “bookend” brackets: the longest and shortest shutter speeds?
The “frequency” refers to how many brackets you need to capture. Most cameras allow you to choose 2, 3, 5, 7, or 9 brackets. Typically, your bracketing frequency will be between 2 and 5 frames for any given scene.
The range you choose will entirely depend on your scene, but a good starting point would be 4 full stops, which would result in three brackets taken at 2-stop increments.
When your range is more than 2 stops total, you should always capture that third middle bracket to smooth out the transition between your bookend brackets.
In the example below, I’ve selected a range of four full stops by setting my exposure bracketing at -2, 0, and +2 stops.
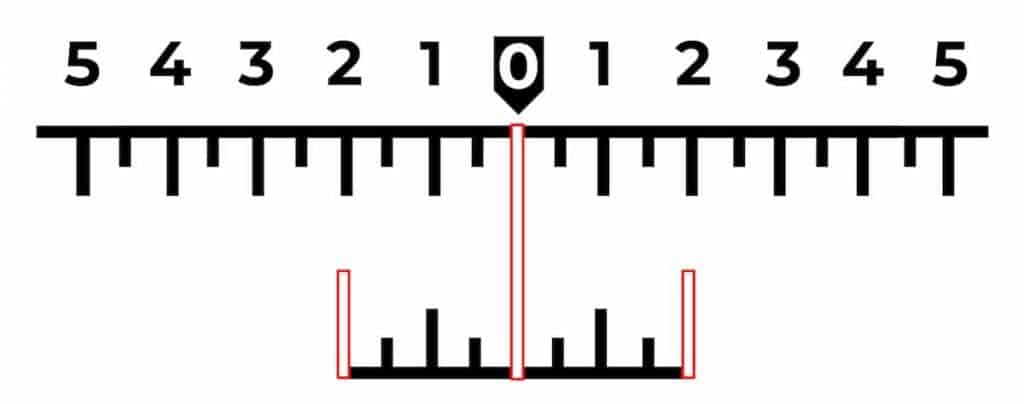
This is the ideal range and frequency to start with since:
- Most landscapes do not require more than a 4-stop dynamic range.
- You typically do not want more than 2 stops between your brackets since blending in such a difference in light can lead to harsh and unnatural results.
- The quality of detail and color in a raw file usually begins to deteriorate after adjusting it more than 2 full stops in Lightroom or Photoshop. For dynamic ranges that require more than 6 full stops (4 stops captured with your brackets PLUS a 2-stop raw adjustment limit), it would be ideal to increase the frequency and capture additional brackets.
Then you selectively blend together the best detail of each bracket as opposed to artificially extending the range beyond 4 full stops in processing.
Exposure Compensation and Autobracketing
You can also move your base exposure a certain amount of stops under or over what your metered/set exposure is, and then set your bracketing range around that new “base” exposure. This allows you to take advantage of the exposure compensation feature and maintain the same bracketing range.
Notice how the base exposure is not set at “0” anymore but is now 1 stop faster. When you enable exposure compensation, your camera will calculate the necessary shutter speed for you, based on whatever you set your exposure compensation at. This saves you that extra step in the field.
In the example above, the exposure compensation is set at -1 stops. At this setting, your camera will take your “0” base shutter speed and automatically subtract one full stop from that.
When autobracketing, this will be your new “base” exposure that your brackets will be based on. In the example above, we have three brackets taken at 2-stop intervals. With an exposure compensation of -1 stop, your brackets will now be set at -3, -1, +1 your metered/entered shutter speed instead of -2, 0, +2.
This is helpful in the field for when your entire range of brackets is under/overexposed, but you don’t want to change your settings manually again. You’ll find this feature especially helpful when the light is quickly fading!
Taking and Reviewing the Brackets
Now that you’re ready to go, it’s time to take the brackets!
With your remote shutter release, hold down the shutter button while your camera takes three consecutive images. If your drive mode is set to consecutive/burst, then you do not need to press the button three times – the camera will take all brackets and stop automatically after the final frame.
When finished, review the histogram to make sure that you have the proper tonal range to work with – meaning that it indicates you captured one image with no blown highlights and another with no blocked shadows.
Your three brackets should look similar to the results below:

Your base image – one that has been metered on evaluative to find a balance between the brightest and darkest parts of your photograph. This is your “foundation” bracket that the recovered highlights and shadows will be blended into.
Looking at the histogram, we can see that most of the pixels are bunched up around the brightest and darkest values of the frame, with very little midtone detail.

Your longest exposure – horrible for the sky, but that’s not the purpose of this bracket. Here we can see that the deepest shadows in the rocks now have some texture and contrast, and the histogram shows no signs of clipped detail.

And finally, your shortest exposure – the blown highlights in the first two photos have been eliminated and we have recovered some excellent color and cloud detail in the sky. This recovery is confirmed by the histogram.
Remember: When in the field, do NOT rely on your LCD screen to evaluate your highlights and shadows visually since that is an inaccurate way to judge your exposure. The screen is small, and the ambient light can alter how your image appears. Always let your histogram guide your exposure decisions in the field.
NOTE: The in-camera histogram is based on a JPG of the raw file, not the raw file itself. Since a JPG has a smaller dynamic range, this means that the histogram may indicate that some pixels are being clipped when they actually are not…giving you a bit of leeway with your exposure adjustments.
If you find that one of your bookend brackets is not exposed properly to capture all of the detail, you’ll need to either (1) readjust your entire bracketing range by adjusting your exposure compensation, or (2) increase the frequency to capture the missing detail.
You may also find that you’ve “overshot” your bookend brackets and the range is actually too wide, leaving large gaps between the edge of your histogram and your brightest/darkest pixels.
While this is not a big issue, it will be easier to blend brackets together that have as little difference in lightness as possible to the original base image. So if you can close that gap without sacrificing detail, it’s best to do it for a more natural transition between your brackets.
More often though, you’ll find that the bracketing range of 4 stops is not wide enough to capture all of your clipped detail.
This is especially true for high-contrast scenes with many bright highlights and deep shadows, like sunrise/sunset photographs that have the sun in the actual frame.
When photographing your landscape during the golden hours, the exposure difference between the immediate circumference around the sun and the deep shadows of your backlit subjects can easily extend beyond 4 full stops.
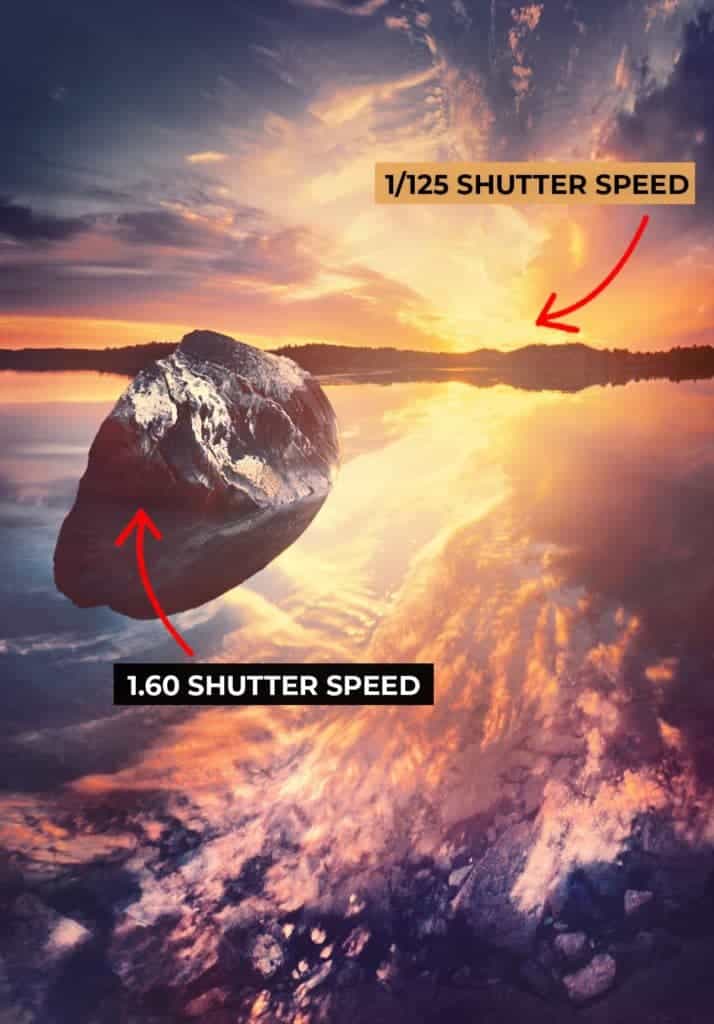
In the example below, the total range between the bracket taken to recover shadow detail in the rock and the bracket taken to bring back those clipped highlights in the sky is 8 full stops. The standard 4-stop bracketing range will certainly not give you the full dynamic range where all your shadows and highlights are recovered.
If that’s the case, then you’ll have to re-bracket your scene at a different frequency amount. Your camera manual will show you how to change the frequency.
You could, hypothetically, extend your autobracketing range beyond two stops between each frame. However, as mentioned earlier and demonstrated here, the detail begins to deteriorate once you push a raw file beyond two stops.
Ideally, you would want to blend in detail from five brackets for those extra-high dynamic ranges.
Also, your landscape photograph will appear more natural with a smoother gradation of color and luminosity when you have those extra brackets as a buffer between your shortest and longest exposure.
A better option though would be to manually bracket your scene as this gives you more control over the range and frequency of your brackets. It will actually save you time and effort since you will not have to completely re-bracket a scene if you decide that you need to extend the frequency and/or alter your range.
Manual bracketing is also an excellent choice for when you only need to recover one end of your histogram (the highlights or the shadows).
In the example below, my base image has a good exposure for the shadows and midtones, but the highlights on the lighthouse need recovery. In this instance, capturing a bracket that is exposed longer will not benefit this image in any way since my shadows are already exposed well. It’s a waste of time and memory.
Instead, I can simply take one additional bracket that is a stop or two faster to capture that clipped texture.
Manual Bracketing for Exposure Blending
Manual bracketing is quite simple to do, and is my preferred method for bracketing (even with only three brackets) since I can confirm whether or not I’ve captured enough detail as I am taking the brackets.
While autobracketing is great for familiarizing yourself with the bracketing process, you will most likely find yourself switching to manual bracketing since it is quicker and more accurate.
- Repeat steps 1 -3 above to set up your tripod and camera properly for bracketing. Do not set up the autobracketing frequency or range.
- Capture your first frame, and look at your histogram. Are there pixels bunched up on one side, or both? Are your clipping warnings going off? Are they on the cusp of being clipped? If so, change your exposure compensation by 1 or 2 stops and capture another frame.
- Repeat the same review process and keep increasing/decreasing your shutter speed until all tones have been recovered. If necessary, repeat the same process for the other end of the histogram.
Live view helps tremendously here as you can review the histogram before actually taking the image.
If you like, you can go into full manual mode and adjust your shutter speed instead of exposure compensation.
Benefits of Manual Bracketing Over Autobracketing
A great benefit to this workflow is that you’re not boxed into capturing brackets that are separated by the same amount of stops.
Perhaps you need 2.5 stops of shadow recovery and only 1 stop of highlight recovery. If you were autobracketing, you would be stuck with both highlight and shadow brackets that are 2.5 stops apart from your base exposure.
This is not only extra work for you to bring up the highlights by 1.5 stops, but such a jump in raw exposure can chip away at the quality of those highlights.
Another manual bracketing benefit is that you don’t have to guess how many brackets you actually need!
When autobracketing, you have to select how many brackets to take before you start the process. After reviewing the brackets, you may decide to change the frequency from 3 to 5 in order to capture the entire tonal range, which means that you’ll have to reset your bracketing and start over.
However, if you’re bracketing manually, all you need to do is keep adjusting your shutter speed until you no longer have any clipped detail.
I find this faster, more efficient, and more consistent since I am not wasting time fiddling around with the camera and can capture the scene I’m looking at before the conditions change…which is always a risk with landscape photography.
For me, the only time that autobracketing helps is when I need to take my brackets a quickly as possible, minimizing the time in between each frame. If there are moving subjects in my scene that cross the threshold between where I want to blend (such as blowing grass or trees that extend into the sky), then autobracketing will help save a lot of time in processing.
Blending the Brackets Together in Lightroom and Photoshop
Once you’ve captured your entire dynamic range and you’re ready to blend those brackets together, there are some important considerations that will affect the quality and simplicity of your blend.
If the content of your brackets is stationary (no movement between frames), and your brackets are relatively identical in their position…
Lightroom is an excellent choice for exposure blending. The big benefit of using Lightroom over other programs is that the resulting blended file will be an authentic raw file (DNG format). This means that the entire dynamic range of all your brackets will be fused into one photograph, as if your camera suddenly has the ability to capture the entire range of light.
This is quite powerful…and as you’ll learn in the video tutorial below, quite simple to do.
However, as I touch on in the video above, exposure blending in Lightroom is still an automated process. You’re allowing Lightroom to decide where to blend your exposures together, which can result in some serious side effects for blends that are not so straightforward…
Blotchy details, fringing, missing content, unnatural colors, and other unwanted distractions that will affect the quality of your final photograph.
For most blending situations, you would want to use Photoshop to manually blend your brackets together using layer masks.
While the workflow itself is actually quite simple, there are many tools and techniques to consider in order to accommodate the unique content of your photograph…
And if no one shows you how to use them properly, you can easily become overwhelmed and frustrated.
In The Darkroom for Landscapes program, I walk you through several beginner-to-advanced level exposure bending workflows…showing you exactly how to transform your brackets into the extraordinary scene you witnessed in the field, packed with light and color.
Probably the most important technique I show you is how to blend in a darker sky behind a jagged tree line (like along the pine trees above). This is one of the most challenging situations that photographers face, especially if your brackets are misaligned.
What’s great about the exposure blending workflows in Photoshop is that they’re not useful just for blending brackets together, but are perfect for other blending needs for landscape photography, such as:
- Focal blending
- Focus blending
- Time blending
- Composites
…or any other situation where you need to blend multiple photographs together.
And once you learn these workflows, the knowledge will pay off exponentially as you’ll open up so many doors for creating extraordinary photographs in Photoshop.
Thanks for reading! If you have any questions, please post them below and I’ll be happy to answer them.
And if you’re interested in learning more about exposure blending, make sure to take a look at The Darkroom for Landscapes training program!
Related Products
Related Products
-

Golden Hours eBook
$ 19.00Learn how to capture the extraordinary light of sunrises and sunsets with this free eBook. I'll show you…
Add to cart -
HDR Field Guide
$ 19.00A necessary part of landscape photography is to capture the full dynamic range of the natural light, which…
Add to cart -

Lightroom Cheatsheet
$ 0.00Discover how to work faster and smarter in Lightroom Classic with this simple-to-follow workflow from import to export.…
Add to cart