Why you Should Always Auto Bracket a Landscape for Exposure Blending
Why you Should Always Auto Bracket a Landscape for Exposure Blending
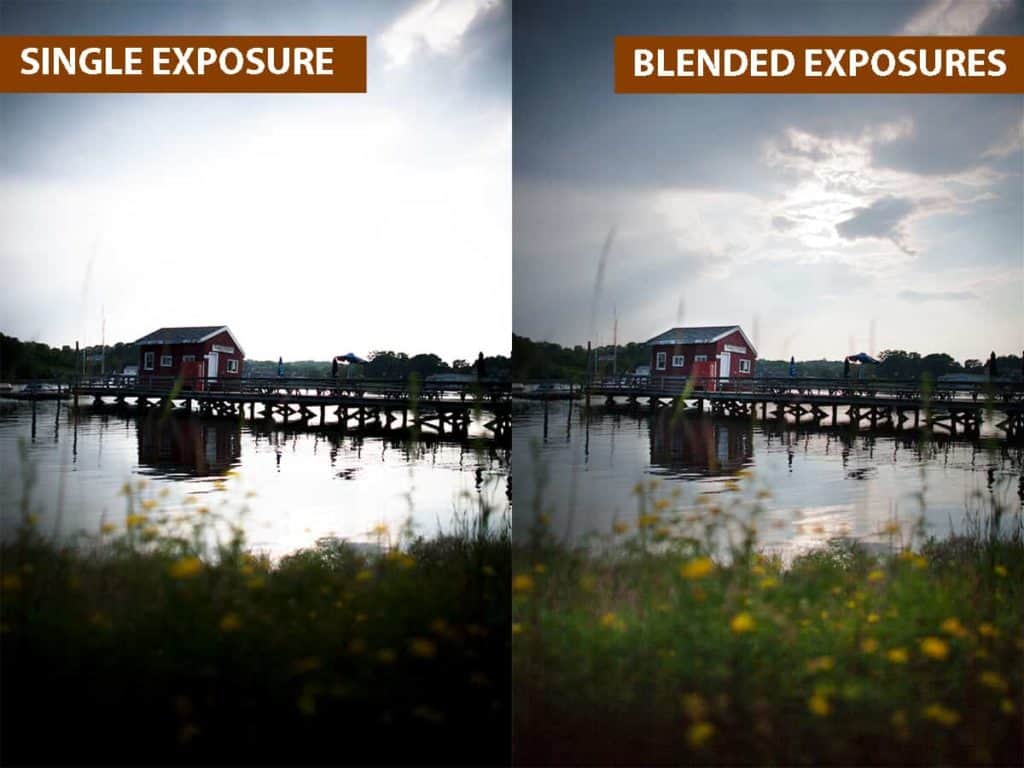
Have you ever photographed a beautiful landscape only to find that your images rarely represent the stunning scene you witnessed? Most likely, the amount of light you photographed was too much for your camera to reign in with just one shutter speed. Don’t worry though…there’s a very easy fix for this (and it doesn’t require any additional gear).
With exposure blending, you can overcome the limitations of your camera sensor and create an accurate photograph of the tones, light, and detail that you saw in the field. By simply auto bracketing your landscape (in other words, capture multiple shutter speeds of the same scene), you can create extraordinary photographs that explode with detail…instead of a washed out sky, dark and muddy shadows, or a disappointing combination of the two.
Your camera sensor (the digital equivalent to a negative) is limited to one aperture and one shutter speed across the same frame, so it’s difficult to capture a scene with a dynamic tonal range without some areas falling outside of your selected exposure, which produce blown highlights and/or crushed shadows. Since we can not manipulate the natural light, we have to rely on our camera skills to bring back all that lost detail by following these two easy steps:
1. Auto bracket your landscape in the field…firing off multiple exposures to capture the full dynamic range.
2. Blending the best parts of those brackets together in Photoshop into one final photograph.
Many photographers are familiar with this process (and if you’re not – don’t worry because I’ll be showing you this process in my full tutorial here). However, some think that auto bracketing is not a necessary step to capture the full dynamic range….and you can simply pull all of the detail out of a single raw file.
While camera sensors have definitely advanced by leaps and bounds over the years…they are still not able to capture the brightest highlights and darkest shadows of large tonal ranges in one exposure (think sunrises, sunsets, or other situations with direct sunlight). So for the highest quality landscape photographs, you still need to auto bracket your scene in the field so that you’re working with the full dynamic range of light.
In this tutorial, we’ll go over what auto bracketing is, how to capture multiple exposures in the field, and explore the incredible level of image quality when you take the time to auto bracket your landscape.
What Exactly is Auto Bracketing?
Our eyes can absorb a wider dynamic range than a camera sensor is capable of capturing, so we are often disappointed by the lack of detail in our landscape photographs. In order to capture the full tonal range of a scene that extends outside of what your sensor can render, and more accurately represent what you actually saw…you’ll need to combine different shutter speeds together.
The number of exposures you need depends on how large your tonal range is, but typically you’ll have one exposure metered for your highlights (a faster shutter speed to limit light), one for your shadows (a slower shutter speed to let more light in for the darker areas – such as your foreground), and one as your base exposure (the average metering between your highlights and shadows).
The base exposure is quite important since the detail here will help to ease the transition between your brightest and darkest areas, creating a more natural and balanced exposure blend.
This is where the term “bracketing” comes in since you’re creating a bracket that encapsulates your entire tonal range, from brightest to darkest…which will capture all of your image detail by eliminating any crushed shadows and blown highlights.
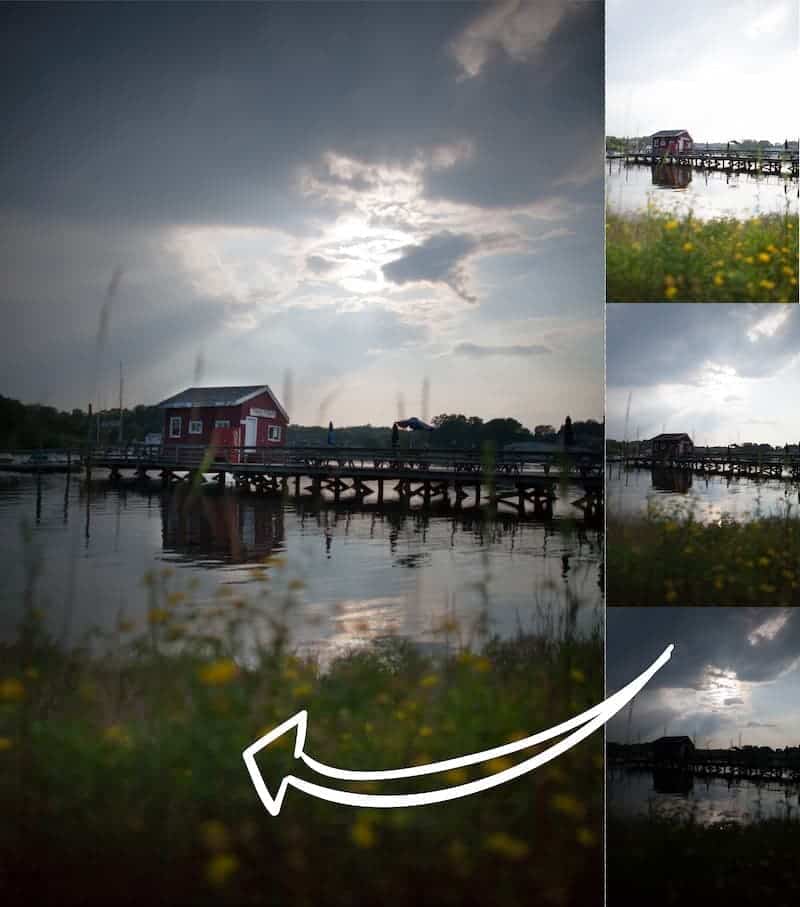
In the example above, the shadow detail from the shadow recovery bracket (top-right, EV+2) has been blended into the foreground of our base photograph (middle-right, EV 0). Additionally, the highlight detail from the highlight recovery bracket (bottom-right, EV-2) was blended into the sky of our base photograph.
The resulting exposure-blended image (left) is now completely free of clipped detail and has more vibrant, natural colors.
In the past, most camera sensors were pretty limited on how much detail they can capture in one frame…so you had to capture five brackets in increments of one-stop each. However, most newer camera models have a much wider dynamic range…which means you can get away with only photographing three brackets in increments of two full stops (as seen above).
NOTE: Exposure blending can also be referred to as “HDR blending” in the sense that we’re expanding the tonal range and creating a (H)igh (D)ynamic (R)ange photograph…however blending your brackets together manually will create a much more natural looking image instead of relying on third-party software like Photomatix to perform the blending for us. For more information on what makes a “good” and “bad” HDR landscape, see my HDR blending article here.
With exposure blending, you have much more control over the end result by manually choosing exactly where you want to blend your exposures together, and at what strength you want that blend to be. It’s a method that is entirely customizable to your scene, which will produce a more pleasing result.
The need to bracket a scene in order to capture the entire tonal range is quite common…and is why camera manufacturers have made it easy to photograph the same subject at different exposures. “Auto bracketing” is a fantastic feature available on most DSLRs, which allows you to take multiple exposures automatically without having to change your shutter speed manually. Simply tell your camera how many brackets to take and at what increments, and the camera will do the rest.
The amount of stops between each exposure can be adjusted depending on your scene, and for most situations three different exposure values (EV) capturing a four-stop range will be sufficient: your base exposure (EV +/-0), an exposure to recover blown highlights (EV -2), and another to recover any crushed shadows (EV +2).
So that is what auto bracketing is…but how exactly does this method give us a better quality image than taking a single photograph and bringing down the highlights and pumping up the shadows in the digital darkroom? Many photographers see auto bracketing as a longer road to the same destination…but like most things in photography, those shortcuts come at a price. Auto bracketing will still give you the best blending results without sacrificing quality.
In order to understand why this is true, you first must learn why raw format gives you a superior image quality.
What is Raw Format?
Your exposure blending capabilities depend greatly on the quality of your brackets; a simple image format will give you basic results. However, the more data you have to work with, the more detailed and comprehensive your results will be when you blend your brackets together. This is especially important for expansive tonal ranges which require a more robust format to capture all of your detail.
In other words, the best exposure blend begins with the strongest foundation to build your image upon..and that foundation is raw format.
A raw file is the digital equivalent of a film negative before it is printed onto paper; it’s the “raw” state of your image that you can’t really use as a photo, but all the information you need to create a photo is there. You can’t upload a raw file to your website or email it to others without special viewing software, but you can take that raw file and turn it into a universal format (such as TIFF or JPG) once you have finished with your processing.
There are many specific benefits of raw format over JPG, which I go over more thoroughly in my HDR Field Guide…but it all comes down to a higher-quality image as you are working in the pure, uncompressed state of your photograph, which is essential for exposure blending.
The Advantages of Raw Format and a Higher Bit Depth
A raw file is notable for its enormous color depth (also known as bit depth) when compared to the more universal JPG.
With a raw image, you are working with a minimum of 12-bits (usually 16), which translates to 4,096 tones for each of the three color channels (red, green, and blue). However, JPG is limited to 8-bits, which gives you only 256 tones for each channel. Technically, raw format is immensely superior to JPG as there is much more data contained for each color channel.
While 4,096 tones for each channel may seem excessive, consider this: the more data you have to work with, the easier it is to maintain color integrity. When blending different exposures together, this becomes extremely important as you may need to call on that extra data to recover your crushed shadows and blown highlights.
If you have the ability to use a more sophisticated format, it makes sense to use it as exposure blending is entirely dependent on recovering as much detail as possible.
It’s like having an insurance policy on your photographs…you may not always need it, but when you do it can be a lifesaver.
For the purpose of exposure blending, this additional data gives you an enormous advantage over JPG when adjusting your exposure, and will also reduce processing artifacts (such as pixelation/posterization and added noise) later on if you decide to process your image further after blending (such as dodging and burning or color grading).
Let’s see how the expanded color depth of raw format can benefit your processing in Photoshop…
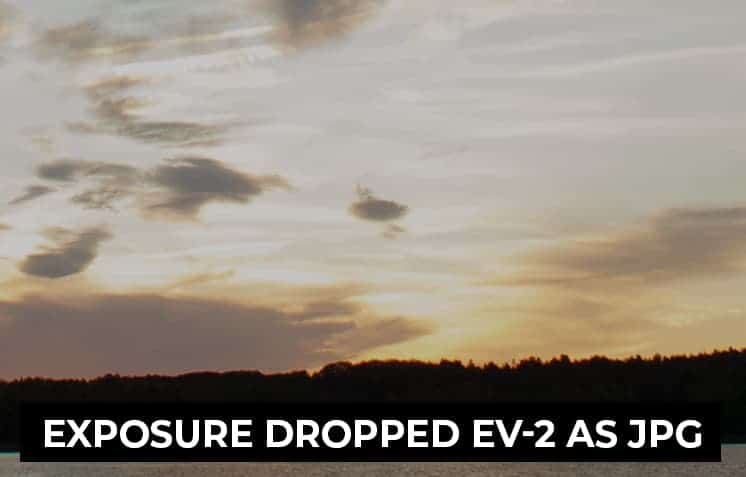
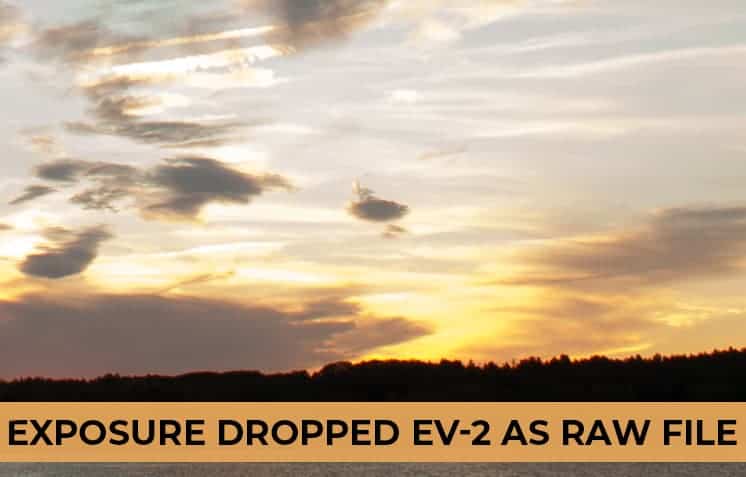
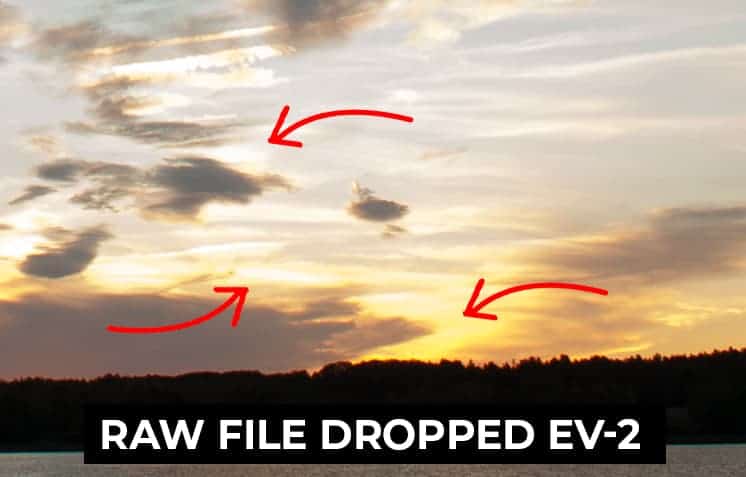
This sunset image was originally overexposed for the sky…and as a result, important cloud detail was lost to blown highlights. To reverse this, I need to reduce my exposure and bring back that lost sky interest.
When I work in JPG mode and reduce the exposure by two full stops (top), not much detail has been recovered since an 8-bit file has a very limited range to work with.
However, when I use a raw file of the same exact photograph (bottom), which is uncompressed, you can see how much more hidden detail is recovered when I adjust the exposure down by two full stops.
There are many other benefits to raw format, but the additional leeway in your exposure recovery is by far the most important…especially when auto bracketing for exposure blending.
Why bother auto bracketing when you can use raw format instead?
With raw being such a versatile format, why is there a need to auto bracket at all when you can simply create multiple exposures from one raw file and blend those together?
It would save time spent on setting up a tripod, taking three (or more) images, and also save on disk space. Isn’t raw a magical exposure recovery tool?
While this may seem like a promising idea….raw format does have its limitations. It’s always best to capture the optimal exposure for a scene in-camera simply because you’ll have more data in a correctly exposed image than one that has been adjusted artificially, even when it’s in raw format.
The more data that is rendered onto your sensor, the more detail your image will have. The recovery capabilities of RAW format should not be a replacement for bracketing a scene, and here we can see why.
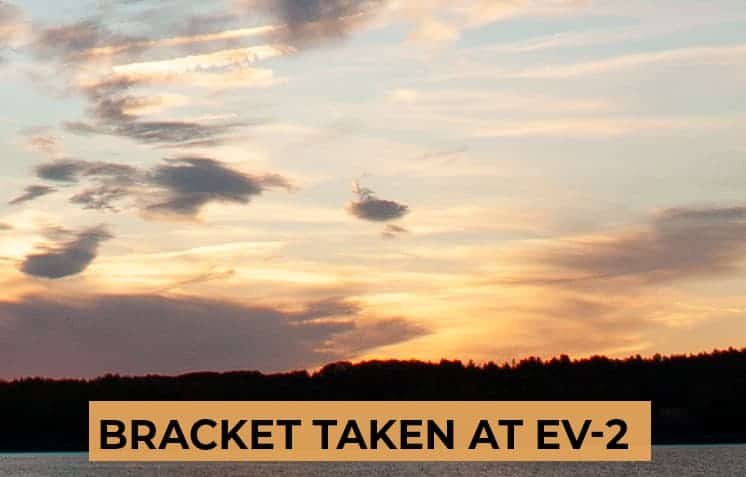
The top image is the same example used in the previous image: a raw file that has been reduced by two full stops in processing. The bottom frame is the same exact scene, but is a bracket that was captured two stops less in-camera…so no exposure adjustment was needed in ACR. When you compare the cloud detail between each example, you can see how much more data was recovered around the sun by bracketing.
So capturing an exposure that has been adjusted in the field with bracketing vs. adjusting a raw file by the same number of stops will always give you a higher quality photograph.
If it’s better to auto bracket than adjust a raw file, why not auto bracket in JPG format?
Although raw format cannot replace auto-bracketing, it’s still a file format that has many benefits over JPG and should be used when you bracket. Not only is there more data in raw format, but you’ll greatly increase your tonal range for editing beyond what you’ve set with your brackets.
If you auto bracket in JPG format, you’ll typically be taking three images: your base image, one taken two stops faster, and another two stops slower, for a total range of four stops.
One substantial benefit to bracketing a scene in raw format is that you can adjust the exposure of a raw file +/- by two full stops in ACR before the quality begins to deteriorate. So when you auto bracket a landscape with three exposures in increments of two stops…this will give you an additional four full stops of a recovery buffer (two stops for your longest bracket and two stops for your shortest bracket), which brings your tonal recovery range up to eight full stops!
So not only will you have less noise, less pixelation, and better color purity with raw format…but as an added bonus you’ll really increase your tonal range for editing in case you need it.
Should I bracket my scene if no detail is being clipped?
If bracketing provides cleaner detail and purer colors, should you bracket a scene where there is no actual damage to the detail (the pixels are not outside of the captured dynamic range)…but will require some brighter shadows/darker highlights?
Usually, yes!
Even if the detail is not actually being clipped, you usually can recover better texture, more accurate colors, and sharper, cleaner detail from a blended file vs. adjusting the highlights and shadows of the actual raw file.
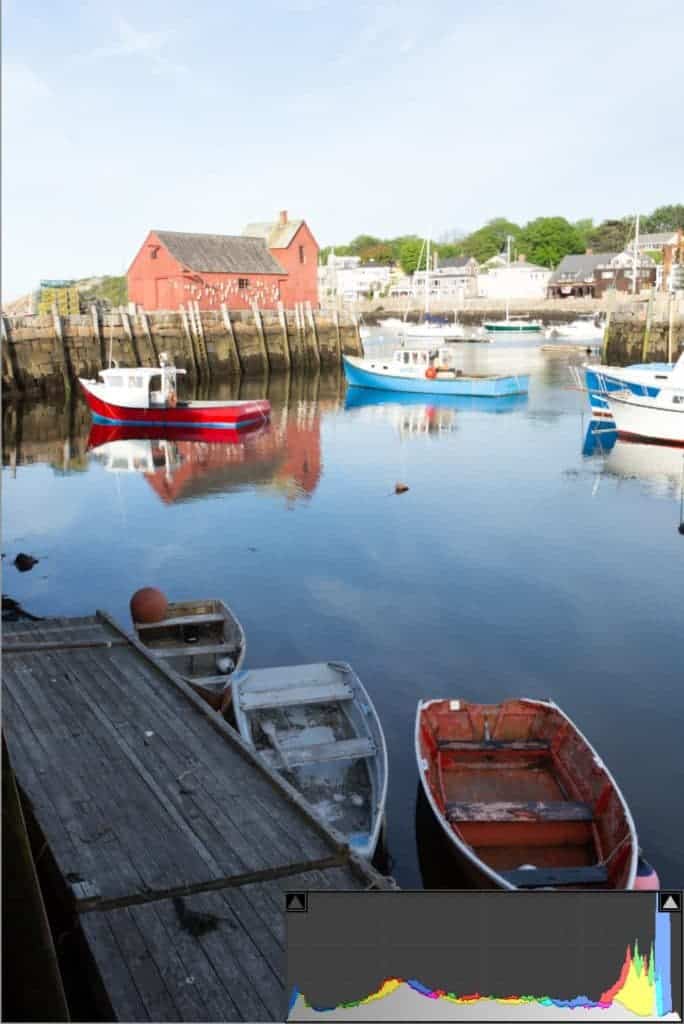
In the image below, the base exposure (EV +/-0) contains no blown highlights or crushed shadows. Almost, but the pixels are not actually touching the edge of the histogram…which means I should be able to pull that detail back into the photograph.
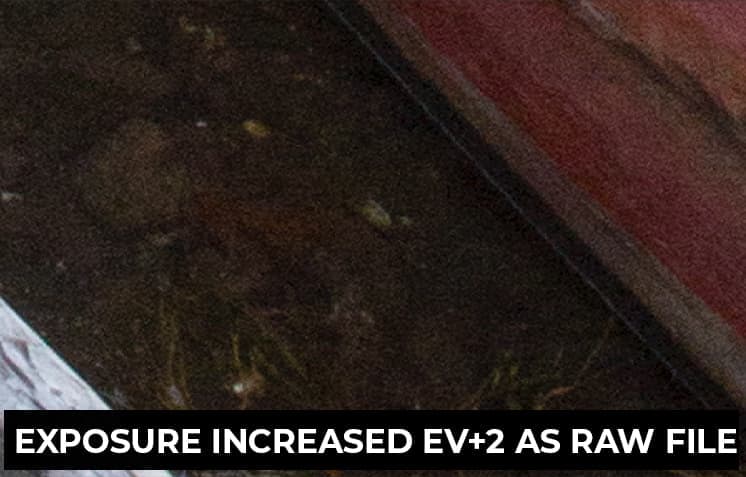
However, let’s take a closer look at the shadows in the bottom-right corner. When I increase the exposure by two full stops and compare it to an actual bracket taken two stops faster in the field, the difference is quite noticeable.

Let’s do the same test for the highlights. You can see that when we increase the base raw file by 2 stops, the highlights have less detail and more contrast than the bracket taken in the field at EV-2.
Note: When recovering detail, you actually want LESS contrast and more variation in the lightness value between your pixels. Contrast is added later in processing.
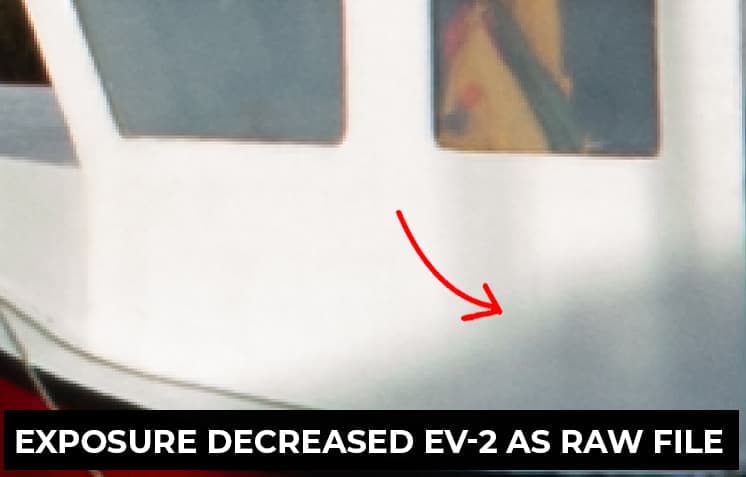

In particular, you can see that the white paint is much brighter in the adjusted raw file, and the gradient in the bottom-right corner is more blotchy with a greenish aberration than the actual bracket captured in the field.
Even though this camera has an advertised “12-stop” dynamic range, and is rated as having an 8-stop dynamic range of “high” quality….the difference in texture, color, and contrast is already apparent with only a 2-stop adjustment.
Even though it’s a marginal difference, there is one…and will only be exasperated as you push the limits to the dynamic range of your camera sensor. Ultimately, it’s up to you to decide how much detail you want to sacrifice in exchange for a simpler workflow.
Here’s the take-away…
Blending exposures using one raw file is best for those candid shots where you didn’t have enough time to set up a tripod but need to correct some blown highlights, or simply want to brighten/ darken small parts of your image – like in wedding or action photography. It’s a fantastic way to save an otherwise unusable photo.
However, if you have the time and ability to auto bracket your landscape for exposure blending…this method will always give you the highest quality output with the largest tonal range.
Exposure blending and bracketing are not just for combining bright skies with dark foregrounds; you can use it in many different ways as part of a non-destructive workflow.
You can recover blown highlights in water reflections, bring back detail lost to the shadow of a tree, or blend a brighter foreground with a darker background (like under stormy, overcast skies).
Another popular use of this technique is to blend different long exposures together – for example, blending an extended exposure that captures moving clouds with an image that shows stationary grass that would otherwise be windswept if taken at the same shutter speed as the sky. The options are endless for this incredible workflow.
Now that you know the great importance of auto bracketing for exposure blending, it’s time to go over the in-camera workflow; the process I go through to capture those bracketed images to later blend in process.
I’ve put together a free eBook that walks you through the entire bracketing process in the field. You’ll find many HDR tips in this guide that will give you extraordinary brackets for exposure blending…such as how to stabilize your camera for sharp focus, the specific gear I use to auto bracket, and of course the actual step-by-step workflow for setting up and executing your brackets.
If haven’t grabbed this guide already, you can download it right now by clicking the button below!
[fl_builder_insert_layout slug=”hdr-optin”]