Introduction to Exposure Blending for Landscape Photography
Introduction to Exposure Blending for Landscape Photography
Welcome! In this tutorial, we shall begin our journey into the wondrous world of exposure blending for landscape photography. Blending exposures in Lightroom or Photoshop is one of the most powerful ways to create an extraordinary landscape photograph, so I can’t wait to show you just how easy it can be.
Why You Need to Exposure Blend
As you’ve probably noticed, it can be very difficult to capture the full dynamic range of light in a landscape accurately (especially those with a bright sky) because your camera sensor is limited to one aperture and one shutter speed at a time. And sometimes, your photograph needs different exposure settings across the frame in order to capture all of that detail properly.
This is why that amazing sunset can appear washed out or otherwise lackluster compared to what you actually saw when taking the photo.
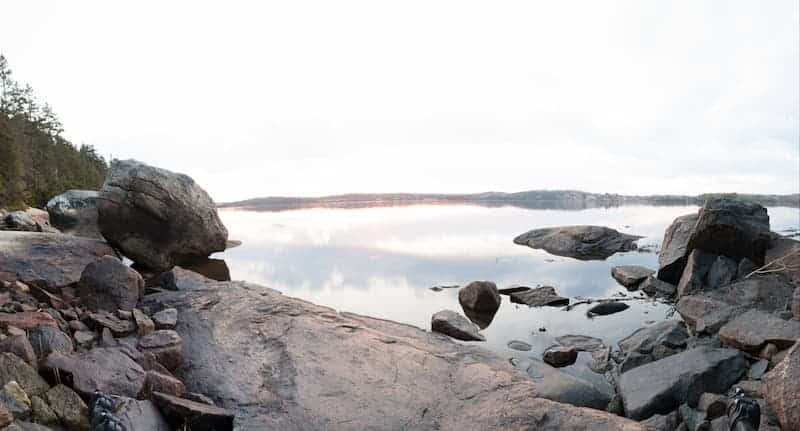
This sunset was an outstanding display of clouds and golden light, but the camera did not pick up any of it. This is because our eyes have a much larger dynamic range than the camera sensor, so we sometimes need to take extra steps in order to accurately recreate what we saw in person.
Exposure blending is NOT about creating an unnatural photograph, but rather piecing what we witnessed back together…and overcoming the limitations of the camera to produce the landscape how it was meant to be seen.
In fact, the results are identical to what can be achieved with a proper GND filter in the field, but exposure blending provides a more accurate, and higher quality image (as explained here).
How Bracketing Works
In order to have a properly exposed landscape with no areas of missing detail, you’ll need to blend multiple shutter speeds together when your dynamic range is wider than the capabilities of your camera.
At a minimum, you’ll need:
- One image exposed (metered) for the brightest tones in your photo (typically the sky). This image will appear underexposed, but the goal here is to make sure there is now blown-out detail and all of your highlights are captured fully (top-right image below).
- Another image exposed for the darkest tones (the ground, usually). This image will appear overexposed, but again…the goal here with this frame is to make sure there are no underexposed shadows (top-left image below).
This is called “bracketing” a landscape since you’re encapsulating the entire range of detail, making sure that no pixel is left outside of this range. You’ve identified the brightest and darkest pixels in your scene and have photographed them properly, essentially creating “bookends” for your dynamic range.
Once you have your two extremes, or bookends, you’ll bring them into Photoshop to cherry-pick the best parts of each bracket and blend them together using layers and masks.
The result? One perfectly exposed landscape.
Exposure blending uses the same principles of HDR photography in the sense that we’re expanding the capable dynamic range for your camera, but blending creates a more natural-looking image – and you retain full manual control over how the final blend looks.
In addition to your fastest and slowest exposures, a middle exposure that’s been metered for the entire image is sometimes needed for any middle ground elements you need to blend in.
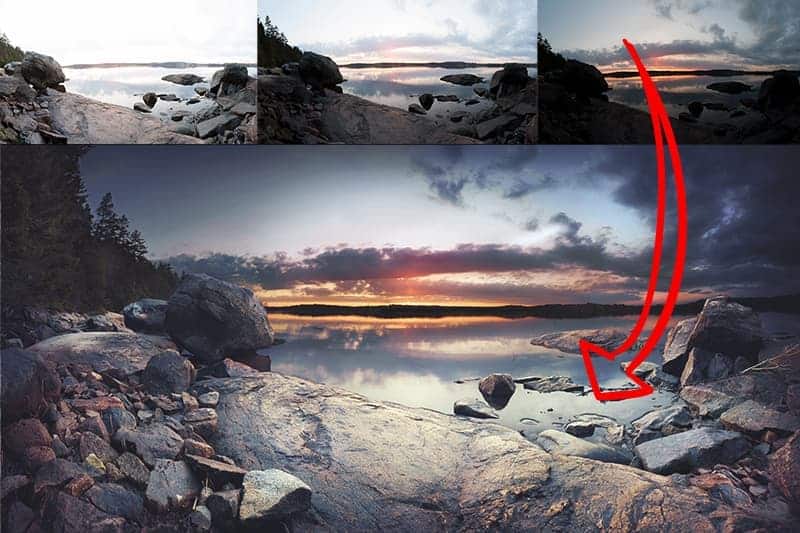
In the example above, I had a rather large dynamic range between the slowest (top left) and fastest (top right) exposures. I wanted to make sure that I captured the great detail in the water fully and accurately, which was not exposed properly in my two bookend brackets…so I also took a frame in between these two points (top middle) so. could blend in the water at the highest quality.
I then used Photoshop to combine the best detail of all three brackets to create the final image.
Are Three Brackets Always Enough for Exposure Blending?
Depending on the tonal range of your landscape, you may need to capture more than one shutter speed in between your two bookend exposures in order to ensure you have no blown highlights or underexposed shadows – it’s not uncommon to have 5 or more photos of the same scene at your disposal.
In the example above, the sun is somewhat obscured by the clouds and not particularly bright, so I only required three brackets total. However, if the setting sun was fully visible, I most likely would require an additional bracket at a very fast shutter speed in order to properly render the surrounding detail of the sun.
The range of your exposures will depend entirely on how bright your highlights are and how dark the shadows appear.
When in the field, you can check your in-camera histogram to make sure your brightest bracket (longest shutter speed) has no crushed shadows, and your darkest bracket (shortest shutter speed) contains no blown highlights.
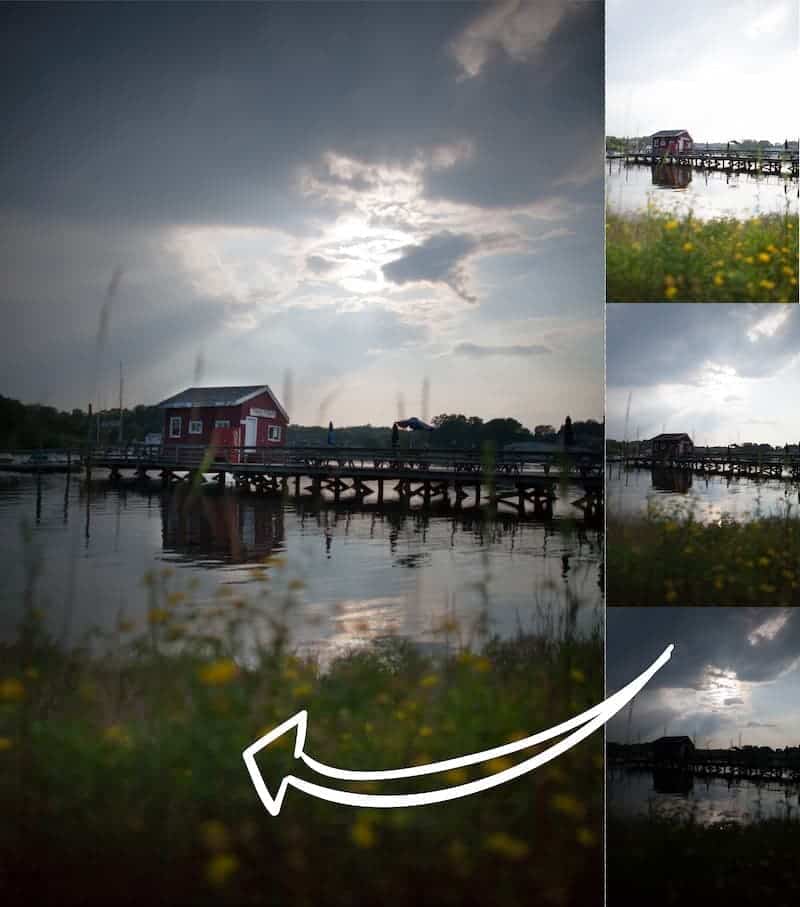
Here’s another example…
As you can see, the setting sun is quite interesting, but the dynamic range was too wide to capture all of the detail in a single exposure. The image where the foreground is exposed well (top-right) has an extremely overexposed sky, while the photo exposed for the sky (bottom-right) has the foreground in complete shadow.
Additionally, the middle ground water is either over or underexposed in both bookend brackets, so I would also need a “base” exposure to blend.
In order to get a proper exposure for the entire dynamic range of light here, I would need to combine these three brackets into one final photograph.
So we’ve now established that there’s a need for exposure blending in order to overcome the limitations of your camera. At this point, you may have a few concerns based on what you’ve heard in the photography world…
“Isn’t exposure blending and HDR fake? I don’t want my images to look unnatural…“
In short, no. Exposure blending is actually the most natural way to capture all of the detail you saw with your own eyes. Unfortunately, blending and other HDR techniques have received a bad reputation due to some photographers taking the method to the extreme. I explain this more here.
“With camera sensors advancing, why would I need to blend exposures? Couldn’t I just pull more detail out of a single raw file? Isn’t this the entire point of raw format?”
While it’s true that camera sensors have come a long way in the past 10 years, they’re still not a replacement for manual exposure blending. You will still get the highest-quality detail and color purity by bracketing in the field and combining those exposures in Photoshop or Lightroom. I dive more into this topic right here.
For the sake of this introductory to exposure blending, let’s agree that blending different shutter speeds together is the ideal way to recreate the extraordinary scene you saw in person. It’s why you chose to photograph it in the first place, right?
So, how does bracketing actually work? It’s quite simple once you learn the technique – and DSLRs have made it a lot easier with automatic exposure bracketing, or “autobracketing” for short.
Autobracketing for Landscape Photography
When you auto-bracket a landscape, your camera will capture three sequential images at different shutter speeds:
- One photo exposed normally based on the metering method you’ve chosen. This is your base exposure.
- One photo exposed for the highlights (dark enough so that your brightest pixel is rendered).
- One photo exposed for the shadows (bright enough so that the darkest pixel is rendered).
Once you tell your camera how wide you want your bracketing range to be, it will automatically adjust the shutter speed as it fires off your three brackets. This is where the term “auto-bracketing” comes from.
This allows you to capture three sequential images of different exposures without having to adjust your settings manually – very fast, and very handy.
One final note: exposure blending is not just for combining bright skies with dark grounds – you can use it in many different ways. You can recover blown highlights in water reflections, use it as a no-damage way to dodge and burn your landscapes, or perform many other editing techniques where you may need different exposures of the same subject.
Related Products
Related Products
-

Golden Hours eBook
$ 19.00Learn how to capture the extraordinary light of sunrises and sunsets with this free eBook. I'll show you…
Add to cart -
Darkroom Foundations
$ 0.00Lightroom and Photoshop were designed to be simple programs to master, although it may not always seem like…
Add to cart -
HDR Field Guide
$ 19.00A necessary part of landscape photography is to capture the full dynamic range of the natural light, which…
Add to cart