The Complete Guide to Luminosity Masks for Landscape Photography
The Complete Guide to Luminosity Masks for Landscape Photography
Luminosity masks are undoubtedly one of the most powerful (and popular) processing techniques in Photoshop, especially for landscape photographers. Being able to create completely customized selections based on the tones of your image will revolutionize your workflow.
It’s easy to see why many professional landscape photographers use these masks. They can enhance almost every technique in Photoshop: crisper detail with dodging and burning…stronger, more accurate selections with exposure blending…richer, more vibrant hues with color grading, and that’s just scratching the surface.
Unfortunately, many think that luminosity masks are difficult to use or take up too much time. It’s quite the opposite actually.
Or they tried luminosity masks in the past, hit a roadblock, and abandoned them altogether.
I see many photographers attempt to use luminosity masks on their own images, and then the problems start…muddy tones, weird color shifts, bad selections and awful pixelation. The reality is that luminosity masks are ridiculously easy (and free) to use thanks to recent technology…so there’s no better time than now to incorporate this magnificent tool into your workflow.
You just need an expert guide to show you the proper technique for using luminosity masks – and most importantly, how to plow through those roadblocks so you don’t get stuck somewhere in the process.
That’s why I created this comprehensive (yet simple to follow) guide, which is based on my many years of using luminosity masks…so you can avoid months of frustration and fumbling around in Photoshop with no clear direction. Because I’ve already done that for you 🙂
Luminosity masks are best learned when taught visually, so I’ve put together a completely FREE video course on luminosity masks, which is pulled directly from my premium membership program. This is a full-fledged course (no samples!) that covers everything you need to know about luminosity masks, completely available to watch around your own schedule.
I’m also including a handy PDF guide and practice files so you can get hands-on right away. It’s so much easier to grasp these concepts in Photoshop when you actually do it yourself as opposed to simply watching someone else do it for you. Just enter your email address below and you can get started right now!

But if you’d rather go through the written tutorial, you’ll find that below.
Table of Contents
- What Exactly are Luminosity Masks?
- Why Luminosity Masks are Better than the Brush Tool
- Luminosity Masks and the “Self-Feathering” Effect
- Creating Luminosity Masks with the TK Basic Panel
- Choosing a Highlights Luminosity Mask
- Choosing a Shadows Luminosity Mask
- Midtone Luminosity Masks
- Applying a Luminosity Mask
- How I use the TK Basic Panel
What Exactly are Luminosity Masks?
One of the biggest challenges that photographers encounter when it comes to luminosity masks is that they simply don’t know where they come from or how they work…and more importantly, how exactly they can enhance your workflow. Believe me, the benefits are outstanding…so we’ll be going with the “big picture” idea behind luminosity masks first.
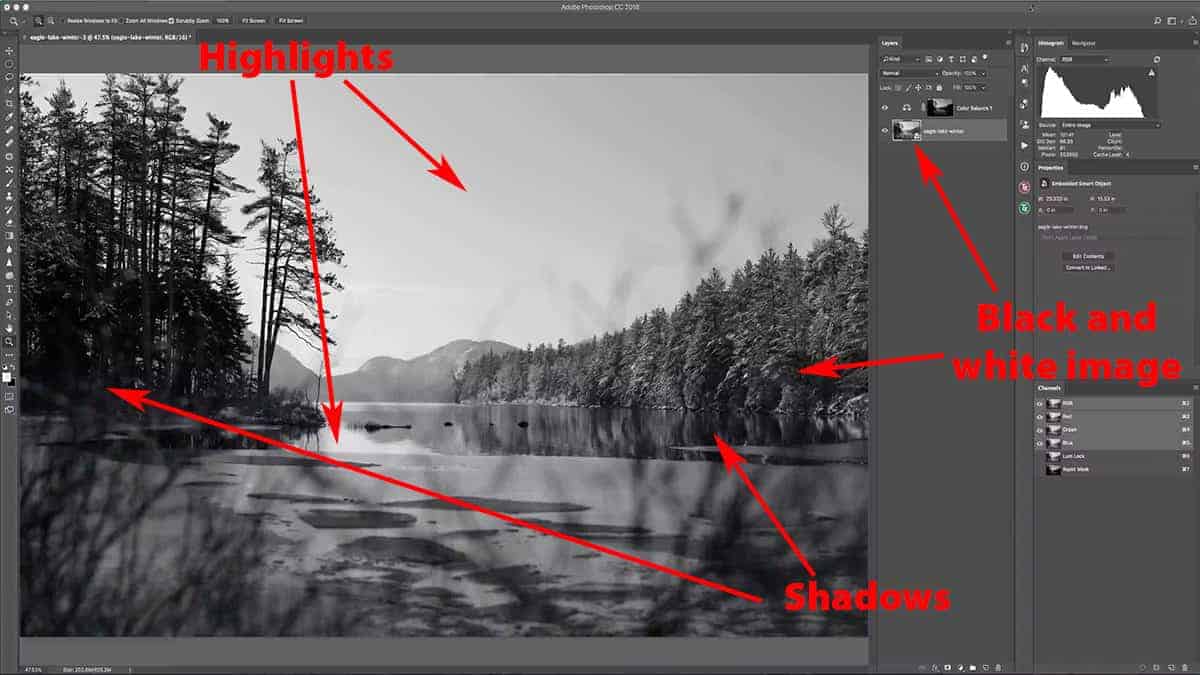
For the majority of this tutorial series, we’ll be working with the black-and-white image below.
Remember: you can download the full video lesson and this practice file by signing up for the free course above.
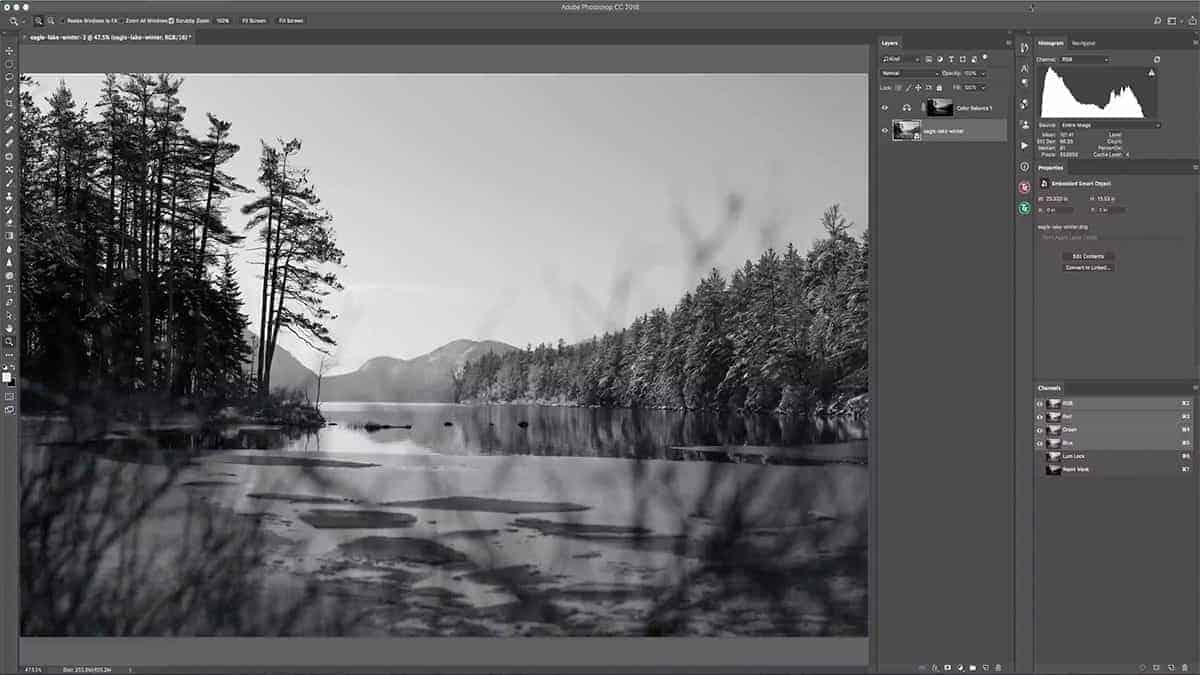
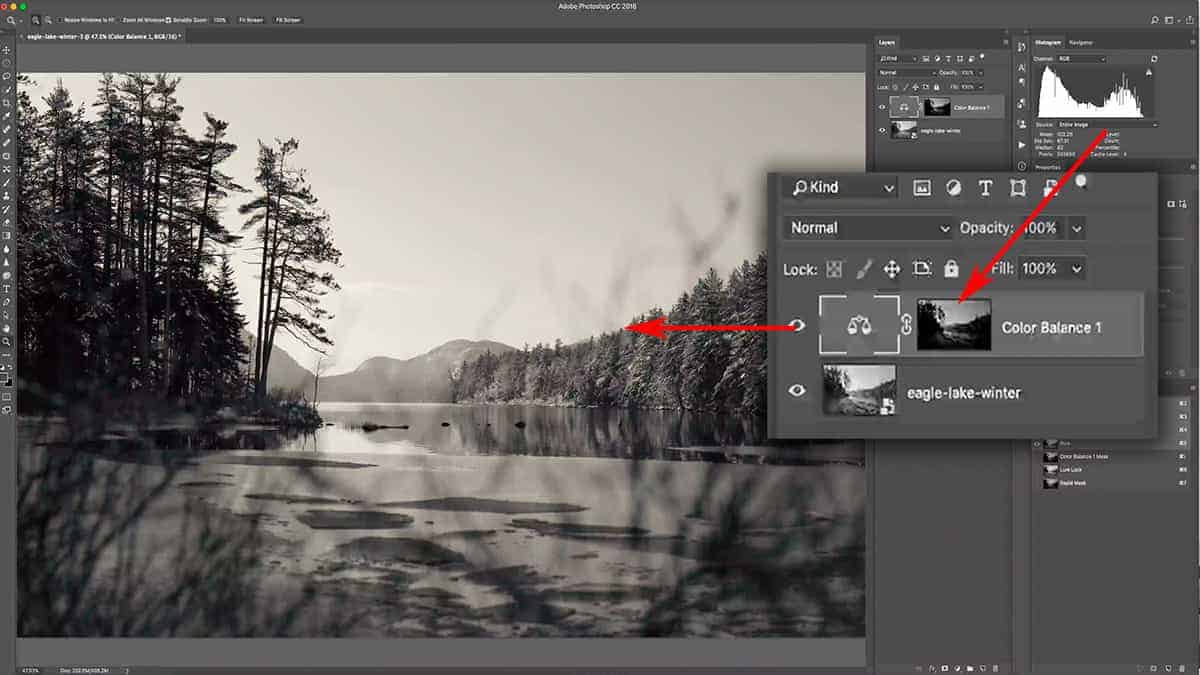
In the layers palette, you can see that I have my image layer on the bottom with an adjustment layer + luminosity mask on top. If I option + click on the layer mask thumbnail, this will bring up a luminosity mask that I’ve already generated. Don’t worry about how I created this mask now; we’ll get into that later.
This mask looks much like the black and white image itself. If you remember from the >>>>tutorial on layers, a layer mask will always be in black and white format and will dictate the transparency of the layer it’s attached to.
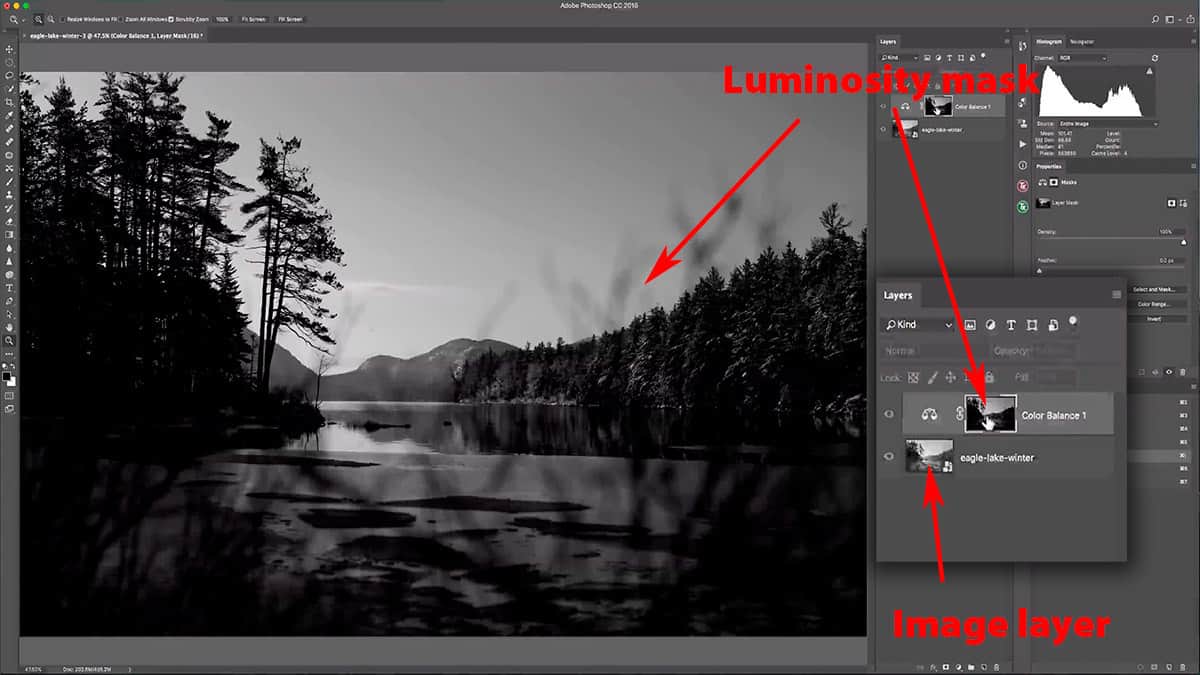
Since a luminosity mask is based on the tonal range of your image, they can look almost identical to the black and white version of your photo. If this is a bit confusing, don’t worry: it will make much more sense once I explain how a luminosity mask interacts with your image to give you highly refined adjustments.
If you understand how layer masks work to reveal or hide certain parts of your layer, then you already have about 75% of the knowledge needed to understand how luminosity masks work. They function on the same exact principles as a regular layer mask, only the results are much more refined and versatile. If you don’t know how layer masks work, I have a few lessons available which will teach you everything you need to know:
>>> How Layers Work <<<
>>> Layer Masks <<<
In the simplest terms…luminosity masks are an automated way to create a selection of very specific tonal ranges in your image, and then convert that selection into a layer mask.
In other words, you can select the different ranges of highlights and shadows of your image (or groups of similar brightness), with just a few clicks of your mouse.
Since a layer mask will conceal or reveal your layer or adjustment based on whatever you paint onto it (black conceals and white reveals)…the lighter areas of this luminosity mask here will reveal this layer more than the darker areas, which will hide whatever this layer is doing.
Screenshot is from the free video lesson on luminosity masks, which you can download by clicking here.
If we turn this luminosity mask off again and take a look at the actual black and white landscape again, you can see that we have strong highlights in the sky and some reflections in the water…and the tree line and most of the foreground is in deep shadow. This correlates closely with what the luminosity mask is controlling.
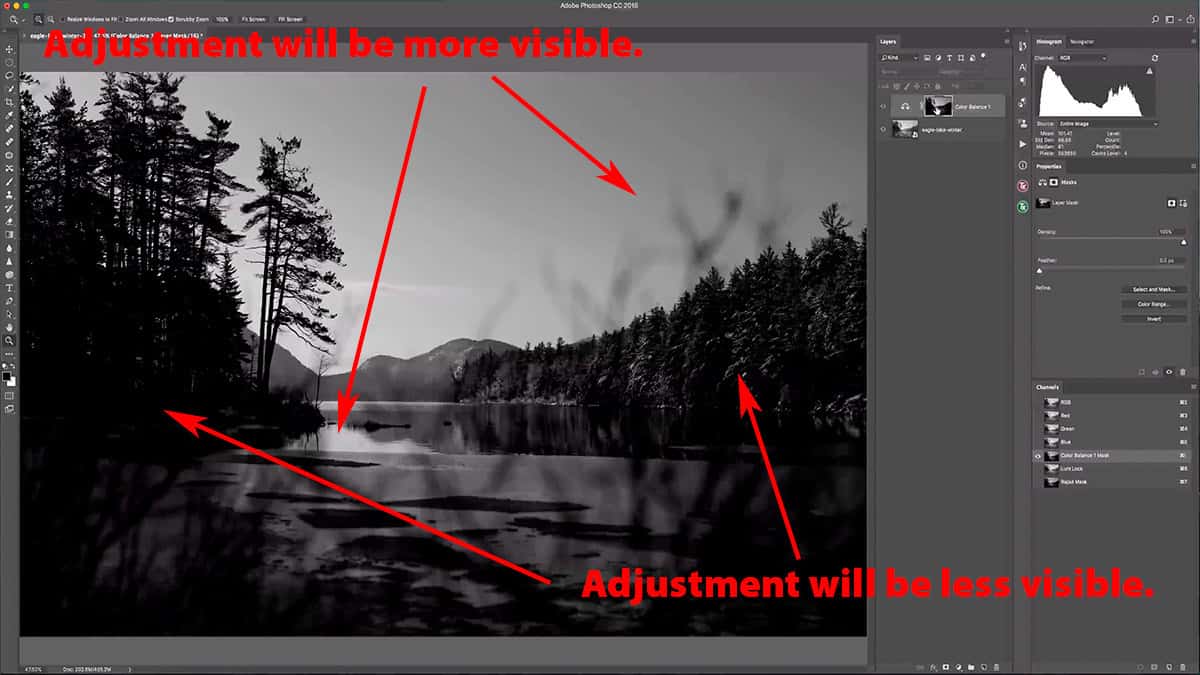
What this all means is that whatever this adjustment layer does to our image (or this example, it’s a color balance adjustment layer ) it will be more heavily applied to the highlights than the shadows.
Since the luminosity mask has our highlights painted in brighter tones (lighter than 50% grey), it will reveal more of the adjustment layer on the highlights. Inversely, since the luminosity mask has our shadows painted in darker tones (darker than 50% grey), this color balance adjustment layer will be less visible over the shadows in our image.
Just like a regular layer mask, the exact shade of grey on your luminosity mask directly correlates to the strength of your transparency. Areas that are close to pure black will hide the adjustment almost completely, while areas that are close to pure white will reveal the adjustment at full strength.
This is why I’m using a black and white image to serve as an example because it’s easier to understand how a luminosity mask works when you’re not distracted by color, which adds another dimension to interpret.
When we bring all the pieces together, this workflow allows you to instantly tailor any kind of adjustment to specific tonal groups of your image. You can add more blue to just your shadows to cool them down and create more depth, or perhaps change the color of just your reflected highlights in the water. You can apply noise removal to just your darker shadows, where noise is the most apparent, without affecting the rest of your image. The options are endless, and I’ll be showing you a few examples along the way.
If you’re still confused on what a luminosity mask is or how it can be used to control your adjustments, that’s perfectly alright. Luminosity masks are better understood when you can see them in action, so let’s make an adjustment to our photo here so you can see the difference these masks can make.
Why Luminosity Masks are Better than the Brush Tool
First, let’s disable the luminosity mask by shift + clicking on the mask thumbnail. This will temporarily hide the mask so we can process our image without seeing its effects, but it’s still there so we can bring it back at any time.
Click on the color balance adjustment layer to bring up the properties panel, and let’s warm this image up a bit by taking the yellow slider and pushing it towards the left by about 65 points. Make sure you are working under your Midtones in the drop-down menu.
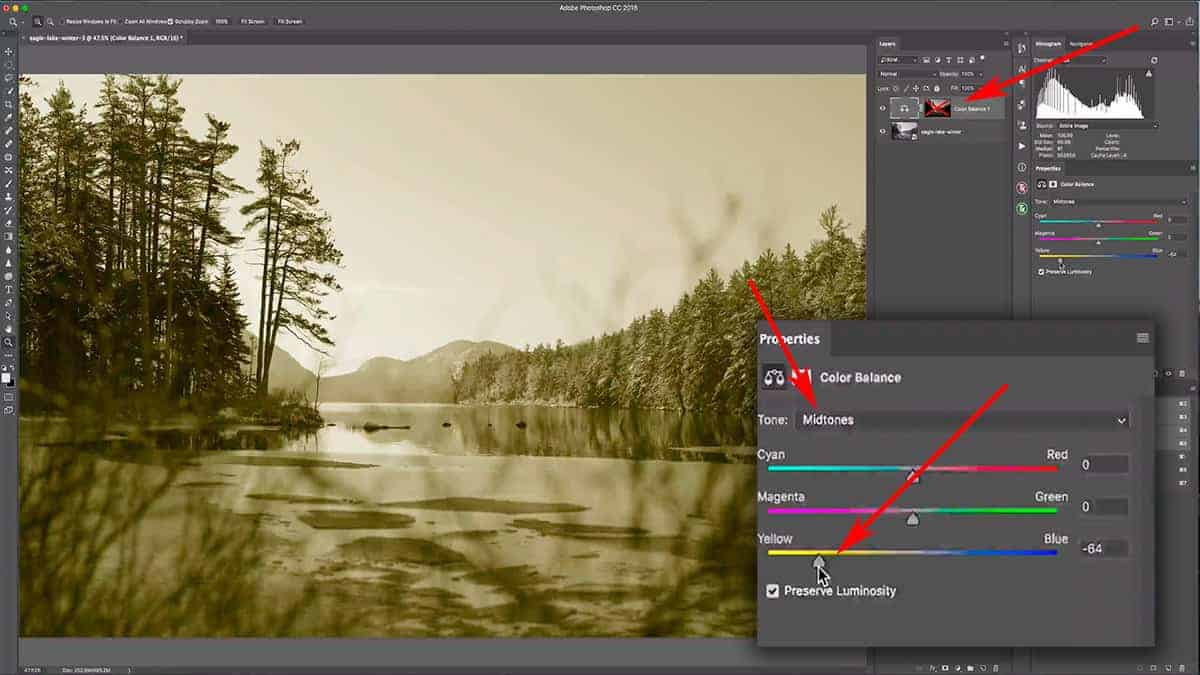
This is a very extreme adjustment, one I wouldn’t normally make to a black and white photo like this…but watch what happens when we add that luminosity mask back in a bit. But first, I want to show you how inadequate the brush tool is for an adjustment like this…which will help you understand why photographers rely on luminosity masks so heavily.
This adjustment warmed up the image quite a lot, but obviously, there’s a problem: it’s affecting my entire composition here and has washed out a lot of detail. What I can do here is restrict this yellow shift so that it only affects my highlights and brighter tones…in other words, the tones which are on the right side of my histogram. This will still warm up my image, but without losing contrast and depth since it will not be changing my shadows.
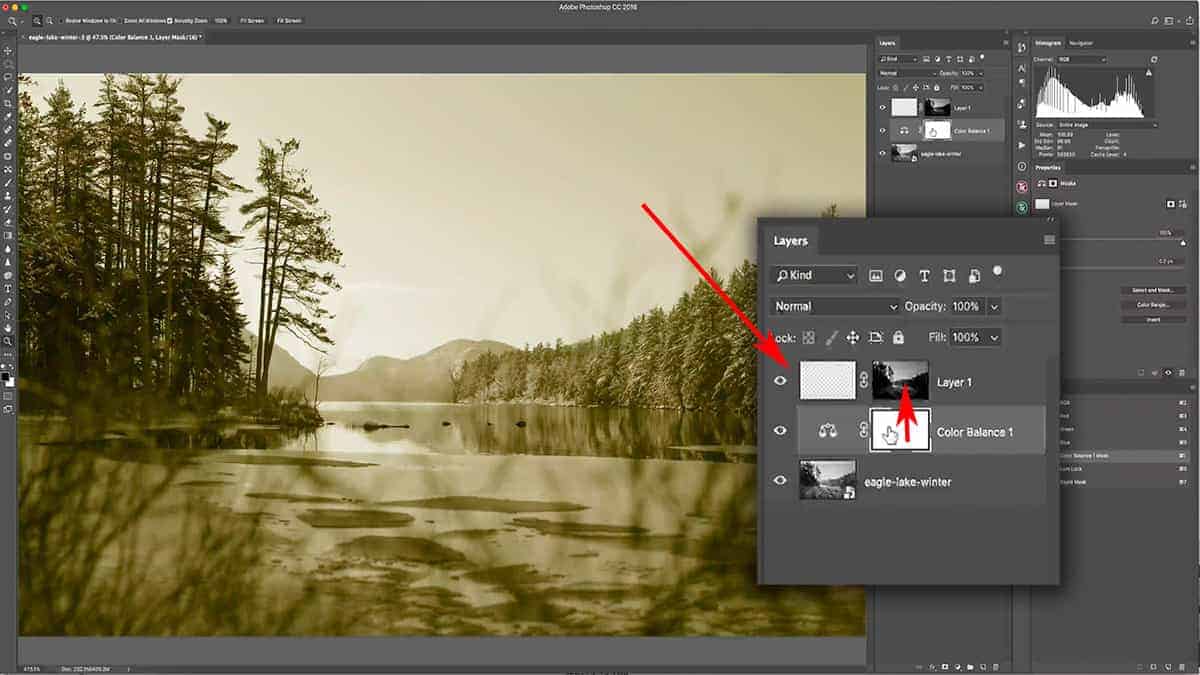
First, see what happens when we try to accomplish this without using a luminosity mask. I’m going to temporarily move my mask out of the way by adding a new blank layer on top and then drag the mask thumbnail up to that new layer. This allows me to add a new layer mask to my color balance adjustment layer without having to delete my luminosity mask.
As you know already, a white mask will show your adjustment in full. If we add black to this mask, the warming effect will invisible in those areas. Let’s grab a black brush set at 100% opacity, and begin to paint onto the layer mask. The warming effect is now completely removed – or hidden – from the areas we’ve painted onto.
This is where the power of luminosity masks come in. What happens when we add grey to the mask – or a point between pure black an pure white? If I load my brush with a grey tone (or simply bring down the opacity of a pure black brush) and then paint onto the layer mask again…you can see that it’s still removing the warming effect, but definitely not as heavy as pure black.
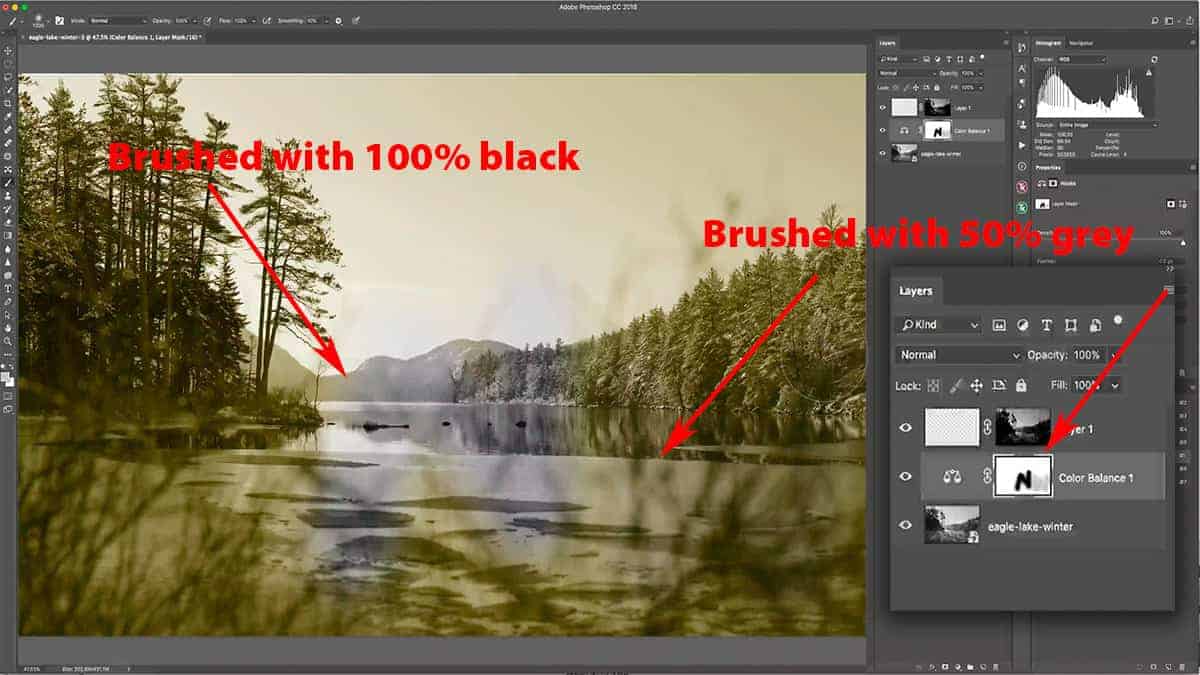
That is how layer masks work: the shade of grey you add to a layer mask directly correlates with the transparency. If you add grey that is 90% black, then that yellow warming effect will be 90% hidden (or only 10% visible). However, if your grey is only 20% black on the layer mask, then that warming effect will only be 20% hidden (or 80% visible).
Getting back to the goal here: I want to (1) remove this warming effect from my shadows and darker tones and (2) keep it visible on my highlights. In other words, my highlights yellow and my shadows not yellow.
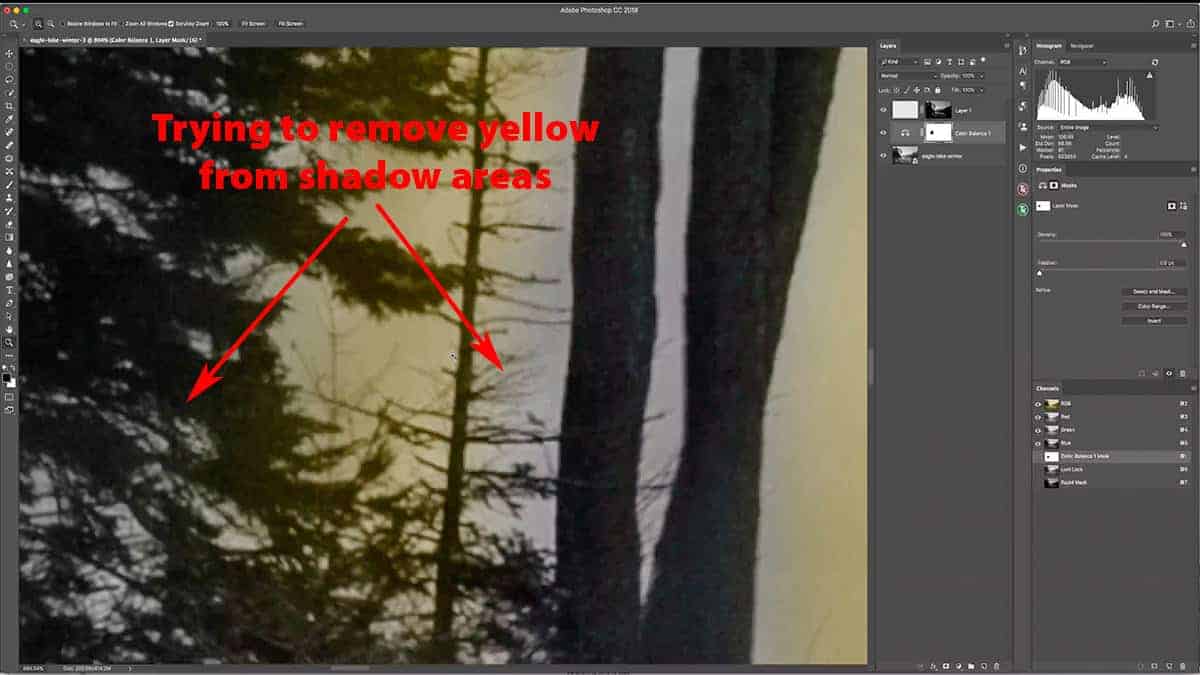
Let’s delete this layer mask, add a fresh one, and zoom into a shadow area so we can attempt to remove some of this warming effect just from the shadows. I’m going to grab a black brush and attempt to paint over some darker areas in order to remove this adjustment layer.
Screenshot is from the free video lesson on luminosity masks, which you can download by clicking here.
This is very sloppy brushwork as I’m only quickly demonstrating the problem with doing this with the brush tool as opposed to using a luminosity mask, but even if I paid much attention to tracing around the shadow areas and trying to “stay within the lines”, the result wouldn’t be much better than what you see here.
Even with the most precise brushwork, the transition between areas we brushed and did not brush is far too harsh and look very unnatural. If we take a look at the tree trunk above, you can see how abrupt the transition is between the trunk and the highlights in the background sky. You can literally trace around the brushwork…when ideally, you want the transition to be very feathered and completely unnoticeable.
The problem with doing this manually with your brush tool is that we’re not addressing the midtones; the areas in your image with a luminosity value around middle grey are being completely left out from this selection.
For example, the mountain in the background is around middle grey, so ideally this should have the warming effect at about 50% strength. If you tried to do this manually with your brush tool, you would have to constantly change your brush opacity to compensate for this – let alone try to paint within the lines. It’s highly inefficient, but also near impossible to do.
Instead, by adding a luminosity mask that has been created based on the unique tonal values of your image, all this painstaking work can be done for us instantly.
Let’s delete this layer mask with all the brushwork, and then bring back the original luminosity mask by clicking and dragging it down onto the adjustment layer.
This is a much more pleasing result; it doesn’t look like we hastily applied a simple warming filter, and the transitions between light and shadow (or rather, between yellow and not yellow) are completely seamless. Since this luminosity mask was created directly from the image itself and is completely based off of the luminosity value of each individual pixel, it works perfectly for the adjustment we want to make here.
Luminosity Masks and the “Self-Feathering” Effect
Let’s option + click on the luminosity mask thumbnail to bring it up and zoom in close to some of the highlights. This is going to help you visualize how luminosity masks control an adjustment like this.
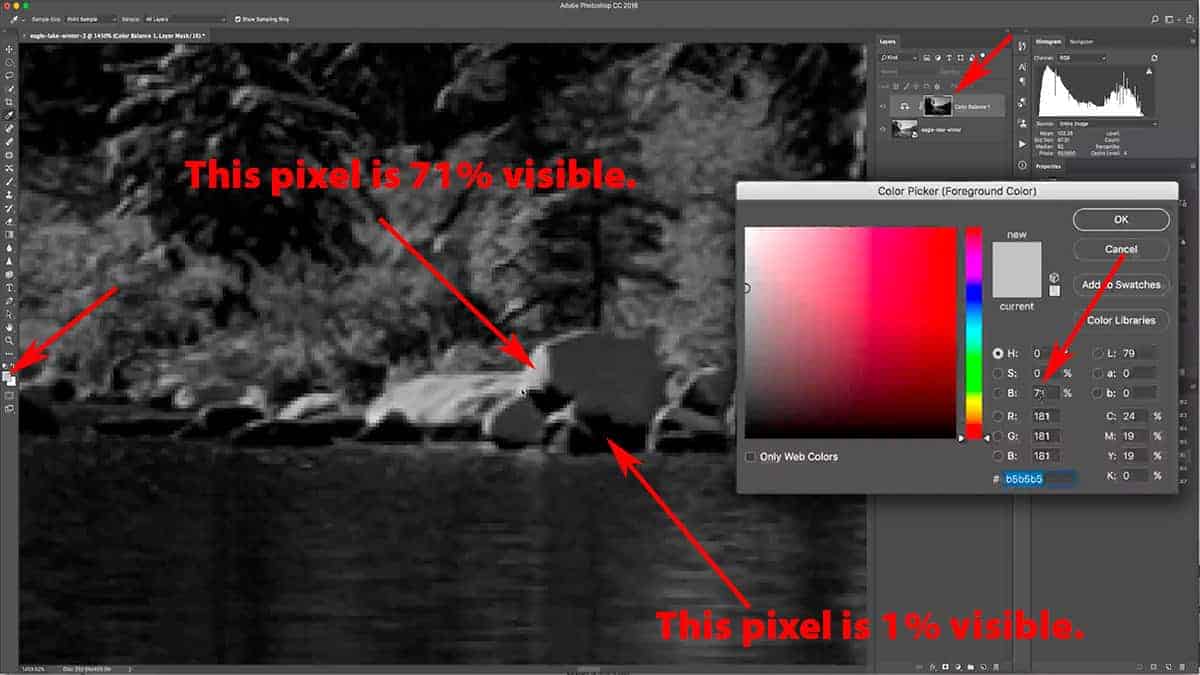
First, let’s sample one of the brighter pixels of my luminosity mask. Press I to bring up the eye-dropper tool, click on an area that is close to pure white….then click on the foreground color swatch to bring up the color picker tool, which will allow us to see the actual brightness level of that sampled pixel. It’s set at 71%, which means that the strong yellow shift we added is now 71% visible for this specific pixel.
Now let’s sample a darker pixel and check the brightness level of that. The pixel I sampled is almost pure black, so the brightness level is 1%…which means the warming effect is only 1% visible on this particular pixel.
So this luminosity mask works perfectly for the effect I’m going for since I only want the yellow shift to be visible on the highlights, not the shadows.
This is one of the many benefits of luminosity masks…the soft and feathered transition of strength as you move from your brightest highlights to your darkest shadows, which makes any adjustment appear seamless and natural.
Looking at my image above with the luminosity mask applied, you can’t see and harsh transitions between my highlights (where the warming effect is the strongest) and my shadows (where the warming effect is the weakest). The strength of that warming effect slowly tapers off thanks to that luminosity mask, which is completely custom to the tonal value of each individual pixel…which smooths out the transition. This is why the brush tool is too rudimentary for an effect like this.
This is called the “self-feathering effect”, and is why landscape photographers use these masks to control all sorts of adjustments (and I will be showing you several examples later on in this tutorial series).
The varying degrees of grey tones in the mask make this effect very soft and feathered…so the yellow warming effect we applied here slowly and gradually drops off in intensity as we move toward the shadows.
Now that we’ve gone over what a luminosity mask is and how it works, let’s dive into how to generate a luminosity mask for each unique image.
Creating Luminosity Masks with the TK Basic Panel
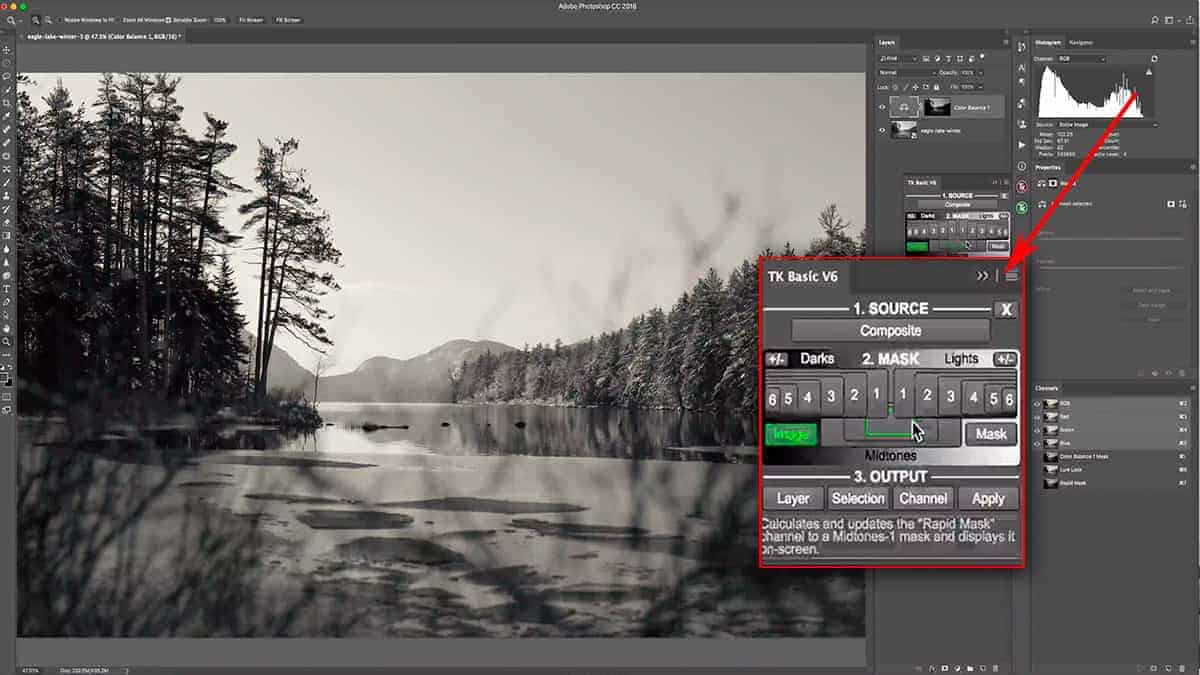
Let me introduce you to your control station for generating these luminosity masks: the TK Basic Panel.
Screenshot is from the free video lesson on luminosity masks, which you can download by clicking here.
This is a free panel was created by Tony Kuyper, who is well known as the “father” of luminosity masks since he is widely credited for introducing this technique to mainstream landscape photography. He’s been kind enough to provide this free Photoshop panel that will instantly create luminosity masks for you in the quickest and cleanest way possible.
I’ve tried other panels over the years out of curiosity, but always revert back to Tony’s for the most accurate selections.
You can create these masks yourself without using the panel, but the process is very long and laborious…and truly a complete waste of time when you have a free panel like this available to do all of the heavy lifting for you. It’s much like cutting your lawn with a pair of shears when you have a lawn mower – tons of extra work with no benefits.
In order to get Tony’s free panel, you need to first download it from his website by visiting the following link:
>> Click here to download the TK Basic Panel <<
Look for the TK Basic V6 Panel (it should be the second item listed) and hit the “Get it here” button in the right column. From there, you’ll go through a free checkout process which will email you a private download link for the panel.
You don’t have to download the panel right now in order to continue on with this tutorial. Actually, I recommend that you wait until you’ve read through this tutorial in full before downloading the panel so you understand exactly how it works.
The TK Basic Panel comes with installation instructions as well as video tutorials that will walk you through how to use this panel. Additionally, I’m adding one of my own videos at the end of this tutorial that will show you exactly how I myself use this panel. With that in mind, I’m only going to generally explain how this panel works since both of the previously mentioned videos go into greater detail.
In order to generate your luminosity masks, all you need to do is hit the Composite button which tells Photoshop to create a fresh set of masks based on the current luminosity value of your image. From there, you would choose which mask you want to use by selecting one of the numbers. Once you settle on the best mask for the type of adjustment you want to make, simply hit the Apply button to add that mask to your current layer.
[fl_builder_insert_layout slug=”lm-optin”]
Choosing a Highlights Luminosity Mask
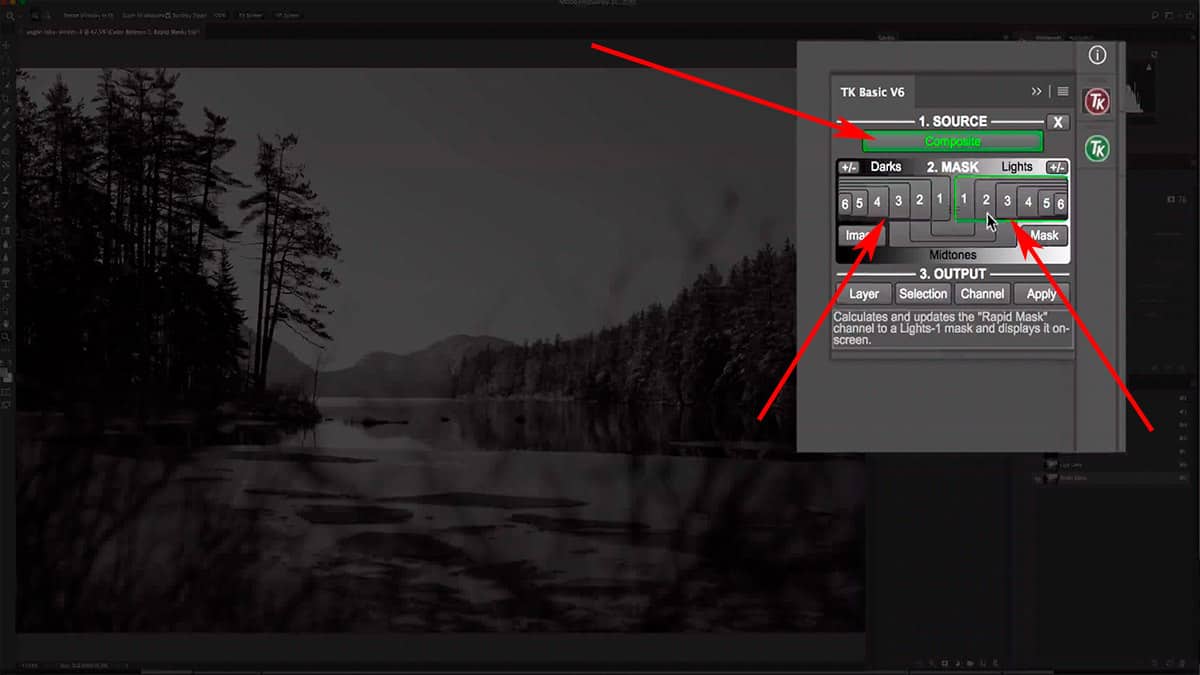
When looking at the panel, you can see the numbers 1 through 6 under the word “Lights”. A “Lights 1” luminosity mask is the largest selection for your highlights. As you can see in the screenshot below, the lighter areas of the mask represent the highlights in the image. If we were to apply this mask to a layer, our adjustment would be heavily applied to the highlights and very lightly applied to the shadows.
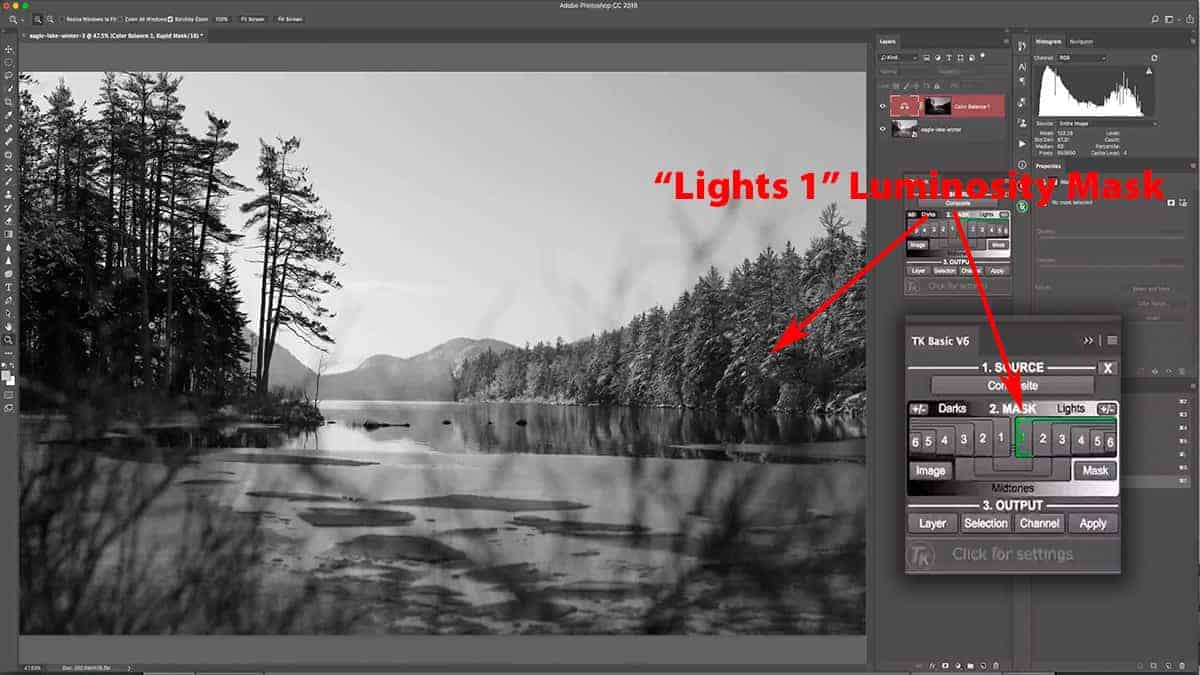
Now let’s move onto a “Lights 2” luminosity mask by pressing the number 2 on the panel. You can see that the mask is now a bit darker, meaning that our selection here is targeting the brighter highlights and starting to exclude the darker highlights (those close to middle grey). In other words, our “Lights 2” luminosity mask is more focused on highlights closer to pure white…so the selection is more refined and narrow than our “Lights 1”.
This refinement continues as you get progressively higher in number. If we look at “Lights 4”, you can see that most of our tones are not selected at all except for a weak selection of the very brightest highlights: some sky detail up along the horizon line and the bright reflection in the water.
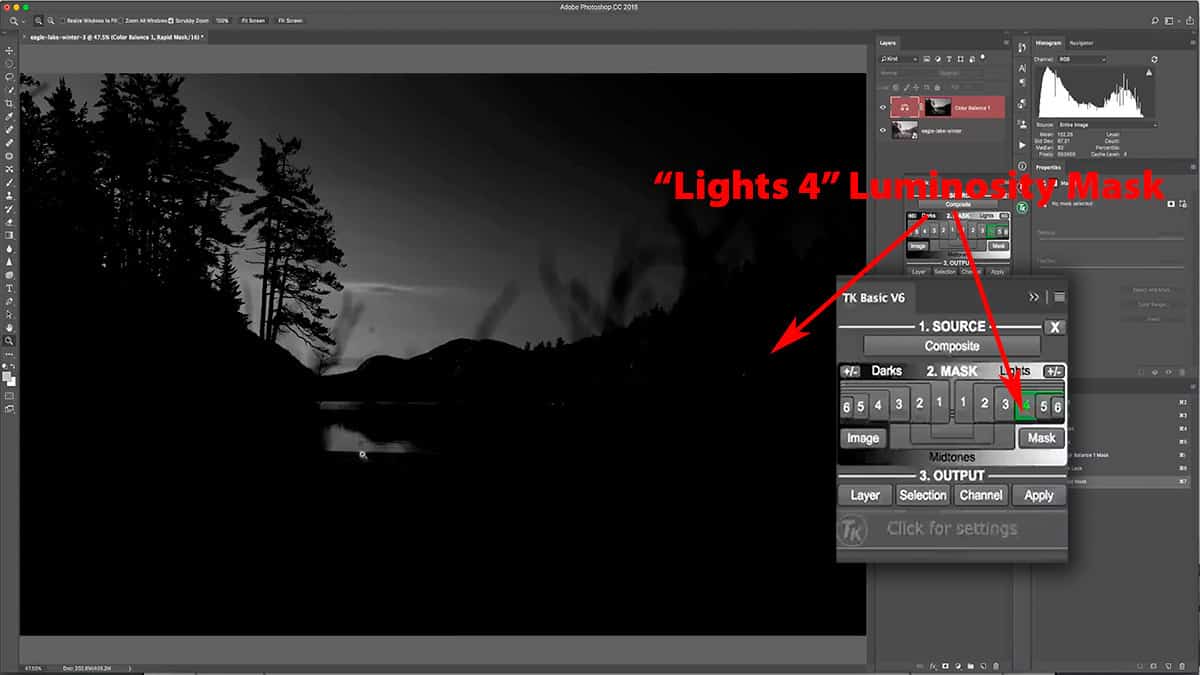
Lights 5 and 6 are extremely narrow, and are only useful when you have highlights that are very close to being blown out; in other words, highlights that are up against the right side of your histogram. Since our image here does not have any blown highlights, a Lights 5 or 6 make very weak selections and are useless as a luminosity mask.
Choosing a Shadows Luminosity Mask
On the left side of the panel under the word “Darks”, we have the same numbers 1 through 6. These luminosity masks are used to create a selection that targets your shadows instead of your highlights. In other words, the darker parts of your image will be masked in lighter tones so that your luminosity mask will reveal those shadows. These masks work exactly the same as our Lights…but instead of isolating our highlights, we are instead isolating the shadows.
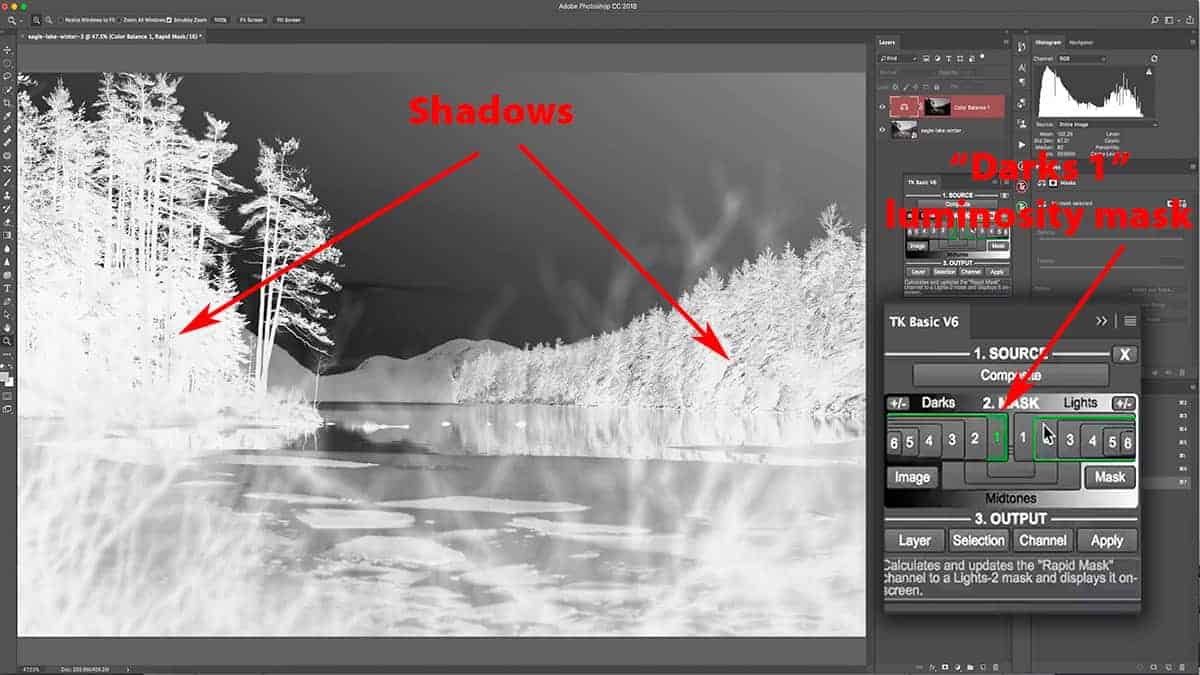
You can see in the screenshot above, the brighter parts of the luminosity mask represent the shadows…..with our darkest shadows shown in almost-pure white. This is a “Darks 1” luminosity mask, which is targeting tones on the left-hand side of your histogram.
Just like with our Lights…as we progress higher in numbers, the selection for the shadows will get more restrictive. A “Darks 3” luminosity mask selects only our darkest shadows and completely excludes the brighter shadows (those around middle grey). More of these brighter shadows get excluded from the selection as we get higher in mask number…until we hit Darks 6, which only selects the very darkest shadows (borderline crushed).

Screenshot is from the free video lesson on luminosity masks, which you can download by clicking here.
So to summarize…your Lights luminosity masks target your highlights, and your Darks luminosity masks target your shadows.
Shortly, I’ll be showing you how to use a Darks luminosity mask to make a color adjustment to your shadows…but first I want to go over a few more things about this panel.
Midtone Luminosity Masks
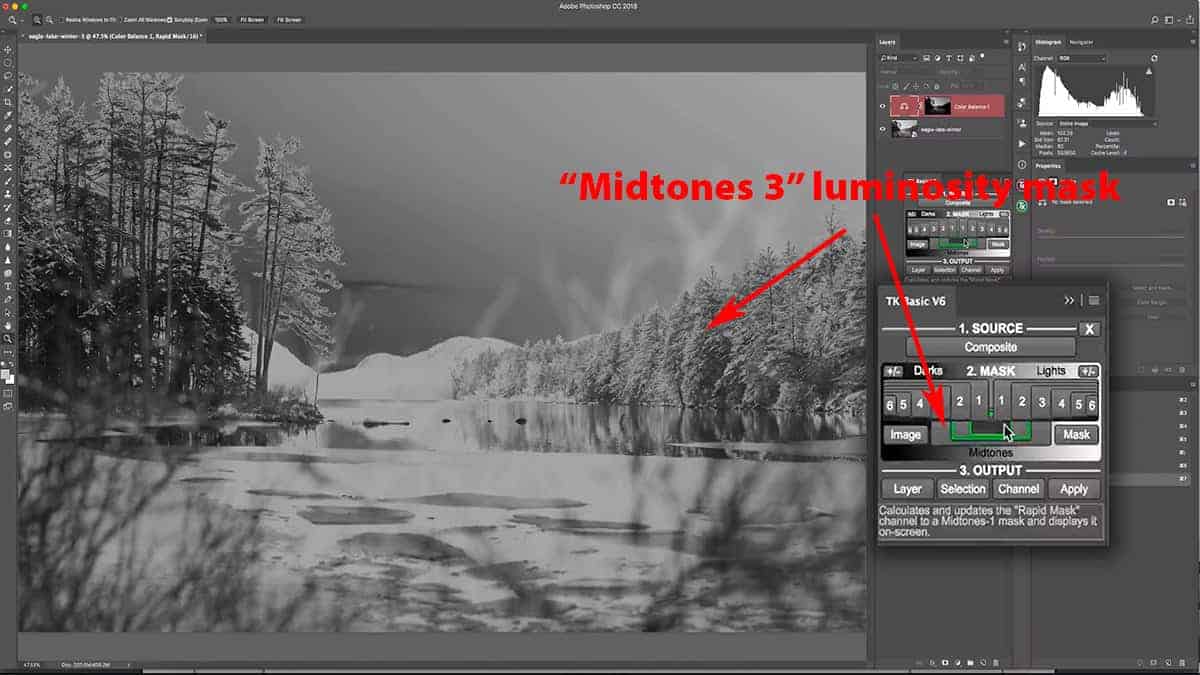
You may have noticed three more buttons in the panel under the Mask section, which generate your Midtone luminosity masks. These target your tones right around middle grey; in other words, everything except your darkest shadows and brightest highlights.
Let’s click on a “Midtones 3” luminosity mask, which is what you’ll probably use the most since it is the broadest selection. “Midtones 2” and “Midtones 1” are a little bit too restrictive, so I typically choose a Midtones 3 and tailor it further if needed.
Midtone luminosity masks are fantastic for when you want to make adjustments without losing detail in your image. For example…if you want to add contrast to a photo that has tones already pushing against the edges of your histogram, you run the risk of blowing out your highlights and/or crushing your shadows.
However, if you add a midtone luminosity mask to control that adjustment, you can now enhance the contrast without brightening your highlights or darkening your shadows any further since the mask excludes those tones from that added contrast. In other words, it’s protecting the edges of your histogram.
We’ll be going over a few examples of using a midtones luminosity mask in a later tutorial.
Applying a Luminosity Mask
Earlier in this tutorial, I added a “Lights 2” luminosity mask to the color balance adjustment layer, which added that yellow warming effect to my image. This mask removed the adjustment from my darker shadows, so that will be more heavily applied to my brighter highlights. However, this mask is a bit too restrictive for the adjustment I want to create, so let’s change this to a “Lights 1” luminosity mask which will increase the strength of this warming effect.
Press the number 1 to bring up the “Lights 1” luminosity mask, which has my highlights rendered a bit brighter than “Lights 2”. This means they are selected more strongly, which will make the yellow shift more visible.
So at this point, I’ve (1) pressed the composite button to generate luminosity masks for this image, and (2) chosen the mask I want to apply. Now I need to (3) apply the mask to the color balance adjustment layer.
As of now, the mask has not been applied to a layer yet; this is simply a mask “preview” which allows you to cycle through all the different luminosity masks and choose the one you want. You still need to “confirm” your choice by choosing your output at the bottom of the panel, as marked in the screenshot below.
The “Output” step is where you tell Photoshop how you want to apply this luminosity selection. Typically, you will just click “Apply” which will add this selection as a mask to whatever layer you have currently selected in your palette.
As we’ll explore in later tutorials, there are other helpful, time-saving outputs here. For example, clicking on the Layer button will bring up a list of common adjustment layers you would want to add a luminosity mask to: curves, levels, brightness/contrast, and hue/saturation. This saves you the extra step of creating these adjustment layers if you haven’t done so already.
For this image, since I want to replace an existing layer mask, all I need to do is hit Apply. This will take the luminosity “mask” you see (it’s not a mask yet – just a selection) and apply it to your current layer. If there is an existing mask on your layer, it will override it – so make sure you want to get rid of your current mask before pressing apply.
For this image, we do want to replace the current “Lights 2” luminosity mask with a “Lights 1”, so let’s press Apply.
Since the “Lights 1” luminosity mask selects a broader group of highlights, the yellow warming effect now appears a bit stronger.
Before I end this tutorial, I’d like to add a blue shift to my shadows. This is a very common practice in landscape photography, and especially with a black and white photograph…to warm up your highlights and cool down your shadows to enhance depth and interest. It works a lot like split toning in Lightroom, but with much more control.
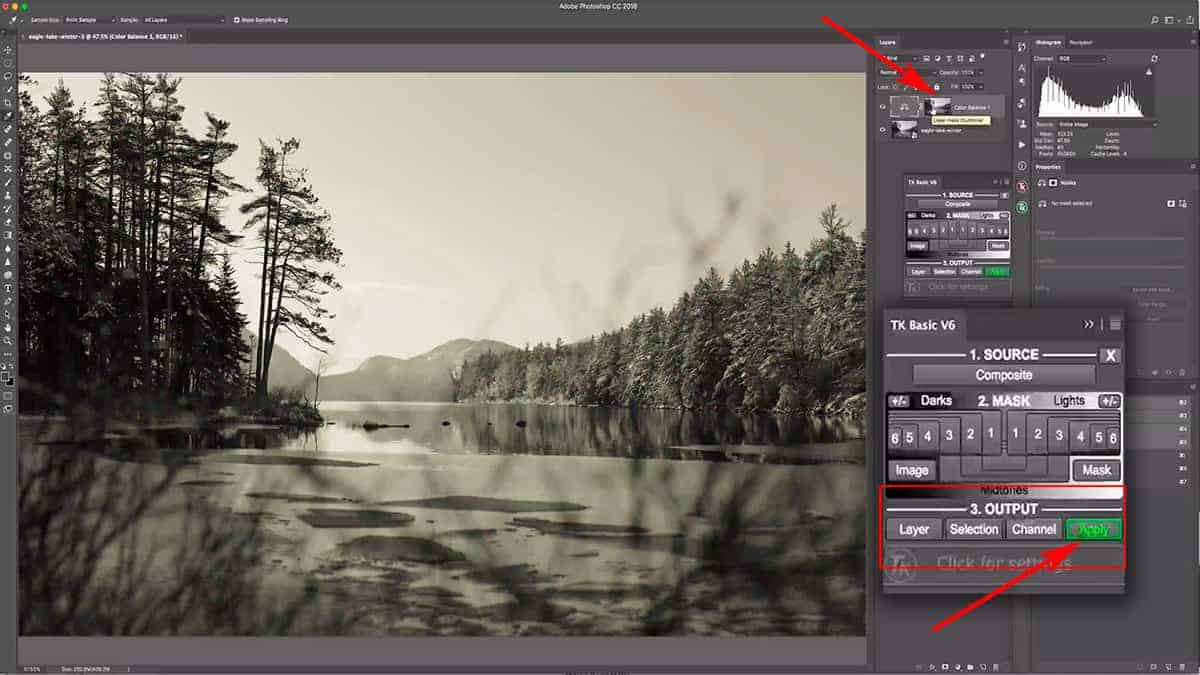
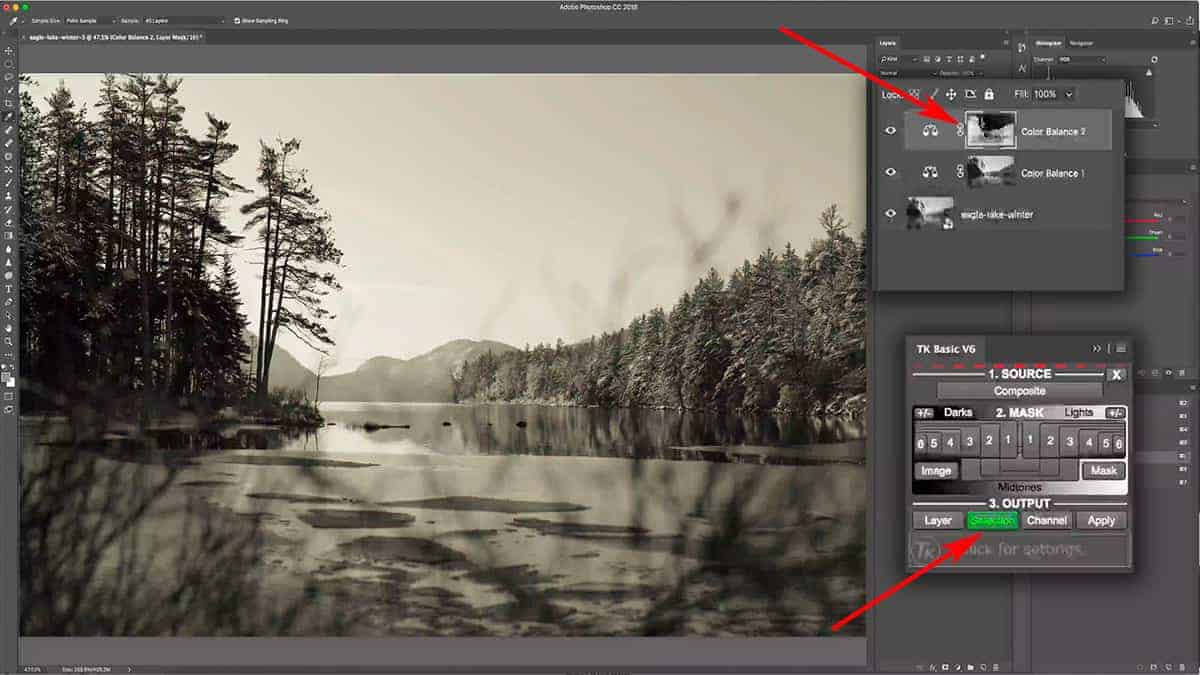
Let’s go to the TK Basic Panel and choose a Darks mask that will give us a nice selection for the shadows. I could use “Darks 1”, but that selection is a bit too broad and is pulling in some of my darker highlights; I don’t want to add blue to any of my highlights, even at a low opacity. Instead, I’ll use Darks 2 which excludes the sky nicely.
Since I will be applying this mask to a color balance adjustment layer, which hasn’t been created yet, I’m going to press Selection instead of Apply. This will load your mask as an empty selection and “saves” it so you can go ahead and create the layer you want to apply this selection to.
Next, go down to your adjustment layers and click on Color Balance. Since we had our selection loaded before adding this adjustment layer, the luminosity mask is automatically applied as soon as you create the layer.
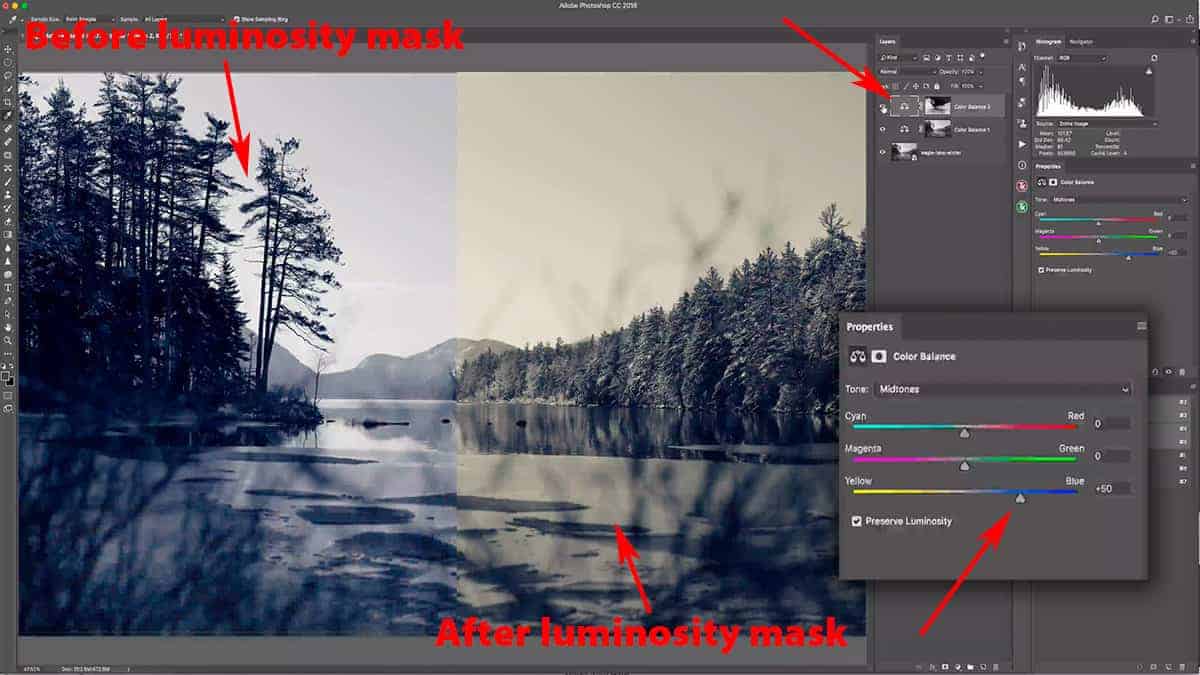
Next, click on the color balance thumbnail in the layers palette and go over to the properties panel to make your color adjustment. Under the Midtones, take the bottom slider and shift it towards Blue by 50 points.
Screenshot is from the free video lesson on luminosity masks, which you can download by clicking here.
On the left, you can see what this adjustment would look like without the luminosity mask: not only does it wash out the tones, but it has cooled the entire image off significantly and eliminated the warmth from the highlights. However, when we combine this shift with a luminosity mask (right) to control the adjustment, the result is much more pleasing; the warm highlights and cool shadows provide much depth and interest.
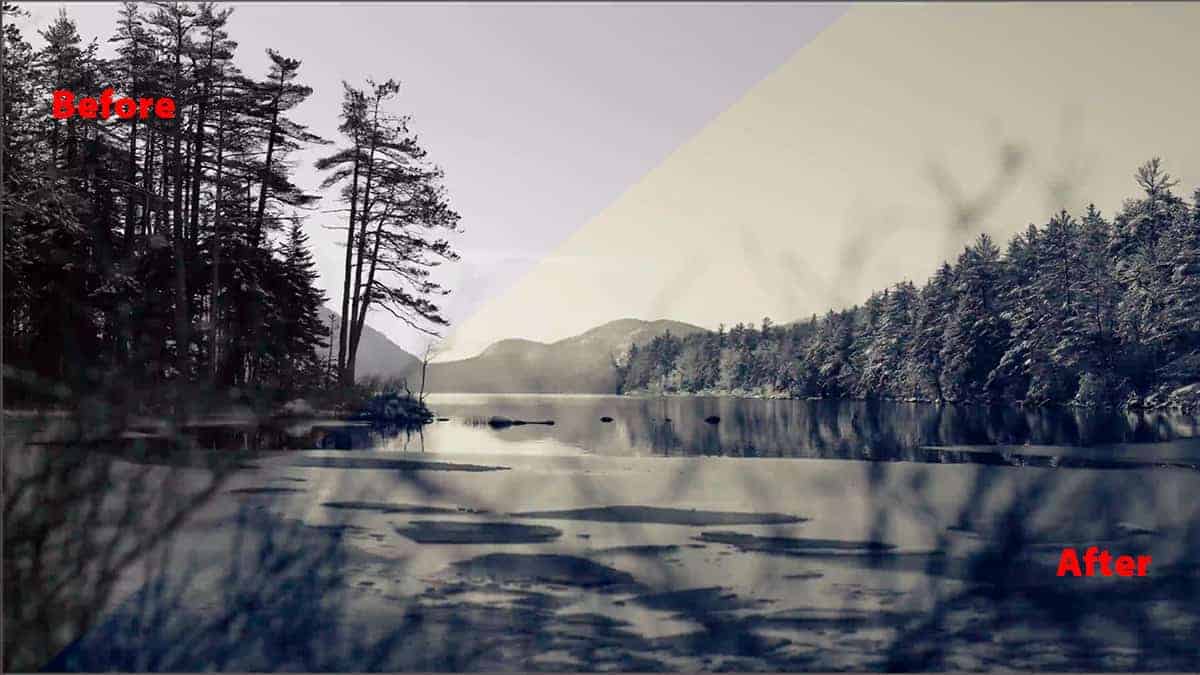
And here’s the complete before and after: the original black and white image and the final result with both color balance adjustment layers + luminosity masks, which made it a much stronger black and white photograph.
I hope you’ve enjoyed this introduction to luminosity masks and that it cleared up any questions you may have had about this extraordinary technique. I find that many photographers never fully comprehend the concept behind these masks, which is why I created this comprehensive tutorial
This tutorial is just a very basic example of how luminosity masks can improve your processing; the additional tutorials will demonstrate more advanced ways that professional photographers use these masks. Now that you know the basics, it will be easier for you to see the true benefit of luminosity masks and countless ways they will enhance your workflow and make processing more fulfilling and enjoyable.
Advanced processing techniques like dodging and burning or color grading are going to look quite poor if you can’t tailor your adjustments to the unique content of your photo. It’s like papering over the cracks: you’re going to see artifacts, posterization, distracting noise and other eyesores when your processing is just slapped over your image.
This is why in the creativeRAW lifetime membership program, I teach you advanced creative techniques (such as color grading, perspective warping, and light painting) that use luminosity masks to their fullest potential…because they give you the control needed for high-quality results with minimal effort.
In the next tutorial, we’re going to take luminosity masks a step further…I’ll be showing you different ways that these masks can enhance the light and atmosphere of a dull photograph.
>>> How Luminosity Masks Enhance Light and Atmosphere <<<
Don’t forget to download the video and practice files for offline learning.
Thanks for joining me…and if you have any questions, feel free to leave a comment below for me to answer!
How I use the TK Basic Panel
This quick tutorial gives you a bit more information on how I personally use the TK Basic Panel for creating and applying luminosity masks. This lightweight panel quickly creates high-quality, accurate masks with no drawbacks, and is my favorite tool when processing in Photoshop.
Note: For installation instructions and additional lessons on how this panel works, make sure to check your download folder that came with the TK Basic Panel (click here to download).
Related Products
Related Products
-

HDR Field Guide
$ 19.00A necessary part of landscape photography is to capture the full dynamic range of the natural light, which…
Add to cart -
Luminosity Masks
$ 129.00If you feel like your landscape images are lacking that special "something" or are just not completely satisfied…
Add to cart -

Golden Hours eBook
$ 19.00Learn how to capture the extraordinary light of sunrises and sunsets with this free eBook. I'll show you…
Add to cart