How Luminosity Masks Enhance Light and Atmosphere
How Luminosity Masks Enhance Light and Atmosphere
Luminosity masks are a powerful Photoshop technique used to make advanced selections based on the tonal value of an image. This makes it the perfect tool for enhancing the light and atmosphere of a landscape photograph…transforming a lackluster image into an extraordinary work of art that explodes with color, depth, and detail.
In this comprehensive tutorial, we’ll take a deep dive into luminosity masks and explore some “real-world” examples of how this technique can intensify the mood and enhance your colors and tones.
This is where luminosity masks get really exciting because now that you know how they work (if not, make sure to read the first tutorial), you can better visualize what is possible when you incorporate them into your own workflow.
Luminosity masks are best learned when taught visually, so I’ve pulled a comprehensive video lesson from my membership program for you to watch. However, a video is not always the most convenient way to learn, so I’m also including the full written tutorial below.
If you’re pressed on time, make sure to download the video lesson so you can watch around your own schedule. I’m also including any practice files so you can practice right alongside this tutorial. It’s easier to grasp concepts in Photoshop when you actually do it yourself as opposed to simply watching someone else do it for you. Just fill out the form below the video and you’ll be sent a download link.
[fl_builder_insert_layout slug=”lm-optin”]
[fl_builder_insert_layout slug=”luminosity-mask-table-of-contents”]
Creating a Sun Glow with Luminosity Masks
Let’s jump right in with our first technique for enhancing a landscape photograph, and that is adding a sun glow effect. This will amplify the warm and glowy atmosphere of the golden hours and make for a more appealing image….and by adding a luminosity mask, we can control where the glow is visible and eliminate any washed out, hazy tones.

Let’s set up the stage for adding a sun glow.
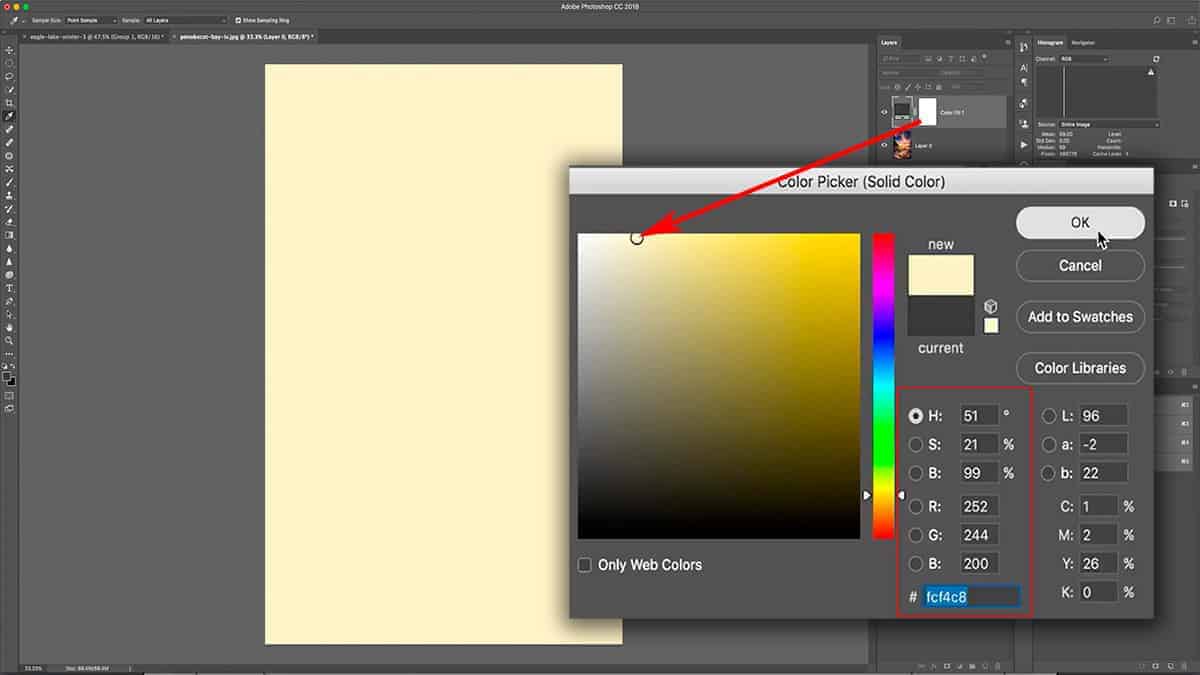
First, add a solid color fill layer by going down to your adjustment layers and selecting Solid Color…and then sample a nice, pale yellow with the settings seen in the screenshot below.
When you’re selecting a color for a sun glow (or any kind of color dodging work), you want to make sure it’s very light in saturation (under 25%) and set a full brightness. If you choose a color that is overly saturated and/or low in brightness, your results will be muddy and distracting.
Another reason why I’m using a solid color fill layer instead of just filling an empty layer with a color is that if I ever decide to change my color, all I have to do is click on the layer thumbnail here and pick a new color.
Next, change the blend mode to soft light; we’re basically dodging here and that is the blend mode I typically use for my dodging.
Finally, fill the layer mask with black by clicking on the layer mask and pressing CMD + I to invert the color from pure white to pure black.
Now the stage is set for applying a sun glow. Press B to bring up the brush tool and make sure your foreground color is set to white, and at a brush opacity at around 30% to start.
Adjust your brush size so that it’s a little bigger than the sun itself, make sure your layer mask is selected and active, and click once on the sun to slightly reveal the yellow fill layer we just added.

This adjustment should be almost completely unnoticeable so that the sun glow effect is very feathered and seamless, but don’t worry: we’ll make this more apparent in the next steps.
To double up on the strength of this effect, let’s first duplicate this layer and mask by clicking on the layer thumbnail, and dragging it down to the bottom of your layers palette until you’re hovering over the “New Layer” icon, and then release the mouse. A copy of this layer + mask will be created.
Click on the layer mask of the newly copied layer, increase your brush size to about double of what you previously used, center your brush over the sun again, and click once.
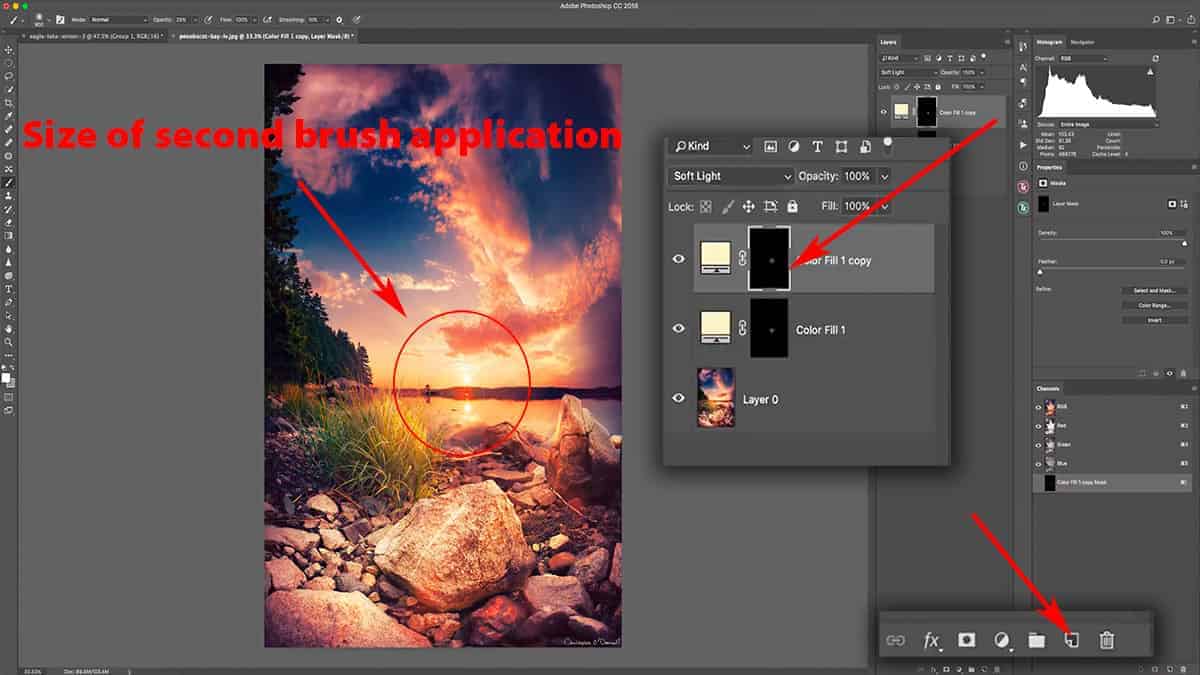
What we are doing here is creating a very soft and natural sun glow by duplicating the layer to amplify the strength, while also increasing the brush size each time to taper out the sun glow so you don’t see any hard edges. Using this method, the sun glow is the heaviest around the sun itself and slowly drops off in intensity as we move away from the sun, which is what a sun glow would naturally do.
I’m also choosing to do this on separate color fill layers vs. just one to (1) give me greater control of the effect through independent layers, and (2) not have a ceiling on the strength of this sun glow.
You can repeat this process as many times as you want until you get the desired result. I’m going to do this two more times: duplicate the layer, bring up my brush size, and click once on the layer mask to reveal more of the sun glow.

Screenshot is from the free video lesson on luminosity masks, which you can download by clicking here.
The sun glow above looks adequate, but it’s very hazy and has washed out a lot of great detail along the horizon and in the water. This is because we are essentially dodging over our shadows as well as our highlights. In other words, this sun glow does not take the unique luminosity of our image into consideration and is affecting all tones with the same degree of intensity…so it looks like we simply added a light leak filter.
This is where a luminosity mask comes in handy since we can tell Photoshop to eliminate this sun glow from the deep shadows…and as the value of a pixel gets lighter, so does the strength of the sun glow. This will also remove the sun glow from the horizon line, which will make this effect appear much more natural.
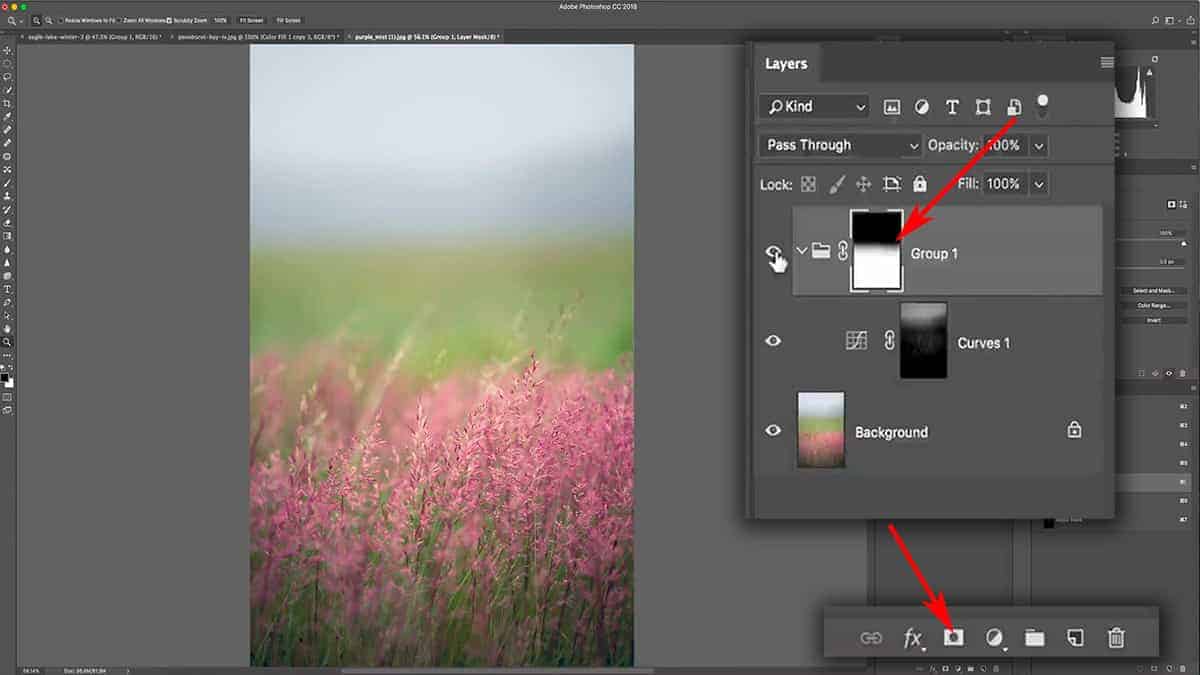
Let’s add these four solid color fill layers into their own group, and then turn off the group’s visibility by clicking on the eye. This is so we can generate luminosity masks based off of the original image, not what it looks like with the sun glow applied. When you generate new luminosity masks, they reflect the tonality of how your image currently appears – including any effects from visible layers. Depending on how you want your mask to look, you may need to turn off the visibility of some layers.
Next, go to your TK Basic Panel and hit Composite to generate a fresh set of luminosity masks.
Note: The TK Basic Panel is a free Photoshop tool used to generate luminosity masks for you. Read more about the panel here.
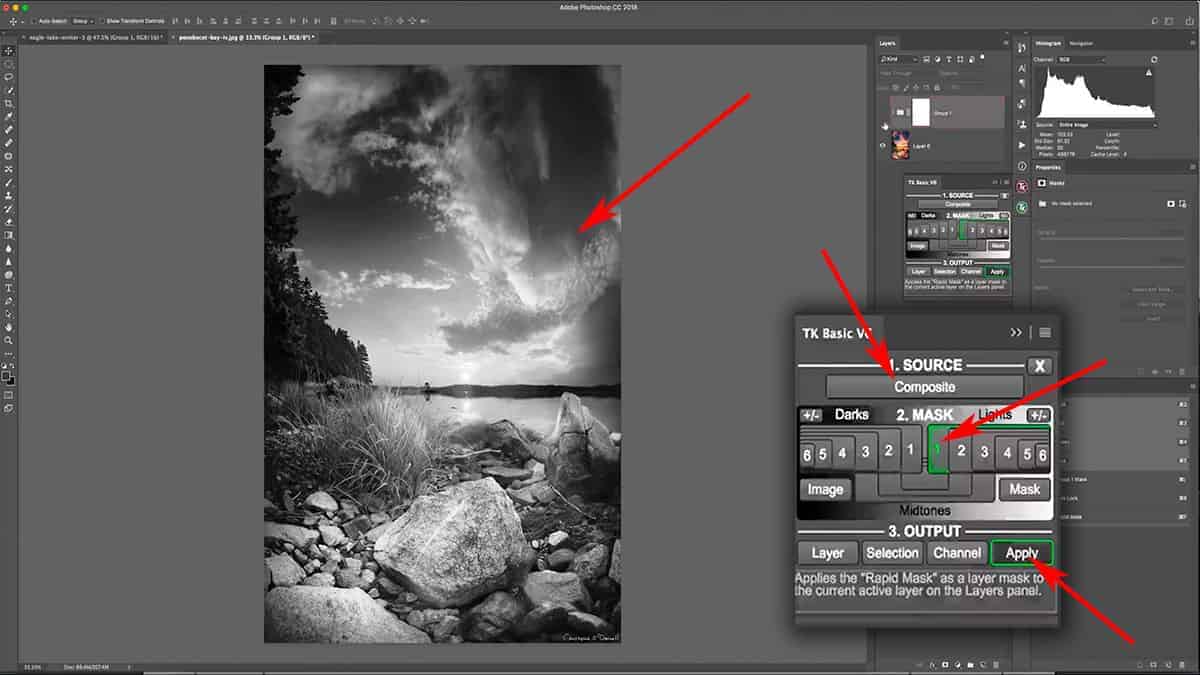
Cycle through your masks to see which one suits the effect you’re going for. Since I am removing this sun glow from the shadows, I want to choose a Lights luminosity mask which has my shadow areas painted in darker tones. “Lights 1” seems to work well for this adjustment since it gives me a nice, soft selection for my highlights, yet removes the sun glow from the majority of my shadows.
Make sure the group is still selected in the layers palette, and hit Apply to add this luminosity mask directly to the group.
Since the mask is added to the group itself, it will affect all layers inside of that group as if you applied the mask to each individual layer.
Another reason why I am using a group here is that we already have layer masks on each individual layer…so we can not add a luminosity mask to them since you can only add one mask to a layer. By grouping your layer(s) and adding a mask to the group, you can circumvent that restriction and effectively use two (or more) masks on an individual layer. This is known as “masking the mask”.

You can see in the final result above, adding that luminosity mask cut through much of that haze…and gives the image a more natural sun glow that compliments and enhances the atmosphere rather than being a distraction.
Enhancing Texture and Detail with Luminosity Masks
For the next example you see below, I want to enhance the contrast to the foreground flowers, which will give it more texture and help it stand out more from the shallow background. Since I used an 85mm lens, the depth was flattened between the foreground and background, so adding contrast will help to bring that back a bit.
However, I don’t want to add a global increase in contrast since that will darken my shadows, which is something I don’t want to do. Instead, I’ll use a luminosity mask to target just the highlights of my flowers so I can increase the brightness and expand my tonal range without affecting the midtones and shadows.
[fl_builder_insert_layout slug=”lm-optin”]
The first step is to generate the luminosity masks, so let’s open up the TK Basic Panel and hit Composite. I’m looking for a mask that will give me a nice selection just for the highlights in the flowers. I’m not concerned with what is going on in other parts of the mask since I will be removing that later; my eyes are focused on the foreground flowers only.
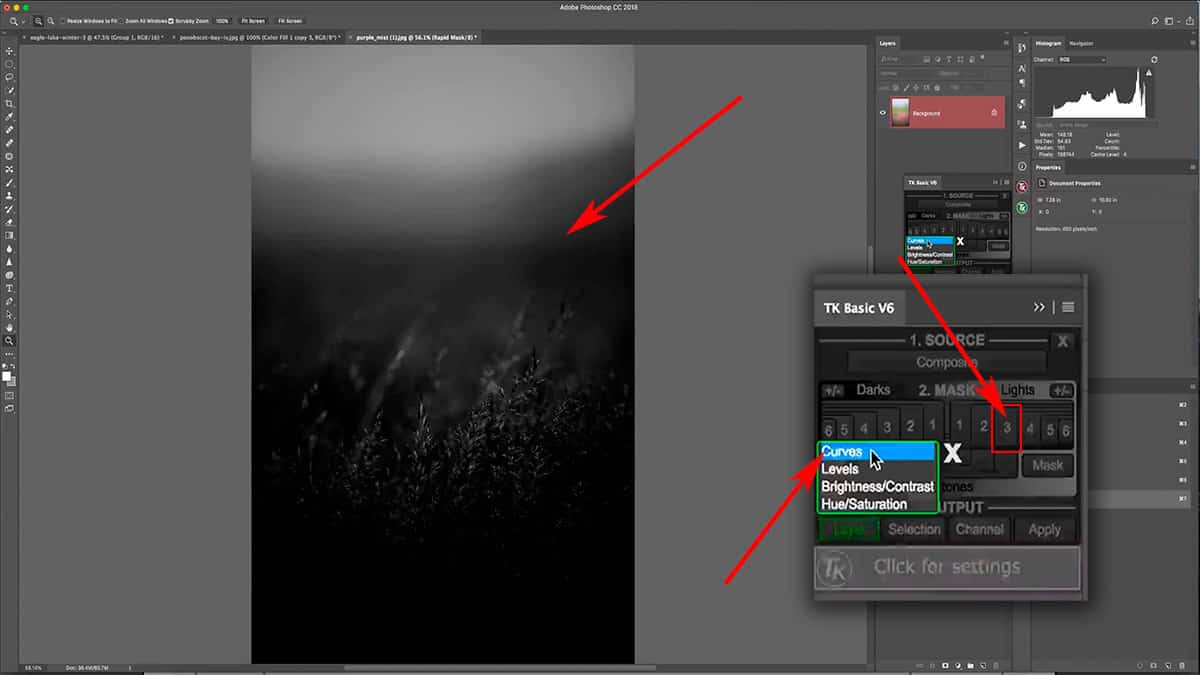
“Lights 3” gives me some nice isolation of the highlights in the flowers, but is leaving out much of the midtones and of course the shadows. This is perfect for the type of adjustment I want to make. Press the Layer button and select Curves to simultaneously add a curves adjustment layer and the “Lights 3” luminosity mask.
Since this luminosity mask is highly restrictive, I can be very dramatic with my tonal shifts here. This is another benefit of luminosity masks….at times, the brightest tone on your mask will be around middle grey, which means you can be heavy-handed with your adjustments and not see much change. This makes it easier to pinpoint exactly how you want your image to look without having to make incremental changes that can be difficult to control.
Since this mask is so dark, I can bring up my curves quite a ways…which brightens the highlights to a very a small degree.

However, we have a little problem here. This curves adjustment layer is also affecting my sky, which is something I don’t want.
To fix this, we’ll “mask the mask” by adding this layer to its own group and masking out the sky. We could simply paint black over the sky areas of the luminosity mask itself, but that’s a destructive workflow since it will permanently alter the intricate detail of the mask.
Add the entire layer to a group, click on the group thumbnail, and then add a new blank mask by pressing the “Add Layer Mask” icon.
I could add another luminosity mask to the group itself in order to remove this adjustment from the sky, but that’s not necessary since this is fairly simple to isolate. The sky is very out of focus and soft, so there’s no sharp detail that I need to follow. Instead, I’ll take a big, soft brush loaded with pure black, bring my opacity up to 100% by pressing 0, and paint over the sky detail.
By first adding this curves adjustment to a group, and then manually painting back onto the group mask to remove this effect from the sky…we were able to preserve the original luminosity mask. This also makes it very easy to reverse any brushwork here by simply switching to white and re-painting into the group mask.
At this point, we’ve only used luminosity masks “straight out of the box”. We’ve applied them directly to layers exactly how they were generated from the panel. However, what happens when the mask is not a perfect fit for the adjustment that you want to make? For example, what if we need to create a mask that is in between a “Lights 1” and a “Lights 2”?
In order to take luminosity masks a step further, you can alter the mask itself by adding contrast to create a stronger selection. Inversely, you can blur the mask in order to soften the selection and feather out the edges even more. This is a very powerful feature that gives you an incredible amount of control over your mask, and I can’t wait to show you how this works.
Refining a Luminosity Mask
Let’s jump back to the image of Eagle Lake that we used in the first tutorial. What we’re going to do here is add some fog to the foreground, but only to the areas that it would naturally appear. Specifically, the fog will be much less visible in the immediate foreground than it will in the background. This will help to retain depth and make the fog appear more natural.
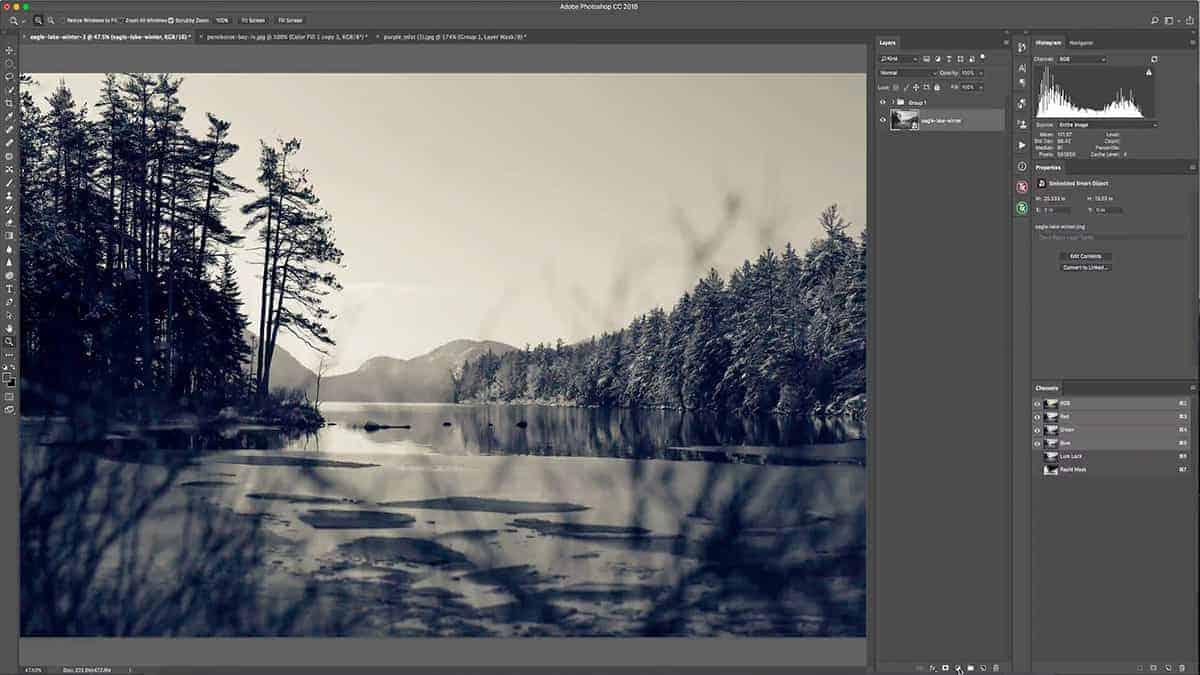
Screenshot is from the free video lesson on luminosity masks, which you can download by clicking here.
Th first step is to add a solid color fill layer…so let’s add that by going down to your adjustment layers and selecting solid color. For this effect, I’m just going to use pure white and press OK. Next, click on the layer mask and press CMD + I to invert it to pure black and hide the solid color layer.

Next, select your brush tool by pressing B and make sure your foreground color is set to white. Set your opacity to 100% by pressing 0, then take a big, soft brush and paint a line across the horizon. Reduce the opacity of the color fill layer to around 30%, or at low enough to where the fog appears more natural.
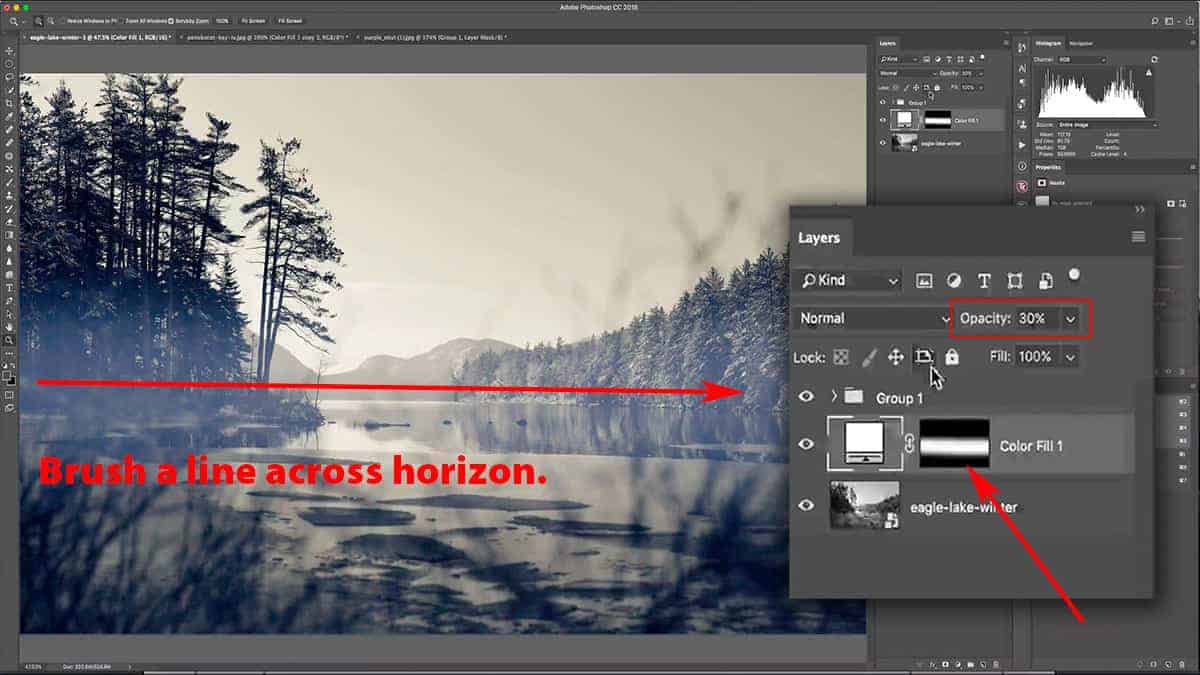
This is looking better, but as you can tell we need to remove this fog from some of the shadow areas in order to bring back some depth and dimension…specifically, the middle-ground trees on the left-hand side of the frame. That is easily done by adding a luminosity mask.
Add this color fill layer to a group and turn the group off temporarily so we can generate some fresh luminosity masks. Open up the TK Basic Panel, click Composite, and select a Darks mask that will give you a nice selection for the shadows.
A “Darks 3” luminosity mask picks up too much of the background, but a “Darks 4” has a weak selection for the foreground trees…so neither one are truly suitable for targeting only the shadows.
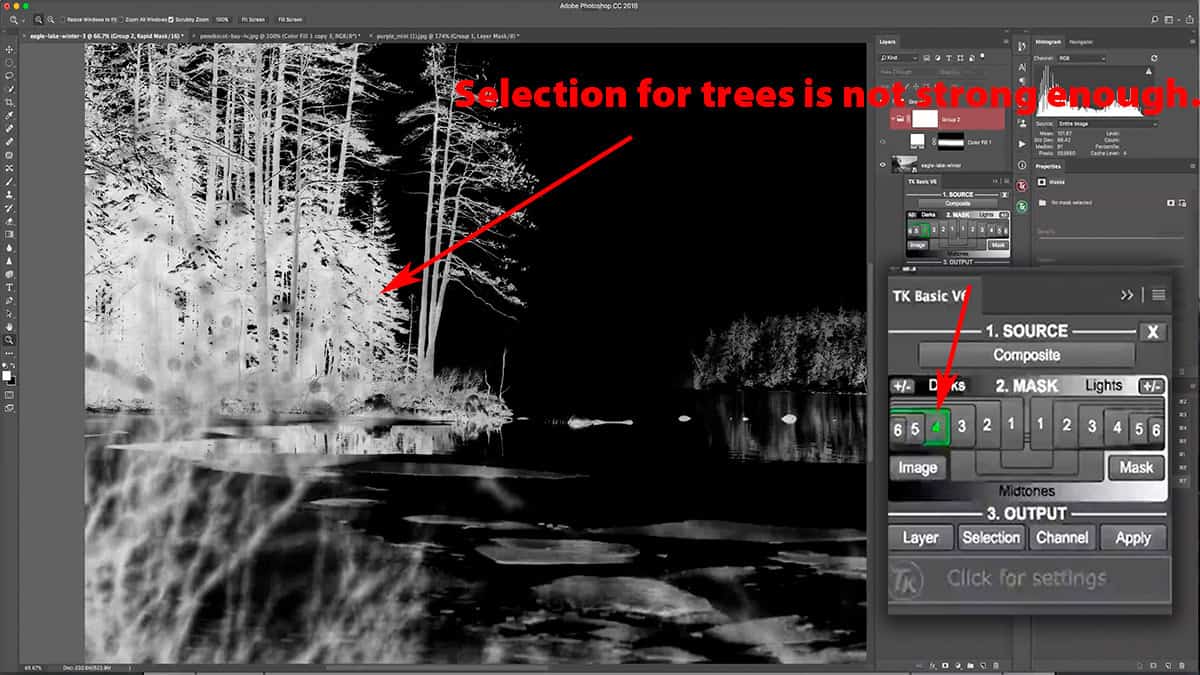
Oftentimes, a luminosity mask will need slight adjustments in order to target the exact areas you want. For example, the luminosity selection may not be strong enough, which will hide your adjustment too much. In other words, those greyish pixels need to be brightened and pushed more towards pure white…which will make your adjustment more visible.
Other times, your luminosity selection may select areas you don’t want to adjust since a luminosity mask is based on your entire image. For example: let’s say you want to create a luminosity mask for the highlights in the foreground. However, this mask is also selecting the highlights in the sky, which you do not want to adjust. In this instance, you would need to control the mask somehow.
You can always “mask the mask” by first adding your layer + luminosity mask to a group, and then adding a mask to the group itself and paint with a black brush to remove the adjustment from areas you do not want. However, this doesn’t always work since you are hand painting with the brush tool and could inadvertently “paint outside the lines” of your desired selection.
This situation is a good example of when you need to manually tailor a luminosity mask in order to get the exact match you want. Since this panel only shows us a mask “preview”, we can alter it directly before applying it to a layer or group.
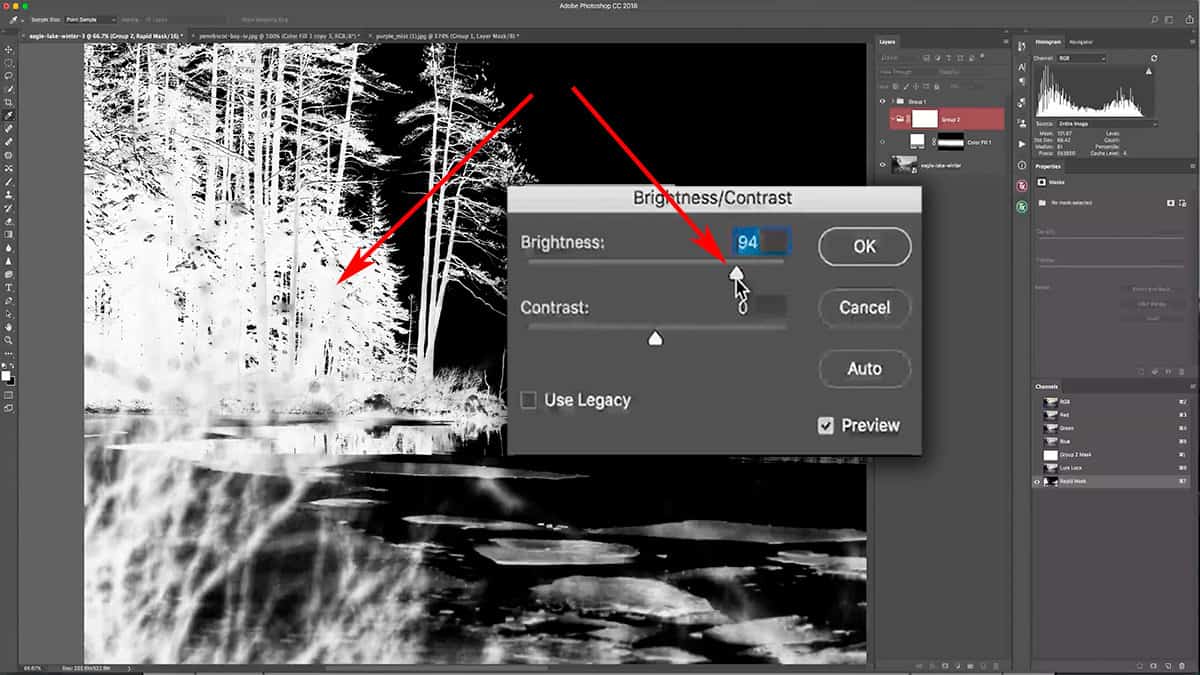
Let’s take our “Darks 4” mask (which is easier to refine since it already has the background excluded from the selection) and go up to Image > Adjustments > Brightness/Contrast. Increase the Brightness slider to around 90-95 in order to brighten up the whites and create a stronger selection for our fog removal. When finished, press OK.
So now we have the best of both worlds: a nice, strong selection for our shadow areas and without any of the background being selected.
SIDE NOTE: You’re not restricted to Brightness/Contrast in order to alter the appearance of a luminosity mask. There are other options available under Image > Adjustments, such as curves or levels. We’ll explore more of these in later tutorials, but feel free to experiment with the type of adjustment to get the results you want.
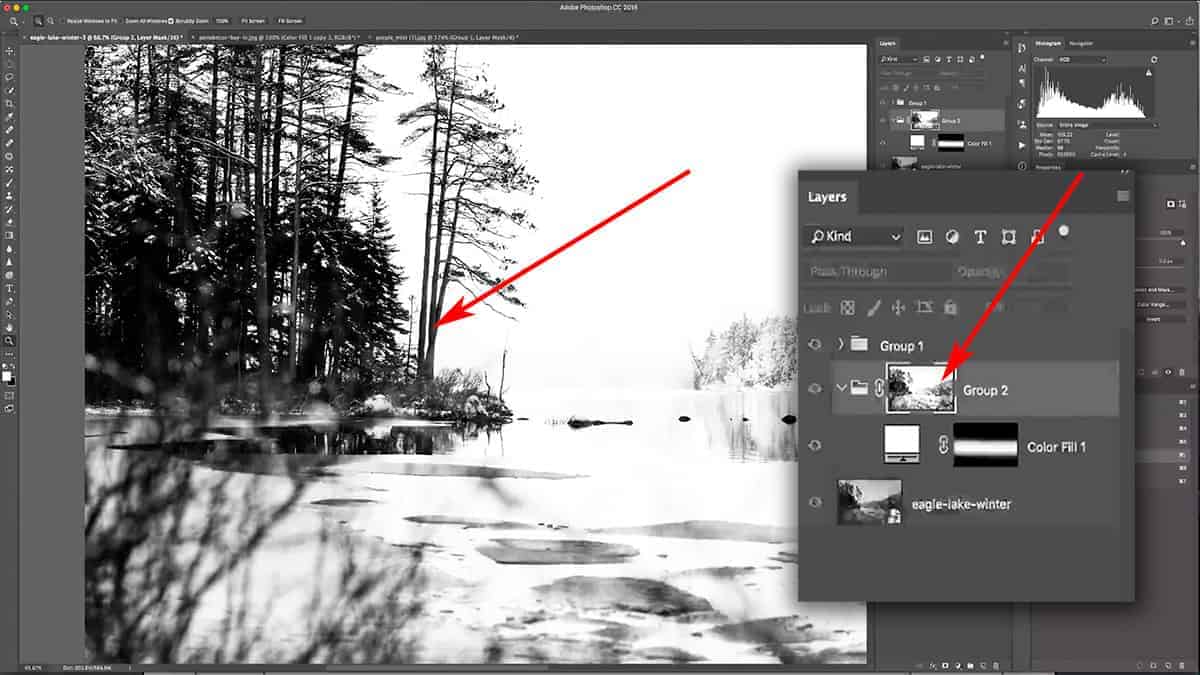
At this point, our luminosity mask has not been applied yet…so make sure to click on the group thumbnail in the layers palette, and go back to the panel and hit Apply to see the result.
Obviously, this is not the result we were expecting…that’s because we skipped an important step.
Right now, our luminosity mask has the shadows painted in white and the highlights painted in black since this mask was created to isolate (or select) our shadows. However, in order to hide the fog from the shadow areas, we want the opposite mask. In other words, our shadows should be black to hide the fog, and the highlights should be white to reveal the fog.
This happens quite often and is a simple fix. Click on the luminosity mask thumbnail and press CMD + I to invert the mask.
At this point, you may be thinking: why didn’t we just use a Lights luminosity mask which already has our shadows in black and highlights in white?
This seems like an obvious choice, but the results are not always what we want. Sometimes, other tones can creep their way into the selection which leaves you with more refining work to do after the mask has been applied. It’s always better to create a luminosity mask based on what you want to isolate, and then invert the mask if necessary.
Since I wanted to isolate my shadows from the selection, I used a Darks luminosity mask and then inverted.
Here’s the final result:
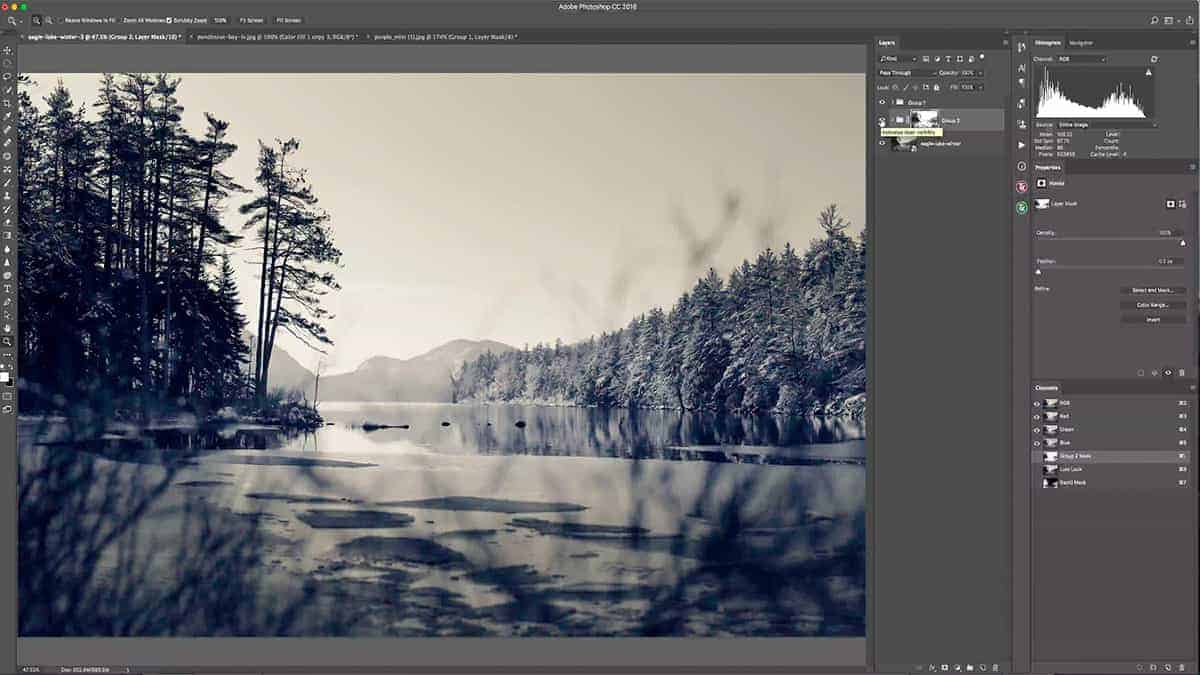
Screenshot is from the free video lesson on luminosity masks, which you can download by clicking here.
By adding the luminosity mask, we managed to cut through the fog quite a lot and created a natural gradient from front to back.
Now if the strength of this luminosity mask is too strong (in other words, if too much of the fog is being removed), you can adjust the opacity of the layer mask itself in order to bring more of that fog back.
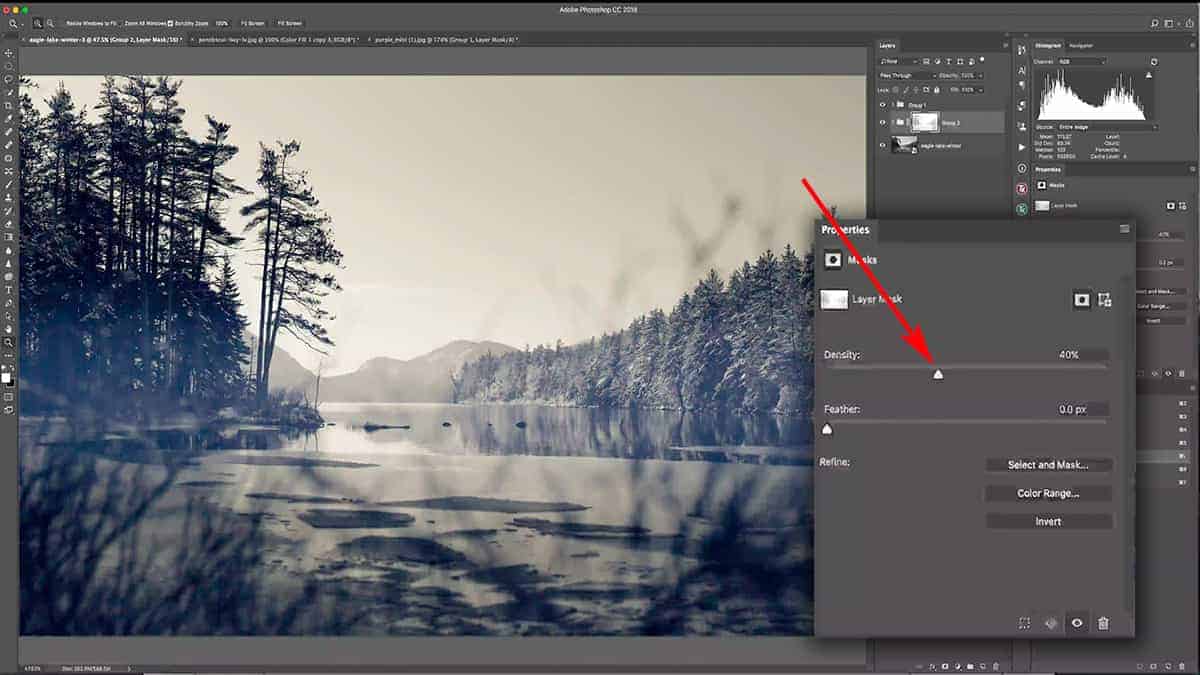
Click on the mask thumbnail and go over to the Properties panel. The Density slider can be adjusted to change the mask opacity; reducing the density will reduce the strength of the entire layer mask (but not the layer itself).
Let’s bring the Density down to about 40%, which brings back enough of the fog to keep the image interesting…but since it’s still controlled by the luminosity mask, the fog is applied much less on the shadows which gives the image more depth and interest.
And since this is a non-destructive workflow, you can always come back later and alter the density if needed.
To finalize this fog effect, we can change our color fill layer to better compliment the image. You can see that the color of the fog is slightly shifted towards blue because it’s adopting that blue shift to the shadows we added in the luminosity masking beginner’s tutorial. To counteract this, let’s change the color fill to something warmer than pure white.
Double click on the color fill thumbnail in the layers palette to bring up the color picker…and pick a nice, pale yellow to better match the image. Make sure you’re at full brightness and very low in saturation.
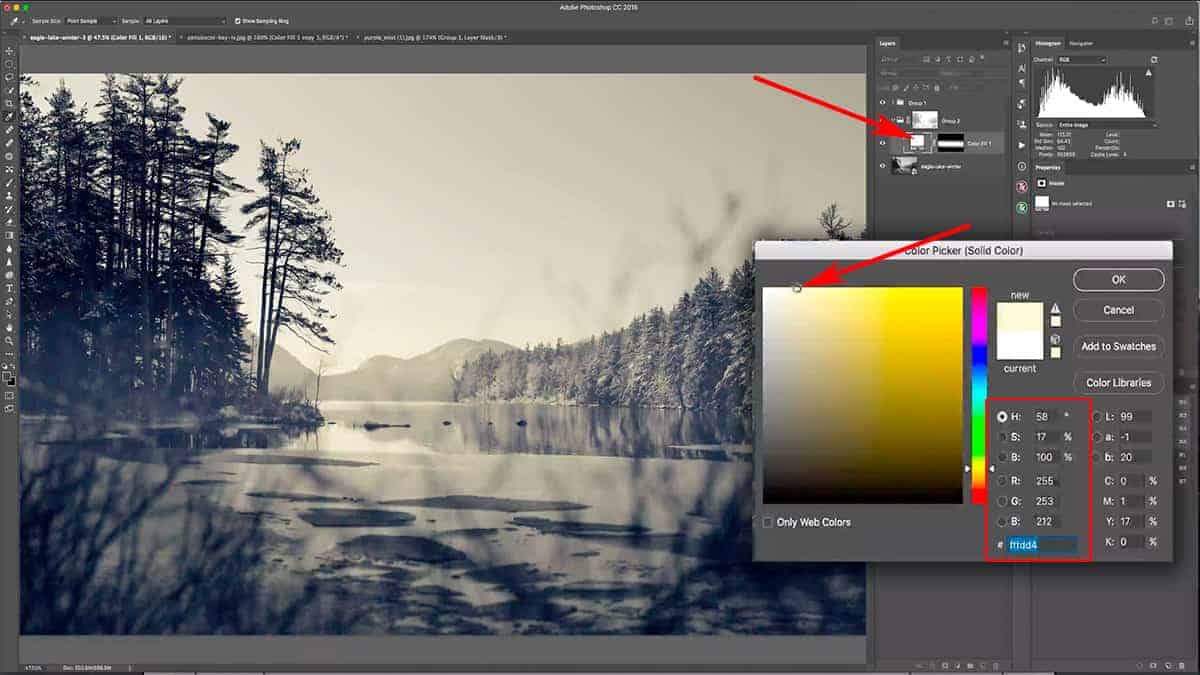
This is why I like using a solid color fill layer since you can always come back and change the color very easily…and you can see the changes live on the image as you choose different colors in the color picker window. This also contributes to the non-destructive workflow we’re trying to preserve.
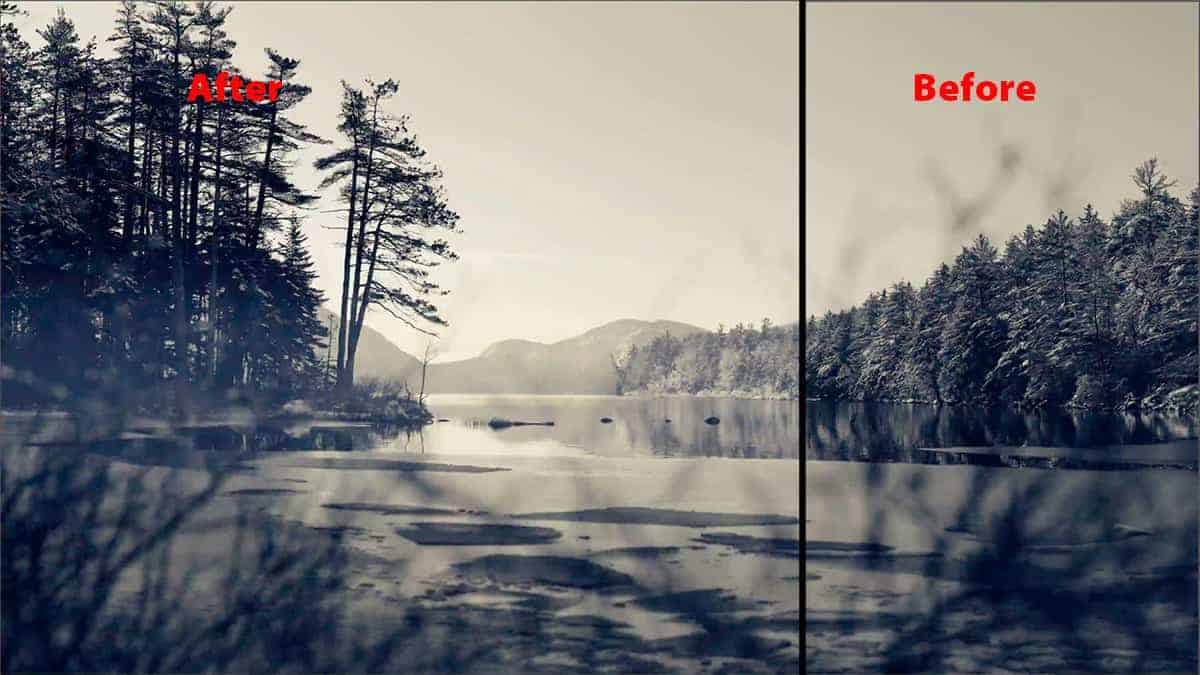
Here’s the complete before and after, showing the cumulative result of our fog:
I hope you’ve enjoyed this tutorial on different ways you can use a luminosity mask to enhance the light and atmosphere of your image.
One final note: a luminosity mask will not change your image for you. You still have full, 100% manual control over your creative adjustments. The only part that is automated here is the actual creation of these luminosity selections (which you then turn into masks), which allows you to skip over hours of repetitive work to create these selections yourself.
This tutorial barely scratches the surface as to what is possible with luminosity masks. There are many other benefits that you’ll soon discover with my additional tutorials and through your own experimentation as you begin to use these masks in your own workflow.
In your next lesson, I’ll be showing you my full dodging and burning workflow, and specifically how luminosity masks will greatly enhance the quality and clarity.
>>> How to Dodge and Burn with Luminosity Masks <<<
While dodging and burning in Photoshop can be incredibly powerful and yield fantastic results, it can also present some unique problems…particularly the flattening of tones. I’ll show you how I use luminosity masks to overcome this challenge.
Don’t forget to download the video and practice files for offline learning.
Thanks for joining me…and if you have any questions, feel free to leave a comment below for me to answer!