Dodging and Burning with Luminosity Masks
Dodging and Burning with Luminosity Masks
Dodging and burning in Photoshop is a powerful way to control the light and shadow of your landscape…but it can also present some unique problems, particularly flat tones and muddy detail.
Here’s the good news: luminosity masks can instantly enhance the clarity of your dodging and burning by preserving contrast and protecting detail..literally acting as a stencil that filters the quality of your brushwork.
Not only is this workflow incredibly powerful, but very simple to use…so I can not wait to show you how this works.
Luminosity masks are best learned when taught visually, so I’ve pulled a comprehensive video lesson from my membership program for you to watch. However, a video is not always the most convenient way to learn, so I’m also including the full written tutorial below.
If you’re pressed on time, make sure to download the video lesson so you can watch around your own schedule. I’m also including any practice files so you can practice right alongside this tutorial. It’s easier to grasp concepts in Photoshop when you actually do it yourself as opposed to simply watching someone else do it for you. Just fill out the form below the video and you’ll be sent a download link.
[fl_builder_insert_layout slug=”lm-optin”]
As you already know, dodging and burning is a fantastic way to strengthen the balance of light and shadow in an image. This is especially powerful in landscape photography since we can not control the natural light in our image (like we can in a studio), so it’s up to our processing skills to enhance the balance of our composition.
Luminosity masks can help tremendously with dodging and burning since these masks will prevent (or reverse) typical problems. For example, dodging a shadow or burning a highlight can wash out detail, muddy colors, and flatten tones…but when you add luminosity masks to your workflow, you can tailor the adjustment to your image and retain contrast and detail.
[fl_builder_insert_layout slug=”luminosity-mask-table-of-contents”]
Luminosity Masks for Dodging
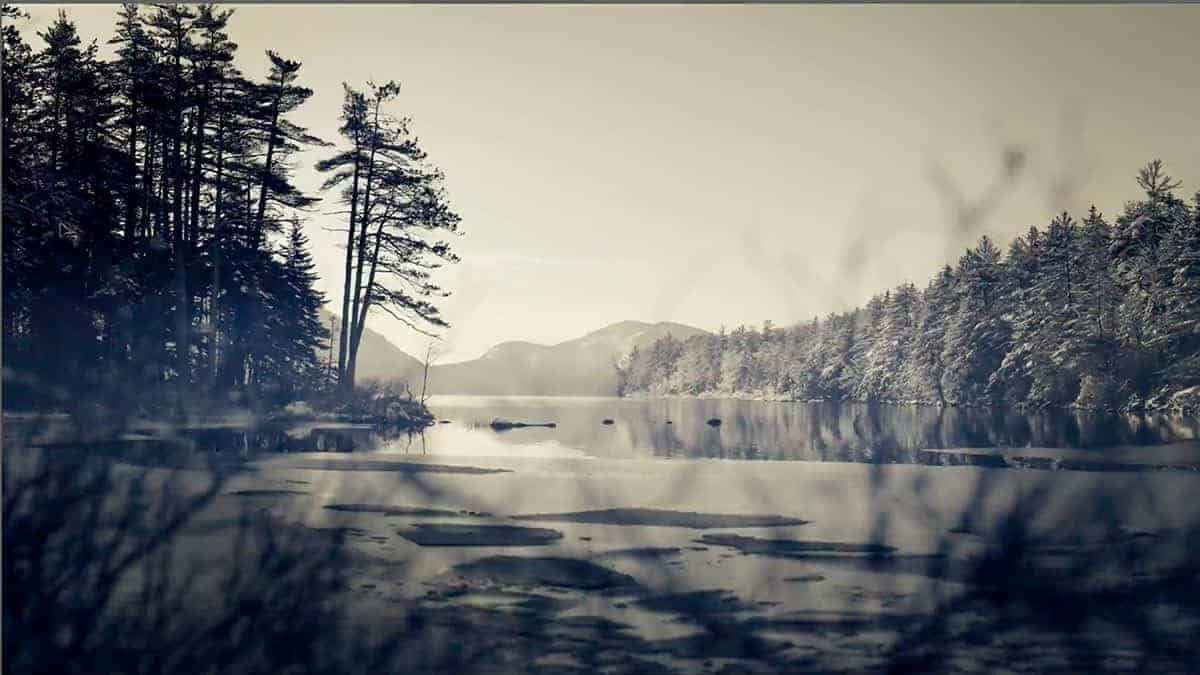
Let’s go back to the image of Eagle Lake we’ve been working with in the previous tutorials. I want to first dodge this tree line in order to brighten it up and pull more attention towards the right side of the frame. The bright sky behind the mountain and the dominant tree is drawing attention to the left side, so I want to fix that.
Also, by brightening up this treeline, it will create a bigger tonal gap between these trees and the darker trees on the left side…which will counter-balance each other nicely. 
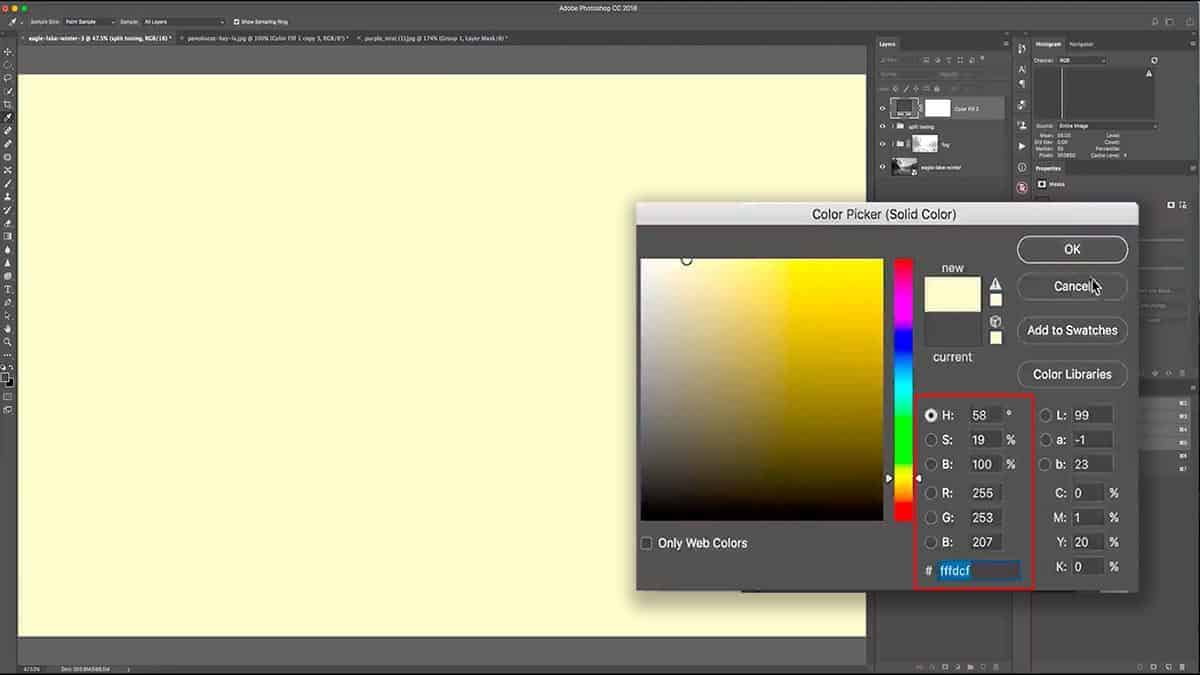
Let’s start by setting up the proper environment for dodging. First, add a new solid color fill layer and sample a light, pale yellow (full brightness and a saturation around 20%)…much like we did in the first lesson where we warmed up the highlights.
Select OK to add this new adjustment layer, and then invert the layer mask to pure black by pressing CMD + I, which will hide this color fill layer entirely.
Also, make sure to set your blend mode to “soft light”, which is what I normally use for dodging.
Grab a big, soft brush (one with 0% hardness) and set your foreground color to white with an opacity around 40% to start.
Begin to dodge the treeline by brushing over it, which will gently reveal the color fill layer we just added (but at a much lower opacity). One pass should be enough to dodge this tree line.
Next, reduce your brush opacity down to about 10% so you can fine-tune the dodging and fill in any areas you may have missed.
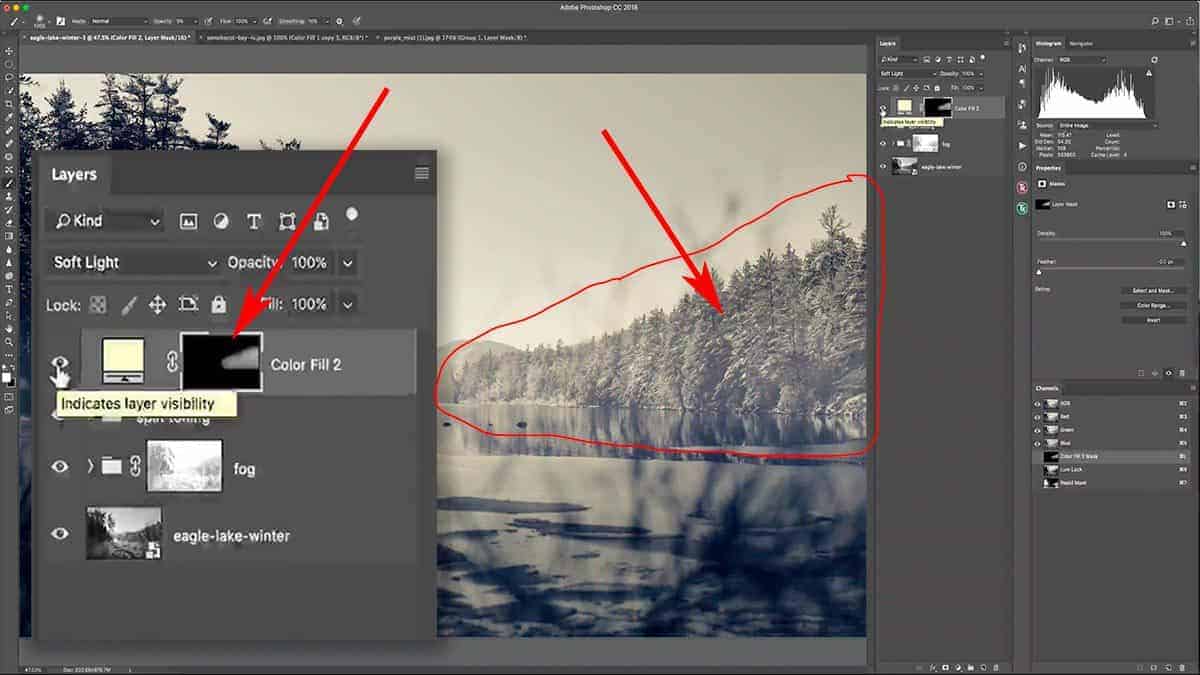
As you can tell, dodging significantly like this can severely wash out your tones and flatten the contrast…and almost looks like you added fog to the treeline. This is even more apparent when you dodge over a highly textured area like this…with lots of sharp detail with bright highlights and deep shadows. You never want to dodge a shadow this dramatically, and this is why.
Luminosity masks can help tremendously here; they make your dodging more effective by allowing you to control which tonal groups your brushwork will effect. By using one of these masks to heavily remove the dodging from the shadows, we can still lighten this area without losing detail, depth, or contrast.
In order to counteract the washed-out appearance of our dodging here, I’ll add a restrictive luminosity mask to remove the dodging just from the shadows.
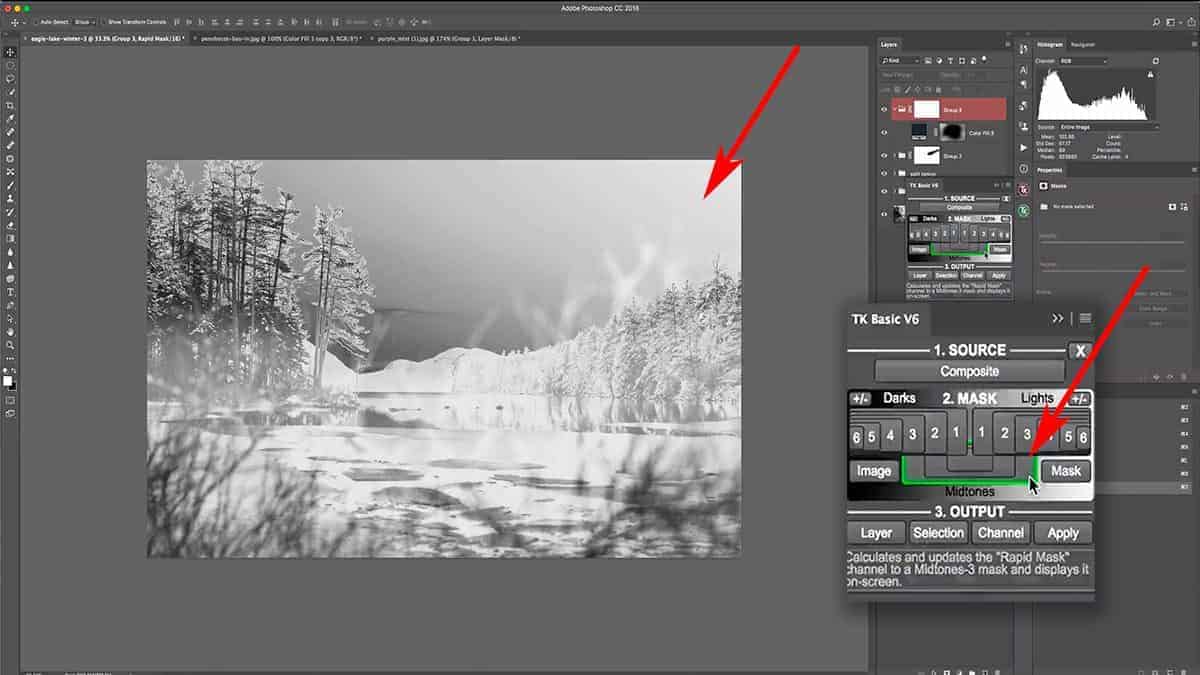
Let’s first turn this solid color fill layer off so I can generate a fresh set of luminosity masks based off of my original image (before we adding the dodging). Next, open up the TK Basic Panel so we can generate our masks.
Note: If you’re unfamiliar with this fantastic (and 100% free) panel for generating luminosity masks, make sure to read all about it on the first tutorial.
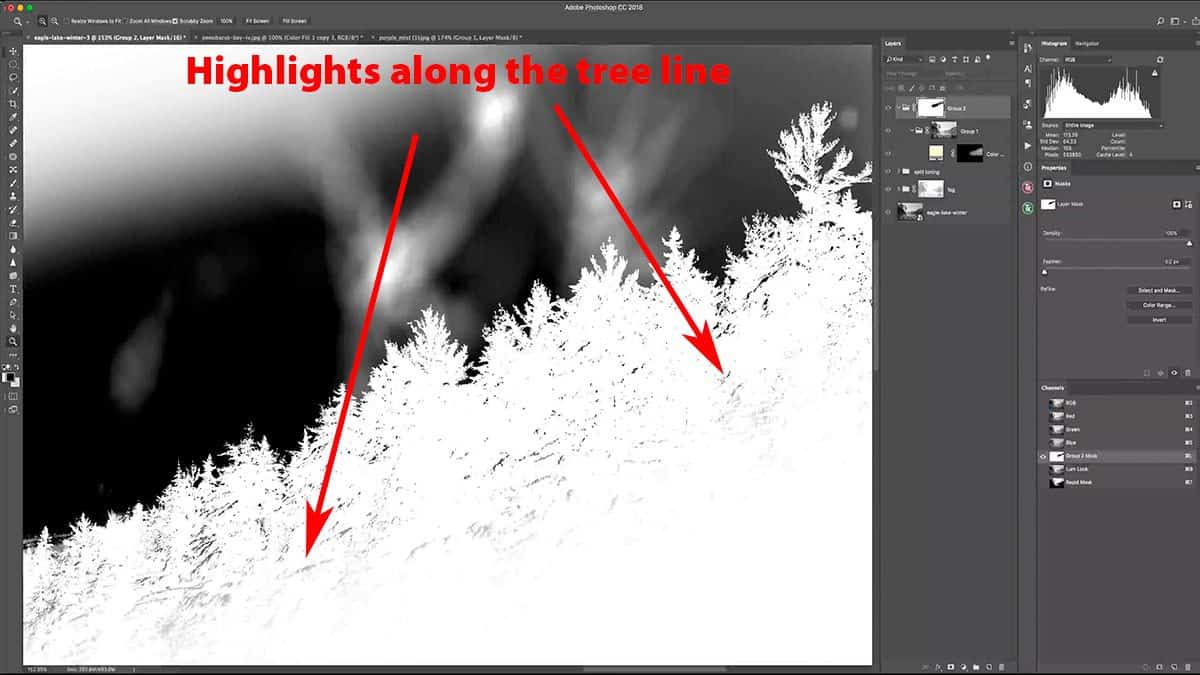
Hit the “composite” button to generate fresh masks, and let’s choose one that selects our highlights nicely while excluding the shadows.
The basic “Lights 1” mask does give us a nice selection of the highlights, but it’s not strong enough. If we zoom in and sample one of the brightest pixels, it is only set at 79% brightness…which means that the strongest selection of this mask is only at 79%. I want a stronger selection for my highlights, so while we are still in the “mask preview” mode, I’m going to refine this mask further in order to strengthen this selection.
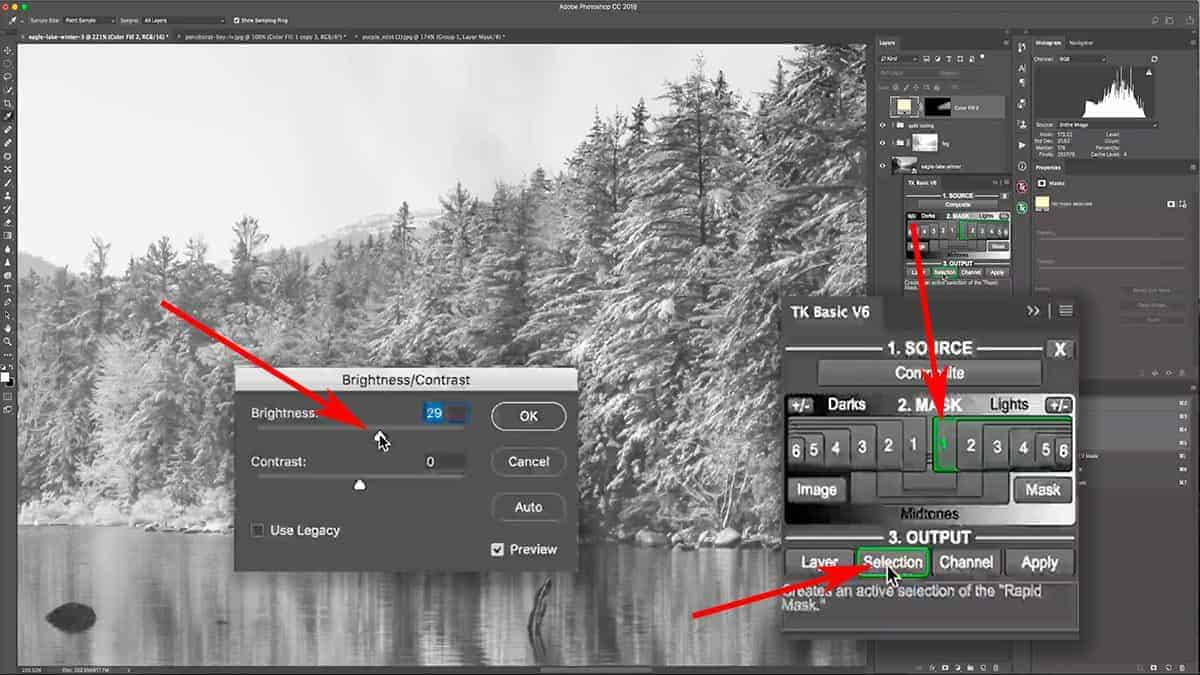
Let’s add some Brightness to this “Lights 1” luminosity mask before we apply it to the dodging layer. Click on Image > Adjustments > Brightness/Contrast and bring up the brightness by about 30 points.
Hit OK, and go back to the TK Basic Panel. Instead of choosing Apply or Layer, I’m going to press Selection which will load the luminosity mask as an empty selection (as seen above) since I first need to move some layers around before creating the mask.
This is a great way to “save” your luminosity mask to the side if you need to first create additional layers before applying it as a mask. Now you can always come back to this panel and access your most-recently created luminosity mask (even if you click off the panel)…but I sometimes find it easier to simply load it as a selection and then rearrange my layers as needed.
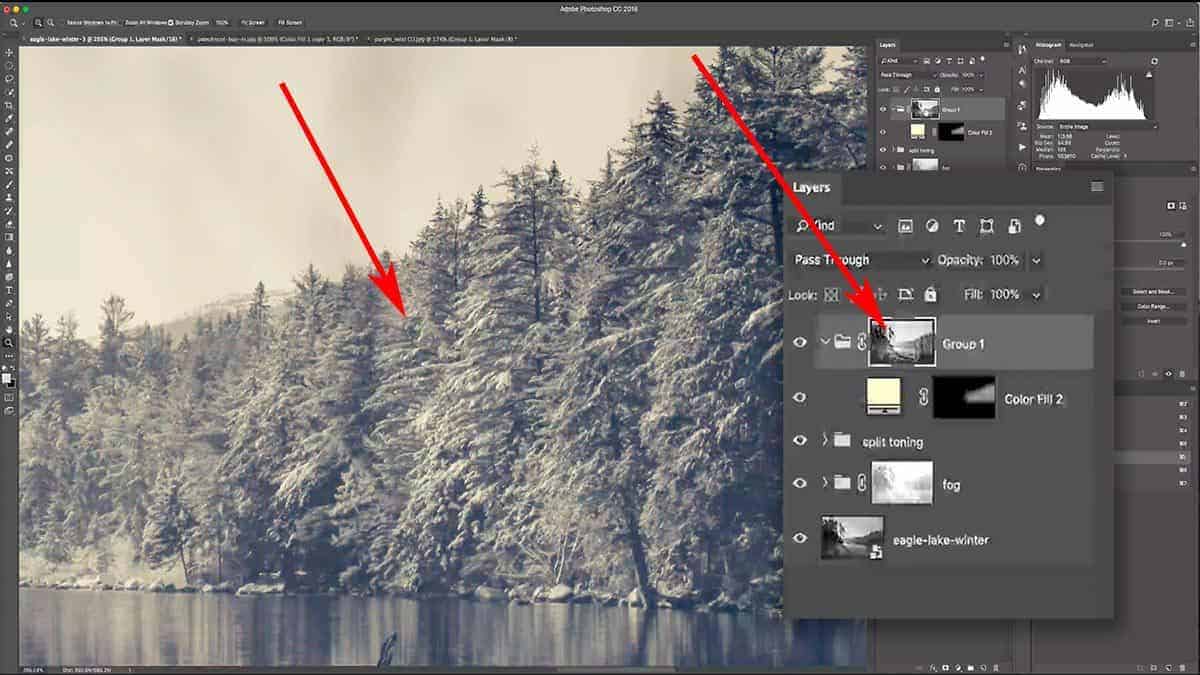
Now that this is loaded as a selection, I can reorganize my layers. Let’s place the solid color fill layer into its own group, then apply a mask to the group itself. Since the luminosity mask is already loaded as a selection, it is automatically applied to the mask as soon as you create it.
Screenshot is from the free video lesson on luminosity masks, which you can download by clicking here.
Let’s take a look at that treeline with the luminosity mask in place. We managed to remove the dodging from the shadows entirely, which leaves us with a highly refined result that would otherwise be very difficult to achieve: global dodging that retains contrast and detail. This gives you a cleaner, protected environment to dodge in and only takes a couple of clicks to create.
Depending on your image, you may need to use a Midtone luminosity mask instead of a Lights. If you remember earlier in this tutorial, I sampled one of the brightest pixels and it came in at only 79% brightness…which means that the treeline can take a bit of dodging before I start to blow out detail.
However, if my brightest highlights in the treeline were closer to 100%, dodging would increase the brightness too much and overexpose my highlights. If that was the case, I would have used a Midtone luminosity mask instead…which would remove the dodging from my brightest highlights and darkest shadows simultaneously.
Luminosity Masks for Halo Removal
Another way a luminosity mask can enhance your dodging and burning is by cleaning up the brushwork. As you’ve probably discovered yourself, it can be very difficult and tedious to brush within the lines…especially when dodging and burning since you want this effect to be very feathered and soft. By adding luminosity masks to your workflow, you can simply brush over an area generally and then use a mask to “sculpt” your brushwork to hug the unique content of your image.
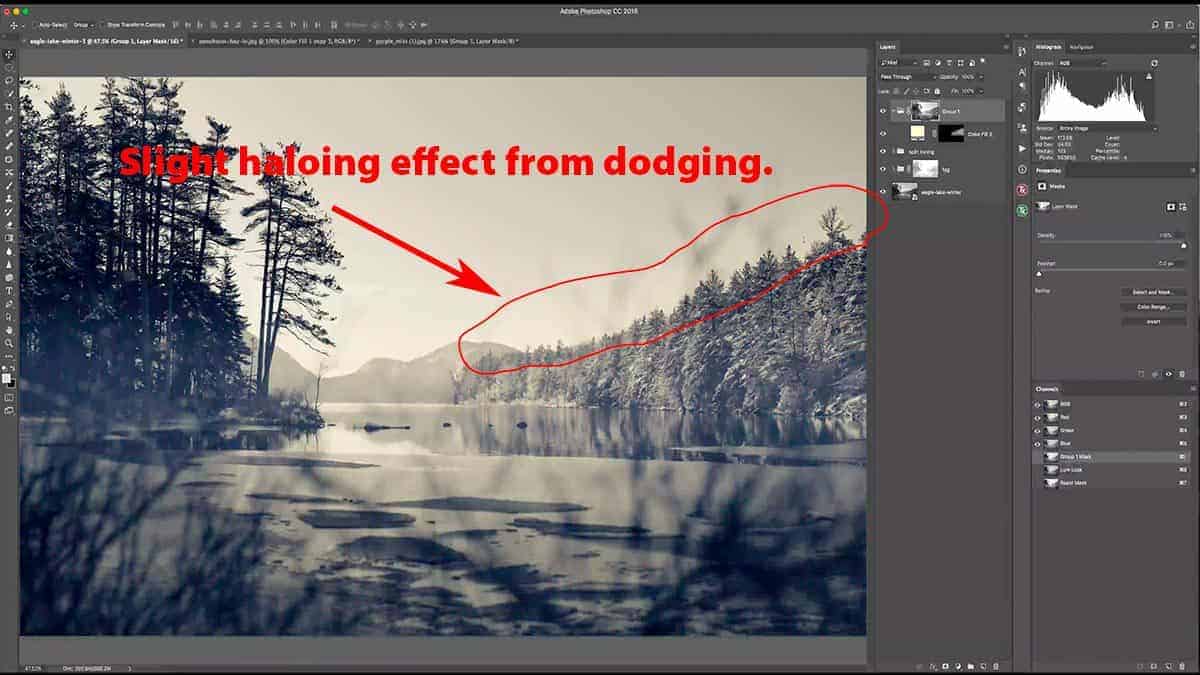
Here I generally brushed over the entire treeline, which also included some sky detail that I don’t want to dodge. This resulted in a slight haloing effect in the sky that needs to be removed. It is a bit difficult to see the halos since my dodging is very light…but in other images, halos can be very apparent depending on how dramatic your adjustments are.
By adding another luminosity mask, I can restrain my dodging to just the tree detail, and have it hug every nook and cranny of those jagged pine trees. In other words, we can use a mask to separate the dodging on the treeline from the dodging on the sky…and then simply hide any dodging that spilled over onto the sky.
Although this sounds a bit complicated, it’s quite easy to do.
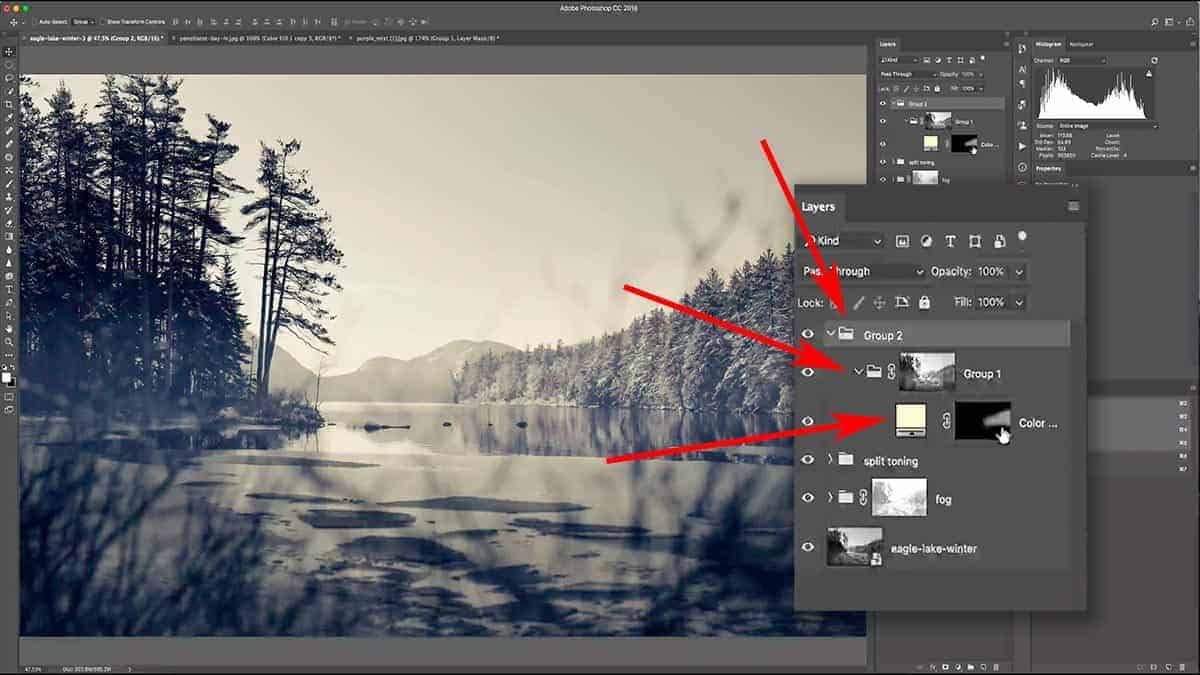
The first step is to place your dodging group into another group, which will allow us to add a luminosity mask to the current group (that contains the solid color dodge layer). In other words, we are taking “masking the mask” a step further by masking a luminosity mask that is controlling the solid color fill layer.
When you add this group to a new group, make sure to also add a new blank layer mask.
Next, let’s create a luminosity mask that will give us a nice, strong selection for the sky only. This will act as a stencil that will filter the original dodging brushwork that spilled over onto the sky detail.
Let’s open up the TK Basic Panel…and for this, we do not have to generate new luminosity masks since they were already created at the beginning of this tutorial. It’s good practice to continually update your masks so that they reflect the current tonal range of your image, but that is not needed here.
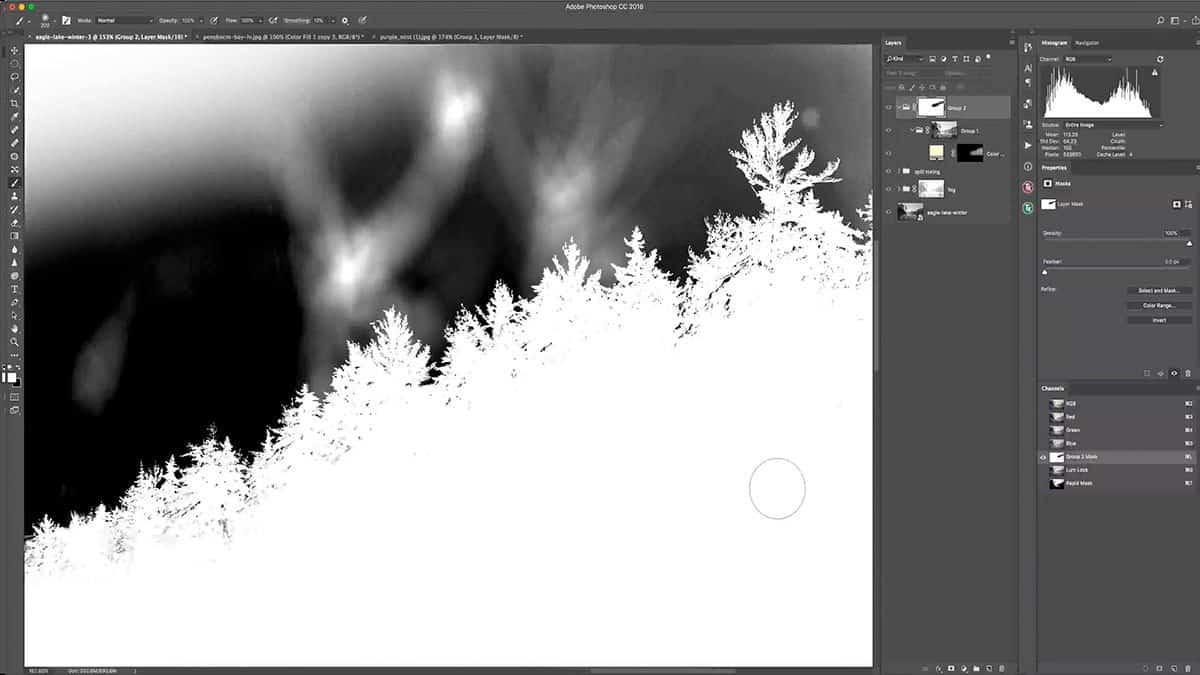
Since we want to isolate the sky from the treeline, let’s cycle through our Lights luminosity masks and choose one that gives us a strong selection between sky and treeline.
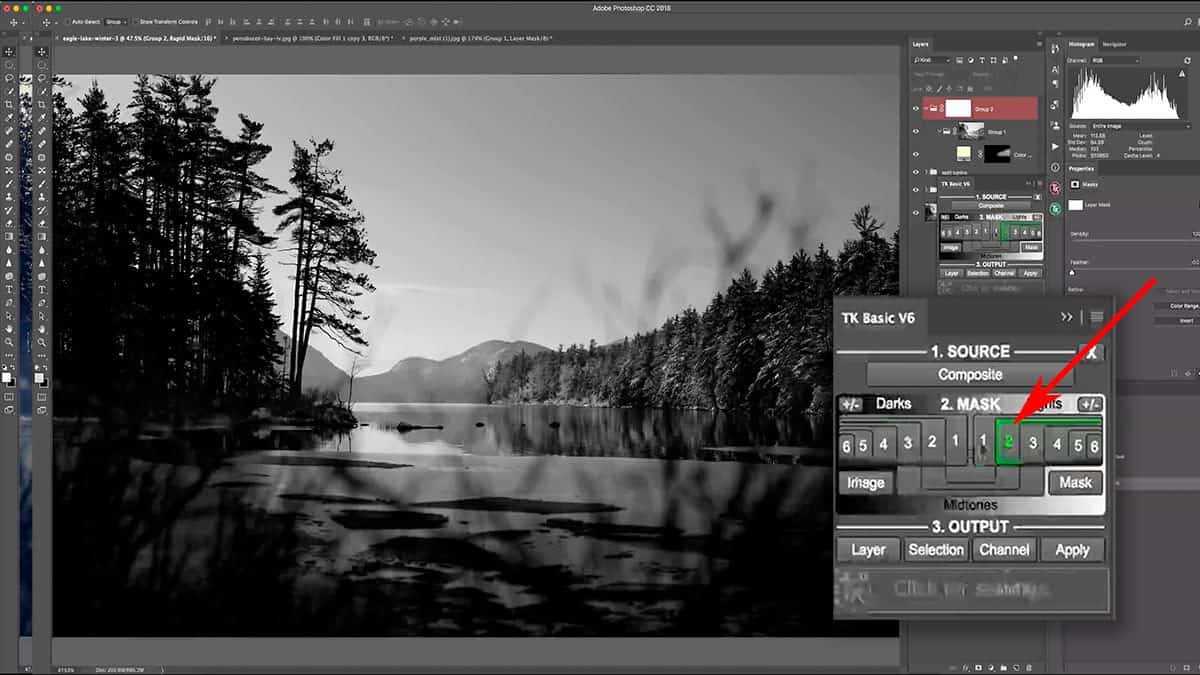
A “Lights 2” mask gives me a solid separation between the sky and the treeline…but we do need to tailor this a bit more so that the treeline is darker and the sky is brighter. Otherwise, we’ll hide some of the dodging from the treeline as well as keeping some of it in the sky. In other words, we need to add some contrast here in order to strengthen the separation even more.
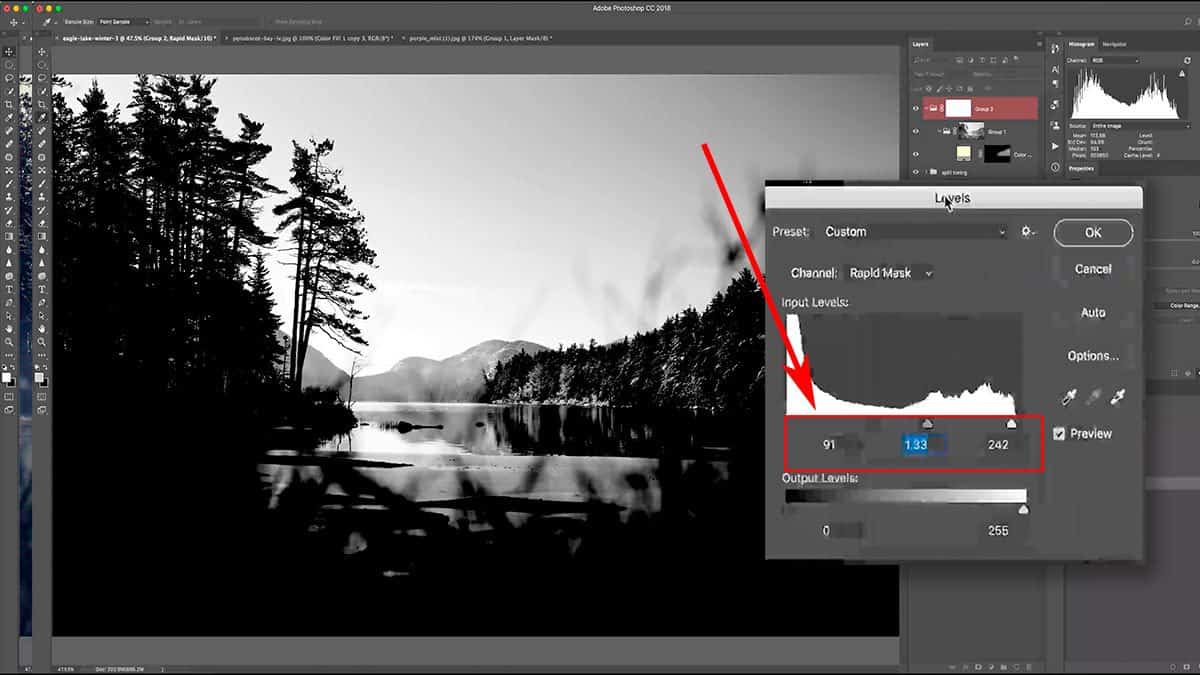
First, let’s brighten up the highlights by going to Image > Adjustments > Brightness/Contrast and increasing the Brightness to about 65 to take care of the sky. Next, go to Image > Adjustments > Levels and let’s add some contrast in order to darken the tree line and create a stronger separation between the sky and trees.
Next, load this mask as a selection by pressing the “Selection” button on the TK Basic Panel, then click on the mask thumbnail for the new group you just created. What we’re going to do here is use our brush tool to paint over the areas we want to remove the dodging from – in this case, the sky area directly above the treeline. Since we are using a luminosity selection, it’s going to control our brushwork and act as a stencil.
This is called “luminosity painting” and allows you to add a luminosity mask only to specific parts of your frame as opposed to the entire image.
Since the only problem area is right above the treeline, this will work well and will help ensure that we don’t inadvertently remove the dodging from the treeline.
Begin to paint over the sky areas with a black brush set at 100% opacity. There’s no need to worry about painting over the treetops since the luminosity selection will prevent the brush from affecting those areas, as seen below.
When you paint over an active selection like this, it works just like a stencil. So while I brushed over this entire area with a soft, black brush set at 100% opacity…it protected the treeline from being painted in black. This gives me the exact result I want: the sky in black and tree line in white, which removes my dodging from the sky (as well as those distracting halos).
This is a highly refined and controlled environment for dodging and burning, which is perfect for a complicated adjustment like this. We have very specific areas that we want to exclude from this dodging (the sky detail and shadows in the treeline), as well as areas we want to dodge (the midtones and highlights of the tree line). Thanks to the versatility of luminosity masks, we were able to isolate these very delicate areas.
[fl_builder_insert_layout slug=”lm-optin”]
One thing you’ll notice about this luminosity mask is that it picked some of the bright highlights along the treeline, as noted by the small dark specks in the above screenshot. These are areas of snow and reflected highlights on the tree branches. Ideally, I want the entire treeline to be completely white…but Photoshop doesn’t know the difference between a highlight on the tree vs in the sky, so I have to refine this manually.
This is why I wanted to paint the luminosity mask in with my brush tool so that I wouldn’t have too many of these areas to remove.
Correcting this is quite simple. Make sure this luminosity mask is selected and active by clicking on the thumbnail in the layers palette, and take a small white brush set at 100% opacity and manually paint over the treeline to clean this up. You don’t have to worry about painting right up against the treetops (where the sky begins to poke through the branches) since that will not be noticeable.
This is not only a great workflow for dodging and burning, but also for removing any halos that will sometimes creep up when exposure blending.
Luminosity Masks for Burning
The workflow for burning is pretty much the same as dodging, but with different goals and results.
For this image, I’d like to add a very soft vignette in order to push more attention towards the center of the image. I like to achieve that by burning the edges of my frame with the brush tool, which will give a more tailored and natural result…as opposed to using actions or other automated vignette effects.
First, let’s zoom out a bit so we can see the edges of the canvas.
Next, add a solid color fill layer – but this time, select a dark and muted blue. The saturation will still be low (under 25%), but the brightness will be at around 15%. Counterbalancing the pale yellow we used for the dodging with a dark blue for the burning will create some additional depth and interest.
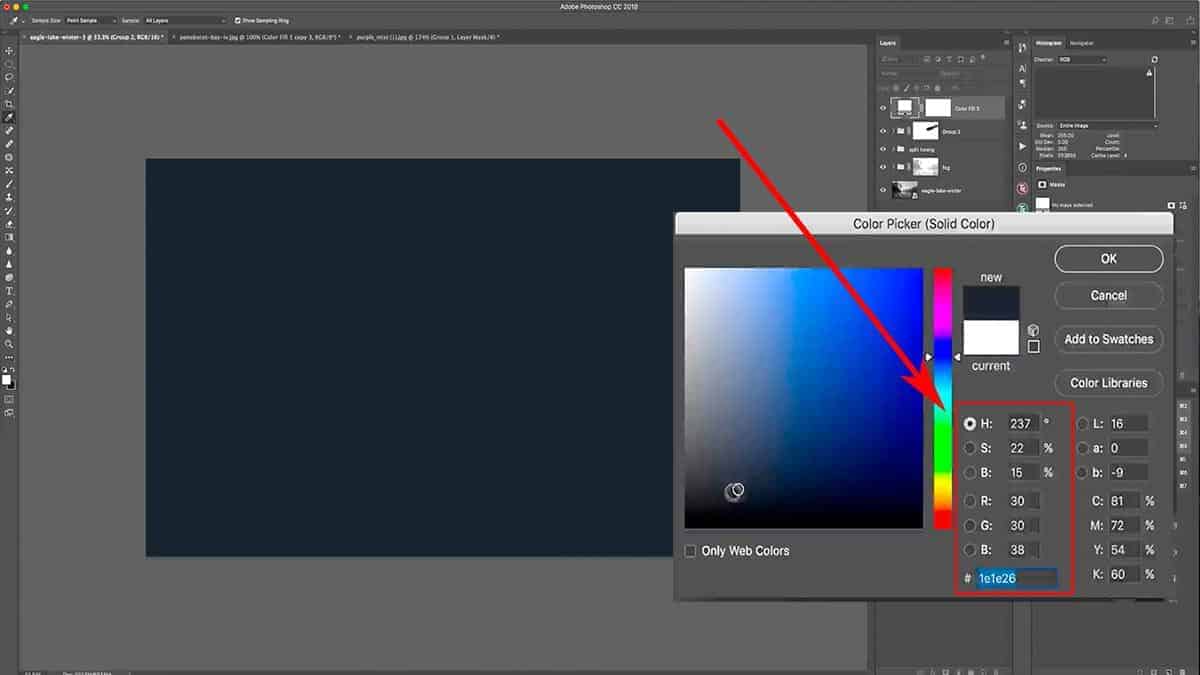
Screenshot is from the free video lesson on luminosity masks, which you can download by clicking here.
Hit OK to create this adjustment layer, then change the blend mode to Overlay (for burning). Next, invert your layer mask so that it’s pure black by pressing CMD + I.
Much like we did with our dodging, let’s grab a soft, white brush set at around 40% opacity to start. Begin to paint around the edges of the frame, paying attention to only burn areas that you want to minimize the most and accentuating the existing light balance.
For example, I burn the bottom left and right corners of this image the most in order to push more attention towards the bottom middle, which is already higher in brightness.
When finished, your layer mask should look something like the screenshot below…where most of the attention is still towards the center of the image, but the brushwork loosely follows the landscape and existing light and shadow.
I find this workflow for a vignette much more successful than simply drawing an oval over the center of an image. Not only is the brushwork 100% customized to the photo, but you can easily remove the vignette from certain parts if you went too heavy. Simply switch your color to black and brush over any area you want to remove the vignette from.
We have our vignette…but as expected the tones are looking rather muddy.
There are two causes for this:
- The burning is crushing our darker shadows. This image already has deep shadows along the edge of the frame (particularly the bottom corners and treeline on the left), and burning those areas starts to crush the shadows and block up important details.
- We are also burning the highlights, specifically along the sky…which is more of a distraction than an enhancement.
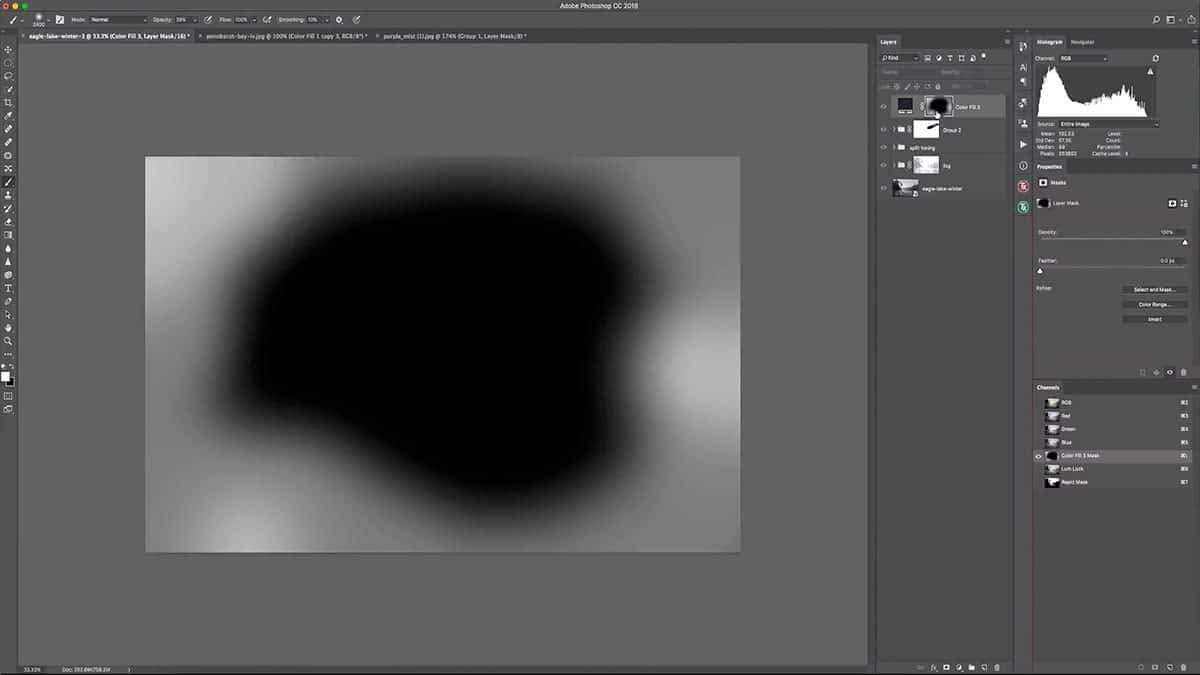
In order to remove this vignette from our shadows and highlights simultaneously, I’m going to add a midtone luminosity mask to this burn layer.
The first step to “masking the mask” is to place this vignette layer into its own group. Make sure to keep the group active by clicking on the group thumbnail in the layers palette.
Next, open up your TK Basic Panel and select a midtone luminosity mask (I’m using a “Midtone 3”). With your group still selected in the layers palette, press “Apply” to convert this luminosity selection into a group mask.
This is looking much better, but I can remove this even more from the sky by adding a bit of grey to the luminosity mask. Alt + click on the mask thumbnail to bring it up on the canvas, and go to Image > Adjustments > Brightness/Contrast and bring that down to about -65.
Here’s the final image with both dodging and burning:
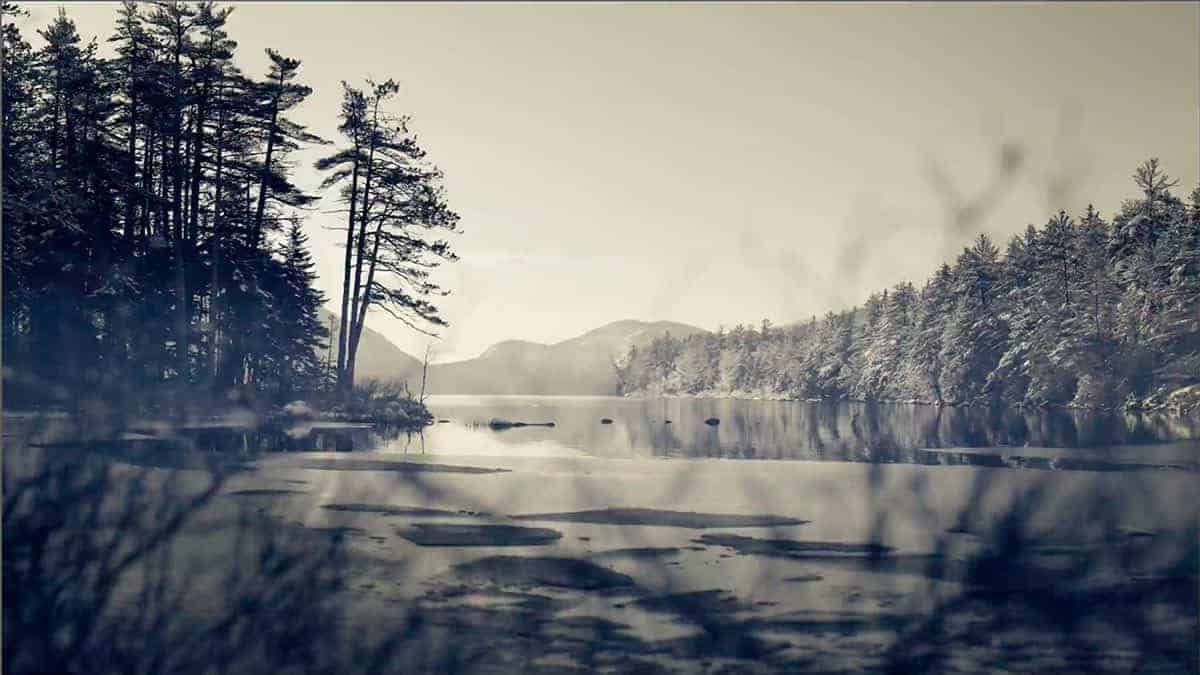
I find the resulting vignette to be very successful since it’s not obvious that you added one. Instead, your eyes are gently directed towards the center of the photograph without knowing why.
You can say the same for the entire dodging and burning workflow: the “before” image isn’t that different from the “after” above, but the entire balance of focal points and overall flow of attention has been improved greatly with just a few small adjustments to light and shadow.
I hope you enjoyed this tutorial and found some helpful tips for your own processing in Photoshop. Luminosity masks are especially helpful with dodging and burning since these selections are complementary to any technique that manipulates light.
Don’t forget to download the video and practice files for offline learning.