The Complete Guide to Shutter Speed for Photography
The Complete Guide to Shutter Speed for Photography
Camera shutter speed is the measurement of time that the sensor is exposed to the light of your scene – thus creating your photograph. It’s not only an essential part of fully comprehending manual mode, but your shutter is also responsible for many creative effects.
For example…freezing fast action or smoothing texture in long exposures is the direct result of knowing how your shutter works and what speed to use, allowing you to completely transform the content of your image by a simple shift in your settings.
Understanding shutter speed becomes VERY simple once the basics are laid out for you, which is why I created this easy-to-follow (yet comprehensive) guide.
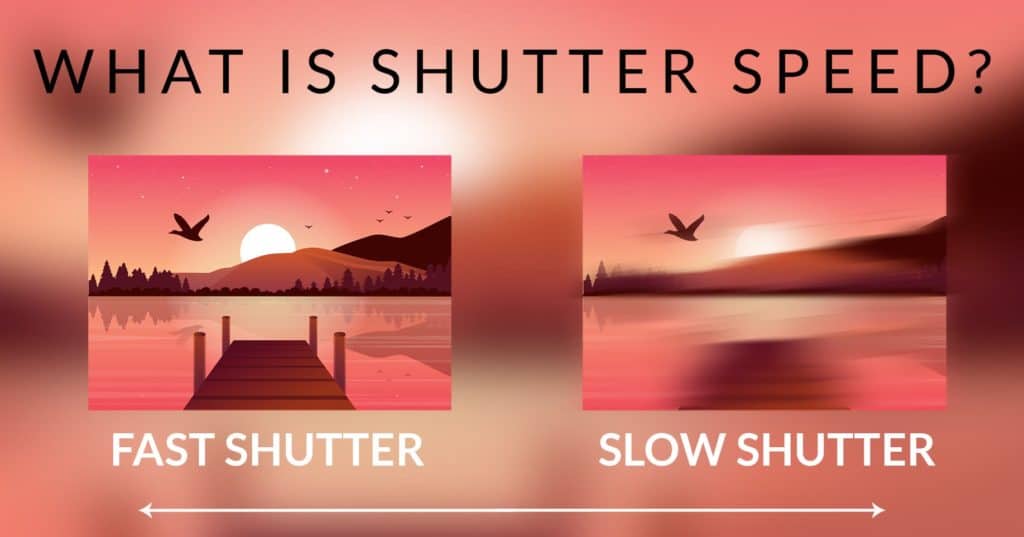
Table of Contents
- 1. What Does the Shutter Actually Do?
- 2. What is a Camera Shutter?
- 3. Why Your Shutter Speed Matters
- 4. Creative Use of Shutter Speed
- 5. Challenges with Shutter Speed
- 6. Finding and Changing Your Shutter Speed
- 7. The Best Shutter Speed for Landscape Photography
1. What Does the Shutter Actually Do?
A photograph is created by exposing the sensor to light. And how much light the sensor needs to properly render your image (not too dark or too bright) depends on what you’re photographing – specifically, the luminance of your scene (how much available light there is).
The goal here is to expose your sensor to the right amount of light for a given scene.
For example: a very dark scene will require more time for the light to be “absorbed” by the sensor. However, if your scene has ample sunlight, then your sensor will not require much time to absorb that light.
In order to create the photgoraph, the camera has two tools for you to use to control how much light is exposed to the sensor:
- Aperture, which controls how MUCH light (the volume) comes through the lens and hits the sensor.
- And then we have the shutter speed, which controls how LONG the sensor is exposed to light – the “exposure time”.
So with these two tools, we now have full control over the volume and time of light exposure.
A good analogy for creating an image is to think of a water bucket that needs a certain amount of water to be filled. Your aperture is the rate of flow from the faucet, and the shutter speed is how long the faucet is open. Once the ‘bucket” is filled, your photograph has enough light to be properly created.
If you widen the aperture, the rate of light flow is faster….so it will take LESS time to fill the bucket (or create the photograph). If you narrow the aperture, the rate of flow is slower…so it will take MORE time to fill the same bucket.
And this relationship works in the reverse: if you increase or decrease the time that the water is flowing (or how long the sensor is exposed to light), you’ll need to close down or open up the faucet (aperture) to fill that bucket properly.
Either way, that “bucket” needs to be filled in order to get a useable photograph.
So the takeaway point here is that by changing your shutter speed, you control how much time the sensor is exposed to your scene – or to light.
However, the shutter is also responsible for movement…specifically, freezing it or blurring it. Subjects that move during the exposure time will be rendered with unique qualities, depending on the amount of movement that occurred during the exposure.
This movement is also the cause of unintentional blurring and lack of sharpness, which is something you probably don’t want in your image.
So to bring this all together: a photograph is the average brightness (amount of light) and movement that was exposed to the sensor during a specific time frame….which is determined by the shutter speed.
If you’re still uncertain what shutter speed is or how it works, don’t worry: it will all make perfect sense soon. This is simply a primer before we dive into the specific details.
Here’s what we’re going to cover in this lesson:
- First, we’ll talk about what the camera shutter actually is – where it’s located, and how it functions.
- Why you would want to change your shutter speed and the effect that has on your photograph.
- How to find and change your shutter speed settings.
- How movement (both by you and your subjects) affects the image you want to create.
- How to use your shutter to control the artistic qualities of your image (i.e. long exposures).
- Challenges with shutter speed: specifically, how to avoid camera shake and unintentional blurring.
- Preventative steps to take for tack-sharp photographs.
- The “best” shutter speed for landscape photography.
2. What is a Camera Shutter?
How an SLR Camera Shutter Works
Unlike the aperture, which is inside your lens, the shutter mechanism is part of your camera and serves to separate (or block) the light from hitting your sensor that’s let in by the lens – specifically, the aperture opening.
The camera shutter is the “gatekeeper” for your camera sensor – a barrier that determines how long the sensor is exposed to the light of what you’re photographing by acting as a “curtain”. When you’re ready to take a photo, the shutter curtain will open up to gather as much light as needed to properly expose your image…and then will close again to end the photo capture process.
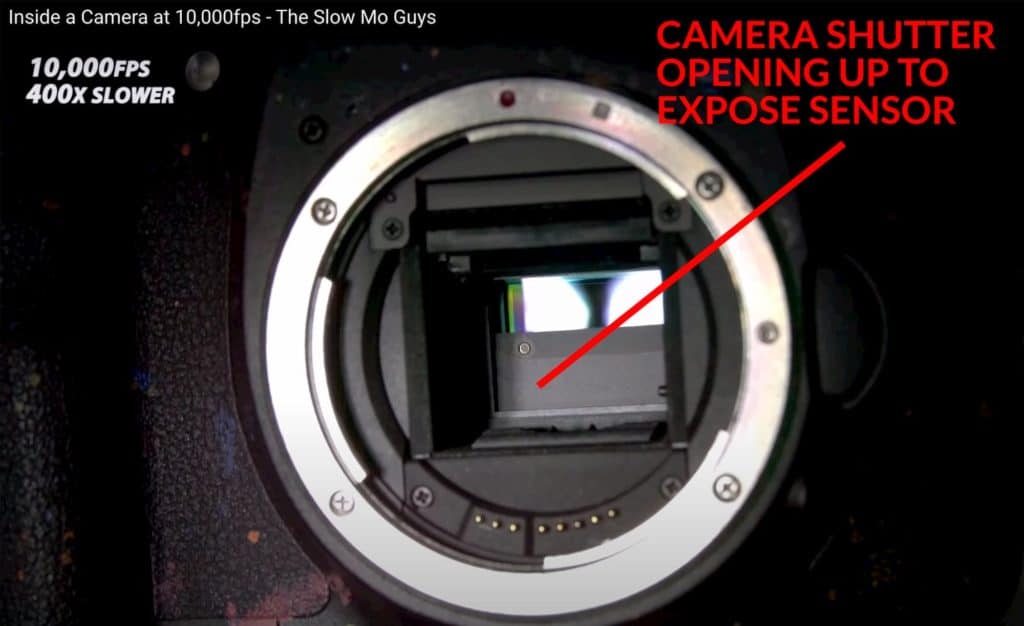
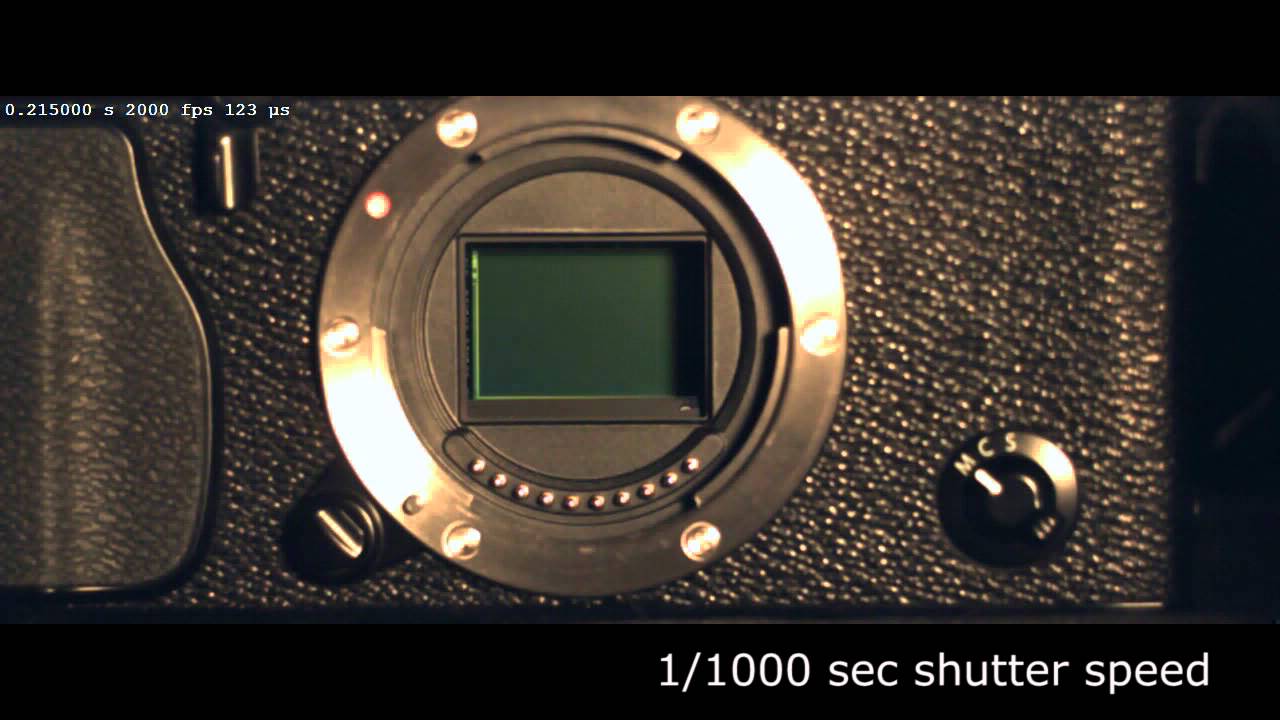
In the image above, the shutter curtain is in the process of opening (top to bottom) to reveal the camera sensor. The mechanical process that takes place is a lot like opening and closing a set of window blinds.
This process is also what generates the familiar “click” sound when taking a photo…and is also what the shutter button on your camera actually initiates. After inputting your settings (either manually or through auto mode), you press the shutter release button to open and close at your chosen speed.
Now if you’re working in auto-mode, the shutter speed is automatically selected based on the estimated luminance of your scene. However, this speed is not always accurate – so you can set the speed manually when needed.
Also, you can choose a different shutter speed for aesthetic reasons and creative intent, which the camera can not factor into its calculations.
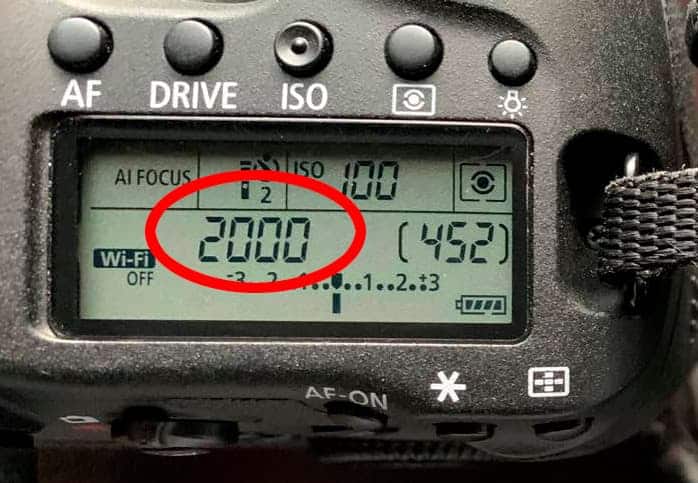
The length of time the shutter is exposing your photograph is measured by shutter speed, which is listed as a fraction of a second (i.e. 1/2000 = an exposure time of 1/2000th of a second). On your camera screen, this is usually listed without the fraction, so you will see “2000” as your shutter speed.
For exposures longer than a fraction of a second, the time will be followed by a quotation mark to indicate full seconds. For example, a shutter speed of 2.5 seconds would be written as 2″5 on your camera.
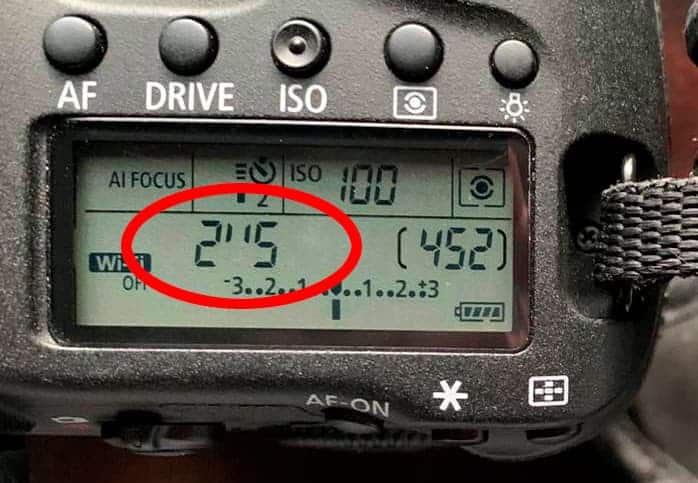
You will have to pay attention to the quotation mark as you could mistake a 10-second shutter speed (10″) for a 1/10ths of a second shutter speed (10).
How long the shutter remains open depends on many different variables, which we will discuss later… but the takeaway point here is that the shutter is responsible for the actual creation of your photograph.
To better understand how the shutter actually works, you can watch this slow-motion video below. The time to start watching is at 1:15 to see the shutter in action.

You can also see how the shutter works at different speeds at the 2:50 mark.
Notice how the mirror first flips up to start the image taking process, and the shutter behind it is closed, preventing the light from hitting the sensor.
The actual image rendering process starts when the first shutter curtain moves down to expose the sensor to light. Then it is followed by a second shutter curtain to end the exposure and cover the sensor again. Finally, the mirror flips down so you can see through your viewfinder.
This is how a mechanical shutter works, and the entire process (from the mirror flipping up to back down again) is known as an “actuation”.
The shutter SPEED is measured from when the sensor is exposed to light, between the opening of the first curtain and the closing of the second curtain.
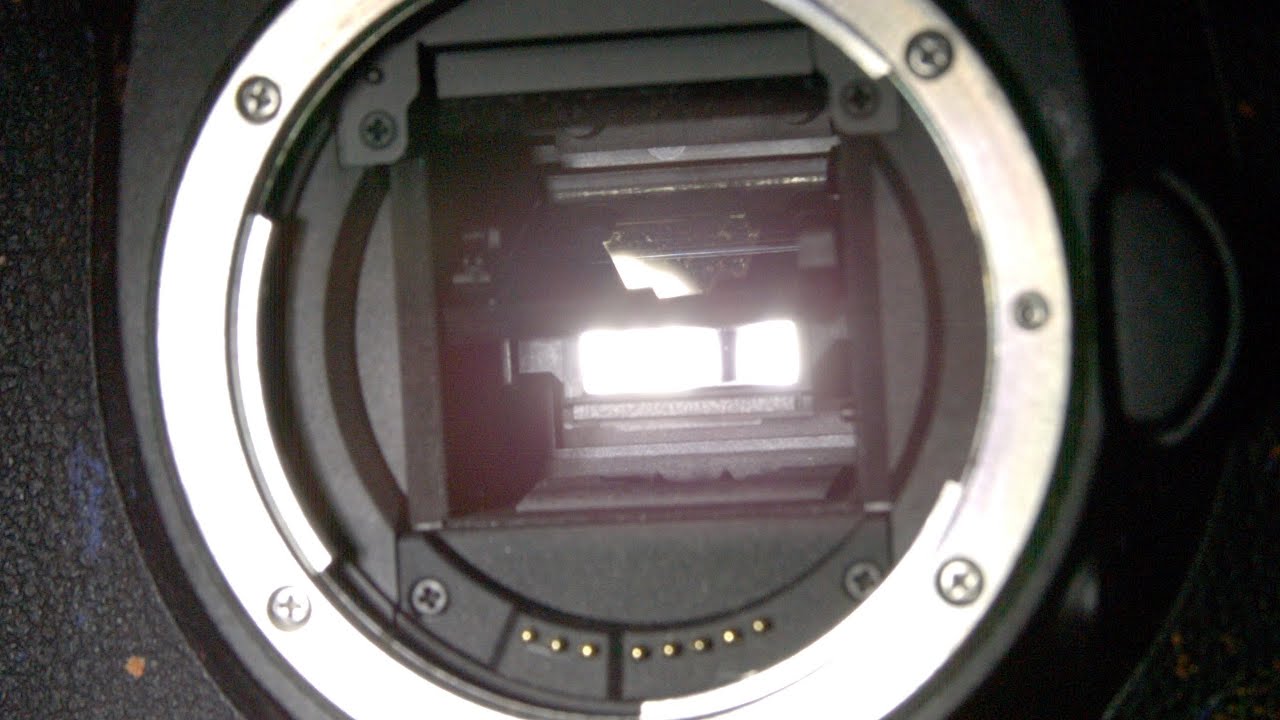
How a Mirrorless Camera Shutter Works
With a mirrorless camera, the sensor has to be exposed to light in order to see our scene through the viewfinder, since it lacks the internal mirror which reflects the scene we are looking at into the viewfinder. With a mirrorless, the sensor is absorbing the scene and displaying it on the LCD screen for us to see (this is also how live view works on an SLR). This means that the first shutter curtain can not be “down” to block the sensor before the exposure begins.
The actual exposure process is a bit different than the SLR. When you’re ready to create a photo with a mirrorless camera, the first shutter will close to prepare the sensor for the photograph, while turning the sensor pixels “on” to absorb light.
Then the first shutter curtain will open to begin the exposure, followed by the second shutter curtain to end the exposure. Upon completion, the second shutter curtain will go back down to expose the sensor again and return to live-view mode.
As you can see in the video above, the actual process that the shutter goes through a bit more complicated than an SLR:
- The first shutter curtain goes down and up again.
- The exposure takes place.
- The second shutter curtain comes up to end the exposure.
- And finally, the second shutter curtain goes down again to go back to live view mode.
That’s twice as much movement compared to an SLR, but there is no mirror to deal with.
Rolling vs. Global Shutter
In the video below, notice at the 3:05 mark how at certain speeds, the shutter doesn’t open and close like how blinds would…but rather has a rolling effect that exposes the frame in a wave, from top to bottom?
When your exposure time is fast (typically 1/500 or faster) the opening and closing shutter curtains follow one another so closely that it creates a “rolling” effect. The gap created between each shutter curtain is smaller than the sensor itself, so only a small horizontal row is exposed at a certain time.
A global shutter exposure, however, will happen at slower shutter speeds. There is enough time for the first shutter to completely clear the sensor before the second shutter follows behind, eliminating this rolling effect.
The problem with rolling shutters is that if you are photographing very fast subjects or are moving quickly yourself (like from a moving car), they can become warped since you are creating the image in sequential rows…and by the time you reach the bottom row, the subject can be positioned differently – even at very fast shutter speeds.
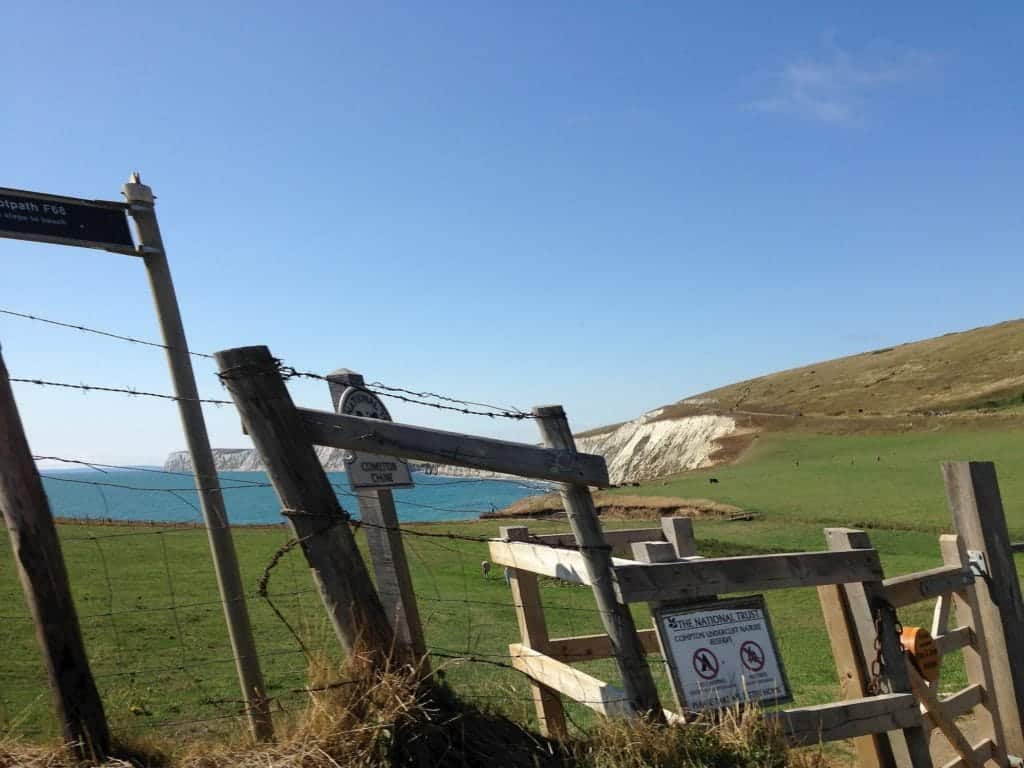
In the above example, the photograph was taken from a moving car traveling at 50mph. Since the fence was close to the camera, it became skewed since its position in the frame had shifted by the time the shutter exposure got to the bottom of the sensor.
There are other minor differences between rolling and global shutters, but the big takeaway point here is that there can be a difference in how the image is rendered.
Mechanical vs. Electronic Shutters
Not all cameras have actual, physical shutter curtains that open and close. Smaller devices like iPhones, Androids, and compact cameras…and now some mirrorless cameras have what are called “electronic shutters”.
With electronic shutters, the sensor is always exposed, much like with the mirrorless or live view…and the pixels are just turned “off” to rendering an exposure.
However, when you’re ready to create a photograph, the sensor simply turns those pixels “on” to start the exposure, and “off” again to end the exposure. No shutter curtains, and no moving parts.
There are several benefits to a completely electronic shutter. First, the camera is completely silent! If you’re a wedding photographer or otherwise find the familiar shutter “click-click” sound to be annoying, then an electronic shutter will be a great benefit.
Sidenote: If you hear the shutter sound with an electronic shutter (like the iPhone), that’s simply an audio playback to give you confirmation that the photo was taken. There’s no actual shutter movement taking place.
Electronic shutters can also reach a much faster shutter speed – up to 1/32000. With a mechanical shutter, you’re usually limited to 1/8000 or slower.
This means that you can freeze fast-action more easily, and photograph very bright scenes with a wide aperture without blowing out detail.
However, one limitation to the electronic shutter is that currently, most of them are rolling-only. They will expose your scene in rows of pixels, because it’s easier to create an image row-by-row than “turning on” the entire sensor globally.
Global electronic shutters are starting to become available for pro-level camera bodies, but we are still a ways off from widespread adoption.
Electronic shutters can also produce more noise than mechanical shutters.
For me, I still prefer mechanical shutters since I typically don’t need a silent operation or fast shutter speeds.
There are pros and cons to each shutter, and if you’re just starting out…it’s not something you need to concern yourself with right now. I just want you to be aware that there are two shutter mechanisms.
3. Why Your Shutter Speed Matters
Now that you know what the shutter actually is, let’s discuss why shutter SPEED is so important to your photography – especially if you want to master manual mode.
Shutter speed controls two very important elements of your photograph:
- The amount of light that is exposed to the sensor.
- How movement is rendered.
This may seem like a simple list, but the length of time your sensor is exposed can have a significant impact on the quality, clarity, and power of your photograph.
And knowing WHEN to use a certain shutter speed is the key to effortlessly creating the photographs you want.
Shutter Speed and Light
As mentioned earlier, the speed of your shutter determines how long the light of your scene is exposed to the sensor. Since the amount of available light is different for every scene, the shutter speed needs to change in order to compensate for those differences.
Dark environments (i.e. indoors or outside on overcast days) require a longer shutter speed to pull in enough light and properly expose your image.
In the example below, the shutter speed of 1/800 was too fast, so not enough light was let in.
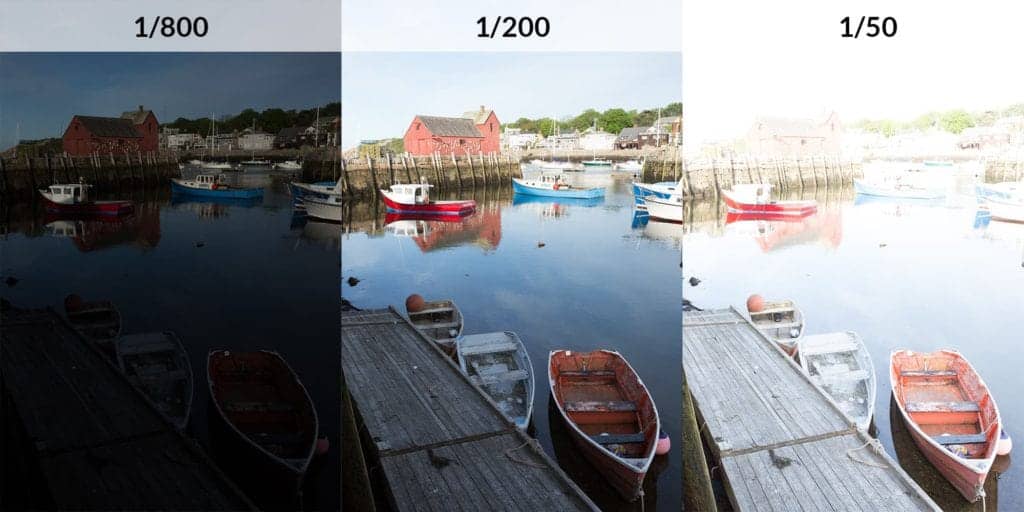
Inversely, bright environments (outdoors on a sunny day or indoors with the assistance of strobes) have more than enough light to properly expose the photograph…so a very fast shutter speed will limit the amount of light.
In the example above, a shutter speed of 1/50 was too long and let too much light hit the sensor, thus overexposing the photograph.
The middle image had a shutter speed of 1/200, which was a good match for the environment I was photographing.
Sidenote: Your aperture controls the rate of light that enters through the lens, but the shutter speed is what actually controls the total amount of light that hits the sensor.
So the goal here with shutter speed (and exposure in general) is to match your settings to what you want to capture…
And the more you practice with your manual settings in the field, the easier it will be for you to find this balance.
Shutter Speed and Motion
Not only does shutter speed control how long the light hits the sensor, but it is the primary camera setting that controls motion – or rather, how the movement of subjects in your frame is rendered on the photograph.
When your shutter is open, any subject that moves during that time will be rendered blurry – if the shutter speed is slow enough that movement takes place during the exposure time.
Usually, when photographing under bright sunlight, there is enough available light to obtain a fast enough shutter speed to “freeze” the action AND properly expose the image (bright enough to capture all of the detail).
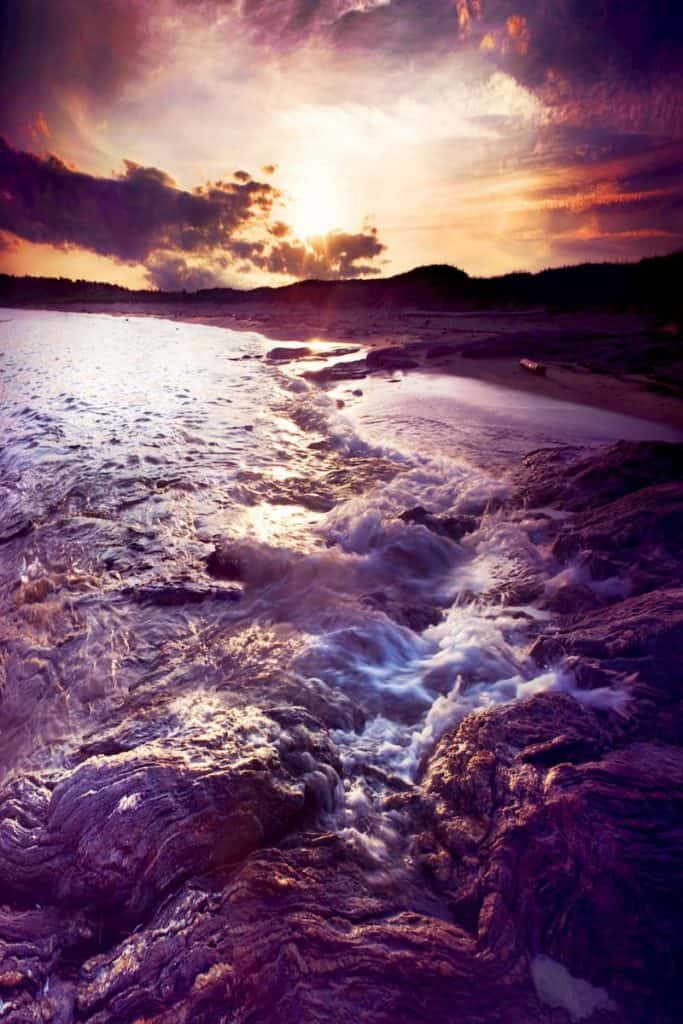
Although the water was moving quite fast in the example image above, the available sunlight was enough to freeze MOST of the movement at my chosen shutter speed.
However, you can see some slight blurring in the foreground waves as they crashed against the rocks, indicating that some of the water was moving FASTER than the shutter speed. This is known as “motion blur”.
Motion blur becomes an issue when:
- Subjects are moving very fast, and/or
- There is not enough light available to freeze the action, so movement occurs during the actual exposure time (when the shutter is open).
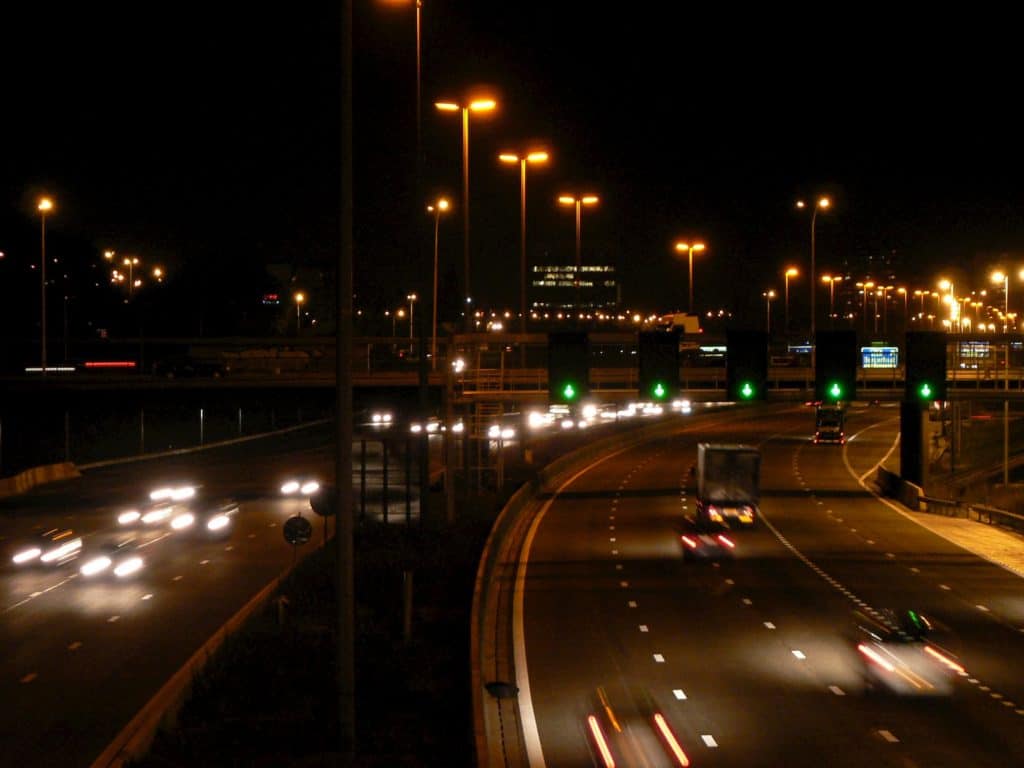
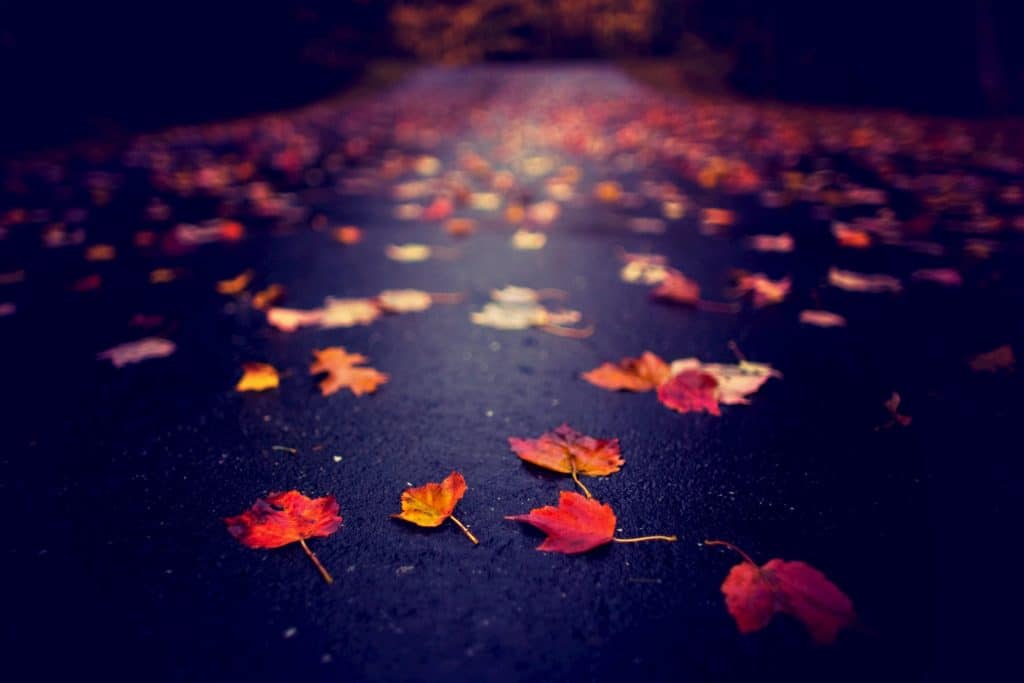
In the example image below, the amount of available light is very little since it was taken at night. This means that the shutter needs to be open longer to let enough light in to properly expose the image.
Notice how the fast-moving cars are leaving a streak of light from their tail/headlights…which shows you the actual distance they moved across the frame while the shutter curtain was up.
And in the example image below, the shutter was open for a longer period…which means that the vehicles traveled a longer distance across the frame during the exposure time.
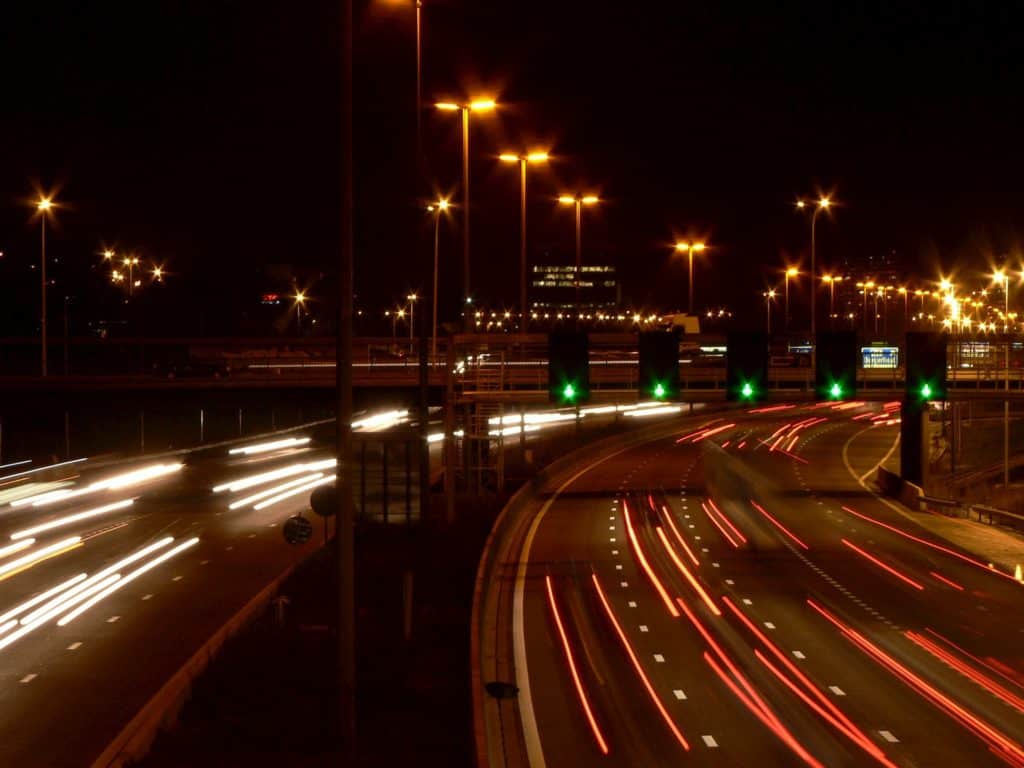
At this point, the vehicles have traveled so far that the vehicles themselves have now been blurred greatly and are translucent.
The ghostly appearance is because, during the exposure, the vehicles were only in that exact spot for a small percentage of the time.
In other words, the vehicle only covered the road for, let’s say, 20% of the exposure time. This means that the combined detail for that specific spot is 20% vehicle and 80% road…which is why you are seeing more road than vehicle.
Fast Action and Shutter Speed
Now if you want to freeze any motion that’s been blurred during your exposure, you’ll need to do one (or more) of the following:
- Adjust your manual settings to increase the brightness of the image (wider aperture and/or higher ISO), which will allow you to choose a faster shutter speed.
- Increase the available light.
- Reduce the speed of movement.
For us landscape photographers, 2 and 3 are usually not viable options…so we have to rely on our camera skills to brighten the image up if we want to freeze that movement.
The overall goal here is to get a fast enough shutter speed to either match or exceed the speed of movement within the frame.
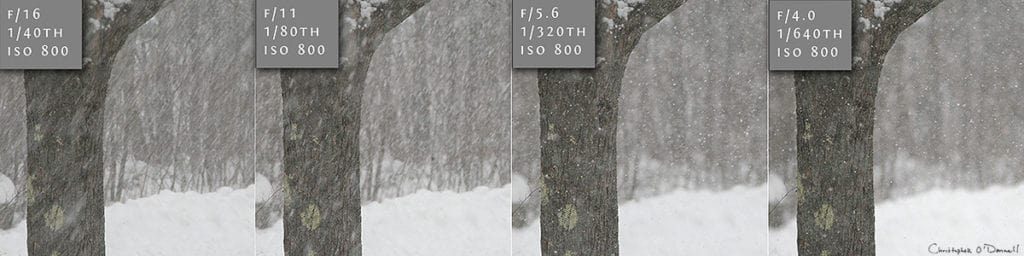
In the example image above, notice how blurry the falling snow is at 1/40 shutter speed. This is a mismatch: the shutter speed is not fast enough to “freeze” the action, so the snowflakes are moving during the exposure time.
However, for 1/320 shutter speed and faster, the snowflakes are frozen in place…so this is the shutter speed required to capture the individual flakes as they fall.
In order to create more light so that I could increase my shutter speed, I had to widen my aperture…at the expense of a more shallow depth of field.
Generally speaking, a “fast” shutter speed is 1/800 or faster…but again, your ability to freeze the action in sharp detail is entirely dependent on the available light and speed of motion.
With the falling snow here, the 1/320 shutter speed will not always be what is required to photograph the snowflakes as they descend. Depending on the heaviness, the rate of snowfall, and available light…I may require a faster or slower exposure time.
Why Not Always Use a Fast Shutter Speed Then?
Now you may be wondering why we wouldn’t just use a fast shutter speed all the time, just in case.
This may work for most situations…but eventually, you’ll run into a situation where that fast shutter speed is too quick for (1) the amount of available light, and/or (2) the size of your chosen aperture (which determines the rate, or volume, of light hitting your sensor).
Eventually, you’ll need a slower shutter speed to “fill up” the sensor with the right amount of light to expose the image properly.
Slow Shutter Speeds with Low Light
If you’re photographing indoors, at night, or are otherwise working with a low amount of available light….you’ll have to slow your shutter down enough to get to the proper exposure time for your environment. Otherwise, your image will be underexposed.
In this image here, I had almost no available light to work with. It was taken at night, and the moonlight was veiled by a thin layer of clouds. Despite my aperture being fully open (f/1.4), I needed a shutter speed of 327 seconds to collect enough light for a useable image.
Since my scene was stationary, I didn’t have to worry about motion blur here…but if I had moving subjects, it would be impossible to render those without significant blurring.
Shutter Speed Controls Light and Motion Together
A common challenge when photographing moving subjects is being able to:
- Properly expose the sensor to the right amount of light for a scene, AND
- Create the right amount of movement – whether that involves intentional motion blur or freezing action in place.
The slower your shutter speed is, the more movement is rendered AND the more light is allowed to hit the sensor (resulting in a brighter image with possible blur).
Inversely, if you speed the shutter up, your image will get darker…and at the same time, any motion blur will be reduced.
Most of the time, you’ll want to freeze action…so you simply set a shutter speed fast enough to capture still movement.
However, the amount of available light may not be enough to achieve that necessary shutter speed.
This can present a unique challenge when trying to compensate for both variables: motion and light.
In the example images below, the image is properly exposed at 0.3 seconds (left), but the water movement is not what I wanted to capture. The ripples are blurred and don’t provide added interest to the frame.
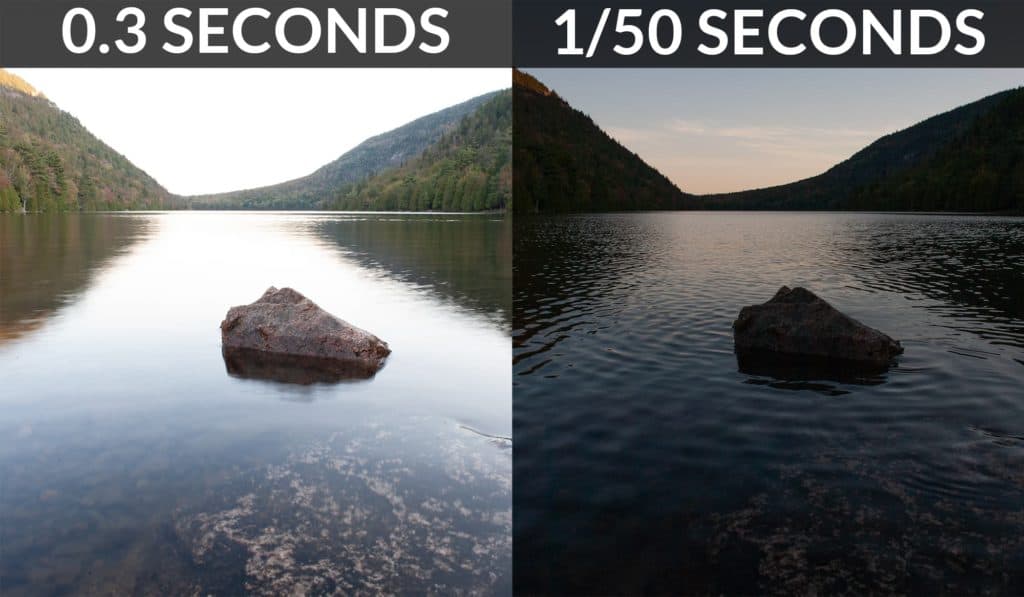
However, the shorter shutter speed of 1/50 was fast enough to capture the ripples moving in the water…but with a significant reduction in light. This image would require much processing to bring the underexposed detail back…and will be of lower quality.
For this image, I would have to either open up the aperture and/or increase the ISO to compensate for the reduction in light AND retain that 1/50 shutter speed. Since I wanted a deep depth of field, increasing my ISO would be the best option for me.
Now if the opposite was happening, where you need a SLOWER shutter speed but the image is already bright…you have better options.
Simply add an ND filter, which act like a pair of sunglasses for your lens. This will limit the amount of light from entering the lens, allowing you to choose a slower shutter speed without overexposing your scene.
Remember: practice makes perfect! Now that you know how shutter speed affects light and motion…the easiest way to become more comfortable with selecting the right shutter speed for your scene is to simply practice in the field.
4. Creative Use of Shutter Speed
The goal with shutter speed isn’t always to freeze action in place. Depending on your creative intent, you may wish to purposefully use a slower-than-necessary shutter speed to:
- Convey movement and fluidity in a still image.
- Soften detail and provide a stronger contrast between high and low texture focal points.
- Add overall interest in the frame and enhance the atmosphere you wish to create.
Panning Photography to Convey Movement
A popular creative technique with shutter speed is to make it appear as though the subject is moving. By creating deliberate motion blur, you can convey the movement of a subject that would otherwise look still if it was photographed with a fast shutter speed.
Instead, you would intentionally use a slower shutter speed while simultaneously “panning” your camera from a single point. For example, if you follow the movement of a passing car while standing still, you can create a photograph that implies movement in a non-video format.
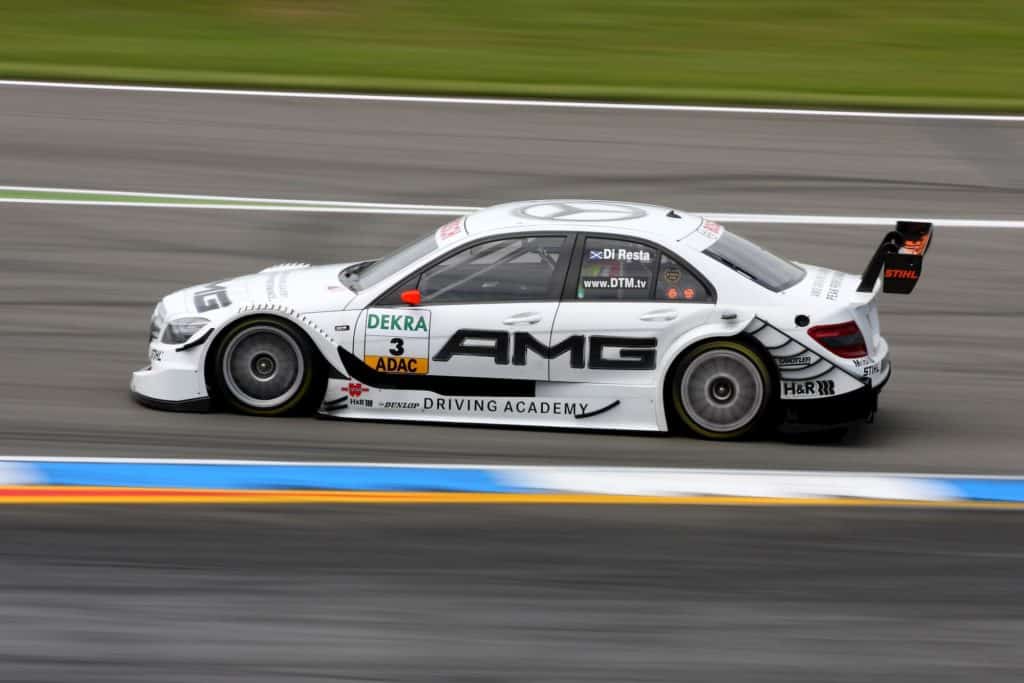
The example image above was taken at 1/125 shutter speed. Notice how the background is somewhat blurred, as well as the tires…but the car is in sharp focus.
This is achieved by keeping the subject in the same position in the frame, but physically moving your camera to follow a fast-moving subject during the exposure.
The background is blurred since that was repositioned during the exposure, and the wheels are blurred since they were repositioned as well…moving in a circular motion against the horizontal movement of the camera.
This blurring implies that the car is moving. If a faster shutter speed was used here, the background and wheels would be in sharp focus…and would look no different than if the car was parked.
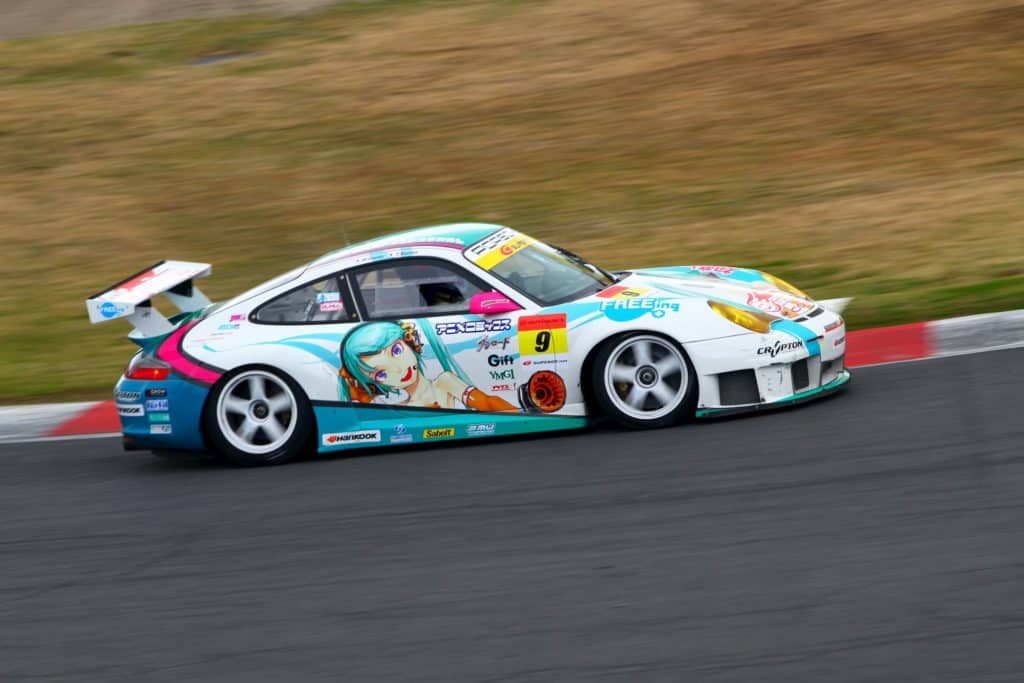
You can see the panning action exaggerated even more here with a shutter speed of 1/80.
In the image above, the background and wheels are a bit more blurred than the first example image. Notice how the car just seems to be moving faster, when in reality the speed of both cars could be identical.
This is the art of conveying movement…and is quite useful for action and sports photography.
On the other hand, the example image below does NOT convey movement. Although the cars were moving quickly, the very fast shutter speed froze the action in place. Additionally, the camera was stationary, so the background was not blurred.
This image lacks contextual signs that movement is taking place, so it appears as though the cars are simply parked on the track.
Sidenote: Panning should not be confused with “tracking”, which refers to the camera moving parallel with the subject in motion.
For example: a photographer taking a photo of a cyclist while leaning out of a moving car alongside them.
Typically, you would use a very long lens (300mm +) to achieve strong panning results as the longer reach will give you a more shallow depth of field to isolate your subject…which will also give you stronger blurring.
Subject speed matters as well. The slower the subject, the slower the shutter speed needs to be to follow the subject and pan…and that may not be fast enough to create blur and imply movement.
Additionally, your panning movement from side-to-side may become unsteady when slowed down. This is why I recommend using a tripod when possible for any kind of panning photography.
Long Exposure Photography to Add Interest and Contrast
Extending your shutter speed (slowing it down) to convey movement and/or smooth out texture is a fantastic way to “get creative” with your photography.
By purposefully using a shutter speed that is longer than what is required to capture movement in sharp detail, you can create an ethereal atmosphere and add interest to otherwise ordinary, mundane subjects.
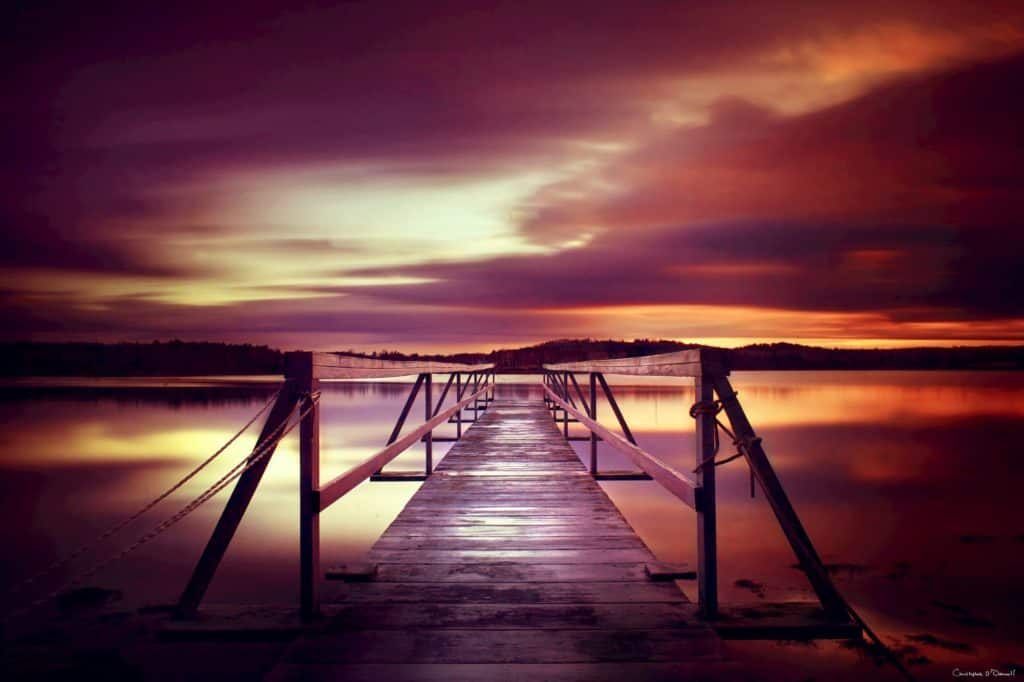
In the image above, the fast-moving clouds were captured using a shutter speed of 2 minutes and 55 seconds…MUCH longer than what would normally be needed to properly expose this image at my chosen aperture of f/16.
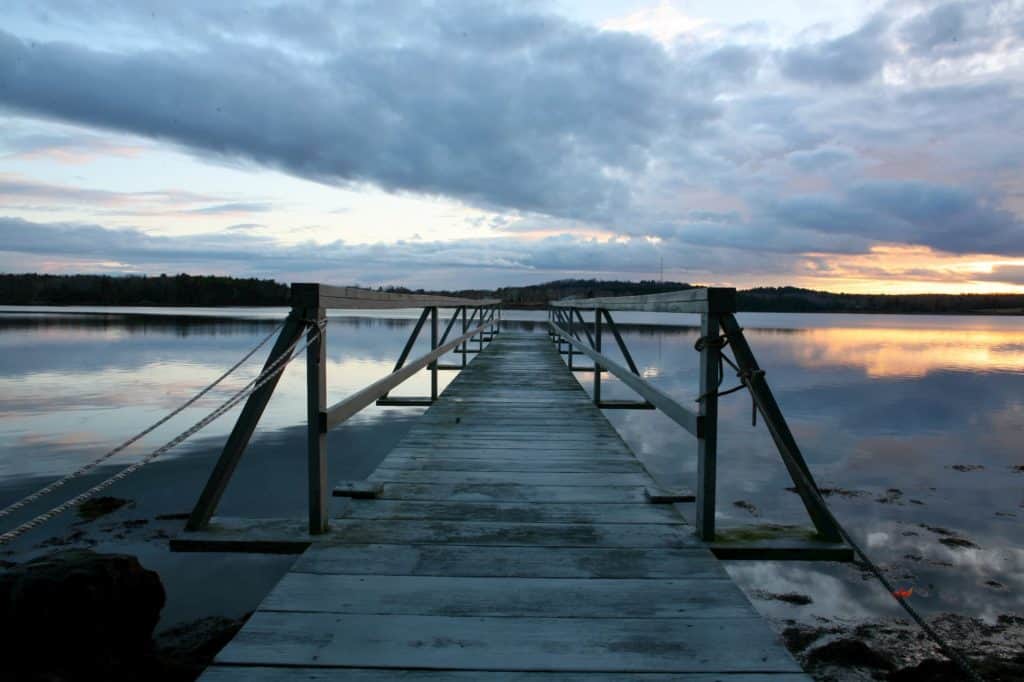
In the image above, the shutter speed was 1/8…which was the fastest shutter possible to pull in enough light.
However, see how much more interest has been added to the texture of the clouds and smoothness in the water? For me, the longer exposure is a more engaging photograph because it completely alters the mood and atmosphere (with the help of some tonal and color adjustments).
Long exposures are more than just a way to add interest though. Keeping your shutter open during movement can also serve to enhance the overall composition by enhancing the “texture contrast”.
Without going too deep into the relationships of contrast and color…focal points of high texture stand out more when surround by areas of low texture.
So by smoothing out the clouds and the water, the pier (which is high texture) stands out more and becomes a stronger focal point by comparison.
In the 1/8 shutter speed frame, the highly textured clouds and water compete for attention, and the pier becomes a bit lost in the composition.
In other words, you’re controlling the weight (or power) of the elements in your frame by enhancing or subduing texture.
I see photographers wanting to know the “best” shutter speed for long exposures (i.e. 5 to 10 seconds), but there are too many variables at play to box your image in like that.
It’s better to not become fixated on a certain speed, but rather experiment with different lengths to see what gives you the results you want…and adjust as necessary in the field.
The exact shutter speed range that is considered to be a “long” exposure is highly dependent on the scene. For example, in the image below, I wanted to use an extended shutter speed to exaggerate the motion of the water to convey movement AND add some texture contrast to make those interesting foreground rocks stand out.
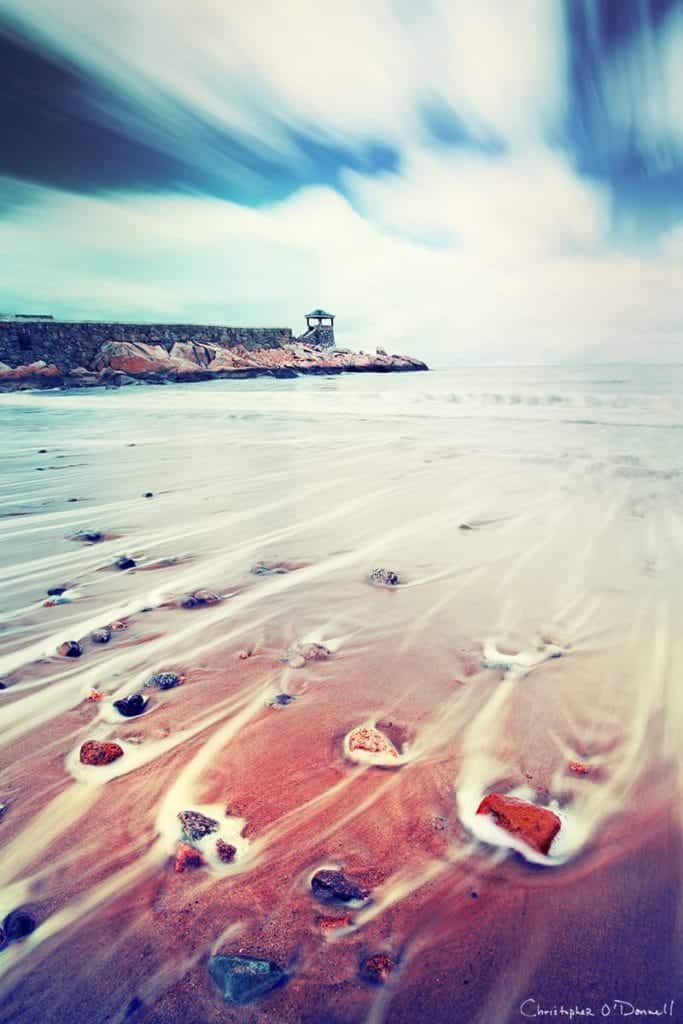
Since this scene was filled with strong sunlight, I only needed a 0.4-second shutter speed to render those waves into smooth streaks.
Now that’s not considered your typical “long exposure” shutter speed…but it was slow enough to create the image I wanted.
I should mention here that a tripod is absolutely necessary for long exposures.
It not only helps with camera stabilization (I’ll discuss the importance of that in a bit), but also assists with achieving awkward perspectives that would otherwise be uncomfortable.

In the image above, the treetops were swaying in the wind and I wanted to capture that movement. However, the angle was very awkward, so a tripod helped me immensely here with my 400-second exposure.
As you’ll learn in the next section, long shutter speeds require stabilization to avoid unwanted blurring from camera shake. In this image, although I wanted to blur the leaves and treetops to convey movement, the tree trunk itself needed to be tack-sharp…so a sturdy tripod was needed.
I also used a very wide aperture to achieve this shallow depth of field…which let a LOT of light hit the sensor. In order to limit the amount of light and allow me to use such a long shutter speed, I stacked two ND filters for this image.
5. Challenges with Shutter Speed
How Camera Shake Causes Blurry Images
Have you ever taken a photo, only to be disappointed by an overall blurriness to the detail? This is very common in photography, especially when the camera is handheld.
“Camera shake” refers to the minor (or not so minor) vibrations that affect the camera during the exposure time. Even if you think you’re holding the camera perfectly still, any minor movement from your body can soften the detail and add blur.
The longer your shutter speed, the more blurry your photos will be from these micro-movements.
The result is a lot like motion blur, but the entire frame is affected…and it is almost always an unwanted side effect.
What causes camera shake?
Camera shake is a problem not because you’re photographing handheld, but rather your shutter speed is too slow for the movements which are affecting the camera stability.
Unlike with motion blur, where subjects in your frame are moving and your camera is stationary…camera shake is caused by your CAMERA moving. And when the camera is repositioned, so does the content within your frame, which chips away at the sharpness.
This means you need to either stabilize your camera, or reduce the vibrations/movement.
Now obviously, not every handheld photo is blurry form camera shake. This is because sharp photos that were taken handheld had a fast enough shutter speed to capture the image before any vibrations could influence the sharpness.
With motion blur, your shutter speed needs to be faster than the moving subject in order to freeze the action in sharp detail. With camera shake, your shutter speed needs to be faster than the vibrations in order to create a sharp image.
For 99% of the time, you don’t have to worry about camera shake when photographing under full luminance of the sun. There will be an ample amount of light to obtain a fast enough shutter speed.
Camera shake is a more frequent problem when photographing indoors, on cloudy days, during the twilight hours, or when you otherwise do not have enough available light.
Other factors can cause camera shake, and we’ll discuss them later…but the most obvious cause is unintentional movement while handheld.
The solution here is to either (1) obtain a fast enough shutter speed to prevent camera shake altogether, and/or (2) stabilize the camera so that vibrations do not affect image sharpness.
Sidenote: Blurring from camera shake is not the same as an improperly-focused image. You should always confirm that your image is focused correctly before determining that camera shake is at fault. I’ve seen many photographers stress over image sharpness and stability, only to find out that they misfocused their scene.
What shutter speed is fast enough for sharp images?
Now that we’ve established that shooting handheld can cause blurry images if your shutter speed is too slow, you’re probably wondering what is the slowest shutter speed you can shoot at for sharp images? What is that threshold you shouldn’t fall under while handheld?
Before we continue, I can not stress enough that a tripod will be your best friend here. When your camera is mounted securely, you don’t have to worry about that minimum shutter speed since camera shake is not a possibility.
There will be some other potential causes of shake on a tripod (which we will address later), but let me tell you from experience…life is much easier with a tripod, especially if you’re a landscape photographer.
However, a tripod is not always feasible. And sometimes, the best you can do is steady your hands and work with what you have.
Now, in order to determine the slowest shutter speed you can shoot with handheld AND retain sharp detail, you’ll need to consider the longest focal length for your lens. In short, the longer your lens is, the easier it is to blur your images from camera shake.
So while there is no concrete shutter speed threshold that applies to all lenses, there is a general rule to follow:
When handheld, always select a shutter speed that is faster than the longest focal length for your lens.
For example: if you’re shooting with a 100-300mm lens, the longest focal length is 300mm. This means that in order to retain sharp images while handheld, your slowest shutter speed should not fall below 1/300.
And since 1/300 isn’t a selectable shutter speed, you’d have to round this up to 1/320.
This very general guideline is known as the reciprocal rule, which was introduced to address the relationship of focal length and camera shake.
The more magnification your frame has, the easier it is to blur the detail since minor movements are more easily picked up when zoomed in.
Have you ever noticed that your frame becomes less steady when working with longer focal lengths? This is why we have the reciprocal rule.
While this “rule” provides a rough estimate, there are other factors at play that can still blur your image from camera shake. Most notably, how sturdy your hands are and the content of your image.
For example: trying to photograph every nook and cranny in a tree trunk in perfect sharp focus will require a faster shutter speed than what the reciprocal rule suggests.
Does the Reciprocal Rule Always Work?
Now if you properly brace yourself and your camera, you can probably get away with following the reciprocal rule. But if your hands are a bit shaky, I would recommend doubling the recommended speed to ensure that the shutter speed is faster than any vibrations put out by an unsteady mount.
If you were shooting with the same lens mentioned above, your slowest shutter speed should be 1/600. Again, since 1/600 isn’t an actual shutter speed, you’d round that up to 1/640.
This is especially important for landscape photography, as we are often shooting under limited light and with a small aperture…both requiring you to select a slower shutter speed for proper exposure.
Does resolution affect the reciprocal rule?
Yes, it does. Plainly put, higher resolution sensors have more pixels packed into a defined space. When the pixel density is more compact, blur becomes more noticeable since there is less breathing room between the pixels.
It’s not a huge difference, but can be distracting in certain situations.
Does sensor size affect camera shake/blur?
In a very small sense, yes it does…but not enough to really impact the reciprocal rule.
Let’ say you have two cameras, both with a 20-megapixel sensor. One camera has a crop sensor (APS-C) and the other has a full-frame sensor. Both have the same megapixel COUNT, but the pixel DENSITY is more spread out on the full-frame sensor.
If you compared two identical images taken with each camera, the full-frame sensor would appear to have less blurring when viewed at 100% since the pixel density is less. So that’s another (minor) reason to use a full-frame sensor.
It’s a nice added benefit, but there are many more compelling reasons to use full-frame sensor (especially for landscape photography).
Does this mean I have to use a very fast shutter speed when using small sensors in order to counteract this blurring?
The reciprocal “rule” doesn’t have to change to compensate for your sensor size. For example, if you were using an iPhone to photograph a landscape, you’re using a much smaller sensor than a full-frame camera body…which would mean that your iPhone would be virtually useless at longer focal lengths. That’s not the case at all.
It’s important to keep in mind that the reciprocal rule is just a “rule of thumb”, not a mathematical rule to follow. It works most of the time, and for most situations….but can not compensate for every possible scenario.
Like with most “rules” in photography, they get you into the general ballpark…but you always need to adapt them to your specific situation, and neve rexpect the results to be static.
This is why a tripod is often recommended for landscape photography since it eliminates the chance of not noticing blur from camera shake until you get the image home and viewed larger on your computer screen.
Image Stabilization and Vibration Reduction
On some longer lenses (most notably Canon and Nikon), there are internal components to the lens which compensate for handheld vibrations…and this makes the reciprocal rule more flexible. Image stabilization can be particularly helpful when photographing portraits or wildlife while handheld, since using a tripod can sometimes be cumbersome.
While this feature can certainly give you a few extra stops to work with before blur sets in, the effectiveness entirely depends on (1) the variables of your environment, and (2) the quality of your gear.
In other words, there is no set number of stops that image stabilization is effective for; it’s still up to you to experiment and confirm that image sharpness has been retained.
How to Prevent Camera Shake While Mounted on a Tripod
While a tripod does ensure that your image will not have blurring from camera shake due to your body movements, there still could be other causes of vibration that you need to compensate for – even on a tripod.
For SLR cameras, the simple act of the mirror flipping up to start your exposure can cause vibrations to the camera itself. Most SLRs allow you to “lock” the mirror up in place BEFORE the actual exposure starts to compensate for this.
After this feature is enabled, you would first press the shutter once to flip the mirror, and again to start the exposure.
Also, if you use live view to compose your frame, the mirror is already flipped up so this is not an issue.
The physical act of pressing the shutter button can also cause camera shake. To counteract this, I recommend purchasing a remote shutter release which allows you to press the shutter button separately from the physical camera body.
Personally, I find the wireless remote shutter releases to be too cumbersome with connectivity issues, so I prefer to use a corded button. Just be sure not to let your remove shutter hang loosely from the camera – the wind can cause it to sway and send up vibrations to your camera.
You also need to turn off any image stabilization/vibration reduction that your lens may have. Since you’re mounted on a tripod, this feature will not help you….and the small internal movements that the lens performs to compensate for camera shake while handheld can actually cause your camera to shake when it’s mounted in place.
You should also be aware of your environment and actively seek out possible causes of vibrations. Weak, flimsy tripods can be easily moved with a strong wind.
If you’re photographing at the beach or your tripod is mounted on otherwise loose soil, simply walking around your tripod may inadvertently shift the ground and move the tripod legs.
Even if your tripod is sturdy and well-made, a strong wind can move it if the center of gravity is off (for example: pointing your camera straight up). This can also happen if your camera is very top-heavy. Make sure your tripod is weighted proportionally and stable. Most tripods have a hook under the center column, allowing you to hang your camera bag or other weighted objects to stabilize the camera more.
Now for very short long exposures (.5 seconds or under), these precautions are probably not necessary. However, the longer your exposure time, the greater the risk is for blur…so always check your results manually in the field.
While this may seem like a lot to check, it does ensure that your image will be tack sharp regardless of your shutter speed….which can greatly open up your creative possibilities.
“Shutter Lag” and Camera Responsiveness
When photographing fast-action (such as wildlife or sports photography), every millisecond counts in order to freeze motion in place. Depending on the responsiveness of your particular camera model, there may be a slight (or not-so-slight) delay between when you press the shutter and when the exposure actually starts.
While some shutter lag (around 1/10 of a second) is inevitable, there can still be a substantial lag if your camera has autofocus enabled…and this lag is exasperated even more if you’re photographing under low-light situations. This can be especially difficult when photographing a moving subject, and cause a full second (or more) of shutter lag.
To prevent this, you should always prefocus your image…preferably using back-button focus. For optimal performance, consider a higher-quality lens that has excellent focusing capabilities.
A Note on Image Sharpness
While you should always try to avoid camera shake, don’t pass up an opportunity to create a photograph if there is only a small amount of blur. I see photographers who zoom into 100% on their LCD screen or computer, see some blurring, and think the image is unusable….but that is not always true.
First, the digital darkroom has come a LONG way in artificially sharpening up images with soft detail. Photoshop, Lightroom, and dedicated sharpening plugins can do a fantastic job in reducing blur induced by camera shake.
Secondly, pixel-peeping for sharpness can lead you down an endless rabbit hole. If you’re photographing with a 45MP camera, zooming in to 100% will probably always look a bit blurry – and that’s perfectly acceptable. You need to consider your output when evaluating image sharpness: what is the final viewing size, and will the blur be noticeable in its final form (whether digital or a physical print)?
For example, slight blurring on a 45MP image printed as a 16 x 20 will not be noticeable since you will not be viewing that image at 100%. However, if you plan on printing a wall mural, then sharpness may become more important.
The point is…yes, you should TRY to get the sharpest image possible. But don’t become fixated on minor improvements in sharpness as, in most cases, you will not notice a difference in the final image.
6. Finding and Changing your Shutter Speed
Finding your Shutter Speed
The first place you should reference is your camera manual, since the location of your set shutter speed may differ between models. However, most professional cameras will display the current shutter speed setting on the top LCD screen next to the shutter button.

For images that have already been taken, you can view the shutter speed used (as well as your other EXIF settings) either on the back display screen during image review, or as part of the image metadata on your computer.
Changing your Shutter Speed
When in auto-mode, the shutter speed will change automatically based on the light metering that takes place during prefocus.
However, you can manually change your shutter speed while in manual mode. Again, you’ll need to reference your camera manual…but this is usually done by turning one of the dials on your camera body.
You can also use shutter priority mode, which works like a semi-auto mode. This allows you to manually set the shutter speed, and the camera will automatically adjust your aperture and ISO to obtain the proper exposure.
However, I do not recommend using this mode unless shutter speed is of absolute importance. Personally, I prefer to use full manual mode or aperture priority, since I’d rather have manual control over my depth of field.
For long exposures, I recommend using full manual mode and taking test frames to fin the optimal exposure balance, making sure to keep an eye on your histogram. Most likely, you’ll need to use ND filters to reduce the amount of light hitting the sensor – at least fordaytim elong eposures.
Most camera models will have a shutter speed limit for long exposures – usually 30 or 60 seconds. For images with a longer shutter speed, you can switch into “bulb mode”. This allows you to start the exposure by pressing the shutter button, but will not end the exposure until you release the shutter button.
For very long exposures, this can be quite tiresome to hold the shutter button down…but most remote shutter releases will have a “lock” that allows you to keep the button depressed until you release the lock again (much like how gasoline pumps allow you to lock the trigger while the tank fills).
7. What is the Best Shutter Speed for Landscape Photography?
This is a question I see a lot from those who are new to manual mode…and is one that naturally comes to mind. However, as you’ve probably gathered from reading this guide, there is no “best” shutter speed for a particular type of image. Nor is there a best aperture, focal, ISO, metering mode, or other manual settings. There are too many variables to consider in the field…not to mention the most dynamic and important variable of all – your personal taste and creative vision.
Do you want to freeze action or exaggerate it through extended exposure time?
How much light is there in your scene, and how does your aperture affect the volume of light hitting your sensor (and thus your shutter speed)?
Are you able to achieve the shutter speed you want AND properly expose the image? If not, what methods can you use to compensate for a shutter speed change (ISO, ND filters, etc.)?
Trying to box your photographs into a specific shutter speed range is not only creatively limiting, but is detrimental to your development as a photographer. Without understanding the WHY behind a certain shutter speed, you’ll rarely find your images to be creatively fulfilling and your photography will just plateau.
Instead, ask yourself what RESULTS you want to achieve…. And THEN use your knowledge and experience to determine the “best” shutter speed to obtain that specific result under the unique conditions of your environment.
While learning how to use your camera manually may seem intimidating at first, you’ll find it much easier when you focus on specific settings independently from one another and experiment in the field.
For example, take what you’ve learned here about shutter speed and ONLY experiment with that knowledge without trying to incorporate your other manual settings. When you focus on specific steps in the process, learning how to use your camera manually will come naturally as a result.
Hands-on learning will always be better than anything you can read in books (or online)…and each outing will bring you one step closer to mastering your camera.
Related Products
Related Products
-

Golden Hours eBook
$ 0.00Learn how to capture the extraordinary light of sunrises and sunsets with this free eBook. I'll show you…
Add to cart -

HDR Field Guide
$ 0.00A necessary part of landscape photography is to capture the full dynamic range of the natural light, which…
Add to cart -
Light and Shadow
$ 129.00Learn how to expertly sculpt light and shadow in both Lightroom and Photoshop. In my brand-new program, Light…
Add to cart