GND Filters or Exposure Blending
GND Filters or Exposure Blending
Which is Better for Landscape Photography?
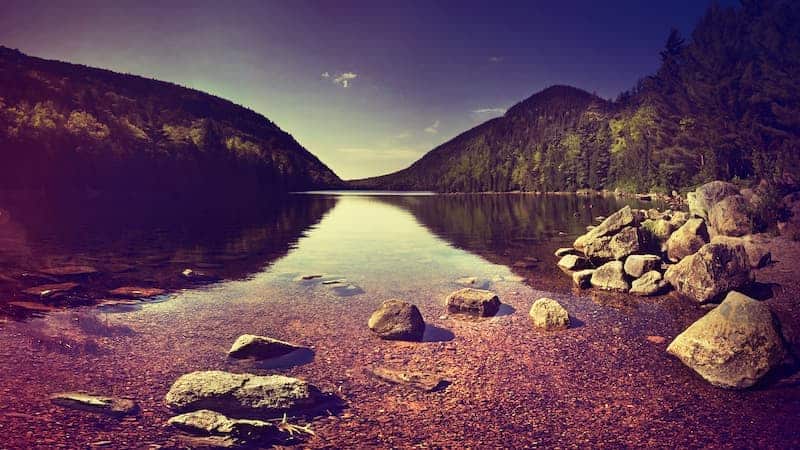
When we photograph a landscape, we are often presented with a large difference in exposure (the amount of light) between the sky and the ground. This is more apparent around early mornings and late evenings.
The sky is naturally brighter than the ground, and oftentimes this will cause problems in obtaining an optimal exposure – most notably blocked shadows (underexposed areas) and blown highlights (overexposed areas) that can not be recovered.
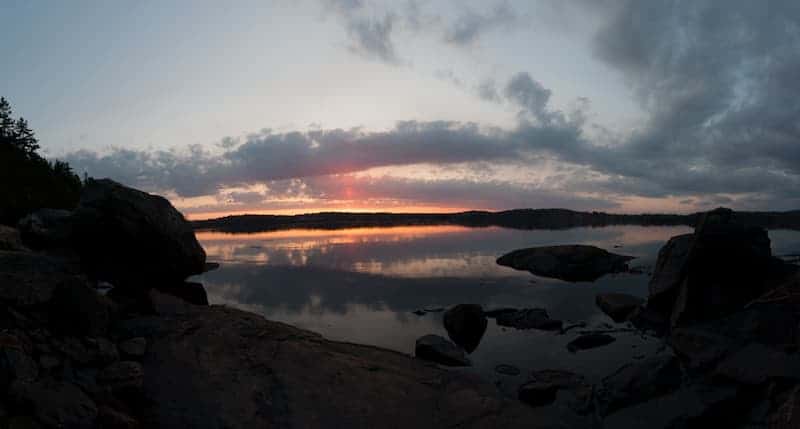
In the image above, you can see that the sky is exposed fairly well…but the foreground is in complete shadow, and lacks detail, color, and texture. This is known as “crushed” or “blocked” shadows, referring to the lack of detail and interest.
If you tried to compensate for this by extending your shutter speed and brightening up the foreground, that will also increase the brightness of the sky…resulting in “blown” highlights.
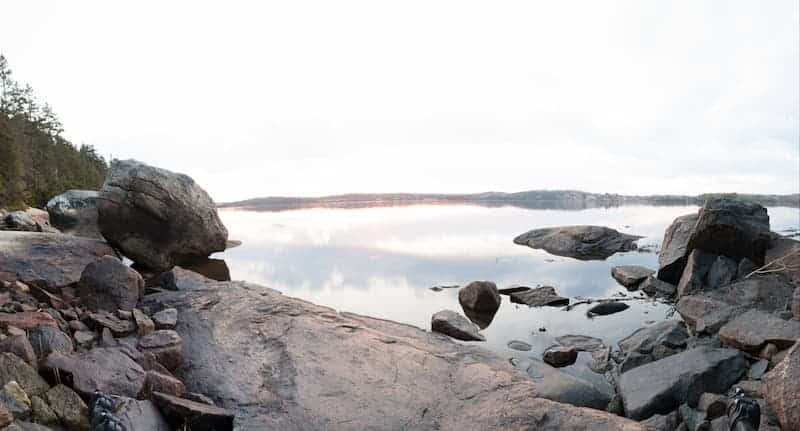
Here you can see that while the foreground looks much better, the sky now lacks all of that great sunset color and detail that the first image has.
Either way, these areas are highly distracting and can take away much detail from your photo…and lead to a loss of bright and vibrant colors.
The problem is that the sky requires a different shutter speed than the foreground in order to properly “expose” the scene with the correct amount of light onto the sensor, thus rendering your photograph.
Typically, your camera’s light meter will try and compensate for this disparity and “even out” the difference of exposures between sky and ground, settling on the midpoint shutter speed between the two.
While most modern cameras can handle this to some degree, it usually results in an unpleasant combination of both blown highlights and crushed shadows…where your sky appears washed-out and your ground appears too dark.

While the detail in this “middle”, or balanced exposure looks better…there is still not as much detail in the sky and ground as in their respective exposures.
Since your camera can not put two different exposures into one frame – that is, have one exposure set for the brighter sky and another for the darker ground – we need to manipulate how light is entered through the lens before it hits the sensor.
How GND Filters Work to Regulate Your Exposure
GND (graduated neutral density) filters act as a literal pair of sunglasses, tinting a certain portion of your lens. Part of the filter has an ND (neutral density) effect which will reduce your exposure by a specific amount of stops.

In other words, it reduces the amount of light that hits your sensor. The rest of the filter does not have this light-reducing effect (this is where the “graduated” part comes in) and will be completely translucent.
This filter is fantastic for these types of situations as you typically only need to reduce the exposure for your sky – as seen below.

The idea with GND filters is to place the transition zone (where the filter fades from 100% translucent to the “neutral density” part) along your horizon line, since that is typically where the proper exposure requirements change. Since the tinted part will reduce the amount of light entering through the lens, it needs to be placed over the sky. This will allow you to meter for the ground and expose that properly, without overexposing the sky detail.
Since the content along your horizon line differs depending on what your photographing, GNDs come in two different styles – soft and hard.
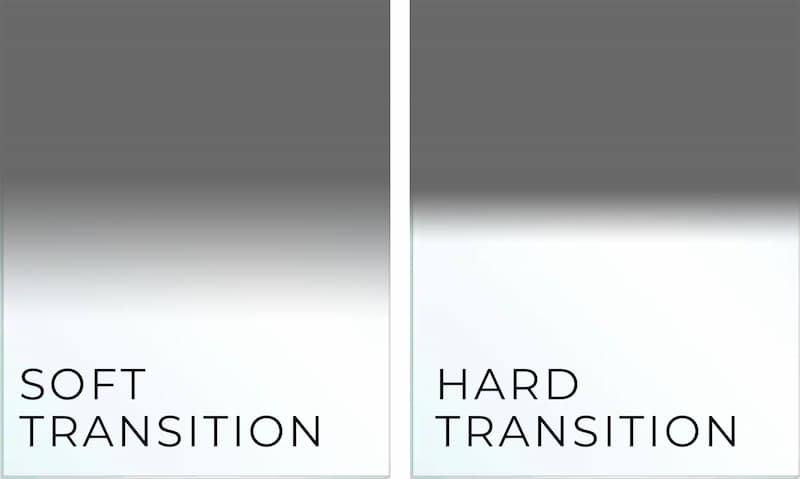
The soft GNDs have a smooth transition between the tinted glass and the clear glass, which is useful for horizon lines that aren’t smooth – such as those with trees, buildings, mountains, and other subjects of varying height.
Alternatively, the hard GNDs have very little room for the transition, which works well for those sharp horizon lines – such as a field of snow or where the water meets the sky. It’s a very popular filter for seascape photography as the ocean’s horizon line is usually flat and unvaried.
Exposure Blending for Landscape Photography
So those are GNDs, but what is exposure blending? It’s a process I use often…and is a revolutionary technique, especially for landscape photography.
Here’s the short version:
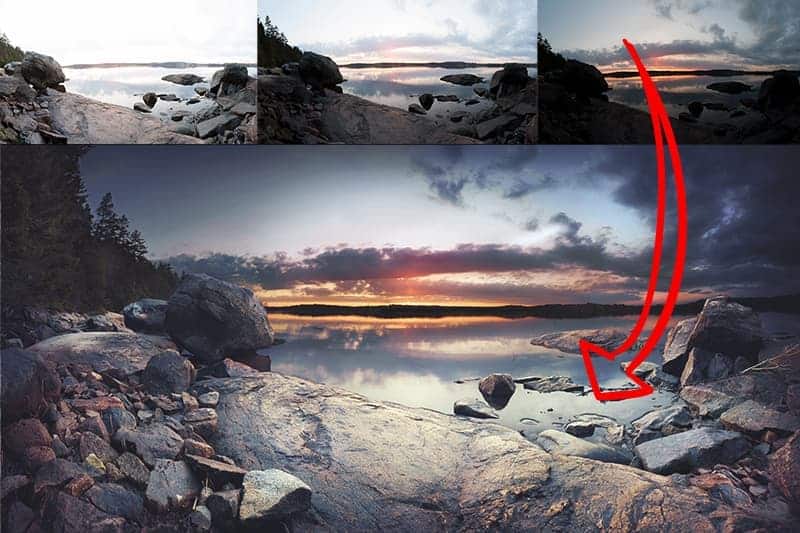
You apply the same principles of GND filters, but instead, take several photos of the same scene at different exposures. Typically, you would capture one frame exposed properly for the sky, and another for the ground (like in the two examples above).
Sometimes, if the difference between both exposures is very large (known as the dynamic range), you may need a third exposure between these two shutter speeds.
Then in Photoshop, you use layers and masks to digitally “blend” the proper exposure for the ground and sky together into one image…essentially picking out the best part of both frames and blending them into one photograph. It’s the digital version of using a GND filter.
GNDs and exposure blending are two very different approaches to the same goal: to have an evenly-exposed image with a complete dynamic range…
Meaning that your photo has as much detail as possible that hasn’t been lost to improper exposure.
There are great benefits to each method, so I’ll go over each to help you make a better decision as to what method works best for your photography workflow.
The Benefits of a GND Filter Over Exposure Blending
A drawback to exposure blending different frames together is what we in the HDR photography world call “ghosting” – which is caused by objects that move within your frame between shots.
A tripod helps to stabilize your camera to prevent it from moving in-between frames, but that’s not always possible. Even the most stable tripod can still be subject to “micro-movements”, such as a strong gust of wind or the earth beneath the tripod shifting (i.e. wet sand on the beach is very unstable).
Any kind of movement will cause your images to not line up properly, which will result in ghosting once those brackets are blended in Photoshop. There are processing techniques you can use to remove ghosting, but that is additional work on your part.
Even when your tripod is absolutely rock-solid, ghosting can still be an issue due to subjects in your frame moving in between exposures. People walking by, grass blowing in the wind, and waves moving through your scene can all cause ghosting as you blend your images together.
These differences between each exposure will register as semi-transparent outlines and will make your image seem low-quality and unpolished.

With a GND filter, you’re only taking one photo – not blending different exposures into one – so ghosting is not an issue.
Using a GND filter is also better for long exposures. If you plan on extending your shutter speed for a dramatic effect, it may be time-consuming to take three (or more) separate images for your exposure blending. With a GND, you’re working with only one image which can be much easier than going through three.
If you’re new to bracketing for landscape photography or otherwise not familiar with how to blend exposures in Photoshop, then a GND filter may be better suited for you as it’s “hand-on” and easier to comprehend the concept.
The Benefits of Exposure Blending over GND Filters
While GND filters can make it easier to photograph a large dynamic range of light, exposure blending in Photoshop will give you higher quality results.
First, exposure blending is much more accurate than using GND fiilters. Even if you’re selecting the right transition strength for your horizon line (soft vs. hard GNDs), there are usually still some elements along this line that won’t look right half-shaded – think of trees or skyscrapers along a flat horizon.
With exposure blending, you can use layer masks to draw exactly where you want to change your exposure. You can move between trees, around rocks, and other structures along your horizon line with ease.
In the image below, I aligned my GND filter along the horizon line. However, the mountains extend well above the line, meaning they are also absorbing the GND effect and are rendered darker.
Since the mountains do not require less light to be exposed properly, they are now underexposed and lost much detail and texture.

However, when I blend two exposure together in Photoshop, I can mask out the sky detail separately from the mountains. You can see below that the results are cleaner, with much more detail in the mountains.
Even if you use the GND filter, sometimes you’ll have to use exposure blending anyways to get the best tonal range and remove lost detail.
A GND reduces the exposure by a fixed amount – and all the scenes we photograph won’t conform to that perfectly. You’ll sometimes find that you may be over/underexposing your scene by a stop or two even with the filter, necessitating the need to bracket your image.
This is especially true for sunsets and sunrises (click here for my guide on how to shoot sunsets). When the sun is in your composition, even the sky itself can have completely different exposure needs that a GND can’t fix. While the sky overall can be exposed perfectly with your chosen GND, the area around the sun can be blown out and lose much detail around its circumference.
This is easily reversible by exposure blending an underexposed image just for the sun area.
That is what I did for my image below, where the sun was much brighter than the surrounding storm clouds. I used two different exposures for the sky alone – one for the entire sky, and another exposure taken with a faster shutter speed to blend in the area around the sun.
If I had not, those dark clouds around the sun wouldn’t be as visible and the entire area would be an overexposed “blob”. And if I was using GND filters alone, this wouldn’t be possible.

GND filters are also “destructive” in the sense that you’re stuck with whatever effect that filter has on your image. If the effect is too dark or bright, there’s no way to alter it since it’s bonded to the actual “negative” itself.
With exposure blending, you’re combining separate photographs together using layer masks…which can be amended at any time.
Yes, you can review the results of your GND filter in the field…but with such a small LCD screen, it can be hard to evaluate your image accurately. This becomes especially difficult with ambient light reflecting off the back of your camera. If your filter is crooked or otherwise misplaced, you most likely won’t catch that until you get home and review your photographs on the computer.
It’s also important to mention that GND filters can become quite costly. You want to invest in a reputable brand, and you’ll need several filters to be prepared for whatever environment that nature presents you with.
What is the difference in quality? Which will give me the “better” photo?
The answer is simple – there is no difference.
If both methods are done correctly, you won’t find a difference in quality between a photo taken with a GND filter and one put together in Photoshop by exposure blending. So the key to a high-quality image is not which method you use, but which method can you execute better than the other?
If you’re happy working on your computer and love Photoshop, you’ll be able to blend exposures with great ease.
However, if Photoshop is intimidating to you or you don’t have a firm grasp on how to blend layers, you’ll easily become frustrated. If that’s the case, then GND filters are probably the better way to go, despite their limitations.
I don’t use GND filters – I exposure blend. That’s not to say one is better than the other, but rather that I enjoy working in the digital darkroom and also like the versatility of using masks to selectively decide where I want to adjust my exposure (this is great when working with an uneven horizon line).
Of course, the downfall to this is potential ghosting – especially if there’s a breeze when I’m photographing. But I’ve learned to work around that, and now teach my exposure blending workflow in The Darkroom for Landscapes program.
The point is, there are obvious pros and cons to each method. Don’t choose the one that works the best according to others, but rather the one that works best FOR YOU. If you’re comfortable with your workflow, you’ll find photography much more enjoyable and successful.
Related Products
Related Products
-
HDR Field Guide
$ 19.00A necessary part of landscape photography is to capture the full dynamic range of the natural light, which…
Add to cart -
Darkroom Foundations
$ 0.00Lightroom and Photoshop were designed to be simple programs to master, although it may not always seem like…
Add to cart -

Golden Hours eBook
$ 19.00Learn how to capture the extraordinary light of sunrises and sunsets with this free eBook. I'll show you…
Add to cart