The Practical Use of the Exposure Triangle
The Practical Use of the Exposure Triangle
If you are just stepping into the realm of landscape photography, you’ve probably heard the term “exposure triangle” come up in conversation. In its simplest form, this refers to the co-dependent relationship between your three manual camera settings (aperture, shutter speed, and ISO), which control how your photograph is created…specifically, the amount of light needed to expose your photograph properly.
While the graph below may seem a bit overwhelming, it’s actually quite simple once you understand your three manual settings individually. Before moving on to the exposure triangle, make sure that you have a basic understanding of how aperture, shutter speed, and ISO control how light is rendered by your sensor.
Now, if there is one thing you could do right now to make a monumental advancement in your skills as a photographer, it’s to understand the basic principle of the exposure triangle..which is how your camera settings influence one another.
This knowledge will directly enhance your ability to create the photograph you want…and free up much time in the field guessing which settings will unlock your desired image.
What is the Exposure Triangle, Exactly?
The first thing to understand is that the exposure triangle isn’t an actual “tool” you use in the field; it’s a visual aid to help you understand a concept…and that concept is how these three variable settings influence one another when one is changed.
Each side of the exposure “triangle” represents the three camera settings that control your exposure: aperture, shutter speed, and ISO. The goal here is to balance these three settings harmoniously in order to properly expose the scene in front of you based on the amount of available light.
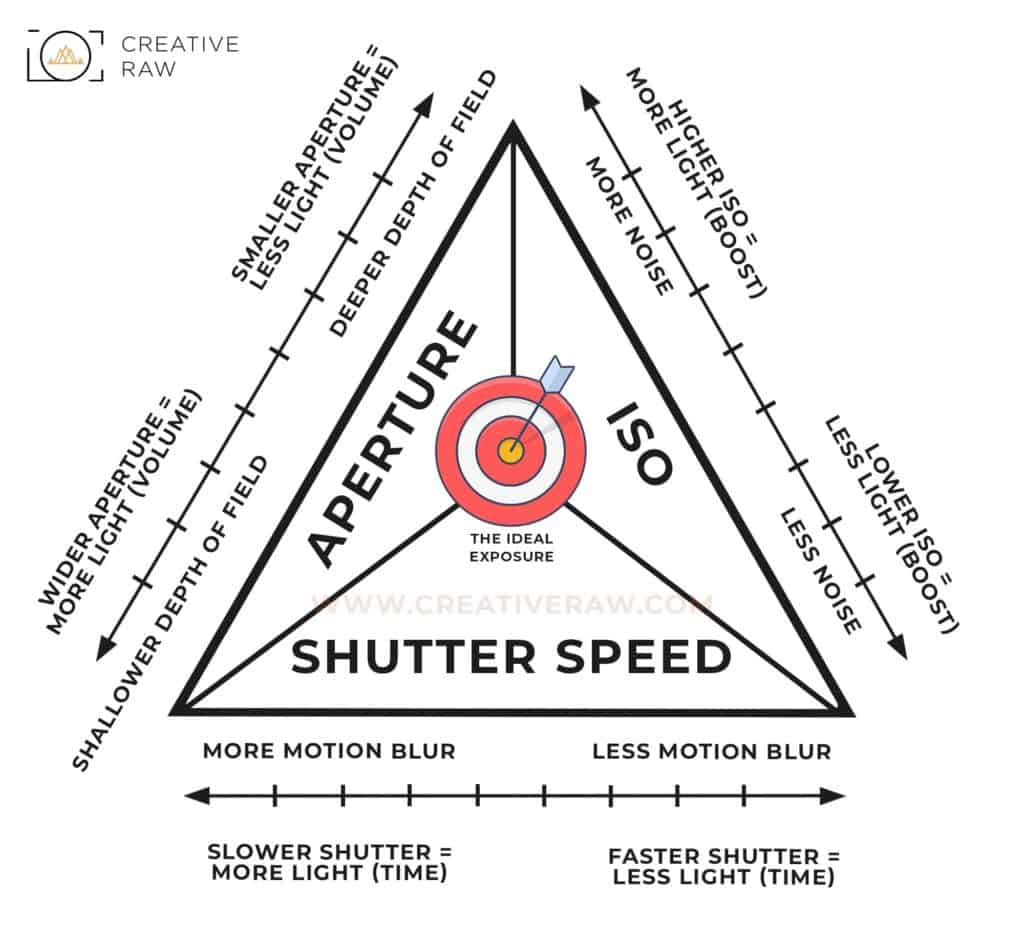
In other words…the aperture, shutter speed, and ISO need to work TOGETHER to get your photograph in the “bulls-eye” zone, which represents the correct amount of light needed for adequate exposure.
This “zone” has some leeway depending on the dynamic range of your scene (how bright and dark the tones are) and the dynamic range of your sensor…but generally, this bulls-eye zone is pretty limited.
As you can see from the chart, adjusting any one of the three manual settings for a specific creative effect will have consequences. For example, if you increase your f/stop to make your aperture smaller for a deeper depth of field, the volume of light entering the lens will be less…resulting in a darker photograph.
So these consequences need to be counterbalanced by your other two settings in order to maintain the same exposure and maintain the proper balance of light.
If a deeper depth of field results in an underexposed image (less light), then you would need to increase your ISO and/or slow down your shutter speed by the same amount of stops. This will bring more light into the photograph and make up for the light lost by using that smaller aperture.
The point of the exposure triangle is realizing that when you make a change to one of these settings, you will need to adjust your other settings in order to compensate for the new volume, time, and/or boost of light.
There is no hard and fast rule when it comes to the specific settings needed for a properly-exposed photograph. This is why general setting recommendations for a certain type of photograph (i.e. f/8 at 1/2000th for noontime sun) are typically incorrect as there are too many variables at play.
The exposure triangle shows you the need to be flexible to adapt to the light available so that you can make suitable changes.
Heres another example:
Let’s say that the ideal exposure for a given scene is at the settings circled below. I did not label the increments with a specific value since that can vary based on your camera and lens, so feel free to imagine your own specific settings. The idea here is to simply recognize that there is a set range for your aperture, shutter speed, and ISO from lowest to highest.

Now, let’s say I want to increase my shutter speed in order to freeze movement and/or reduce motion blur. According to the chart, the consequence of that is a darker image since the time that the sensor is exposed to light has been reduced.
If you only increased the shutter speed without counter-balancing this reduction of light by widening your aperture and/or increasing your ISO, then this will result in a darker (underexposed) image.
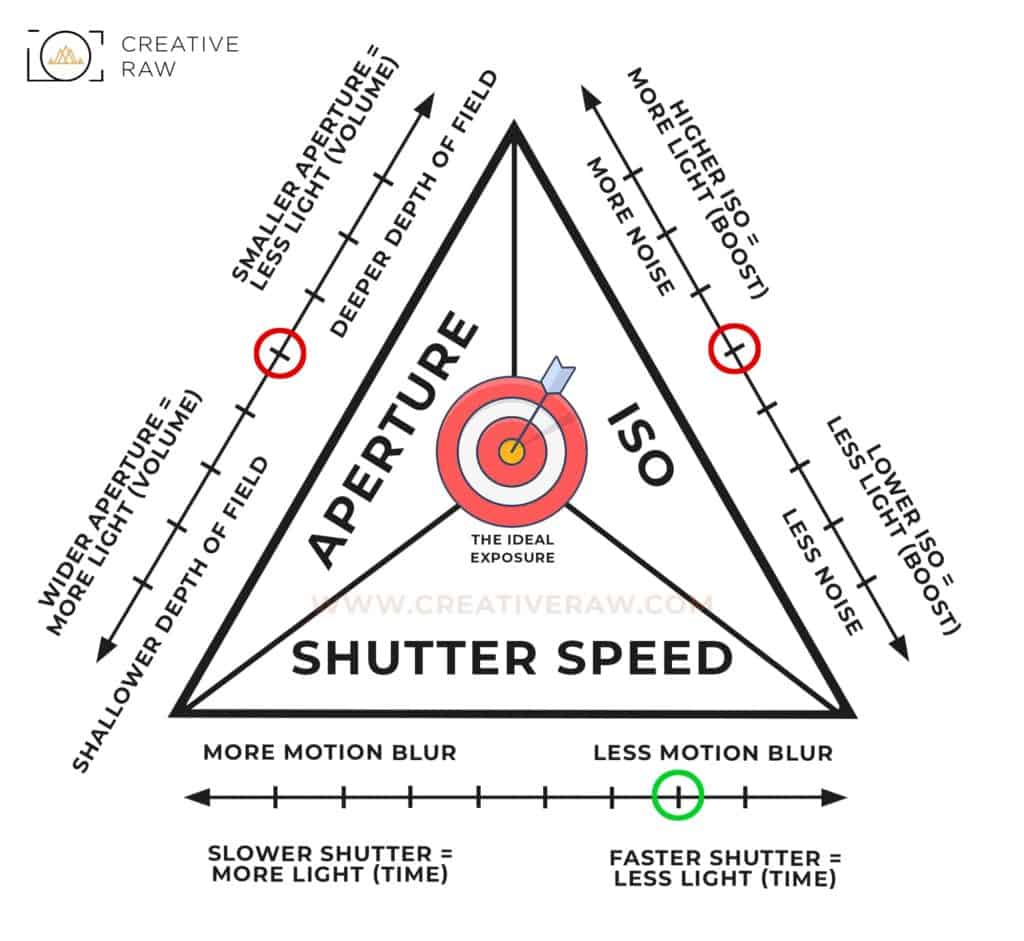
And depending on (1) how much the shutter speed has changed and (2) the dynamic range of light for your environment (whether or not the brightest highlights and darkest shadows are close to being clipped), your exposure may fall outside of the “bulls-eye” zone. That’s what you need to keep in mind when changing your settings in the field.
Using the Exposure Triangle to Balance Light and Content
The exposure triangle is particularly helpful for when you are at the lowest/highest increment for a particular setting (for example, at your fastest shutter speed) and you need to increase/decrease the amount of light beyond that point in order to (1) get your exposure within the bulls-eye and (2) render the content you want.
For example, if you were at the highest (fastest) shutter speed for your particular lens in order to freeze fast-moving action (such as raindrops) but your image was too dark, you would increase your ISO and/or use a wider aperture. This would increase the amount of light so that your photograph is not underexposed, and you can maintain the fastest shutter speed in order to freeze action.
However, you need to keep in mind that the exposure triangle is not JUST about light. As you can see from the chart, adjusting your manual settings will have other consequences (such as motion blur or noise)…and depending on your creative intent, you may need to use a different combination of settings in order to (1) obtain a proper exposure and (2) your desired content.
In the example above, I wanted a fast shutter speed to freeze moving action, so I adjusted my ISO and aperture to increase the amount of light. However, what if I wanted to freeze action AND have a deep depth of field (small aperture)? In this case, I would need to increase my ISO substantially to make up for the reduction of light from both the fast shutter speed AND small aperture opening.
In the end, it’s the same exposure (amount of light)…but the content has changed to reflect my creative choices.
The Fourth Variable: Light!
Light, in essence, is a fourth variable to the exposure triangle as it directly influences your manual settings…and will determine your settings in the exposure triangle. I am not trying to convert it into “exposure square”, but rather bring attention to the fact that any change in light will require a change to one or more of your manual settings.
For example…if your environment becomes brighter, you would need to (1) use a smaller aperture, (2) use a faster shutter speed, and/or (3) decrease your ISO if you want to maintain the same exposure.
Light controls, or fuels, the exposure triangle…and whether or not your image is still within the “bulls-eye” will depend on (1) how much the light has changed and (2) if you properly adjusted your settings to compensate for this change.
The Practical Use of the Exposure Triangle
With modern-day digital photography, the exposure triangle isn’t used to calculate the proper exposure anymore, but rather is about simply understanding that your manual settings are directly influenced by one another…
And that adjustments need to be made in order to (1) achieve the desired change in detail (such as a wide aperture for a shallow depth of field), and (2) maintain the proper exposure (level of light) that’s within the bulls-eye range
Typically, you’ll be using a semi-auto mode (aperture priority or shutter priority), which allows you to have full manual control over one setting, while letting the camera automatically adjust the other to obtain the best exposure based on your metering mode and exposure compensation (if any).
Aperture Priority (A), as the name suggests, allows you to control the size of your aperture opening (and thus your depth of field) but it frees you from changing the shutter speed, which is automatically calculated by the camera.
Whereas, Shutter Priority (S) allows you to control the shutter speed of the lens, while freeing you from the calculation of aperture as you change your shutter speed in order to maintain the same exposure. Since motion blur is (mostly) controlled by this setting, you would use this mode for when you want to freeze or intentionally blur moving subjects.
ISO is then typically adjusted separately as the last resort, when you can not adjust your shutter speed and/or aperture any further…as explained in my guide to ISO.
You would then use the concept of the exposure triangle to make adjustments as needed…until you find a suitable balance between the (1) optimal “bulls-eye” exposure and (2) your creative intent.
Also keep in mind that you can incorporate other methods into your workflow for when you can not settle on an adequate balance. For example, if your image is still too bright for your desired settings, you can add an ND filter to cut down on the amount of light entering through the lens.
And if you’re constrained by the dynamic range of your environment (when there is a large gap between your brightest highlights and darkest shadows), you can always bracket your scene and exposure blend in post process.
2 thoughts on “The Practical Use of the Exposure Triangle”
Leave a Reply
Related Products
Related Products
-
Darkroom Foundations
$ 0.00Lightroom and Photoshop were designed to be simple programs to master, although it may not always seem like…
Add to cart -

Golden Hours eBook
$ 19.00Learn how to capture the extraordinary light of sunrises and sunsets with this free eBook. I'll show you…
Add to cart -
Light and Shadow
$ 129.00Learn how to expertly sculpt light and shadow in both Lightroom and Photoshop. In my brand-new program, Light…
Add to cart
a lot of knowledge for free. this is explicit. thank you for this explanations on exposure triangle.
Hello I loved the visuals and explanation so much I hope it is okay that I linked it and created it on my website! I love the work y’all are doing to grow the photography community!