Complete Guide to Backing up Your Landscape Photos Securely: Part One
Welcome to my three-part series on a very boring, but an undoubtedly essential topic for landscape photographers: how to properly (and securely) backup your precious raw files.
INTRODUCTION
If you’re anything like me, then you know how important it is to recover your images from any kind of destructive force…whether it be a computer meltdown, damaged/stolen external drives, or the most likely cause: corrupt files.
I must get at least half a dozen emails every week asking about my photo backup workflow, so I figured it’s time I outline (in great detail, as usual) the exact steps I take to make sure that my raw files are protected to the max.
It’s not a matter of “if” something will happen to your photos, it’s when. I’m not saying this to scare you, but to put the importance of a proper backup system into perspective.
Whether it’s hardware failure or simply deleting your images by accident, it’s going to happen. The goal is to make sure that you have redundancies in place to minimize the effects….because a proper backup system can be the difference between a slight inconvenience and a catastrophic loss of all your images.
You know you need to have a solid backup workflow in place….but just thinking about it can be overwhelming, especially when there are so many variables. If you’ve been putting off this crucial step….or have simply dumped all of your images onto an external drive thinking that it’s good enough, then this is the article for you.
HINT: An external drive alone is not a proper backup!
What you need is a solid backup strategy….and if you’re anything like me, the last thing you want to do is spend a bunch of time figuring out the best method for backing up your images. Personally, I’d much rather spend my time in the field or processing my photos than masquerading as an IT professional.
Good news for you though: I’ve already spent hours upon hours researching and testing out all sorts of backup methods over the past few years so you don’t have to 🙂
A proper backup system is absolutely crucial because even a small oversight can cost you your entire library of photos. Believe me, there are a LOT of loopholes to the JBOD backup system, which stands for “Just a Bunch Of Disks” (yes there is an acronym for this method).
External drives give you a false sense of security, and you probably know deep down underneath that you should be doing more to protect and preserve your images. I’ve seen too many photographers lose their entire portfolio because of missteps in their backup workflow….and the worst part is that it was so easily avoidable!
My top goal here at creativeRAW is to make sure you have the best knowledge at your disposal…..even if I have to drag you through a long and boring series about proper backup strategy. I’m sorry, but it can’t all be about pretty pictures….so it’s time to sit down and etch out a solid backup strategy.
Here’s what to expect in this three part series: I’ll show you exactly how to create a solid and reliable photo backup system in a simple, straightforward manner….and without having to invest thousands of dollars or requiring a Ph.D. in computer science to implement.
FAIR WARNING: No backup plan is 100% fail proof….there will always be variables beyond control that could potentially wreak havoc on your library of images. However….you can take some simple precautionary steps to avoid silly mistakes, which will greatly mitigate the chances of a total loss. That is what we’ll be focusing on in this series.
And at the end of this tutorial, I hope you can have a bit more fun with your photography knowing that your precious photos are protected and backed up properly!
HERE’S WHAT WE’LL BE GOING OVER…
PART 1: For this post, I want to outline the “big picture” ideas of a proper backup system…because this is where I see many photographers get overwhelmed and ultimately abandon their backup efforts. It’s easy to get wrapped up in the small steps (like picking out the “best” external drive or cloud storage), but that’s putting the cart before the horse if you don’t understand how all of the parts to a proper backup strategy work together.
Once you know the general structure of a dependable backup strategy, the smaller details fall right into place and will make much more sense.
PART 2: I’ll walk you through my personal backup system, step-by-step…from importing images off of my camera, backing up my raw files in several locations, and how to use cloud storage for an added layer of security.
PART 3: There’s more to a complete backup workflow than simply protecting your image files. I’ll also show you how to backup and sync your Lr catalog file between two devices, so changes you make on your laptop are automatically sent to your desktop (or any other synced device). Don’t forget about your PSD files too.
DISCLAIMER:
My backup workflow is best suited for hobbyists or otherwise non-professionals (or at least do not rely on direct business-to-client sales, such as with portraits or weddings)….or those who otherwise do not require network-level syncing and file storage. If that’s the case, you’ll need a more robust (and complicated) backup strategy to preserve your images and protect yourself from disappointing your clients. Your best bet for long-term success here is to hire an IT consultant to walk you through an adequate NAS backup workflow….which will not only protect your business but will best serve your clients.
For most landscape photographers like me though, my workflow consists of well-planned shoots and perhaps one or two PSD files from each outing. My needs are wildly different from those who need instant backups in the field and rely on high-speed syncing across multiple devices/computers. Those backup systems are overly complicated and offer me very few advantages for the time and monetary investment.
Let’s get started!
I want to jump right in by going over a HUGE backup pitfall that I’ve seen so many photographers unknowingly stumble into. Simply backing up your images to an external drive gives you a false sense of security because many assume that backups are 100% dependable. The reality is quite the opposite as it’s not a matter of IF an external drive will fail, it’s when.
Good drives will last five years or more, but poorly-made drives can fail much sooner….and faulty drives can fail at ANY time.
This means you absolutely need a Plan B (and a Plan C) in order to have a high degree of redundancy if your main backup source fails…giving you a chance to recover your images and replace your failed drive.
In other words, you need to backup your backups!
THE SINGLE POINT OF FAILURE
Every single case of a catastrophic loss of photos that I’ve come across has been due to one preventable cause: the photographer did not protect themselves from the single point of failure.
Most photographers rely too heavily on purchasing the “best” and most reliable external drive to place their images on…..but the focus of your backup strategy should be entirely on mitigating the single point of failure.
What is a single point of failure exactly?
In the simplest terms…it’s a single point in your backup system that if it fails, you’ll permanently lose your photos.
For example….let’s say you import your images onto an external drive with no backup copies in place. That external drive is now your single point of failure because you have nowhere else to turn to if your images are lost. This prompts many photographers to purchase an additional external drive and copy your images over…giving you two copies of your raw files.
This is the point where many photographers end their backup strategy…but what you may not know is that these two drives still leave you open to so many opportunities for a complete loss of images.
Let’s say you carry around both external drives in your camera bag, and your bag gets lost or stolen. Your camera bag is now your single point of failure.
How about this: you take one external drive with you on the road and leave another at home. You haven’t checked your home external drive for a few weeks, and at some point during this time the drive failed….and your camera bag takes a dip in the river (this is a true story, by the way). Your backup system has now completely let you down.
Here’s another situation: you go crazy and copy your treasure trove of images over to five different external drives. Your little nephew decides that your office is a great place to try out his new water pistol, or someone breaks into your home and cleans out all your hardware. Your house is now the single point of failure.
I could go on with scenarios (and you’re probably hoping that I don’t), but I think you get the point. You need to diversify your backup strategy so that if it fails in one area, you have another to fall back onto.
ALWAYS REMEMBER: your memory card is your first single point of failure, so you should copy your images onto another media as soon as possible. It drives me nuts when I see photographers come back from a once-in-a-lifetime landscape shoot and leave their precious raw files sitting on their memory cards for days or even weeks. No dawdling!
If you can think of a single point of failure in your own backup workflow, don’t worry….many photographers overlook this when backing up their photos. The number one goal here is to lessen your exposure to the single point of failure as much as possible….and this is where the 3-2-1 rule can help:
THE 3-2-1 RULE
- Three (3) copies of your data — 1 Original and 2 backups….
- Located on two (2) different media, such as the cloud and an external drive…
- With at least one (1) being in a separate location.
While this is not 100% fail-safe (nothing is in the world of backups)….following this rule will put you in a great position to prevent and easily recover from any kind of backup failure.
BUT WAIT! THERE’S MORE…
So now you know that you need to diversify your backups. However, the point of failure goes beyond just the physical location of your images (i.e. all backups at home) and the type of media you use….it also includes whether or not you replace all of your backups with the most recently saved version.
I love to use examples to illustrate my points, so let’s create a scenario.
Let’s say you copy over your images to your computer’s internal drive, and those same images are backed up via Dropbox (cloud storage) and Time Machine (synced backups to an external drive). This follows the 3-2-1 rule….three copies (computer, Dropbox, and Time Machine), two different medias (cloud storage and hard drives) and with one being off-site (Dropbox).
And even better – this backup strategy relies on syncing, so when you change the master file on your computer, any changes are instantly pushed off to your Time Machine and Dropbox so you never have to worry about keeping your images up to date across all backup media.
Sound great, right? You would think this would cover all your bases, but that is definitely not the case.
What happens if the images on your computer become corrupted….or accidentally deleted and you don’t realize it immediately? Since Dropbox and Time Machine are synced to the source files (the images on your computer), changes made to your photos (whether good or bad) are instantly pushed off to Dropbox and Time Machine.
Since file syncing can’t tell the difference between the GOOD changes and BAD changes, you could potentially wipe out or corrupt your entire backup system in one fell swoop.
In other words, file syncing can be a “single point of failure” as well and should not be your only form of backup.
This is a problem I see with many backup strategies is that they are connected, or synced, to one central source. In theory, this is fantastic since any changes you make will be instantly sent off to all backup locations, but as illustrated above….it can be a monumental single point of failure.
If a corrupt file or bad data is introduced at the source, it spreads like a virus through all of your synced backups.
This is especially important for digital photography since a corrupted raw file can affect all your backups and render your photo useless. Or if you mistakenly delete one of your older images and don’t realize it for months or even years down the line, you’ll be well beyond the point of restoration and have lost those images forever….without any warning.
YOU NEED TO ISOLATE YOUR RAW FILES
What I find with many photographers who have quickly put together a backup workflow is that they do not even realize that file syncing is taking place, and they just assume they can restore their files to their original state indefinitely. Services like Time Machine or Dropbox will store deleted images and/or older versions of your images for a LIMITED time, but not indefinitely.
In other words, if one of your images becomes corrupt or if you mistakenly delete a photo from the source, and this spreads throughout all your backup sources, AND you don’t catch it in time….you’re going to lose those photos forever.
So in addition to the 3-2-1 rule above, you need to ISOLATE your original, unadulterated raw files (direct copy from your camera card) as soon as you transfer them off of your camera card and put them into “cold storage”….never to be altered or re-saved again unless you need to restore your raw files.
If this seems confusing to you, don’t worry. It sounds a lot more complicated than it actually is…and will make much more sense in the next article when I show you my backup strategy.
Isolating your original raw files will give you a fail-safe to fall back onto in the event that your working raw files (the copies that you import into Lightroom, edit in Photoshop, etc.) are accidentally deleted or become corrupted.
The key here is to ISOLATE them on an external drive and protect them from file syncing or any kind of change from an outside source….in other words, to quarantine them. Think of these files as film negatives and treat them accordingly.
I’ll go over my step-by-step backup workflow in the next article and explain exactly how I keep these images isolated, but for now, I just want you to be aware of the importance.
I’ve seen so many photographers get unknowingly caught in this nightmare…where they do not have the original raw files to revert back to if necessary. It’s so easy to swap out a corrupted image in Lightroom with a fresh copy of your original photo and retain all of your edits (remember: your Develop module work, keywords, collections, etc. are stored separately from your raw files).
NOTE: Backing up my Photoshop files is a separate process and is something I’ll go over in the next part of this backup series. For the purpose of this article, I just want you to focus on backing up your image master files (the raws).
Don’t get me wrong – I LOVE file syncing and use it every single day as part of my own backup workflow. The key here is to diversify your backup strategy so you have both the convenience of file syncing AND an isolated copy of your original raw files tucked away securely.
In fact, I use file syncing every day to share my Lightroom catalog file between my laptop and desktop, which has revolutionized my processing workflow. In part 3 of this backup tutorial, I’ll be showing you exactly how to do this…a fantastic time saver for those of you who use both a laptop and desktop!
This brings me to my next backup tip, something that I see many photographers overlook…..
BACKING UP YOUR LIGHTROOM CATALOG FILE IS JUST AS IMPORTANT AS YOUR RAW FILES
When strategizing your backup workflow, many photographers will focus solely on their raw files….but completely neglect the incredible importance of your Lightroom catalog file. If this become corrupt and you do not have a proper backup system in place, you can say goodbye to countless hours of editing and organizing.
If you use Lightroom (and you should simply for your initial raw processing and organizational capabilities, as discussed here), then you probably know that the catalog file is the “brain” behind all of your processing work. It contains a set of written instructions that detail every raw change that you make (such as lens corrections, exposure adjustments, etc.), as well as all of the Library module work….such as keywords, copyright info, and collections.
Rather than package these changes together with your image, Lightroom will store these separate from your raw files and keep them isolated in the catalog. This is a good thing since you want to preserve your original raw file as much as possible with a non-destructive workflow, and not continuously re-write your raw file for every change you make.
With this in mind, you absolutely must treat your catalog file with the same respect and importance as your raw files themselves.
Don’t worry, I’ll be showing you my step by step backup workflow for the catalog file as well….but for now, I just want to make sure you know that simply backing up your raw files will NOT backup your editing work if you’re using Lightroom.
DON’T FORGET ABOUT INTERNAL BACKUPS!
All this talk about backing up your photos, it’s easy to overlook another integral part to your digital darkroom: your operating system and other computer files. Without a proper backup in place, a computer crash can cripple you for quite some….not to mention losing your important, non-photography computer files.
You may already know how to backup your internal drives….but if you don’t, it’s quite easy to create a backup. It’s often overlooked so that’s why I’ll be throwing that in as well in this series.
LET’S QUICKLY RECAP WHAT WE’VE LEARNED HERE….
A strong backup system for your photographs consists of the following:
- Diversifying your backup media (i.e. a mixture of external drives and cloud storage) and locations to minimize the single point of failure.
- Follow the 3-2-1 rule: Three copies of your photographs, using two different types of media, with at least one copy being in a separate location.
- Isolate and preserve your original raw files so you can always revert back to the master file if necessary (like you would with a film negative).
- Treat your Lightroom catalog file with the same importance as your raw files…and back it up accordingly!
- Backup your computer(s) as well, as a small amount of prevention here can save you hours of frustration when your computer crashes.
Now all of this may seem overwhelming and confusing, but a solid backup strategy is pretty easy to implement when you have a game plan and a solid understanding of what you need to do. Once you understand all of the points above, you’ll be in a great position to easily recover from any kind of disaster.
Strengthening Camera Stability for Rock-Solid Brackets
The smallest amount of prevention can save you much frustration during the exposure blending process….and it all starts with camera stability.
Blurry photos with soft focus and/or an inconsistent depth of field can completely derail your blending workflow, causing you to lose out on a potentially extraordinary landscape photograph. Since you’re blending multiple exposures together of the same scene, it’s necessary to have each exposure align perfectly in order to combine them without errors…such as ghosting or soft focus.
The key to perfect alignment is (1) a solid mount for your camera and (2) the prevention of any vibrations….because even the most minor movement can slightly alter your composition or soften your focus, which can create a major obstacle once you bring your brackets into Photoshop.
In this article, I’ll go over my best techniques for ensuring that your camera mount is rock solid, and also how to head off any potential causes for camera shake….so you can easily blend exposures together and create seamless HDR landscapes like this:
Let’s start by going over why your tripod is so important for auto-bracketing, and how to make sure that nothing can interfere with your stability.
Why you always need a tripod when bracketing.
While you can certainly capture your scene handheld (if you have enough light), a stable camera mount is almost mandatory for bracketing. When you bracket a scene, it’s of the utmost importance that each image will align perfectly when you blend them together later in the digital darkroom.
A stable tripod will ensure that your camera can not move, and that each exposure you photograph will be identical in composition as even the most minor movement can produce errors in blending.
Composition aside, a tripod will eliminate any chance of soft focus due to camera shake, allowing you to concentrate more on fine-tuning composition instead of worrying about keeping your arms steady.
While your initial metering may produce a shutter speed fast enough to use handheld, your longest exposure (metered for your shadow detail) may be on the cusp of that limit…and could produce soft focus for that bracket without you even realizing it.
This is especially true for landscape photography where you’ll typically be using a small aperture for a deep depth of field, be in an environment with limited available light, and be working with a wide range of exposure values to capture all of your tones.
Instead of finding this out after you begin your bracketing – or even worse, once you get home and look at your brackets in greater detail – it’s far easier to prevent this in the field by using a stable camera mount…giving you more time to enjoy your photography.
1. A tripod gives you a more secure way to line up your shot.
I’ve learned that you can never trust handheld compositions fully. When I’m shooting in awkward positions (especially down low or laying flat out) what I see in my viewfinder isn’t always what appears on my computer later. Using a tripod gives you stability, which helps you slow down and check those important compositional elements, such as using the rule of thirds or straightening out your horizon…and making sure that everything you want within your frame is there.
Without a tripod, I would have had a very difficult time trying to line up this composition and adjust my settings as I was laying flat out on my stomach for this perspective.
Also, a tripod allows you to check your histogram and adjust your settings without affecting your perspective or composition….very helpful!
2. A tripod helps you to pinpoint your focus.
Slight movements from a freehand grip can lead to focusing problems, especially if you’re working with a shallow depth of field. Any kind of vibration or movement can throw off your focus and alter your depth, which makes exposure blending near impossible.
A tripod helps tremendously by giving you the opportunity to check and re-check your focus (I’m a big advocate of chimping or using live view to confirm proper focus) and other settings without inadvertently moving your camera.
If your focus isn’t where you want it to be, you can fine-tune it manually…which is much easier to do if your camera is stationed on a tripod.
3. A tripod helps with proper image alignment for processing.
You’ll appreciate the added stability of a tripod if you’re auto-bracketing for exposure blending, or shooting a panorama.
When you photograph an image handheld, even the slightest movement can cause minor discrepancies between each frame….which makes it very difficult to align images in the process later for blending or stitching.
For this image, a tripod was necessary for several reasons. The awkward angle of my camera (pointed almost directly vertical and low to the ground) required a firm mount in order for me to compose and set my focus.
Additionally, the autumn wind was very intense and I wanted to execute a long exposure to capture the moving leaves and tree branches. Since I was working very wide (f/1.4) I had to use not one, but two ND400 filters, which gave me an image that was 18 full stops slower than the unfiltered exposure and left my shutter open for 40 seconds.
With this in mind, a tripod was absolutely necessary.
Considerations when purchasing a new tripod.
When I originally chose my tripod, I selected a model that offered supreme stability since I use exposure blending often in my work. I settled on carbon fiber tripod legs that had several wonderful features that I knew would greatly benefit my exposure blending workflow.
The greatest feature I found with these particular legs was how fluid and easily you can switch the center column from vertical to horizontal mode, allowing me to get extremely close to ground level….so I can capture perspectives like this with a stable mount.

To switch, it’s simply a matter of fully extending the center column, pressing a button, and folding the column down….could not be easier. When working in horizontal mode with the legs fully extended, you can achieve a ground height of only 4.5 inches, which is an impressive vantage point to have with a stable camera mount.
With my older tripod legs, I had to completely disassemble the center column and carefully align it horizontally. I can tell you from much experience that attempting to do this while racing the dissipating light of a sunset or in subzero temperatures with bulky gloves is not an ideal situation. I often work at ground level, so for my particular workflow, this was a huge improvement and has saved me much time and frustration in the field.
The most basic and important function of a tripod is a stable mount and the elimination of any vibrations, which is essential for bracketing. The legs I chose were one of the larger models (these legs can reach a max height of 68.9 inches fully extended), and a larger model equates to a more stable, secure mount….and the max load of 17.6 lbs gives me plenty of breathing room for my heavier lenses.
Despite the larger size, carbon fiber construction is light in weight; not only has this made it easy for me to carry on extended hikes, but it also performs fantastically at absorbing vibrations when compared to more compact and flimsy models.
Let’s not forget the tripod head which is equally as important for a stable mount….
Being able to quickly realign my composition (fantastic for panorama stitches) without having to adjust a knob on my tripod head each and every time has been a huge advantage to my in-the-field workflow. Using a joystick head with a quick-release plate allows me to easily attach my camera to the tripod with no fuss or delay, and the locking pin secures my camera into place.
My favorite part about this head is the joystick design; it’s not only ergonomic but allows you to simply grip and reposition along both vertical and horizontal axes at once as opposed to adjusting knobs for each and every movement. Despite the free-flowing design, the precision movement is another great feature as you can still achieve controlled adjustments for your composition.
By using this tripod or one of similar construction, you can have the confidence that your composition is locked into place and any environmental vibrations will be absorbed to a great capacity.
Your blending result is entirely dependent on the quality of your brackets, and taking every precautionary step to ensure that your camera is on a solid mount will save you much time and frustration once you jump into Photoshop later.
Mounting your camera securely.
Now that you have a stable and reliable tripod, you can begin to auto-bracket your scene. Before you adjust your camera settings, you need to ensure that your mount is secure and your focus is set properly.
Unsuccessful brackets are usually the result of small and preventable errors, so it’s worth the extra time spent to prepare than to walk away with an unsatisfactory set of exposures.
Before you adjust your camera settings, you need to ensure that your mount is secure and your focus is set properly. Unsuccessful brackets are usually the result of small and preventable errors, so it’s worth the extra time spent to prepare than to walk away with an unsatisfactory set of exposures.
Before you mount your camera on your tripod, make sure all joints are secure and your quick-release plate is firmly locked onto your camera. If it’s particularly windy out, consider a lower vantage point as vibration absorption and stability is greater when your tripod is not fully extended.
Alternatively, you can add some additional weight to your center column (if possible) which will help to redistribute the weight of your tripod for more secure footing.
At times, small vibrations can come from unexpected sources. Usually, our intent is to shield our camera from environmental vibrations – such as wind, unsecured footing, or the photographer themselves. However, the source of these vibrations is quite often directly from the camera.
The image stabilization (vibration reduction for Nikon users) feature of certain lenses can actually cause vibrations if your camera is mounted. This fantastic feature is designed for handheld shots when you’re walking that shutter speed line between a sharp focus and one that has been softened from camera shake.
However, since your camera will be mounted securely, IS/VR is redundant and should be turned off as it has been proven to actually produce minor vibrations when your camera is already locked into place.
A remote cable release (wired or wireless) is a necessity for accurate bracketing and general camera stability for any shutter speed where camera shake could potentially become an issue. The simple act of pressing the shutter button sends vibrations to your camera, which can soften the focus of longer exposures. The remote cable release will allow you to press your shutter via a remote so you’re not actually touching your camera, essentially eliminating any chance of movement.
Another great benefit of the remote cable release is the ability to lock your shutter button into place, allowing you to create long exposures without having to physically hold the shutter button down during bulb mode.
For my workflow, I prefer the Canon remote cable release since it’s simple to operate, and the chance that it could fail in the field is far less than a battery-operated wireless release….which is dependent on a functioning infrared or radio frequency connection. Since my subject is landscape photography, there isn’t much need to trigger my shutter wirelessly as I am always in close vicinity to my camera.
Proper focus for tack-sharp brackets.
The final step in making sure your brackets are sharp and seamless for blending is to focus properly.
In order to get a proper exposure and uniform depth of field with your set of brackets, I have a few helpful tips before you press the shutter.
Most (if not all) digital SLRs have several autofocus points that you see through your viewfinder. The camera will automatically use these points as a reference to decide where the main point of focus should be, meaning the sharpest point of your image.
While this is a helpful invention, you’re basically playing a guessing game with your point of focus, which is something you should avoid…especially when shooting shallow depths.
The easiest solution here is to pick one focus point instead of allowing your camera to randomly select them for you (your camera manual will show you how this is done). This gives you much more control over where your point of focus will be.
You can then easily aim the camera at your subject, do a prefocus, and then tweak your settings while your composition remains locked thanks to your tripod. Since most cameras now have focus points across the entire frame, you can easily select one that lines up with your point of focus….or close enough where any readjustment of your composition is minimal.

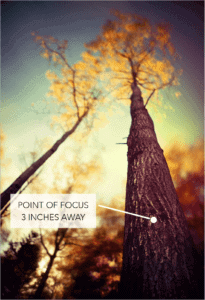
By using a tripod, I was able to achieve this awkward perspective and pinpoint my focus exactly where I wanted it…something that would be near impossible to do freehand.
You can also just use the center focus point and aim at your subject (where you want your focus to be set)…and then switch to manual focus and compose your frame. However, this isn’t the most accurate way to set your focus, especially when working very close to your subject with a shallow depth of field. I find it better to focus after composing and then fine-tune it manually.
The important step here is that after you find a strong composition and have set your focus, make sure to switch to manual focusing so that your lens doesn’t automatically refocus when taking multiple shots. This is very important as it will make it near impossible to blend your brackets together seamlessly.
If you follow these important focusing steps, you’ll ensure that your slice of focus will be pinpoint accurate…and always where you want it to be.
One final note: make sure to attach your remote camera release! If it’s wired, tie up any dangling cord around your tripod to prevent unwanted vibrations, but leave enough slack so you can trigger your shutter without pulling on the cord.
Also, ensure that your camera is set to raw format for image quality. I go over why raw format is extremely important (especially for exposure blending) in the free HDR field guide.
This PDF guide will show you how to master HDR field techniques and capture extraordinary (yet natural-looking) landscapes with my proven, step-by-step workflow.
Now you’re ready to go into your camera menu options and activate your auto bracketing features! The bracketing workflow is something I also cover in the HDR field guide, so make sure to give that a read for more of my best tips and tricks for seamless exposure blending.
Remember: the strength of your brackets will dictate how successful your exposure blending process is in Photoshop….so a bit of prevention in the field will ensure that your blending workflow will be seamless for an extraordinary final image!
How I Photograph a Golden Hour Landscape
There’s a profound challenge that many landscape photographers face when photographing a sunrise or sunset: they often find that their golden hour images rarely represent the scene they observed. Not only is the sky blown out and the foreground deep in shadow, but compositions tend to weaken when distracted by the mesmerizing light and texture of this time.
In this article, I go over some of my best techniques that I use to compose my golden hour landscapes….which I hope gives you more confidence in your ability to photograph this beautiful light successfully. With this new knowledge, you can overcome any disparity between your view and your results…and focus on enjoying your photography and expanding your creative horizons.
Once I’ve settled on an ideal location for the golden hour light, my first instinct is to choose a composition and focal point that compliments my environment. I usually do not decide on a specific vantage point until I’ve taken in all of my surroundings as my image is entirely dictated by the light during this time.
Not only is the angle of light an important factor, but both the quality and strength of the light have much to do with how it interacts with the landscape – specifically if it’s affected by clouds and other atmospheric elements.
When the sun is at such a dramatic angle, even the slightest move towards the horizon can drastically transform the scene around you.
Location scouting will give me a general area of interest…but I will often let the light dictate my composition once I return to that location.
Evaluate the sky first.
When I approach my scene during the golden hours – whether it be a beach or a forest – I survey the sky first. Is there enough interest to make this my focal point?
Clouds have a way to make a dull, flat sky come alive with textures and colors, which is only amplified as the sun is closer to the horizon line. I will rarely miss an opportunity to make the golden hour sky my focal point when there is lots of drama present in the clouds….unless there is something truly extraordinary in my foreground.
Clouds can also extend the golden hours before sunrise or after sunset depending on their elevation. Just like many environmental elements, clouds reflect light – which explains why the colors and textures of clouds explode during this time.
While the sun may still be hidden behind your horizon, the clouds above are within the sun’s view…making for an ethereal show of color and tones.
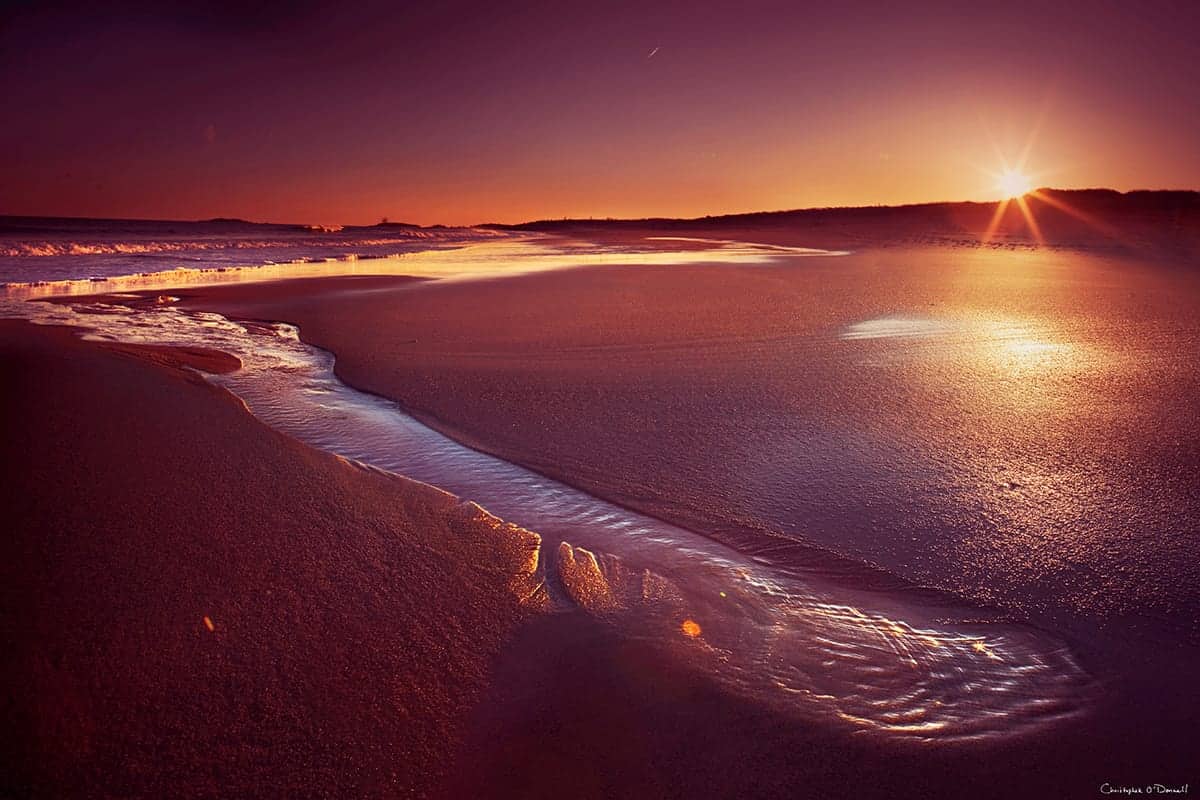
If, however, the sky is flat and uninteresting, I will often choose to include the sun in the upper left or right corner of my frame and search for a prominent foreground subject to help even out the “weight” of an image.
Directing the Flow
If I choose the sky to be my main focal point, I will look for a foreground subject that will not only compliment it, but help to balance my composition. The weight of my focal points in relation to the sky is very important to me, and is something I take into great consideration when composing my frame.
By “weight”, I am referring to the power and balance a specific focal point has over the entire image. A photo that has a heavy focal point will draw much attention away from the rest of the composition…while a light focal point will be barely noticeable, and perhaps only once the entire image has been looked over.
Usually, I want to create a balanced image where the sky and ground have an equal amount of weight. Depending on the heaviness of my sky, the foreground subject I choose can vary greatly. A highly-detailed, intricate sky will draw much attention, so a strong and noticeable foreground focal point will be required to make a complete and well-balanced image.
Redistributing the weight of your focal points is another way of altering the flow of your image: how your eyes move across the composition, and what points cause them to pause and focus.
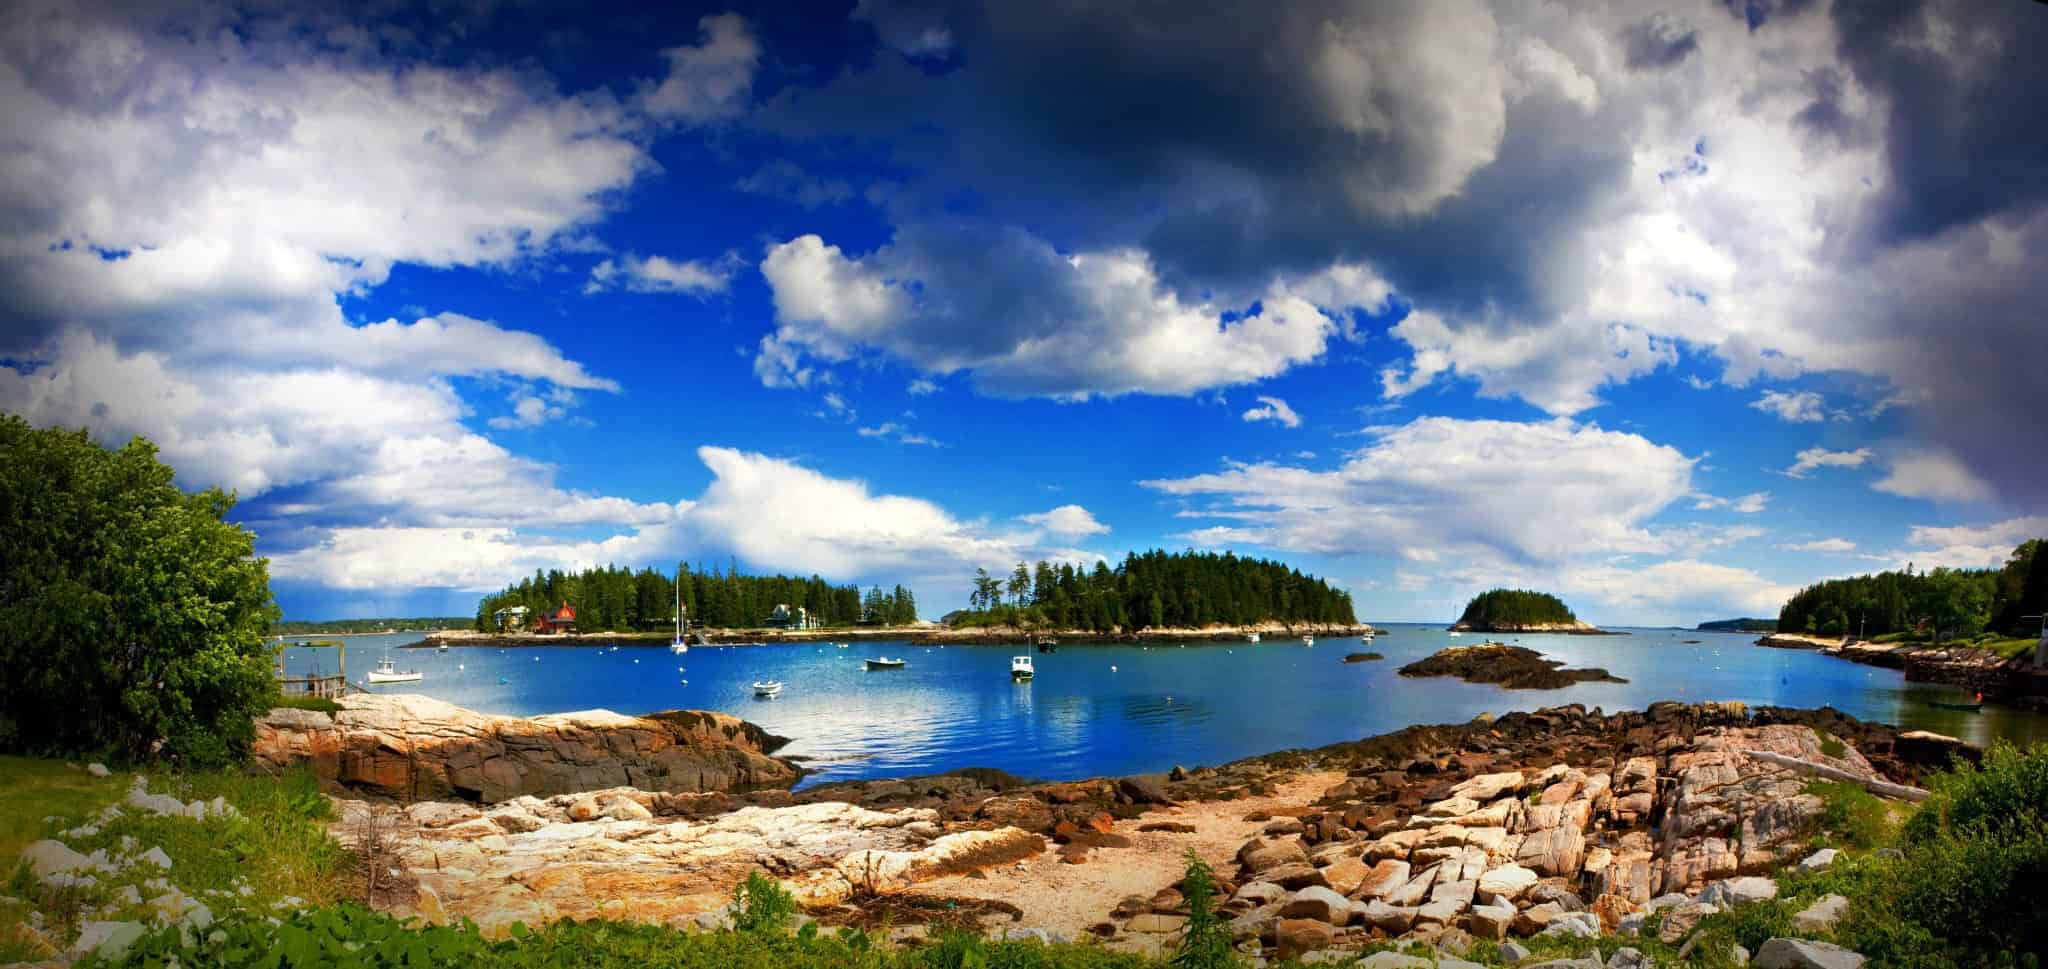
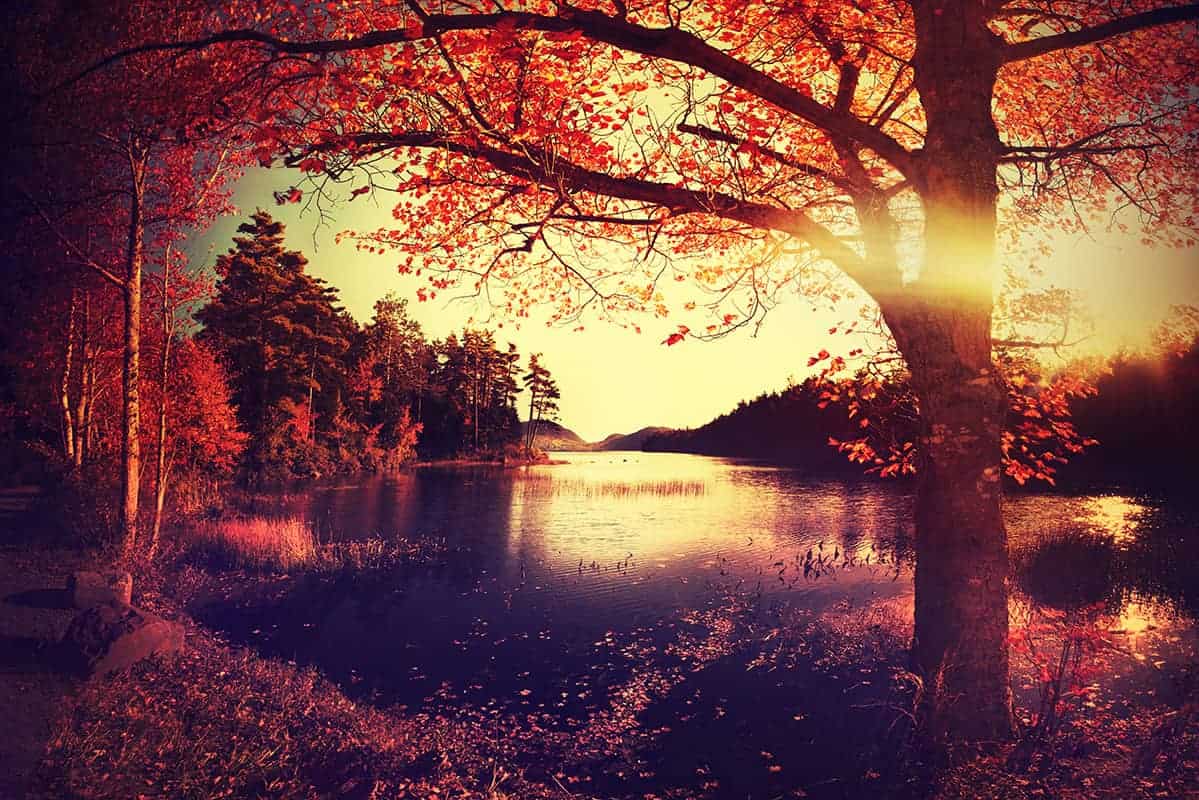
When composing for the sky, it’s important to not let it “float” by adding “anchors” – points of reference that give it perspective and depth (like the boats and islands in this image).
Using “anchor points” for a stronger composition.
A photo of a stunning sunset sky can be mesmerizing, but without an anchor point to ground the image, it can appear to float and become lost. By framing your scene with added interest and reference points, you can present a more powerful impact.
Foreground anchor points not only ground your scene with added interest, but they can also help to balance out a dramatic sunset or sunrise.
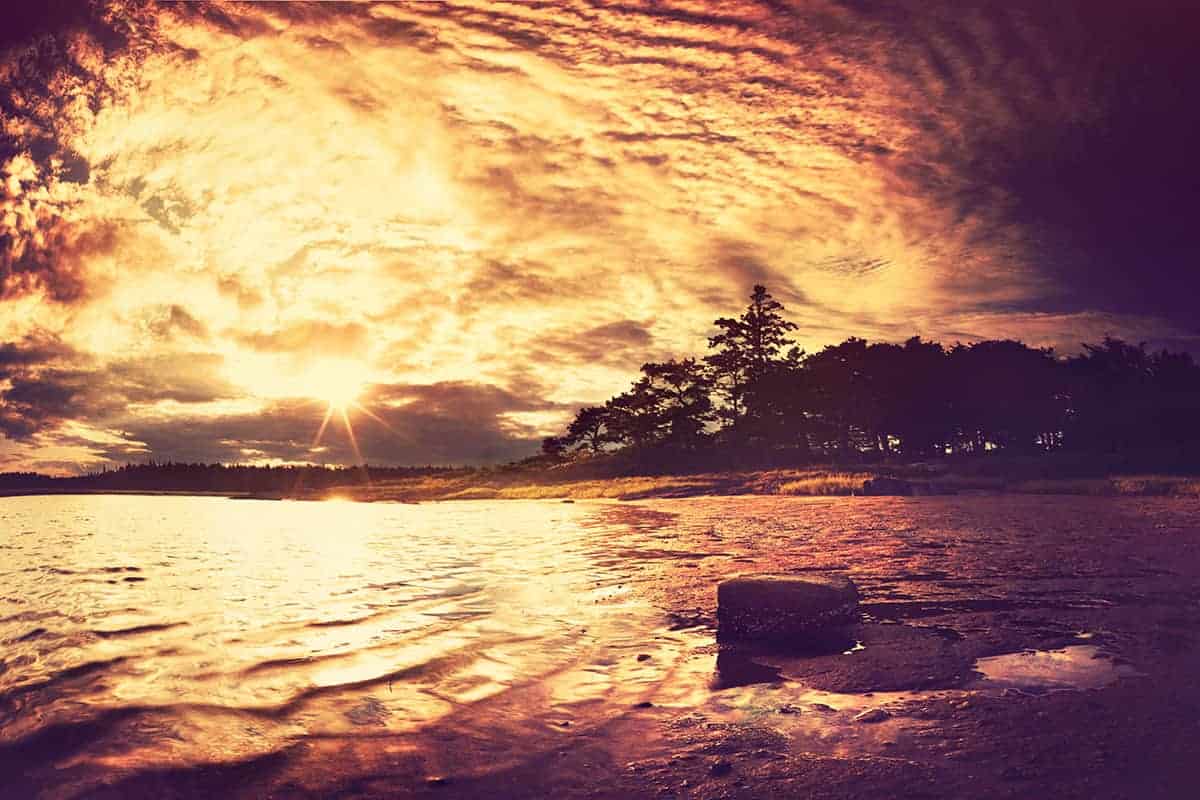
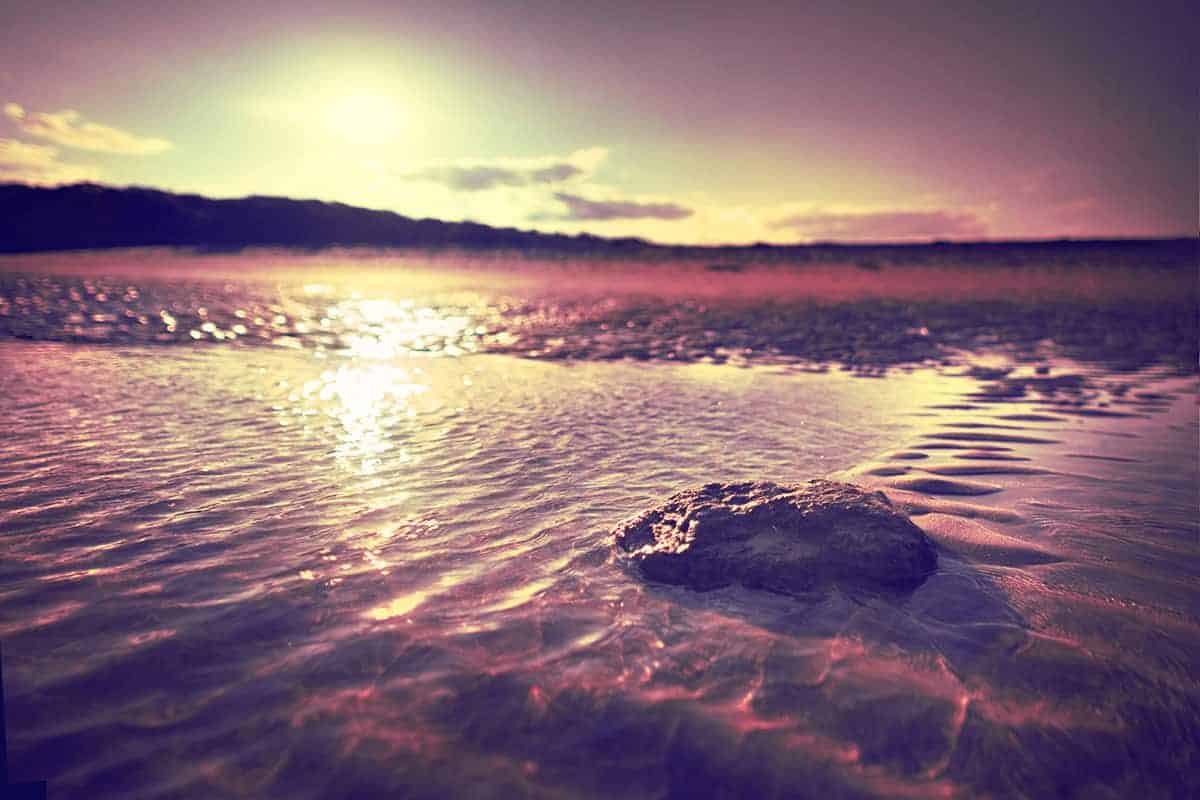
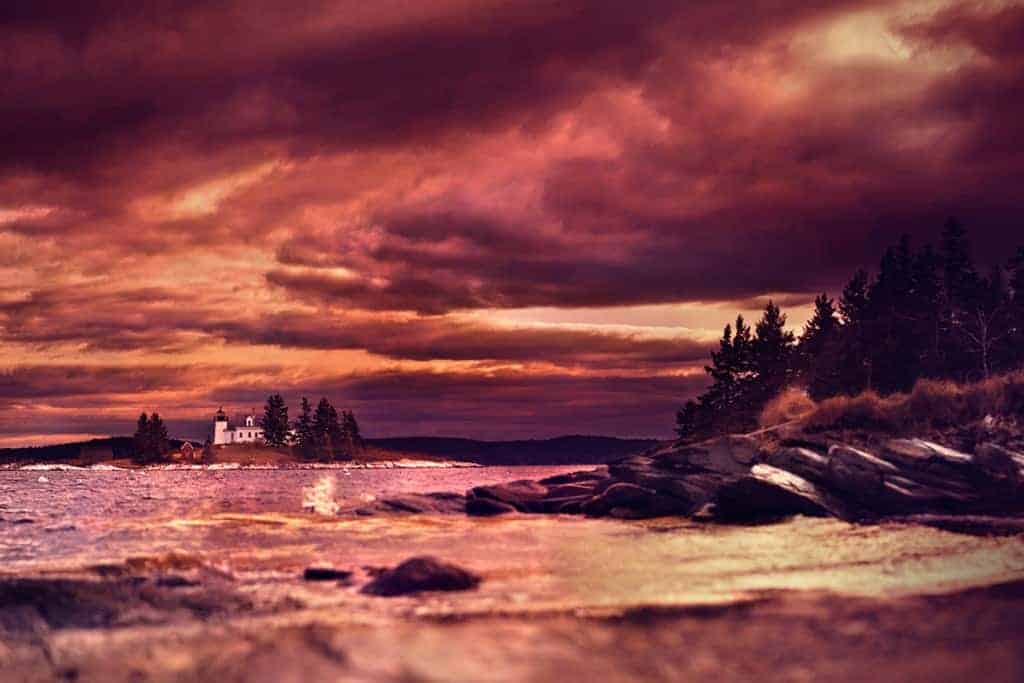
This golden hour sky exploded with textured, swirling clouds over the bay. I wanted to include the tree line on the left of my frame, but knew that was not enough interest to anchor my sky.
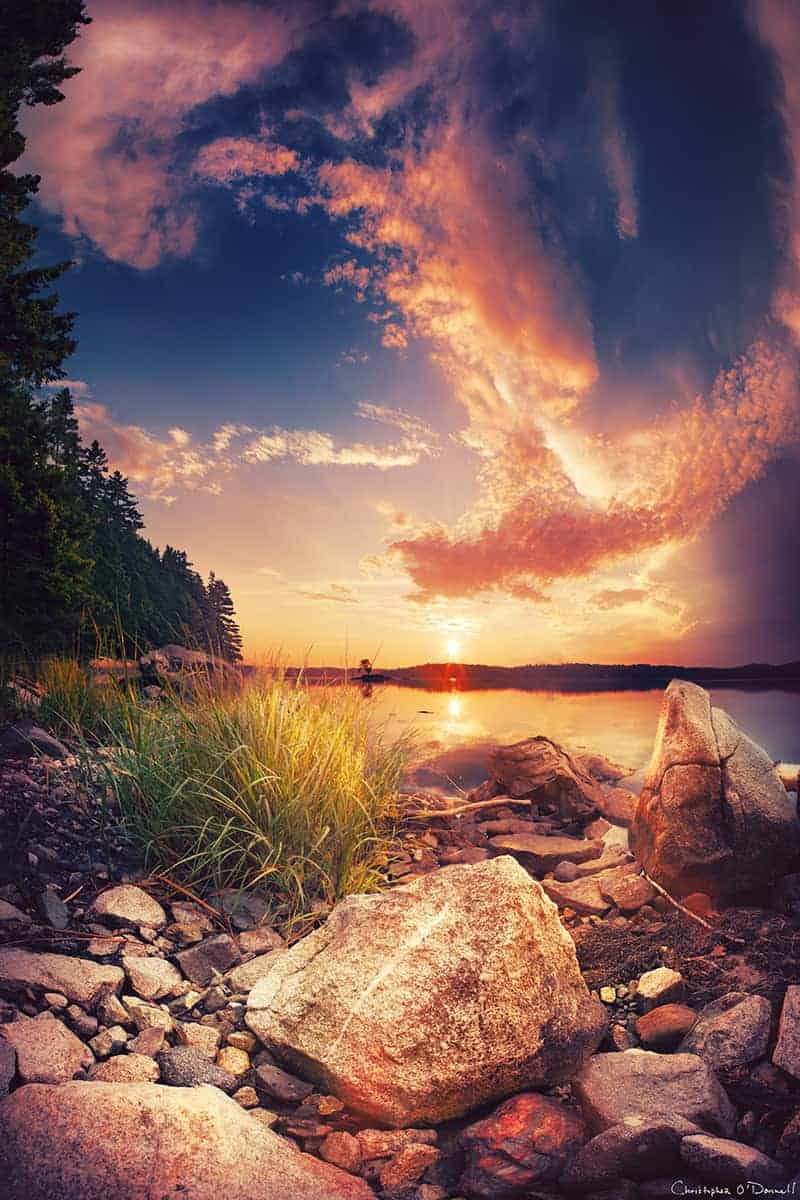
For added depth and interest, I composed the setting sun with this sizable shoreline rock. Notice how it redistributes some of the weight (or attention) away from the sun and onto the lower third. Without it, the photo becomes unbalanced and begins to float.
By checking the foreground for interesting elements, you can incorporate strong focal points that enhance your entire image.
If I lack a strong, singular focal point to balance out a dramatic sky, then I will often switch the “rule of thirds” and place the horizon line in the upper third of my image to include more ground in my composition. The lack of a heavy anchor point in my foreground above is now balanced by reducing the area of the heavier sky.
Finding the perfect balance.
There are many creative paths you can take in order to balance out the weight of your image – for example, changing focal lengths, adjusting your aperture, or altering the size of your frame. I go over several in-the-field techniques I use to compensate for an unbalanced frame in this article here, but for now I’d like you to take a moment and study any golden hour photos that you consider exceptional.
Identify the focal points, and analyze how they work in harmony to create a visually-pleasing scene. Your ability to be flexible and adapt to the landscape will not only push your creative boundaries but will make photography more enjoyable by providing you with the means to get the results you are striving for.
The light of your environment changes constantly during the golden hours. Knowing how to accommodate for these changing conditions will give you the creative freedom to pursue any landscape!
Ways to control the golden hour light.
So now that you have an idea of how the light interacts with your landscape, let’s go over how to render this gorgeous light successfully with your camera.
The golden hours set the stage for you to capture an ethereal view of the world, and is a time of day that is highly coveted by landscape photographers. At the same time, this light presents a unique set of challenges that can be difficult to overcome if you don’t know the proper workflow to use.
The natural light differs as the sun moves throughout the sky, so it makes sense that we need to change our camera workflow to accommodate for this movement.
Your camera sensor is typically not capable of capturing the entire tonal range of the golden hours.
In the simplest terms, your camera is a tool made for capturing light, with many features you can utilize to adapt to different environments. Varying qualities of light (direct, overcast, filtered, etcetera) require different methods to capture it, and the golden hours certainly have their own parameters to work inside of.
However, the unique challenges this time presents are well worth the added effort as this light yields highly rewarding results.
The directional light of the sun during the golden hours can add much depth and texture to your scene, making for a visually stunning composition. This amplification of detail comes from an increase of shadows and highlights across the landscape.
This light can transform any boring object into a textured focal point, drawing much interest and attention to an otherwise mundane subject.
When you view a golden hour image in black and white, you can see the vast differences between light and shadow, and these differences contribute to the added texture and interest you see when the sun is at such an extreme angle.
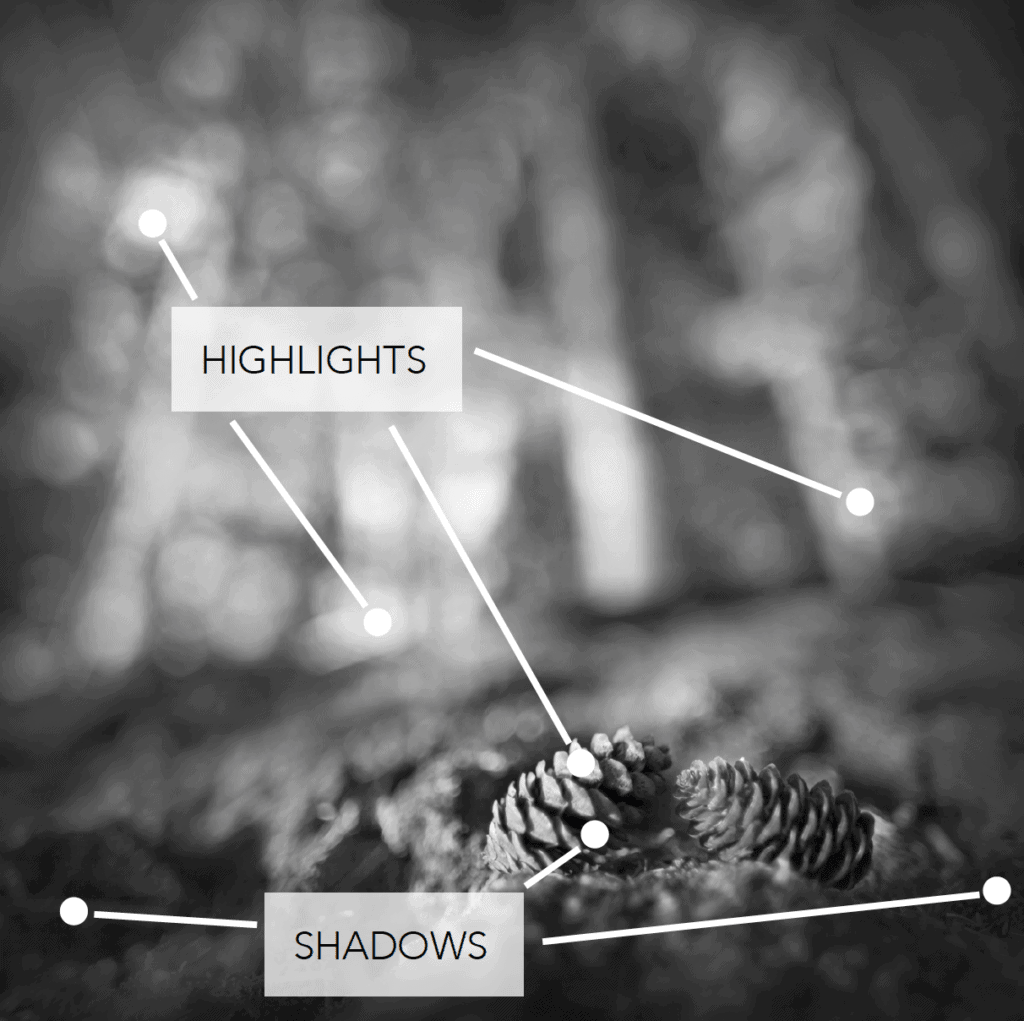
It is also the source of much frustration as your camera sensor cannot capture the full quality of both the brightest highlights and darkest shadows of this vast tonal range.
The “golden challenge” for proper exposure.
All these variations of light and tones make it challenging for your camera to capture them under one exposure without some noticeable side effects, which mainly come in the form of crushed shadows and blown highlights.
The two images below are probably familiar scenes to you when trying to capture a sunrise or sunset. The sky is naturally brighter than the ground, especially as the sun nears the horizon and your foreground becomes backlit.
Since your camera can only take one exposure at a time, and you’re photographing a scene that has several different optimal exposures within the same frame, you’ll end up with parts of your image that are overexposed and/or underexposed.
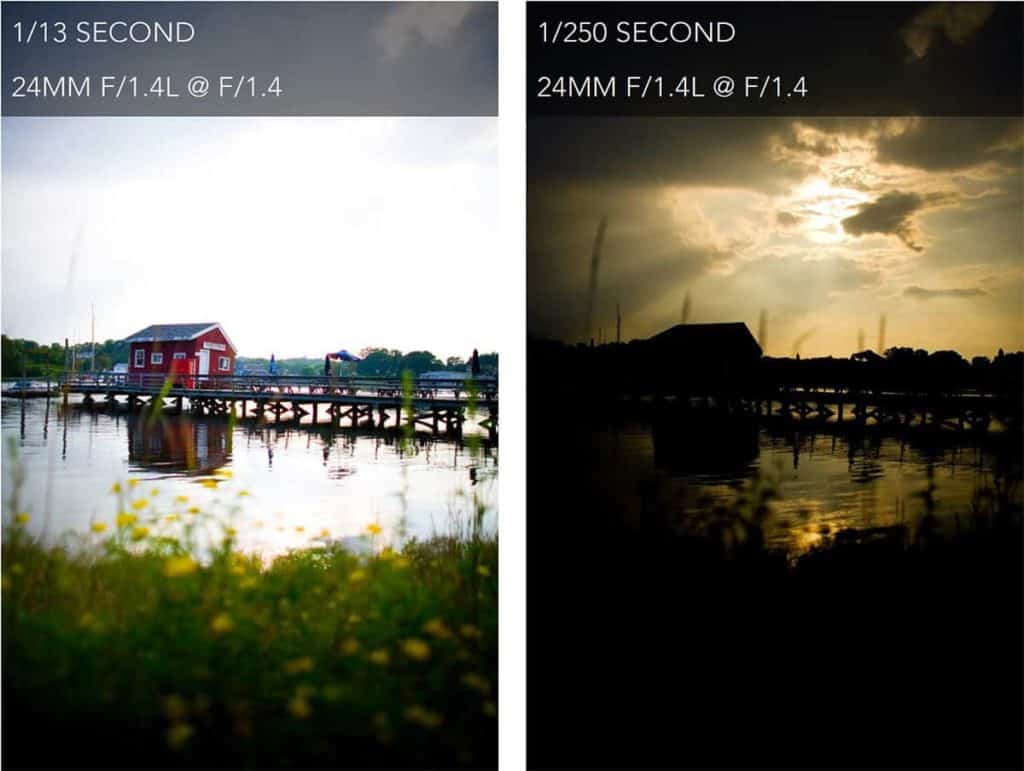
In the left frame, my shutter was open too long for the sky, despite the ground level being exposed properly. By choosing a shutter speed to capture my foreground, I lost nearly all of the fantastic sunset detail. Unfortunately, too much of the sky is overexposed, which means it can only be recovered by adjusting my exposure.
When I reverse this process and adjust my exposure for the sky (right), the ground becomes underexposed and I lose all of the interest and color that the opposite image captured. The underexposed details here, much like the overexposed areas of the left frame, are not rendered on the camera’s sensor and therefore cannot be recovered fully.
Typically, your camera’s meter will try and compensate for this disparity and “even out” the difference of exposures between sky and ground. This usually results in a distracting combination of the two, with your sky washed out, your ground too dark, and much detail lost in the process.
So what you see with your eyes is often quite different than what your camera is able to capture, and this disparity is the source of much frustration to photographers.
Blending exposures together for a complete tonal range.
This disparity in exposures is why many golden hour scenes are not rendered the way they appear in person, and photographers often notice this lackluster representation of what should be a stunning image.
The good news is that there is a simple way to overcome the “golden challenge” in Photoshop, and the results are truly phenomenal!
Since the camera can not accommodate for these differences within the same frame (that is, expose part of your image for the highlights and another part for the shadows) we need to manually blend the best parts of each exposure into one frame to recover the full tonal range.
This will ensure that your entire image is a true representation of the golden hours, and that any lost detail from improper exposure has been recovered fully.
Great! So how do I exposure blend?
There are many tools out there designed to blend exposures together, but the highest quality results (landscapes that are exploding with detail without the over-processed look) will be from Photoshop.
There are many quick and automated ways to expand your tonal range and recover more detail in your photographs….such as using third-party programs like Photomatix or even “faking” an exposure blend by using just one raw file….
However, like with most processing techniques, these shortcuts come at a cost of quality. There are very important reasons why myself and other landscape photographers continue to use Photoshop to blend brackets when there are quicker options out there….so I want you to understand why Photoshop is the best tool for exposure blending.
But first, you need to know how to capture perfect brackets in the field….otherwise, you’re going to have a very difficult time blending (no matter what program you use).
If you haven’t downloaded it already, I’ve put together a totally-free HDR Field Guide which will teach you proper camera techniques so you can capture extraordinary (yet natural-looking) landscapes.
I know how intimidating Photoshop and exposure blending can be….but actually, the workflow is quite simple (not to mention a lot of fun). You just need a mentor to explain the process to you step-by-step, which is why I created this field guide to get you on the right track.
How to Avoid the “HDR Look” when Exposure Blending
Exposure blending in Photoshop is a revolutionary processing technique that can transform boring, lackluster landscapes into extraordinary works of art. More importantly, this workflow can overcome the limitations of your camera’s sensor so you can recreate the exact scene you witnessed in the field.
However, exposure blending makes it very easy to overprocess your image if you don’t know what to look out for. There’s a fine line between “overcooked” and natural-looking when it comes to landscape photography, so a delicate balance is needed in order to avoid the dreaded “HDR look”.
No worries! I’m here to help guide you through the murky waters of exposure blending with my best tips for creating exceptional landscape photographs without the over-processed, cartoonish look that HDR photography is unfortunately associated with.
The first topic we’ll cover in this comprehensive tutorial is where the “HDR look” originated…and why exposure blending is incorrectly lumped into the same category. Once I explain why all HDR landscapes are not created equal, I’ll give you some of my best practical tips for avoiding that overcooked look when exposure blending….so you can use this fantastic technique to create extraordinary, natural-looking images that are full of detail….but without the “over processed” appearance.
What is HDR exactly and how does this benefit my landscape photography?
Many photographers are mistaken with their definition of “HDR landscapes”….which can affect how you view and approach your exposure blending. So unless you are 100% certain about what HDR photography is (and isn’t), make sure to give this section a read through.
When HDR (high-dynamic range) first became popular in the digital photography world, the excitement was well justified. Finally, there was a quick and easy solution to a huge problem for photographers: the ability to recover missing detail that your camera sensor could not pick up on.
This was especially celebrated in the landscape photography world since we have very little (if any) control over the natural light. For example…a dramatic sunset scene with intense highlights and shadows was captured with a blown-out sky and blotches of black in the foreground; a lackluster representation due to the limitations of the camera – not the photographer.
This is because the camera’s sensor is not as dynamic as the human eye, which explains why our landscape photos will often misrepresent the beauty we saw in person.
HDR photography was the answer to this overwhelming roadblock!
In the early days of digital photography, the learning curve of proper exposure blending in Photoshop was quite high for the novice digital photographer…and the technique was very tedious. This required a lot of prerequisite Photoshopping knowledge that was difficult to learn….back in the days when online Photoshop classes were few and far between (and usually of low quality).
Remember: this was back in a time where many photographers had not jumped into the world of Photoshop or advanced digital processing, and before helpful panels and actions were available to streamline the HDR workflow.
The was an overwhelming need for a simple and effective method for recovering blown highlights and crushed shadows….and third-party programs like Photomatix cropped up to fill this void.
These programs quickly became the go-to tools for putting that beautiful detail back into a photo….and they were a quick, easy, and fun solution to one of the most challenging aspects of landscape photography – capturing every detail in the highlights and shadows that you saw in the field.
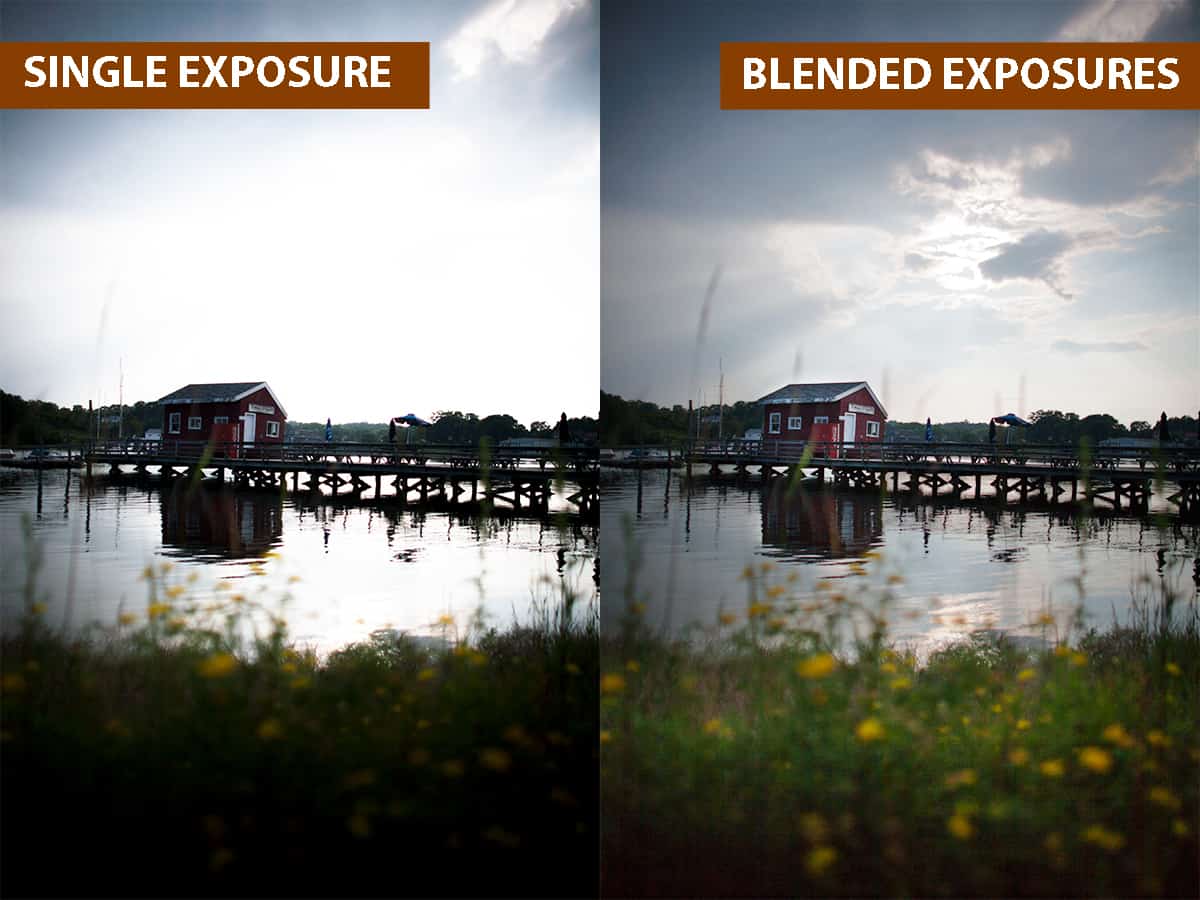
As you can see, the single exposure missed out on some extraordinary sky detail that the blended image was able to recover. It seemed like the best of both worlds…no need to choose between exposing for the highlights or shadows anymore!
Unfortunately….not all blended images look as natural as the example above.
It’s easy to go overboard with a new photography technique, and these simple-to-use programs were no exception. Anyone with a basic understanding of computers was now able to create their own HDR images…and many got caught up in the excitement of how simple it was to overcome the limitations of the camera.
Photographers became so overwhelmed with the initial “wow factor” that they misplaced their sense of aesthetics when creating HDR images with these third-party programs….and oversaturated the internet with high-contrast, grungy, cartoon-like landscape images.
After the novelty wore off…HDR photography became synonymous with overcooked, super saturated, and all around awful-looking photographs.
Although many landscape photographers now agree that examples like above are quite horrifying, it’s very hard for HDR photography to shake that negative reputation. Even today, many associate the term “HDR” with the undesirable, overcooked appearance that photographers now run from. It’s now a pariah among the photography community and many avoid this style altogether in fear of their work being labeled an “HDR photo”.
The “HDR look” is one BIG misunderstanding.
Unfortunately, the reputation of the HDR look has deterred many photographers from exploring the fantastic world of (good) HDR processing…and that is a true shame.
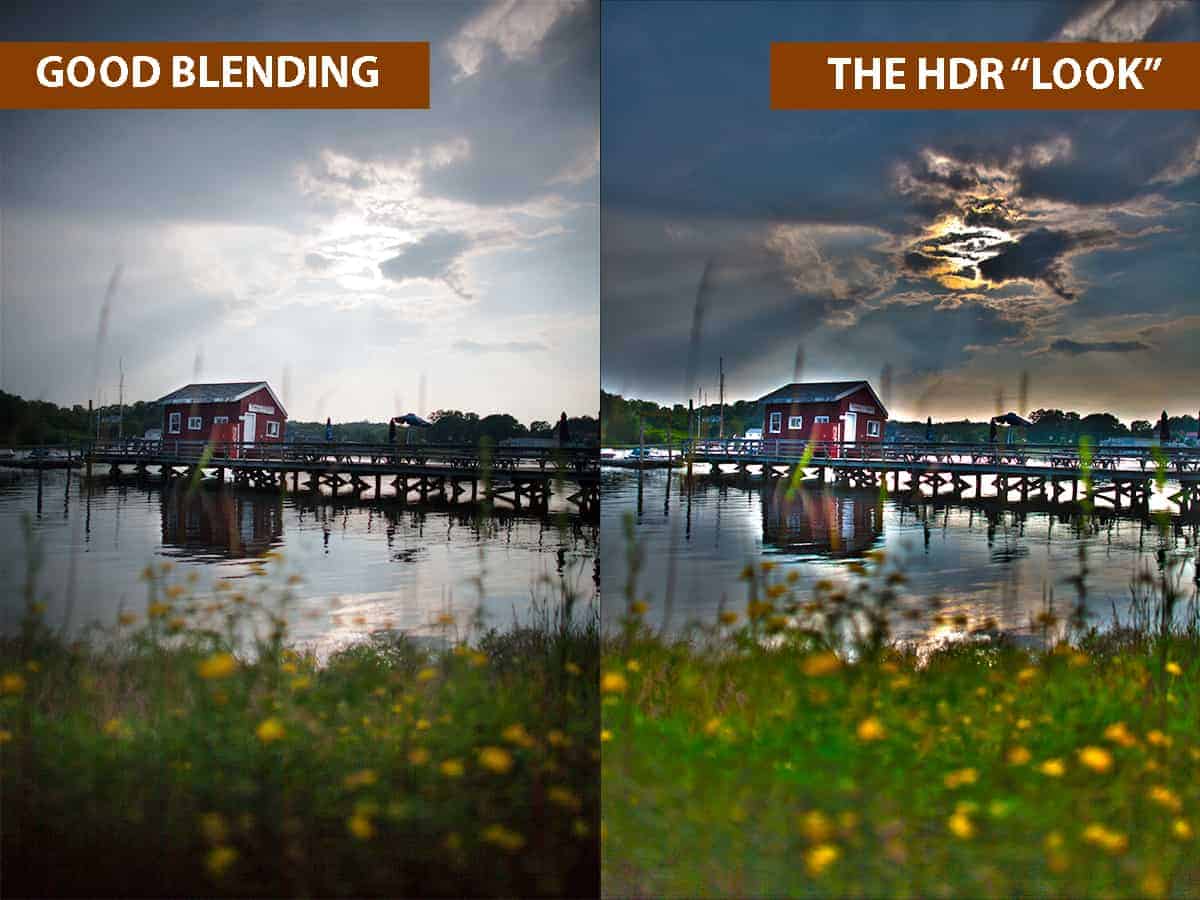
What if I told you that the images you see below are both a result of HDR processing?
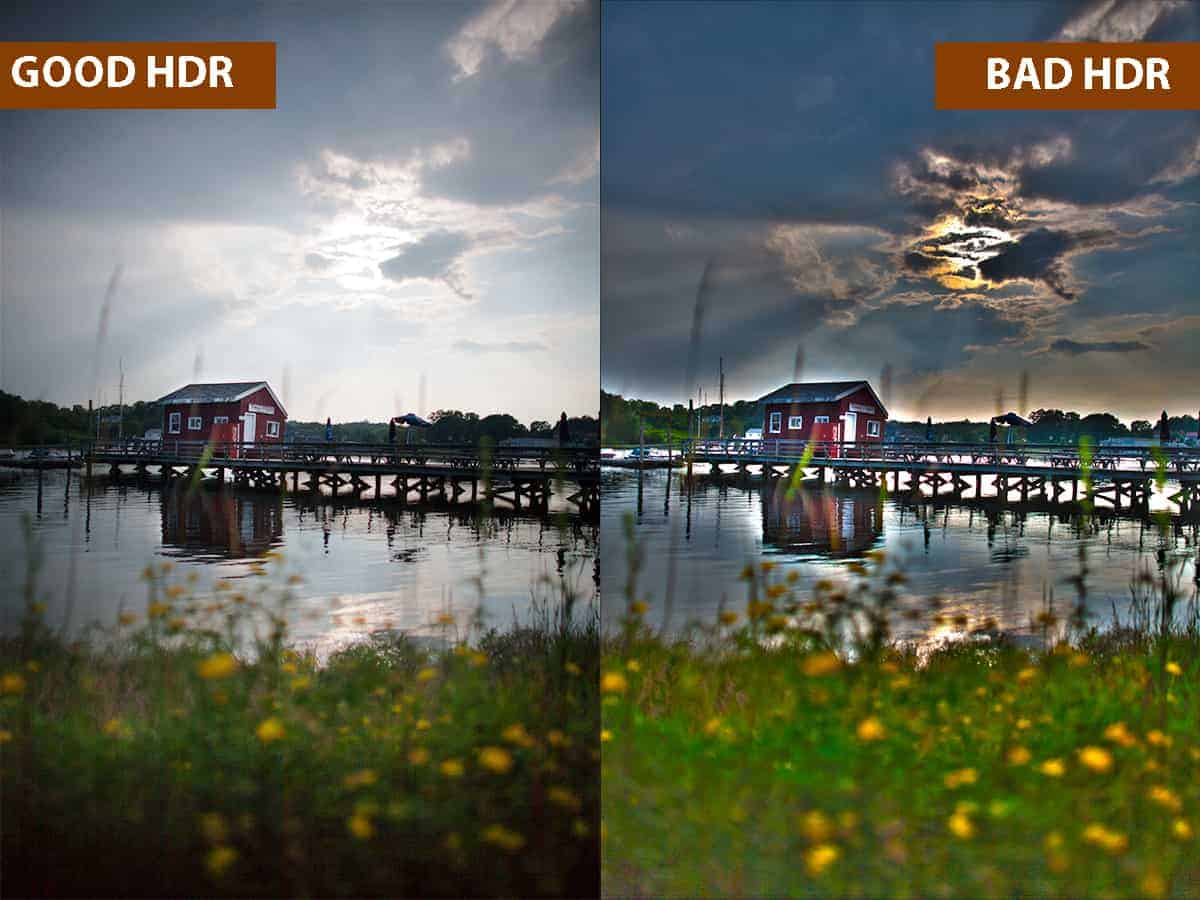
Two entirely different results from using the exact same tool.
I have good news for you! The HDR look is not synonymous with HDR photography, and you can absolutely create stunning, natural-looking landscape photographs by using solid and accurate HDR blending techniques.
I’ve outlined my very best tips for seamless HDR processing below… but first I want to go over the key difference between “good” and “bad” HDR photography so you know what to strive for when processing your landscape photographs.
The two images above are both HDR images…but the workflows used to create them are entirely different.
The image on the right was created by tone-mapping the scene, which uses algorithms to blend in highlights and shadows from multiple exposures and recover detail. There’s a much more technical explanation for tone-mapping, but that is the gist of it.
As you can see in the “bad HDR” image above, it often produces unnatural results….and even the most carefully tone-mapped image will have an artificial look to it, also known as the “HDR look”. This process is what most third-party programs like Photomatix use and why this cartoonish quality to landscape photographs became so popular.
In contrast, the image on the left was created by exposure blending in Photoshop….which uses a completely different workflow to achieve what HDR processing was meant to do: recover any blown highlights and crushed shadows that your camera sensor missed, while retaining a natural appearance that is full of detail and interest.
In other words, to accurately recreate the beauty you photographed in the field and to overcome the limitations of your camera.
Both tone-mapping and exposure blending are categorized as HDR techniques….but obviously, give you two entirely different results.
The additional manual control you have with exposure blending is absolutely phenomenal and is why most professional landscape photographers will choose exposure blending in Photoshop over tone-mapping any day.
So what is HDR photography exactly?
Here’s the confusing part and why some photographers mistakenly lump exposure blending and tone-mapping together in the same category: HDR is not a specific technique, but rather a broader term that covers several different ways to expand the dynamic range of your camera sensor. It is neither good or bad, and the result can be perfectly natural…or completely horrifying.
HDR photography is simply the ability to bring back lost detail by expanding the dynamic range of your camera sensor (hence the term “High-Dynamic Range”).
In other words, the goal of HDR photography is to remove unwanted blown highlights and crushed shadows. It’s nothing more than a broad subject that means you are bringing back detail that your camera sensor could not capture. That’s all HDR means!
“Tone-mapping” and “exposure blending” are two entirely different methods.
But they are often lumped into the same category and are negatively referred to “HDR”, which leaves professionally exposure blended photos with a distasteful reputation.
Many people associate HDR as a whole with tone-mapped images, which is like mistaking fast food for cuisine. Technically it is a correct statement….fast food IS cuisine, but not good cuisine. And even worse, fast food and fine dining share the same “cuisine” category….which is a lot like exposure blending and tone-mapping being part of the same category.
Nowadays, most photographers know that programs like Photomatix will produce overcooked and over processed images, which is really off-putting for landscape photography. It also helps that the learning curve of Photoshop is much less intimidating than it was years ago, with helpful panels and actions that assist with the exposure blending process….and new, innovative Photoshop tools that streamline this workflow. This helps to lower the bar for any landscape photographer to jump right into exposure blending the proper way with a very limited background in Photoshop.
Speaking of exposure blending in Photoshop…I actually show you how to blend this image above in my exposure blending course, which is part of the creativeRAW lifetime membership program. Click here to read more about the Lightroom and Photoshop courses included with membership!
So to sum this up….HDR Photography is not a bad thing then?
Absolutely not! The only bad part about HDR photography is when it is poorly executed…typically from tone-mapping, but any HDR technique can produce cringe-worthy results if done incorrectly.
Here’s the key point to remember: HDR photography techniques are simply tools, not a style. The quality of your HDR image is entirely dependent on your execution and how effective you are at using these tools….and when you use them properly, you can create extraordinary, natural-looking landscape photographs.
Which technique should you use to create HDR photographs? I’ve been through them all and can confidently say that exposure blending in Photoshop is the best technique for creating high-quality HDR landscapes. You can easily create refined, top-quality images that are exploding with detail…and without any of the awful, overcooked side effects that tone-mapped images are known for.
Automated programs like Photomatix make the HDR blending process ridiculously easy but at the price of quality. However, when you blend images together manually in Photoshop, you’re in full creative control over your blending.
This is why exposure blended images are of the highest quality and why professional landscape photographers rely on this technique: you are in total control of the process 100% of the time. No guesswork or hoping that the computer will produce a quality image for you….you are in the driver’s seat of your photography, as you should be.
The good news is that exposure blending in Photoshop is now MUCH easier to do than it was years ago, thanks to some new tools and a more streamlined approach.
Let’s go over some of my best tips for avoiding the “HDR look” when blending exposures in Photoshop so you can produce quality landscape photographs.
One size does not fit all in Photoshop.
Photoshop is (likely) the most versatile photo editing program available today, which is why professional landscape photographers love using it.
This means that there are several outstanding workflows you can choose for exposure blending….and which technique you settle on is entirely dependent on (1) your desired result and (2) the content of your image (i.e. the luminosity value, which areas you want to blend together, how many brackets you have, etc).
In other words, there needs to be a logical reason why you’re using a certain blending technique rather than just randomly selecting one.
I see many photographers get extremely frustrated when a certain blending technique isn’t working the way they had planned. What looks extraordinary on one image can be absolutely awful on another…which leads them to incorrectly believe that either their execution is poor, or the technique is flawed. In reality, the method is most likely just a poor match for your image and your desired result.
There are several different exposure blending methods designed to accommodate certain situations…ranging from the quick and simple to the advanced for complicated blends.
To summarize: one blending technique is not generally better than the others, but rather one technique is usually better than the others for a particular image.
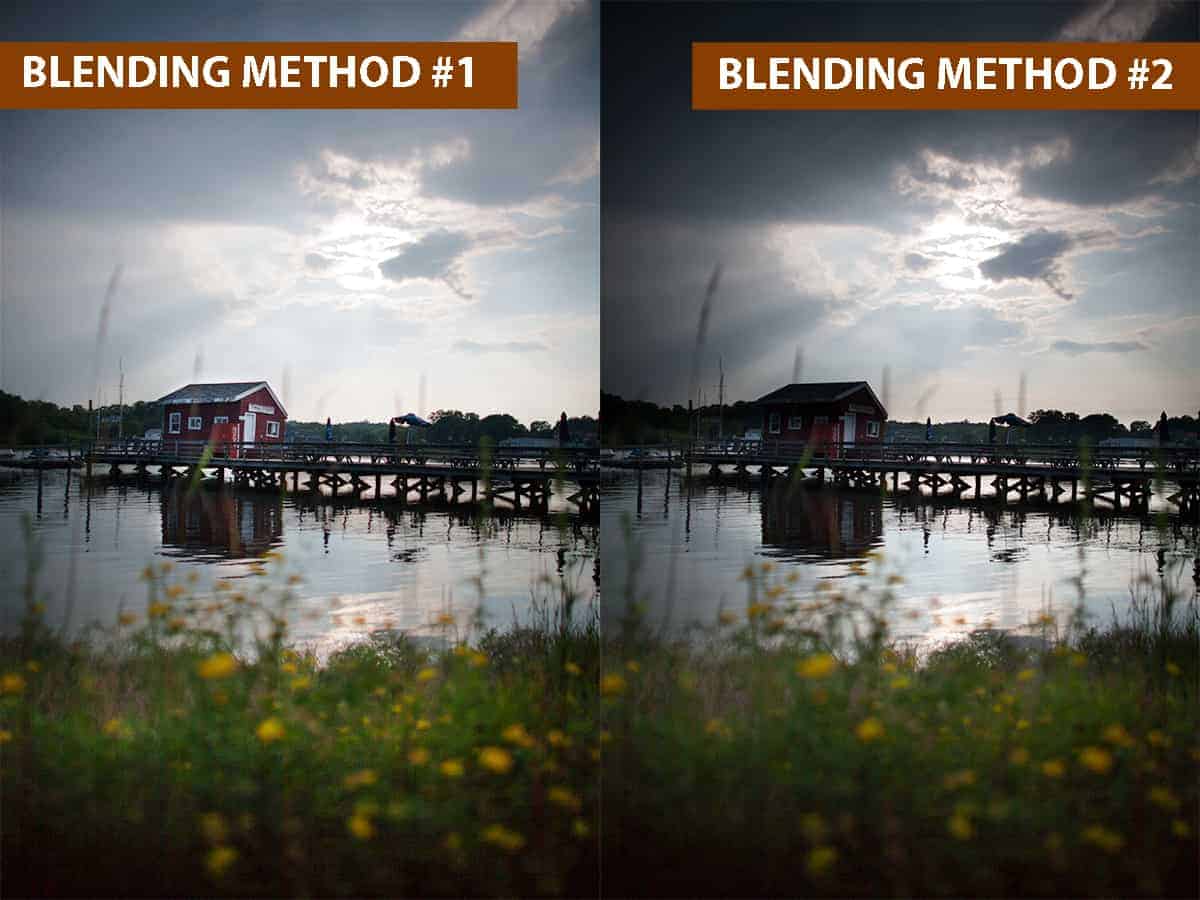
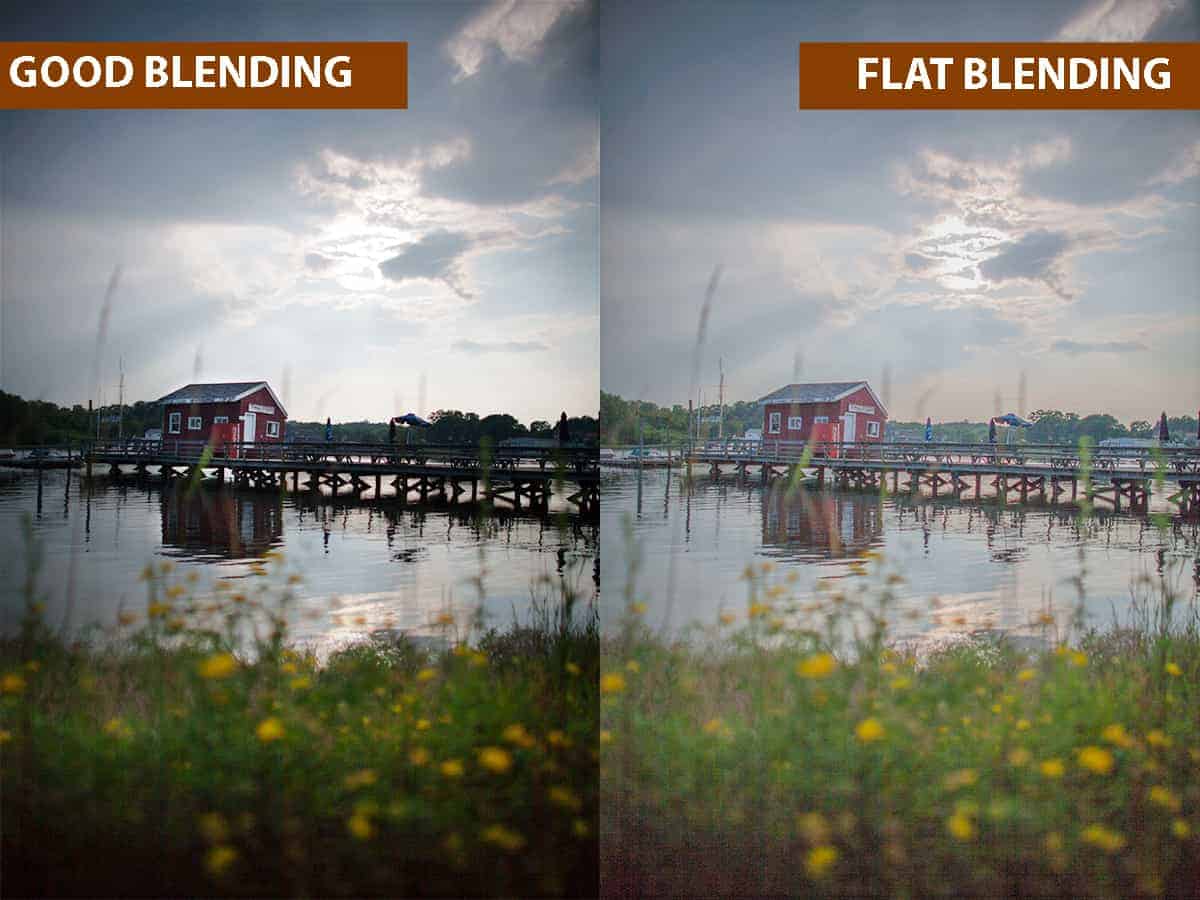
The image on the left was the result of using a technique that was a good match for the photo…while the image on the right shows what happens when you try to blend the same photo using a technique that is not a good match.
You wouldn’t use a power washer to clean your dishes or use a spray bottle to clean your driveway. The same mindset applies with exposure blending – the tool (or exposure blending method) you choose to use will depend on what you are blending and your desired result.
In my exposure blending course, I examine and compare several blending techniques (ranging from simple to advanced) so you can make an educated choice on which method will suit your particular image better.
Tips for avoiding the “HDR Look” when you’re exposure blending.
Now that you have a firm grasp of what HDR photography is and how much this technology can enhance your landscape photographs, let’s go over some of my best tips for avoiding the dreaded “HDR Look” altogether.
1. Adjust your highlights and shadows in a balanced manner.
Exposure blending can be extremely powerful…and much like with tone-mapping, you can get overzealous with your blending and create an unnatural looking image.
The goal of exposure blending is to bring back any missing detail that your sensor missed so you can have the best possible foundation to create your vision on. Sometimes, you can over-correct your highlights and shadows and create an unbalanced image.
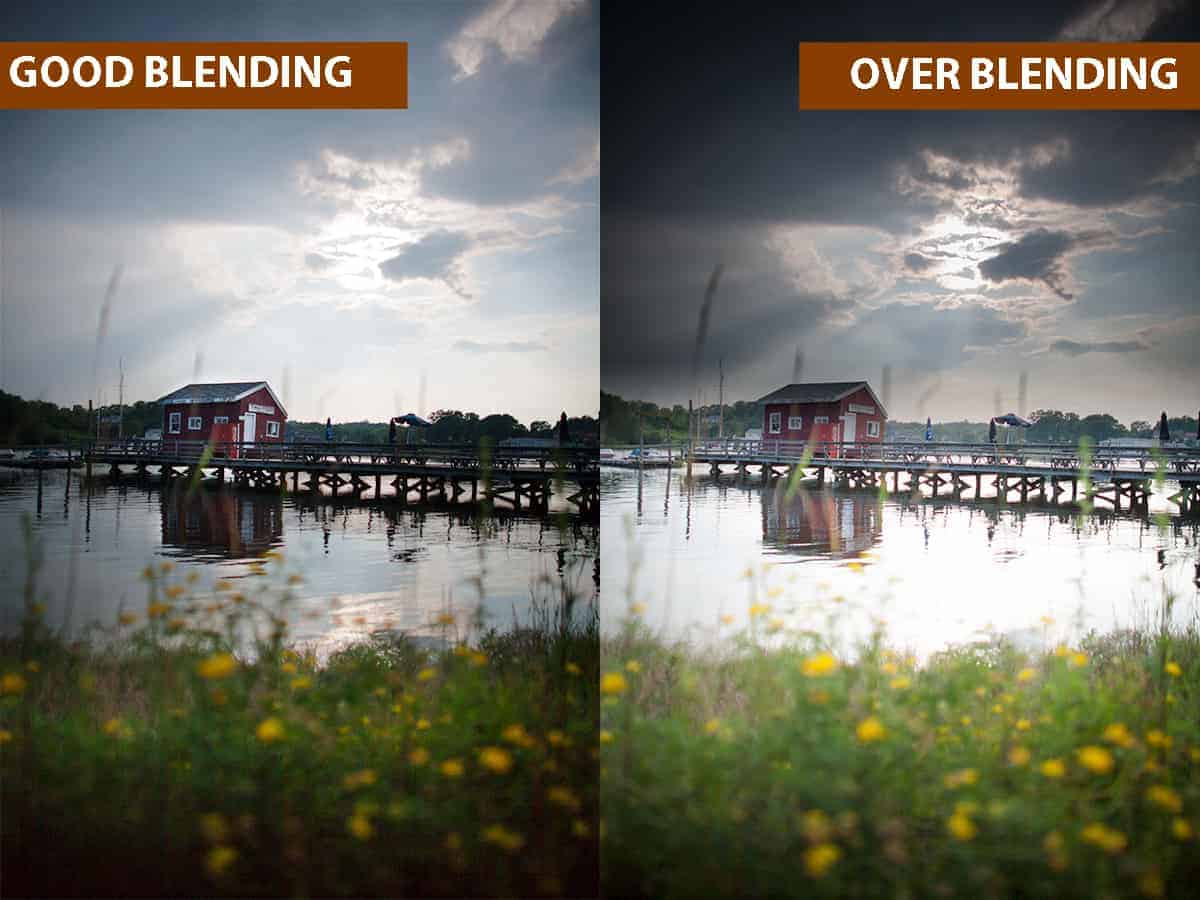
In this example, the highlights in the sky were brought down a tremendous amount to recover the great sky detail of the approaching storm. However, this is unbalanced when compared to the foreground water and ground and looks entirely unnatural. The highlights were brought down too much and shadows were brought up too much….and while technically speaking the image is solid (no crushed shadows or blown highlights), this over-correction is an inversion of light and just screams bad HDR.
2. Watch your contrast
Over correcting your highlights and shadows is not just about creating an unbalanced image (like above). You can also inadvertently remove too much contrast, leaving you with flat tones and an overall uninteresting image.
It’s very easy to get tunnel vision when exposure blending…and get carried away with the desire to eliminate those shadows and highlights, which can remove some stellar contrast that enhances the atmosphere.
The image on the right is what happens when you take the opposite ends of the histogram (darkest shadows and brightest highlights) and push them towards the center….which results in an image that is flat and not as compelling.
When you compare this to the image on the left, you can see that the darker shadows and brighter highlights give this scene depth and drama.
Exposure blending is simply about recovery…bringing back any lost detail from blown highlights and crushed shadows. It’s not about eliminating them entirely, which will give your landscape a cartoony appearance.
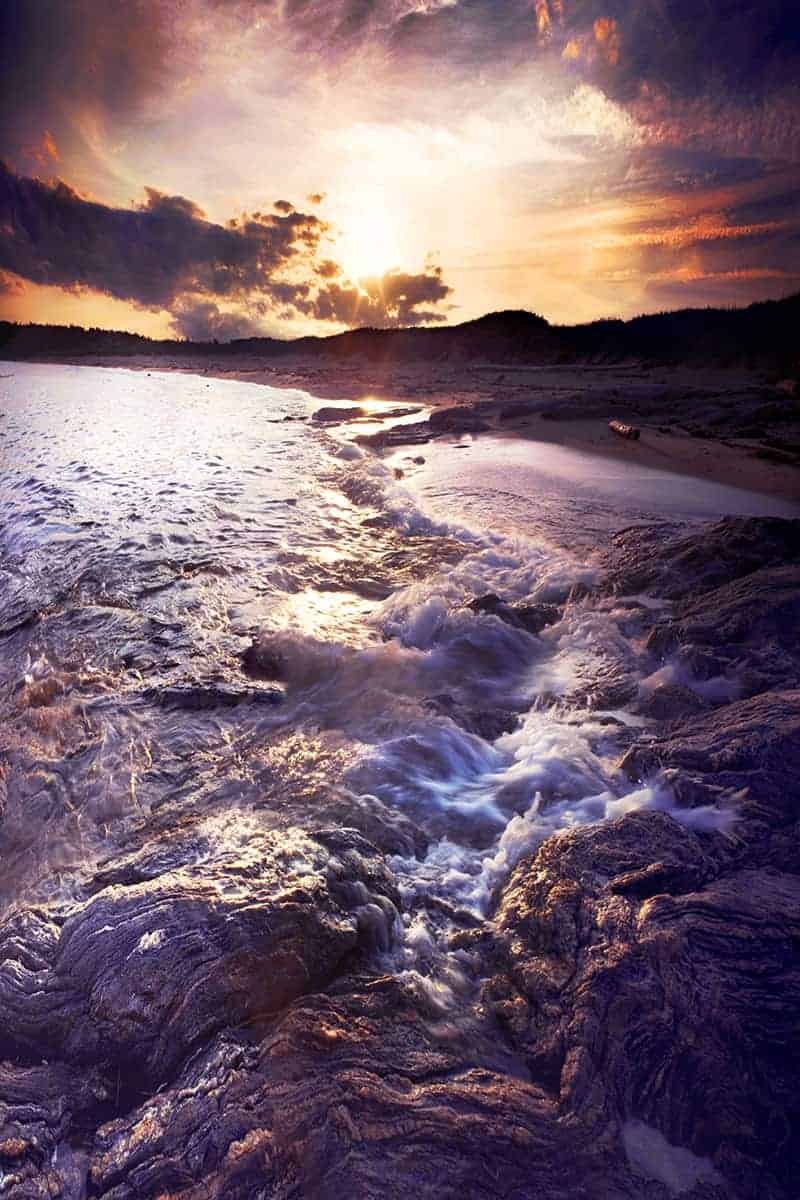
Bonus tip: Water should (almost) always be darker than the sky!
Scientifically speaking….the reflection of a sky is darker because water will absorb some of the light. However, this is often overlooked when exposure blending since we are typically blending along the horizon line….combining a shorter exposure for the sky with a longer one for the foreground. If that foreground includes water (such as lakes, oceans, etc.) then the water (and reflection) will inadvertently be brighter than the blended sky.
I see this ALL the time with HDR landscapes, and this imbalance is a dreaded trademark for the “HDR look”.

Now there are very rare instances where the water may be of the same luminosity value as the sky – or even brighter, depending on your perspective and where the sun is in relation to your camera.
An easy guideline to follow is to take a look at your original, unblended raw file …is the luminosity value of your sky darker, similar, or brighter than your water? Make sure to keep this balance when blending for a natural-looking result.
3. Scale back on any added saturation.
This is more of a general Photoshop guideline than one exclusive to HDR….but I felt it was important to mention since the “HDR look” typically includes overpowering saturation to the point of surrealism. While this may give your image some added punch, this over-saturation will also introduce color clipping, banding, and noise in the process.
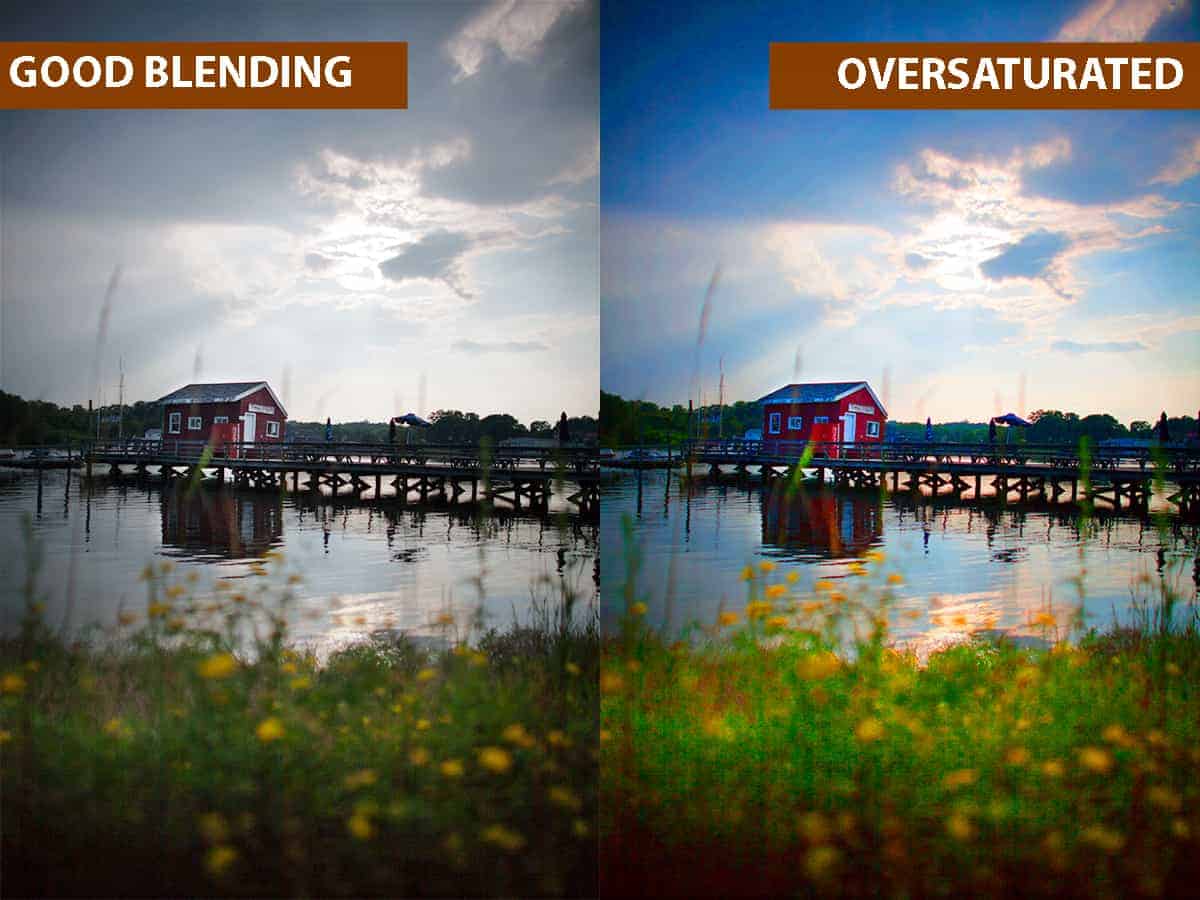
In the image above, you’ll notice some banding in the upper-left corner of the sky, and a dramatic increase in foreground noise…both unwanted and easily-avoidable distractions. Not only does this bring down the image quality, but it contributes to the overcooked look.
4. Avoid the brush tool when blending.
Unless you’re really keen on wasting a lot of time for poor results.
When some photographers bring their brackets into Photoshop for blending, the most obvious way to blend them together would be to use the brush tool and a layer mask. This works well for other creative methods, so why not with blending exposures?
Unfortunately, an unrefined brush tool and exposure blending do not mesh well….it is incredibly difficult to “paint within the lines” of where you want to blend, no matter how careful and deliberate you are with your brushstrokes.
This often results in a very distracting side effect called “halos”…which looks like a bright outline along where you have blended your exposures together.
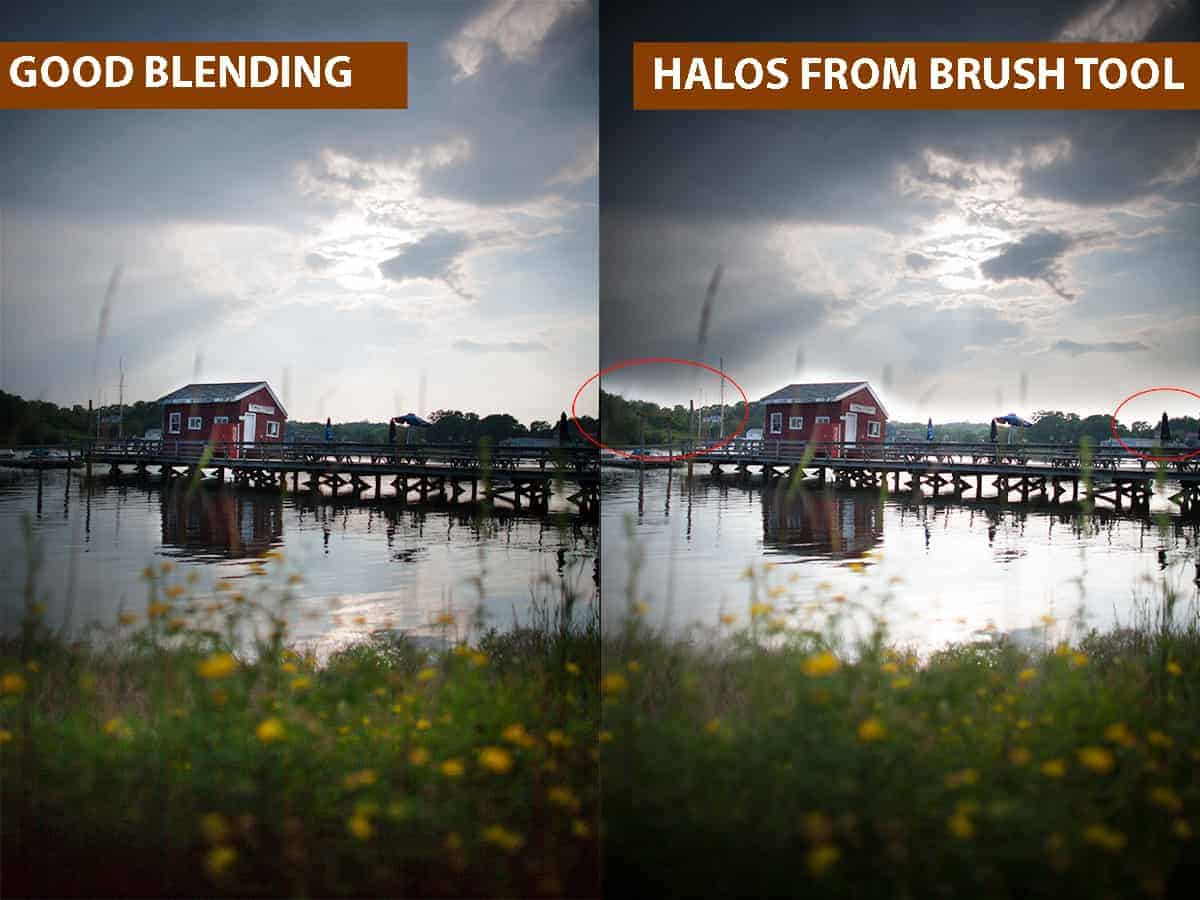
Notice how it seems as though the tree line is glowing where I’ve circled? Those are halos…and not only do they look unnatural and distracting, but are synonymous with the HDR look.
I go over halos (and how to avoid them) in my exposure blending course, but here’s the short and simple: your freehand brushstrokes are not able to paint within the very fine line along the horizon (or wherever you are blending your exposures), and you inadvertently spilled over and blended in a bit of the overexposed sky.
This can also happen in the reverse: instead of your brushstrokes being too broad and spilling over onto the sky, you can mistakenly blend in some of the underexposed foreground for a burnt appearance.
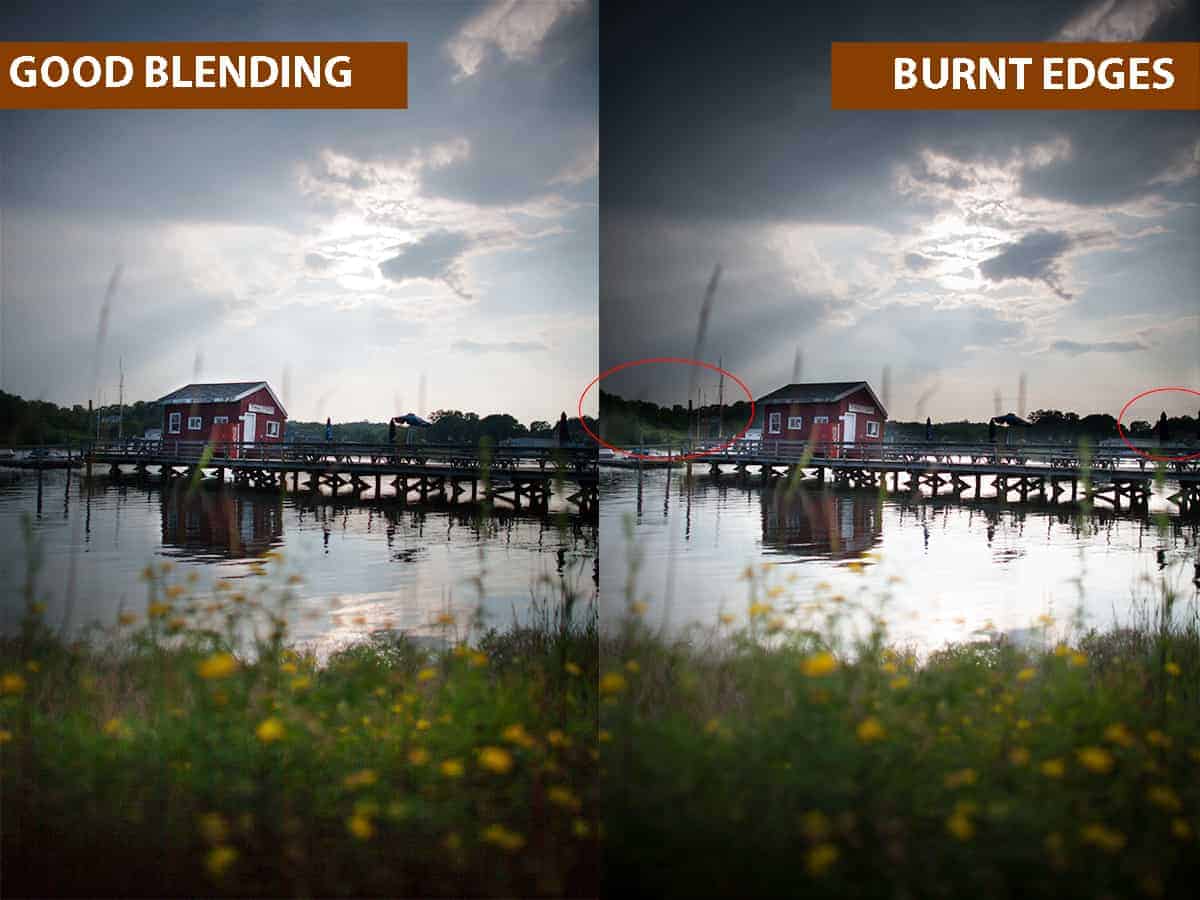
Either way, it’s very difficult to blend in exposures precisely with the brush tool, and the resulting halos or burning is a signature side effect of the HDR look.
What a landscape photographer requires is a stencil that hugs every contour, nook, and cranny of where you want to blend so that you can combine the best parts of your exposures without trying to color within the line. This is near impossible to do without hours of painstaking work for subpar results.
Photoshop is an incredibly powerful program…and has more refined, dynamic tools for blending than what the brush tool has to offer.
Luminosity masks (something I teach you more about in the creativeRAW lifetime membership program) can act as this stencil, and you can literally generate these customized masks with only a few clicks.
In the example above, the image on the left was blended together with a luminosity mask…and as you can see, the results are much, much cleaner than what can be achieved with the brush tool alone.
5. Gradient blending should only be used for flat horizons.
When exposure blending, we are typically blending in a longer exposure (brighter) for the foreground with a shorter exposure (darker) for the sky in an effort to capture the best detail of both highlights and shadows. This means that our transition zone between these exposures is usually located along the horizon line.
One of the easiest ways to exposure blend in Photoshop is to use a simple gradient to create a smooth transition between your brackets. It exactly mimics the effect of a GND filter in the field, and your creative capabilities with a gradient in Photoshop will far outweigh the limitations of a GND filter….which is why many landscape photographers have packed their GND filters away.
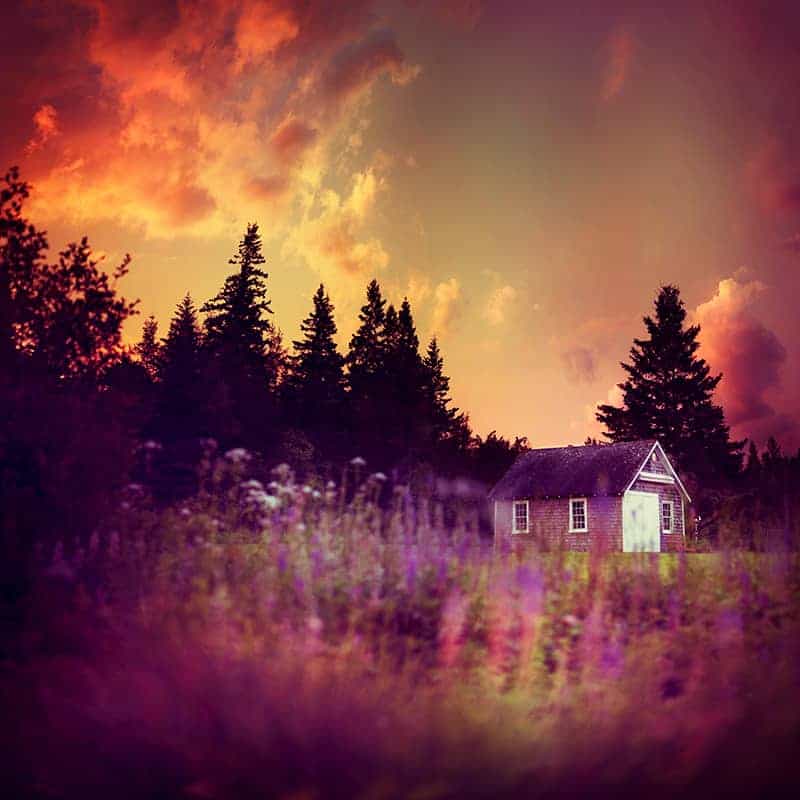
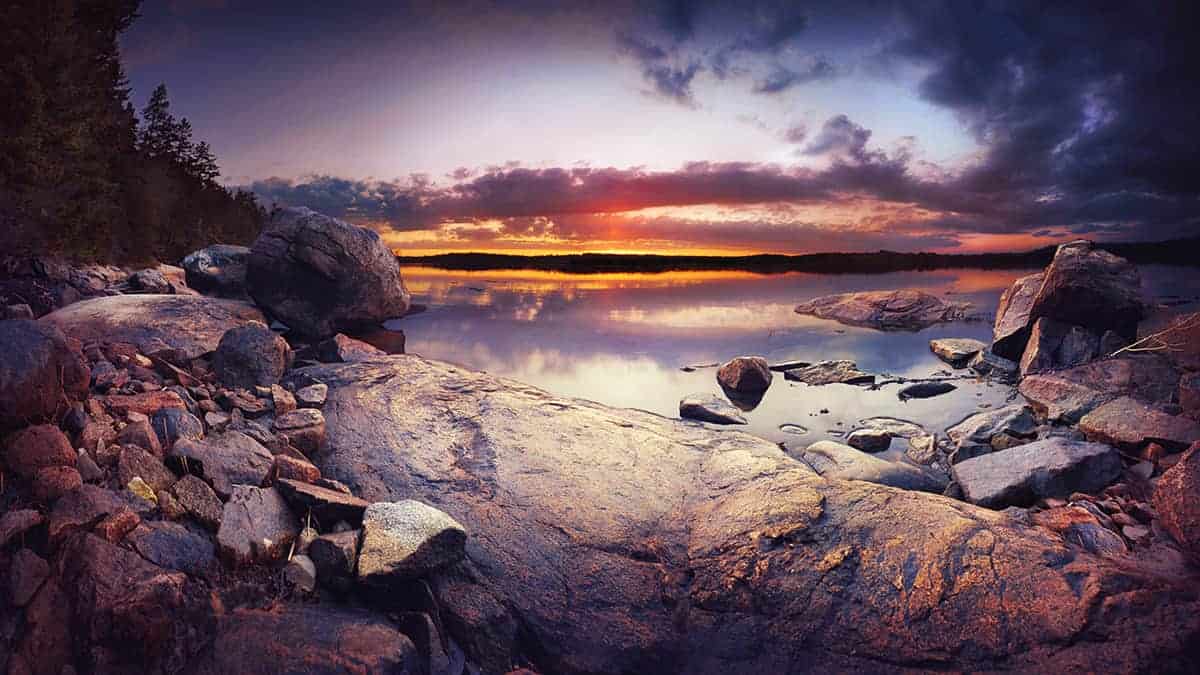
However, I see many photographers blending their exposures improperly by dragging their gradient over objects that protrude into the sky…such as trees, buildings, mountains, or anything else that interrupts a flat horizon.
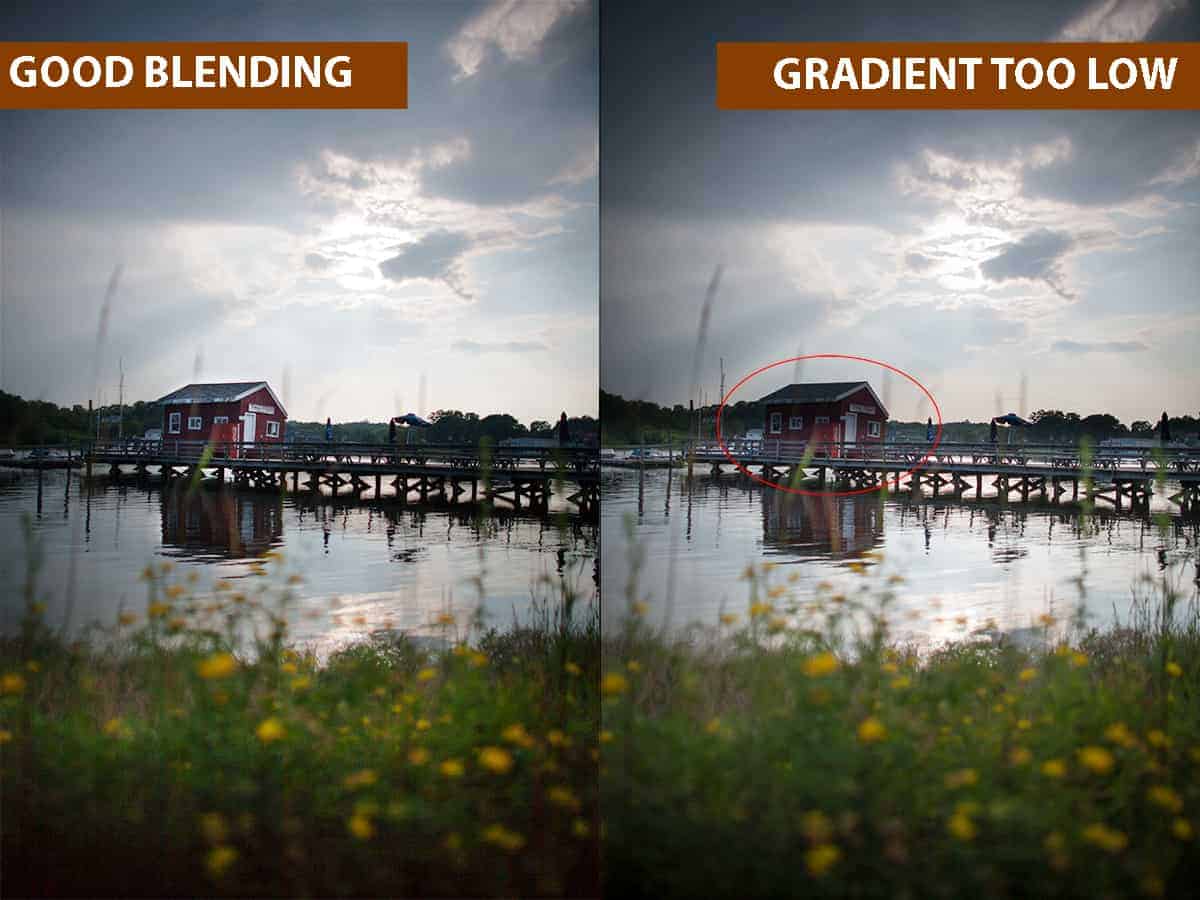
Much like with the brush tool, a gradient can not accurately take the unique contours of your image into consideration. In the example above, you can see that the gradient has been brought down over the fishing shack because the roof is higher than the horizon (the transition line between exposures)….which gives it a burnt appearance.
When you are blending exposures along an uneven line, your results will be much cleaner with a more tailored approach using luminosity masks (as seen with the left image).
The devil is in the details when exposure blending. The more manual control you have over your blending workflow, the better your final image will be.
6. Don’t skip the middle bracket.
The dynamic range of camera sensors have come a very long way since the early days of auto bracketing…but don’t be tempted to skip that middle bracket when you’re in the field!
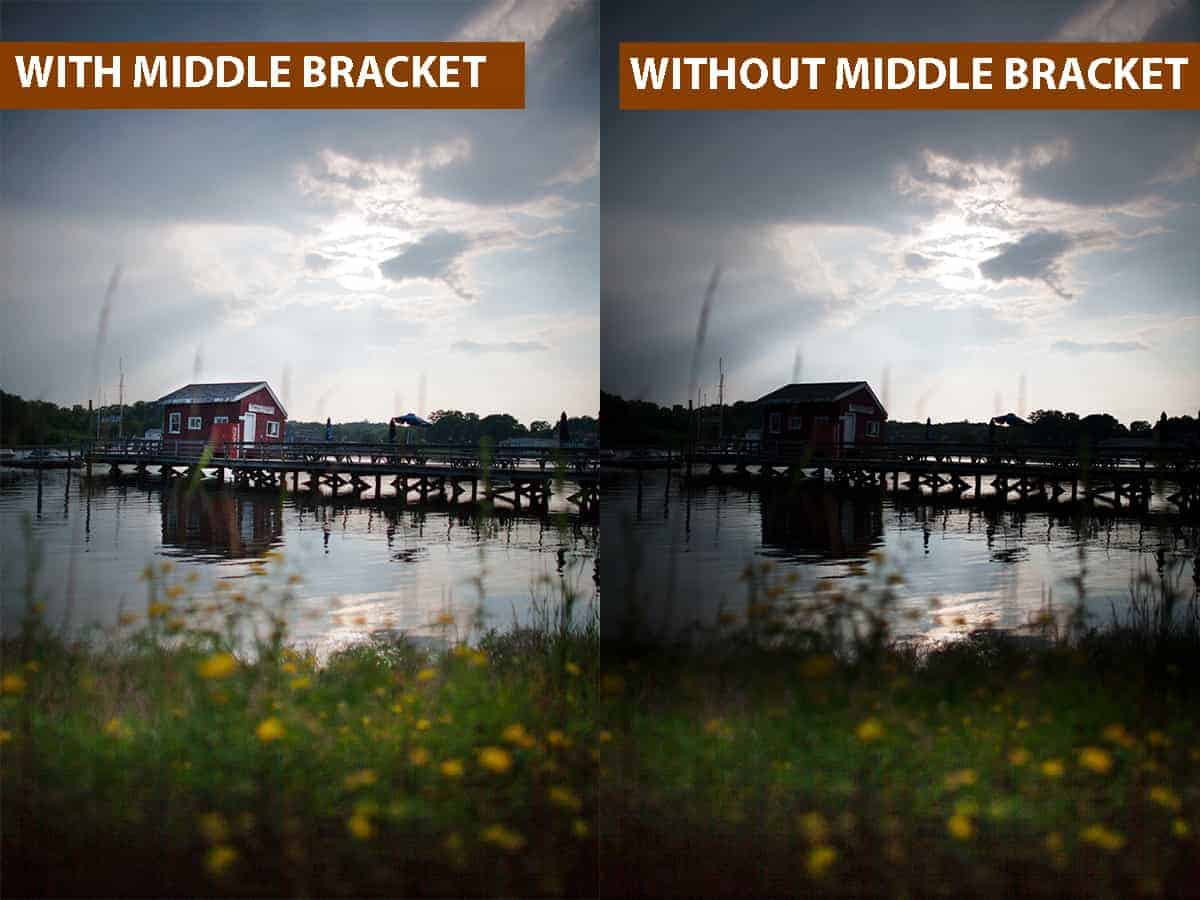
Exposing for only the shadows and the highlights can skip a lot of important detail, especially for high dynamic ranges like this image:
Notice how underexposed the middle ground tree line and cabin are, leaving out some fantastic detail…which also contributes to an unnatural looking image.
However, the photograph on the left shows you how much interest is added when your middle bracket bridges that gap between the brightest and darkest exposures….and creates a much more pleasing final image.
Shorter dynamic ranges can get away with using only two brackets….but always make sure to capture at least three shutter speeds in the field just in case you need that base exposure!
7. Keep an open mind to single raw file blending.
Although I always advocate for blending together genuine brackets (2-3 exposures taken at different shutter speeds) for the highest quality image….there are some important reasons why you would only use a single raw file and create artificial brackets.
For example, if your scene is filled with fast-moving subjects (such as trees blowing in the wind or storm clouds), then it may be extremely difficult for the novice exposure blender to combine these brackets without an overwhelming amount of ghosting. In that case, it makes more sense to take a small drop in image quality (i.e. how much highlights and shadows you can recover accurately) rather than to try and blend an image outside of your Photoshop capabilities.
And this technique gets even more powerful when you combine it with luminosity masks (especially when working with moving subjects)…the results are truly incredible.
8. Blend at the beginning of your workflow.
I can not stress this one enough! Blending before any creative work will save you much frustration, trust me.
Developing a logical processing workflow (creating a roadmap of which techniques you should perform first) is one of the biggest favors you can do for your landscape photography as it will save you a lot of time fumbling around Photoshop….and that workflow should put all of your corrective edits before any creative processing.
Exposure blending at the beginning of your workflow, before any global color and tonal work, will ensure that your final image will look more uniform and your blending seamless.
And finally, the number one way to get better exposure blending results and totally avoid that trademark HDR look…
9. Improve the quality of your brackets!
Seems simple and obvious, right? Unfortunately, many photographers find the fault in their exposure blending results in Photoshop, when the real source of their lackluster images are the brackets themselves.
Like with any aspect of photography, you can’t improve on something that is fundamentally flawed…and that includes the quality of your brackets. If you capture poor exposures in the field, then your blending work will be nothing more than papering over the cracks.
The biggest step you can take to avoid the HDR look and create top-quality landscape photographs is to strengthen your brackets so you can blend on a rock-solid foundation.
Small changes in your field work can make a monumental difference in quality once you bring your brackets into Photoshop.
For example, making sure that your camera mount is sturdy will ensure that your brackets are aligned perfectly…which will give you a sharper final image. There are many factors that can affect the stability of your camera mount, so it’s imperative that you do not overlook this important step.
Another field tip of mine is to ensure that your camera settings are consistent between each bracket, such as aperture and ISO. Otherwise, you’ll have a very difficult time blending your images together.
There are many small, but crucial steps to capturing perfect brackets in the field, which is why I created a free HDR Field guide.
If haven’t grabbed that already, you can download it right here for free.
[fl_builder_insert_layout slug=”hdr-optin”]
This PDF guide will show you how to master HDR field techniques (such as auto bracketing and proper camera stabilization for tack-sharp images) that are necessary for creating extraordinary (yet natural-looking) landscapes.
Final Notes
Photoshop is a powerful program with many hidden gems that can give you outstanding results for very little effort…and is well worth your time if you are serious about improving your landscape photography. Most of the frustration and difficulty with learning Photoshop stems from inadequate and incomplete teaching…not from the program itself. It’s actually a fun, dynamic, and powerful program that any photographer can easily learn!
All you need is a knowledgeable instructor who is ready to steer you in the right direction….and that is why I have created these free articles and mini-courses.
Thanks for reading!
Four Ways to Better Balance a Landscape Photograph
The path to a stronger composition is not always clear in landscape photography, and at times can be the most challenging aspect of the craft. Since you can not physically alter the landscape to create your own vision, you as a photographer rely on your camera skills and creative techniques to control how the landscape appears through the lens.
This will often push the limits of your abilities…but these images are usually the most rewarding and beneficial to your creative development.
Below I discuss four versatile methods you can use to create a stronger composition, and all of them stem from one very important concept – balance.
Finding Balance
By knowing how to adjust the balance – or weight – of an image, you can greatly improve the composition of your landscape photographs.
The impact that balance has is oftentimes subliminal – a landscape image can be noted as being successful or powerful, but the “why” is not always obvious. Each focal point contributes to the overall composition of a photo, and when the weight is shifted between these points, it redirects the flow and harmony – which can produce an entirely different result.
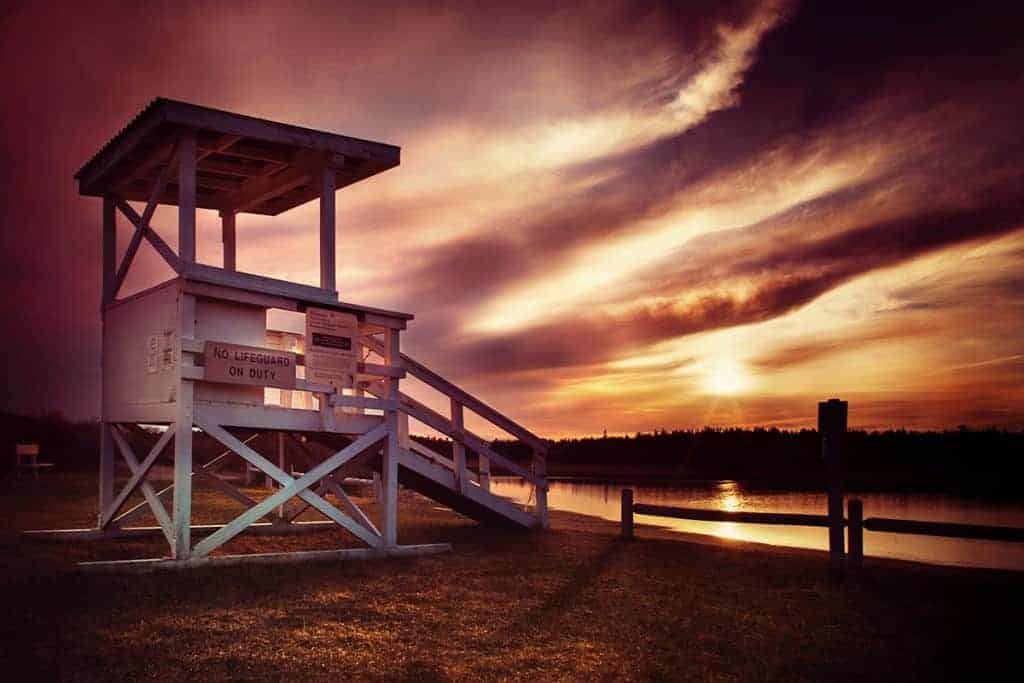
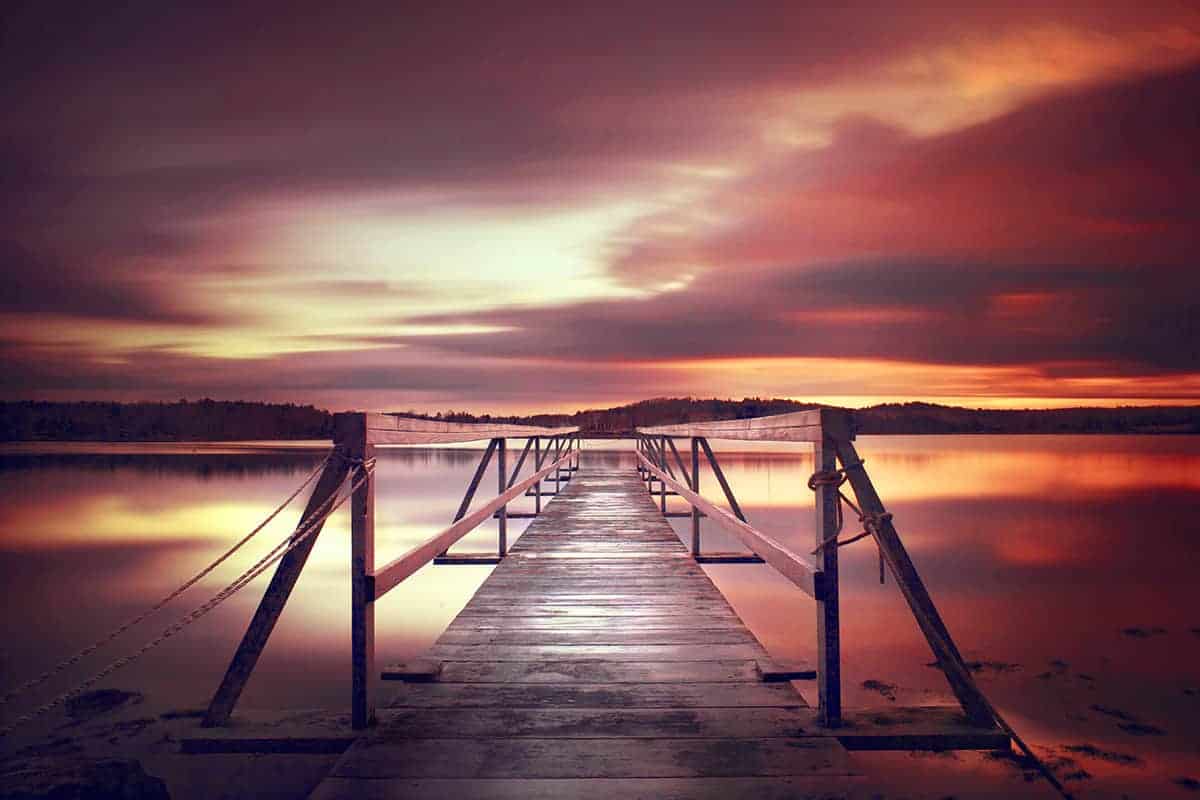
When I write of “weight”, I refer to more than the obvious strong focal points within your frame that are easily identifiable – for the above image, those would be the guard shack, fence and sunset sky.
The ability to use the less-apparent negative space to counterbalance a strong subject is a powerful tool for composition, and one that can greatly improve the impact of your image.
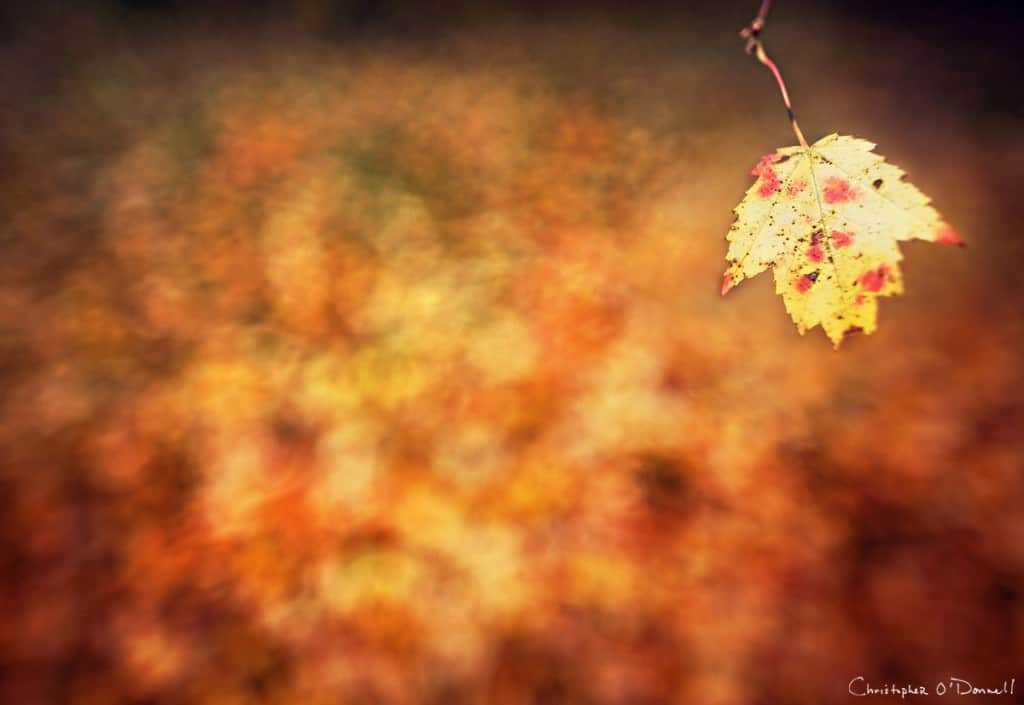
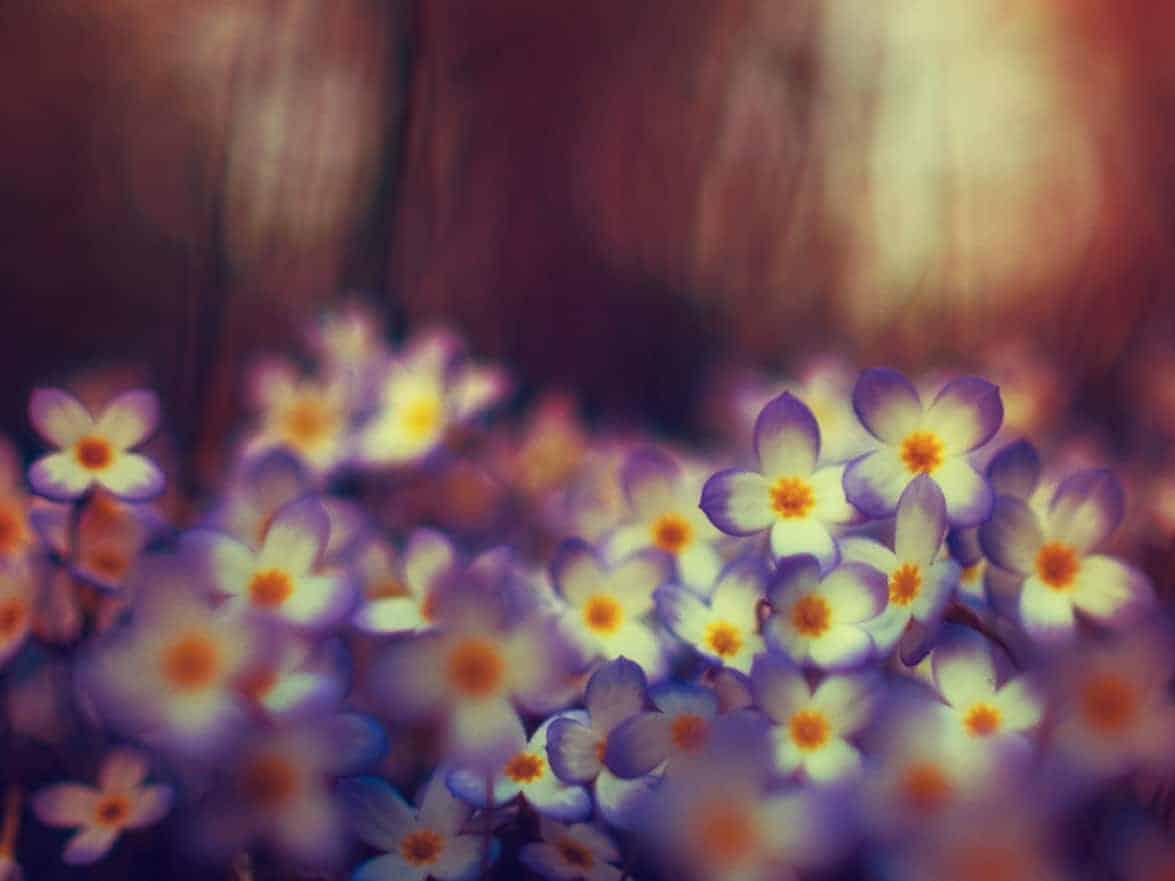
With no identifiable focal points other than the focused leaf, I used the foliage backdrop to serve as negative space, which helped to balance out my composition.
Many landscape “rules” of composition stem from your ability to create balance – foreground interest is a good example to illustrate.
The idea of composing your landscape with a strong focal point in the foreground provides a point of reference against whatever backdrop that your image may possess, and can also act as a strong anchor point – something else to look at besides the mountain range, sunset sky, or other points of interest that draws attention from the eyes.
Foreground interest is a method landscape photographers use to redistribute the weight of an image – to place a focal point in the frame that can counterbalance the magnetism of another. It provides more interest, and encourages the viewer to look at other elements in your frame rather than just one – in other words, you’re creating a flow between the focal points for a more harmonious composition.
There are several ways to change the weight of your focal points. By utilizing the methods described below, you can learn how to alter the appearance of your landscape by shifting the weight and balance, which can improve the strength of your composition.
1. Focal Length
The focal length of your lens can contribute much to the overall impact of your image, and can greatly affect your balance.
The ability to tighten your composition and focus on a small part of the landscape….or alternatively, widen the borders of your frame and include more of your surroundings, can be a versatile tool for creating your composition. However, the focal length you choose can affect your balance in another way.
The weight of the focal points in your composition can be shifted by the apparent relation they have to one another. Your focal length can alter this relation substantially by compacting and exaggerating the distances between each point. Longer focal lengths can compact these distances, while wider focal lengths exaggerate them.
In other words, the longer your focal length is, the closer your subjects will appear in relation to each other. The distances get smaller.

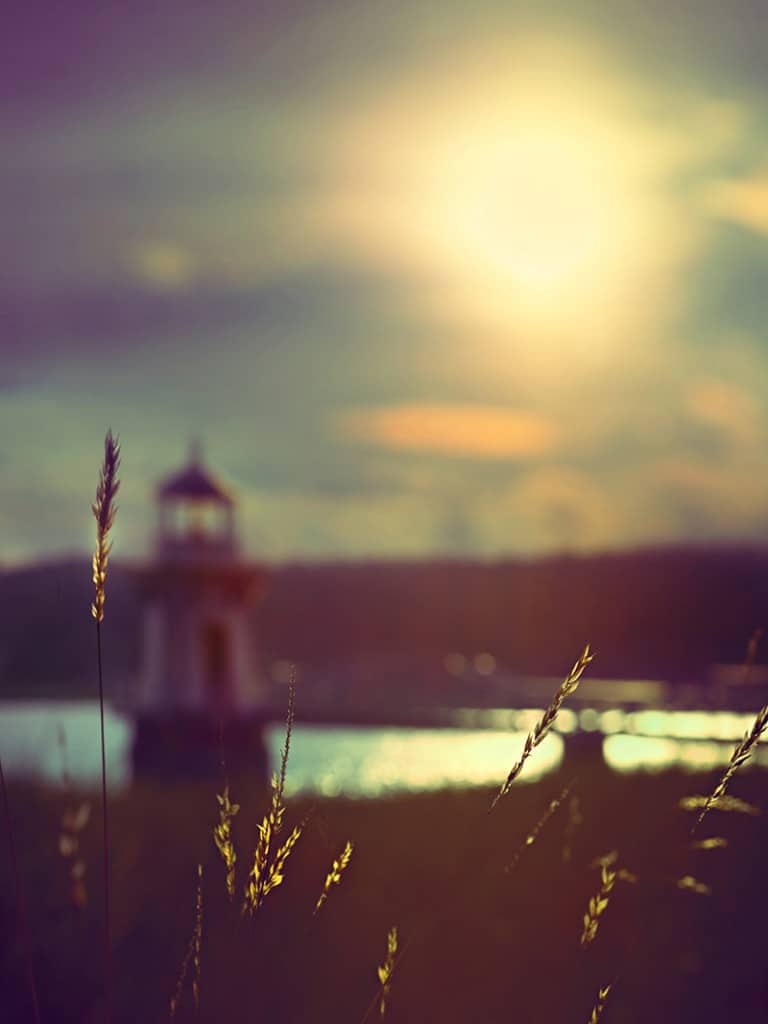
I captured these two sunsets on the same evening, and from the exact same location. However, the weight and balance of my focal points are vastly different.
For the top photo, I used a focal length of 24mm – which put much distance in between the foreground grass, the middle ground lighthouse, and the distant sun.
However, when I switched to a focal length of 85mm for the bottom image, you can see how larger – or heavier- those focal points became by condensing the space between them.
If you want to change the balance of your image – that is, to lighten or increase the weight of a certain focal point – an adjustment to your focal length can help tremendously.
2. Perspective
While the focal length can alter the depth of your image from front to back – exaggerating or compacting the apparent distance between the foreground, middle ground, and background – your chosen perspective can also redistribute the weight of your focal points.
In particular, the height of your camera determines how much of a landscape you’re able to capture within one frame.
Lower perspectives can increase the depth and drama – making foreground elements appear larger, and background focal points appear smaller.
Additionally, a lower point of view can include more distant layers of interest in your composition that would have otherwise been excluded if you framed your focal point from a taller vantage point.
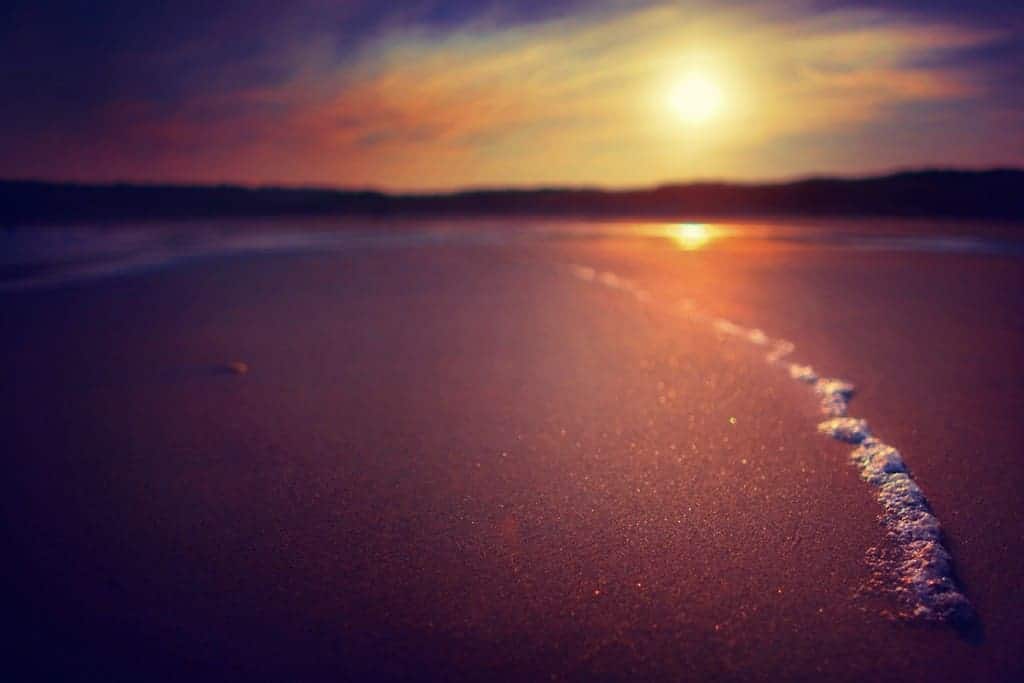
My vantage point here was quite low – only inches above ground level. This perspective allowed me to include the sky and sun within my frame, and also added more depth to the image.
3. Aperture
Your depth of field has much to do with the overall balance and weight of your image, and the aperture you choose can greatly change how light or heavy your focal points appear. You can selectively choose which focal points have more weight by bringing them into sharp focus, and reduce the weight of other elements by obscuring their appearance.
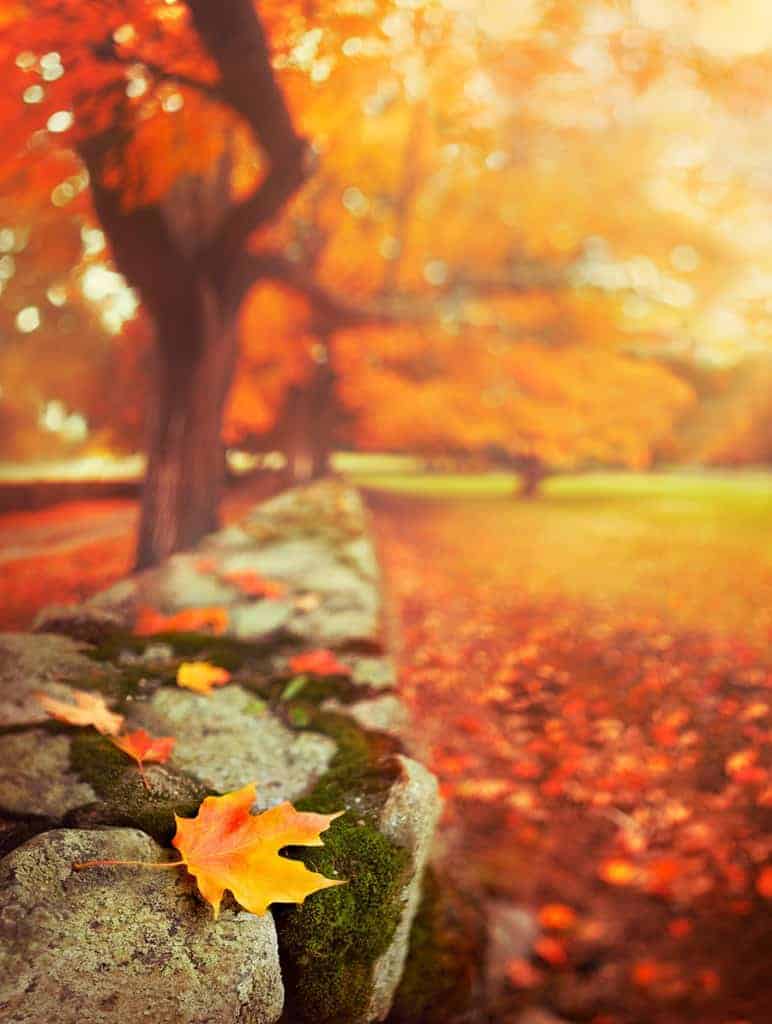
Want more on how to use your aperture creatively in landscape photography? Jump on over to this article.
4. Shutter Speed
Your chosen shutter speed can drastically alter the appearance of moving subjects in your landscape, which in turn can redistribute the weight and overall balance.
By purposefully lengthening your shutter speed, you can smooth the texture of otherwise heavy focal points – such as clouds, water, or wind-blown grass. This can create a harmonious relation between focal points for a more balanced composition.
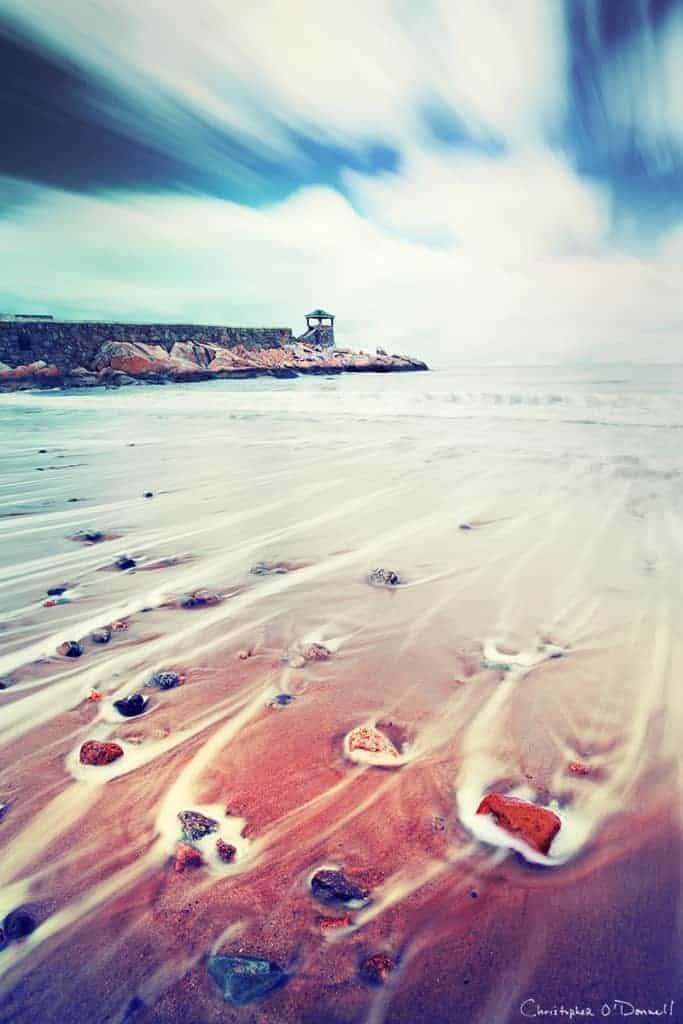
Long exposures can quiet an otherwise busy image….such as smoothing out the textured clouds and choppy ocean above…and allow you to redistribute weight onto smaller focal points which would have been overwhelmed by a fast shutter speed. It’s minimalism being used as a way to create balance.
Having a heightened awareness to the weight of your focal points will help you create a more balanced image for a stronger composition. When you analyze the focal points in your image critically, you can find ways to counterbalance strong, heavy subjects with other elements in your frame.
Alternatively, you can adjust your composition to lighten the weight of those strong focal points, and redistribute the balance more evenly.
The landscape is a subject that we have to search for compositions rather than create them ourselves. By simply being aware of the weight of your focal points and how they interact with one another, you can begin to identify ways to shift the balance and create a stronger composition.
The methods above are simple outlines that can be the source of inspiration. They offer a boundary to work within – a starting point that can lead you down a path you haven’t traveled before, which can spark entirely new ideas of your own fruition.
My Best Tips for Photographing Snow
As a landscape photographer, if there’s one thing I look forward to the most when the season turns cold, it’s the snow. As I’m writing this from Boston where last year we received a crippling amount of the white and fluffy (if you live in the city, then you know it’s never white and rarely fluffy), I still find myself just as excited about the first snowfall as I was when I was a kid: only for many different reasons.
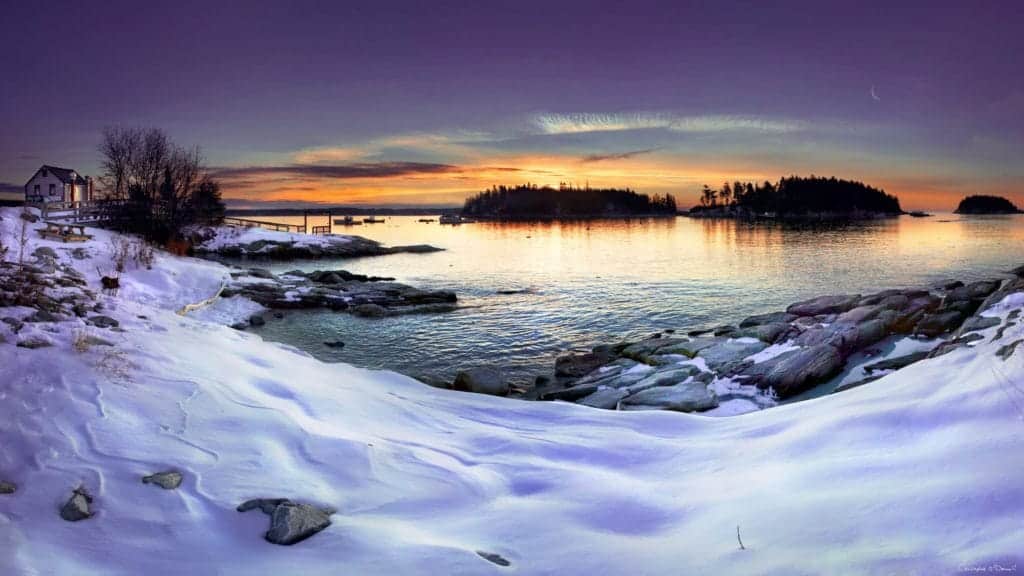
Snow can add layers of interest and texture to any environment, allowing you to expand your creative horizons. After a fresh snowfall, I look at what was once a stark and barren landscape with a refreshed vision. While I do enjoy photographing what is often referred to as “stick season”, the snow reinvigorates my inspiration to create during the winter months.
I’m particularly fond of black and white format with snow. You can greatly expand your tonal range, which provides some much-needed highlights against the bland landscape. Texture is also greatly affected by the snow, turning brush and dirt into a blanket of smooth transitions and interesting curvature.
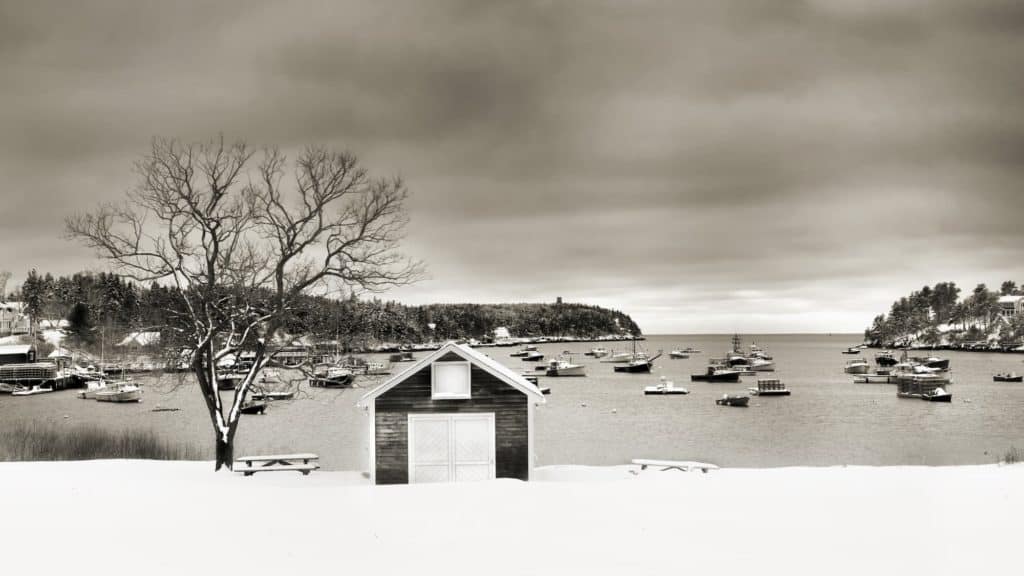
However (you knew there was a “however” coming), photographing snow can be a challenge. It requires a specialized workflow to 1) obtain proper exposure and color, and 2) photograph snow as it falls. With the right tools and knowledge, you can easily overcome this landscape hurdle.
Why does my snow come out grey?
This is something that I get asked ALL the time – why does my snow look dirty and grey when it was brightly white in person? The answer is simple: you’re underexposing your scene.
Now when you’re photographing snow, it’s good to retain some shadow in order to provide texture and depth…if you overexpose, you’ll lose all variation and will be left with an uninteresting white blanket.
The red flag you’re looking for is whether or not your snow is just varying shades of grey with no pure white point; if that’s the case, then you need to shoot a bit more to the right.
Not sure if you’re underexposing the scene? Check your histogram in the field: if your tones are bunched up to the left-hand side (right image below), then you need to open up your aperture or slow down your shutter speed to let in more light. Ideally, your histogram should look like the bottom-left image here – most gathered in the last third of your histogram, but with no (or very little) tones hitting the right edge.
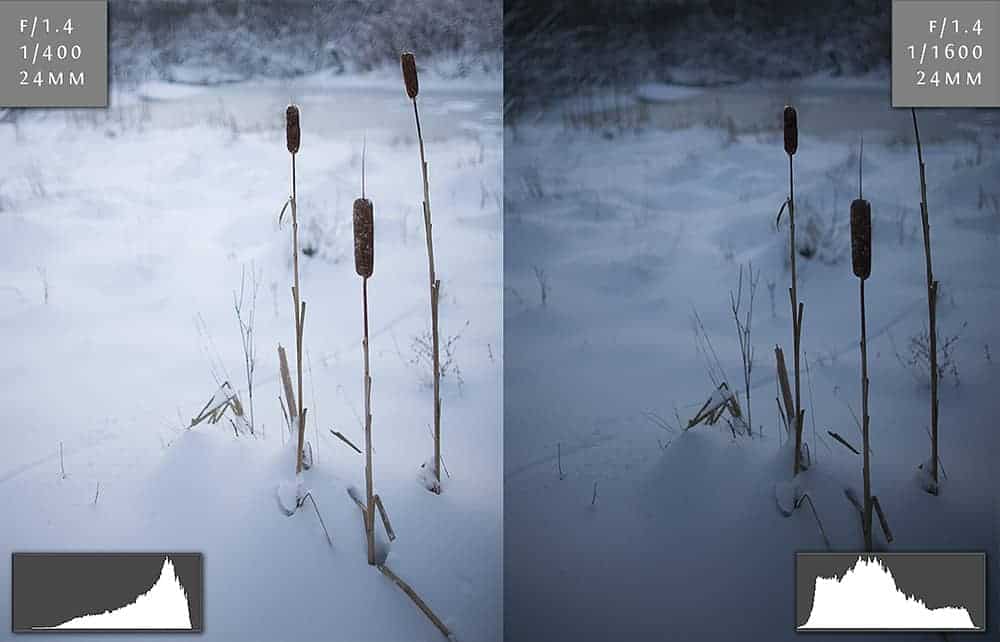
One exposure is not always enough.
In order to make sure that there are no blown highlights or crushed shadows (in other words, ALL of the detail has been captured), you’ll sometimes have to use HDR techniques; this means to bracket off your scene and combine the best details of multiple exposures into one photograph.
This is especially true for high-contrast landscapes – i.e. when you’re photographing the golden hours. The sun can reflect off of the snow and produce some intense peaks and valleys of your value scale, so you may not be able to capture all of your tones with just one photo.
And that is where HDR comes in. This incredible workflow allows you to throw away the limitations of your camera and capture every crisp detail of your highlights and shadows – which will help you achieve that perfect balance between natural-looking snow and recovering the full tonal range.
HDR is not a form of “cheating”, nor does it mean you are creating an unnatural photo. It’s a simple (yet extremely powerful) recovery method that you can use when your camera just isn’t capable of photographing every highlight and shadow. It’s also a lot of fun 🙂
I’ve put together a very helpful (and totally free) HDR field guide that will walk you through the ENTIRE in-the-field workflow so you can capture your brackets the right way. The quality of your HDR images entirely depends on how accurate your brackets are, so taking successful brackets in the field is absolutely the most important step.

Click here to download your free field guide.
Photographing Snowfall
When trying to photograph any moving subject, your shutter speed plays a very important part – and falling snow is no exception.
The faster your shutter speed, the more defined and crisp your snowflakes will appear. Conversely, the slower your shutter speed, the smoother and streakier (yes that is a real word) those flakes will look. Now whether you want sharp or smooth snowflakes is entirely dependent on your creative intent – but knowing how to obtain either one of these effects is important knowledge to have as a landscape photographer.
Now the exact shutter speed you need can vary greatly. Not only are you working with the exposure triangle (shutter speed, aperture, and ISO), but you need to take your environment into consideration: the speed at which your snow is falling, amount of available light, and your focal length (longer lenses require more light).
It’s a delicate balancing act, but one you must master as a landscape photographer since we rarely have control over these elements in the field.
Usually, the biggest challenge us photographers face when working with falling snow is a lack of available light. Snow typically falls under an overcast sky, and you may find it difficult to get a shutter speed fast enough to freeze those flakes in motion.
Here’s a side-by-side comparison showing how much difference your shutter speed can make in rendering those falling snowflakes (click to enlarge).

For the images above, I used a 300mm prime lens and set my focus on the tree, which was about 50 feet away. I started out with an ISO of 100, but none of the shutter speeds were fast enough to stop the snowfall. So for this image set, we’re working with an ISO of 800.
In this side-by-side comparison, you can see that as my aperture widened, the snowfall looks quite differently. Since a wider aperture means more light is let in through the lens, I can increase my shutter speed to compensate.
If I were to choose one image to use, I would select the f/5.6 aperture – it’s fast enough to render the falling snow without streaks, but my depth of field isn’t TOO shallow where I lose many flakes as they are thrown out of focus (like in the 1/640th frame).
If you need to increase your shutter speed, you have some options. Change to a shorter focal length, increase your ISO, and/or widen your aperture (like in the example images above).
Like with most creative choices in photography, the changes you make will adversely affect another. Increasing your ISO will produce digital noise and soften your focus, widening your aperture will create a more shallow depth of field, and shorter focal lengths will exaggerate your distances. Consider this balancing act as all part of your photography fun 🙂
Creating layers of snowflakes.
Once of the reasons why I love to photograph during a snowfall is the ability to create layers with my camera. By choosing a longer focal length (and a wide aperture), I can simultaneously compact my distances and increase the size of those falling flakes.
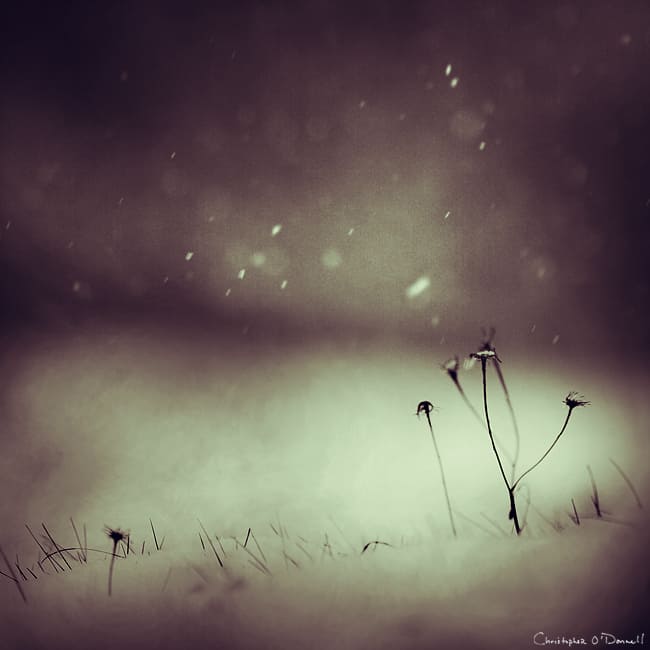
The longer your focal length is, the more shallow your depth of field will become for a given aperture – which is illustrated in the photo above. I used a 300mm lens here, which gave me multiple layers of snowflakes at various sizes. At f/4, I was able to use a rather small aperture to create some soft bokeh (although f/4 is pretty large in the scope of photography, it’s considered small for creating a super thin slice of focus like in this photo). This added texture and depth to a very light snowfall; if I had used a deeper depth of field and/or a wider lens, the snowflake interest would have been much less recognizable.
Thanks for reading…and remember to download the HDR field guide!