Getting Started with creativeRAW
Note: if you need help setting up your account, logging in, and/or resetting your password, please refer to this guide here.
- The Dashboard
- Focus Mode
- Navigation
- Completing Lessons and Topics
- Course and Program Progress
- Video Playback and Quality
- Downloading Lessons and Practice Files
- Changing your Profile Picture
- Changing your Email Address
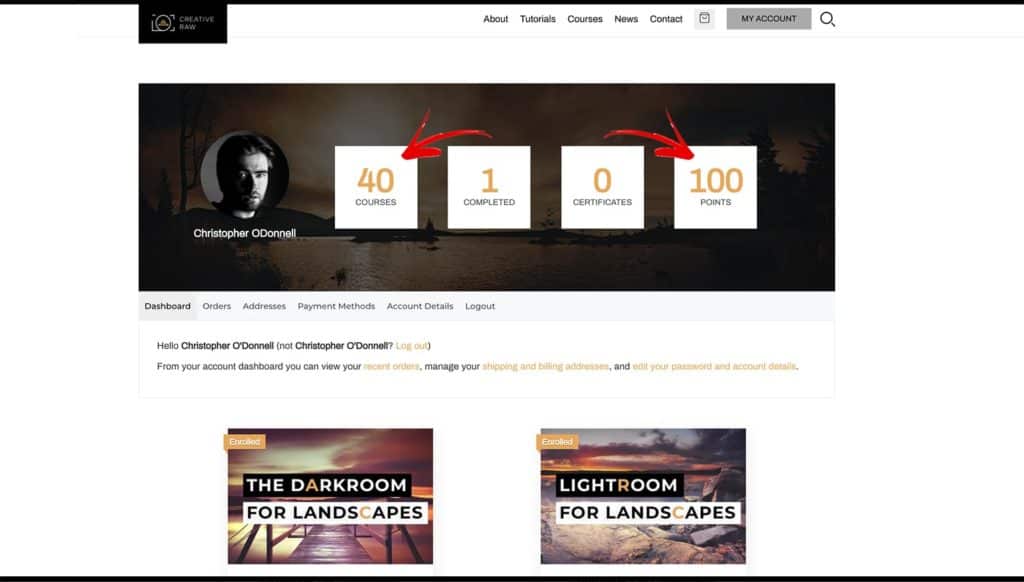
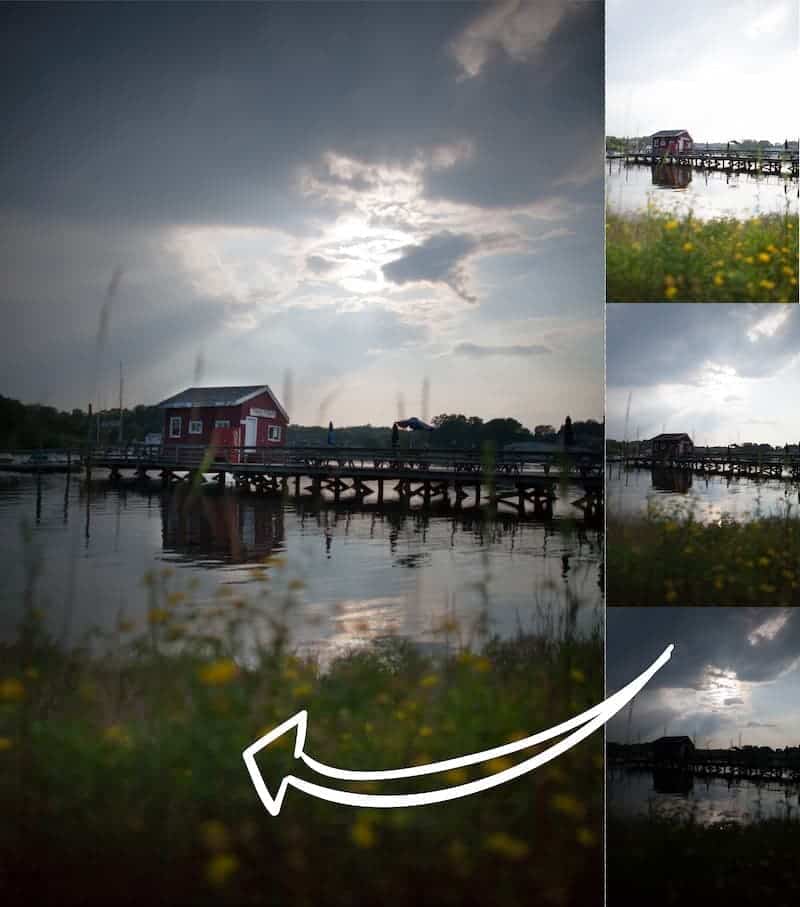
The Dashboard
As soon as you log in, you’ll be greeted by the Dashboard. This is your “control station” where you can access your courses and manage your account.
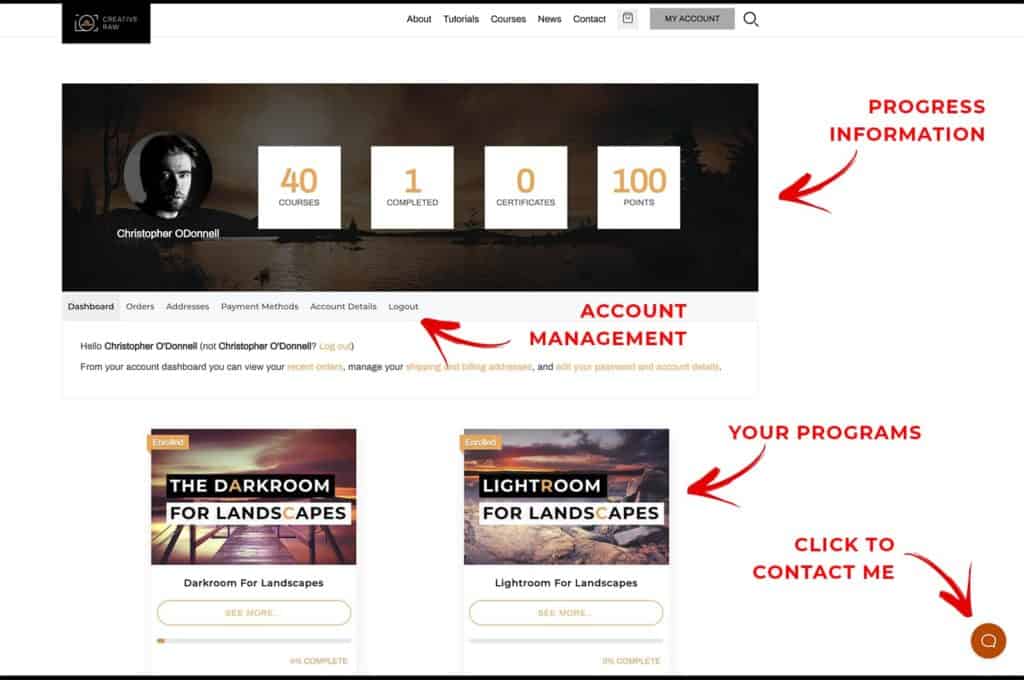
Below you will see a list of programs that you currently have access to.
Each “program” may contain multiple courses, so that is why your course count number at the top might be different than the number of programs you have access to below.
Let’s click on a program to see the content. You can either click on either the program image or the “See More” button right below it.
Note: At the very bottom, you will notice a “Continue with Last Lesson” button once you start a program. The next time you log in, you click on this button to pick up right where you left off.
Once you enter a program, you’ll find a list of courses and lessons. I’ve laid out the program so you can see all lessons from one page rather than having to hunt through different courses to find a certain video.

Each course has a hierarchy tree: the course, lesson, and (if needed) topics within each lesson. This is simply for organizational purposes. The video content will be on the lowest point in the hierarchy (either a lesson or topic).
Tip: On the program page here, press CMD + F (CTRL + F on Windows) to bring up the text finder. Enter a lesson or topic title to jump right to a specific lesson that you know of without having to scroll through the entire page.
Now, click on either a lesson or topic to access the video you want to watch.
Focus Mode
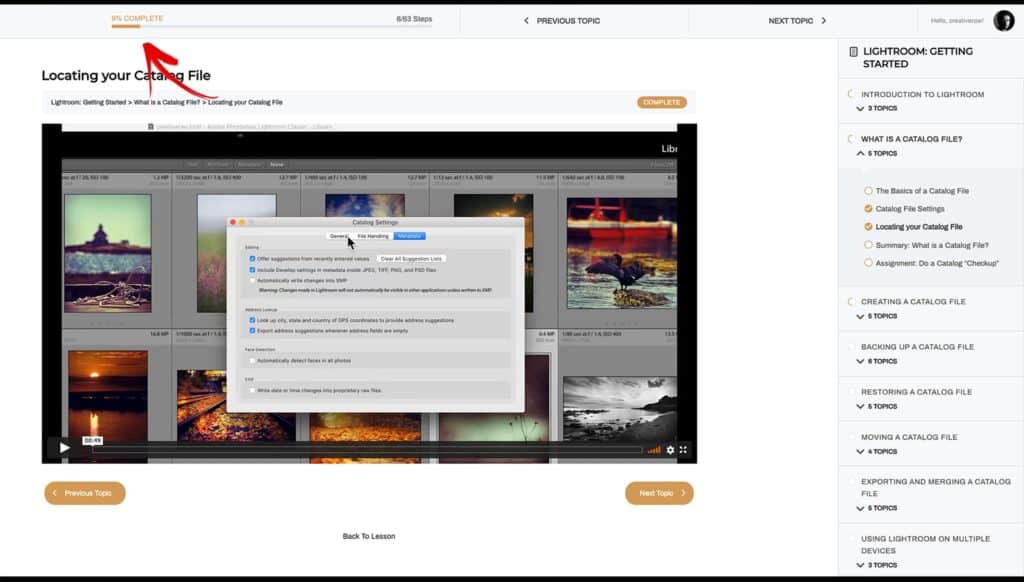
Once you enter a lesson or topic, you’ll find yourself in what is called “Focus Mode”.
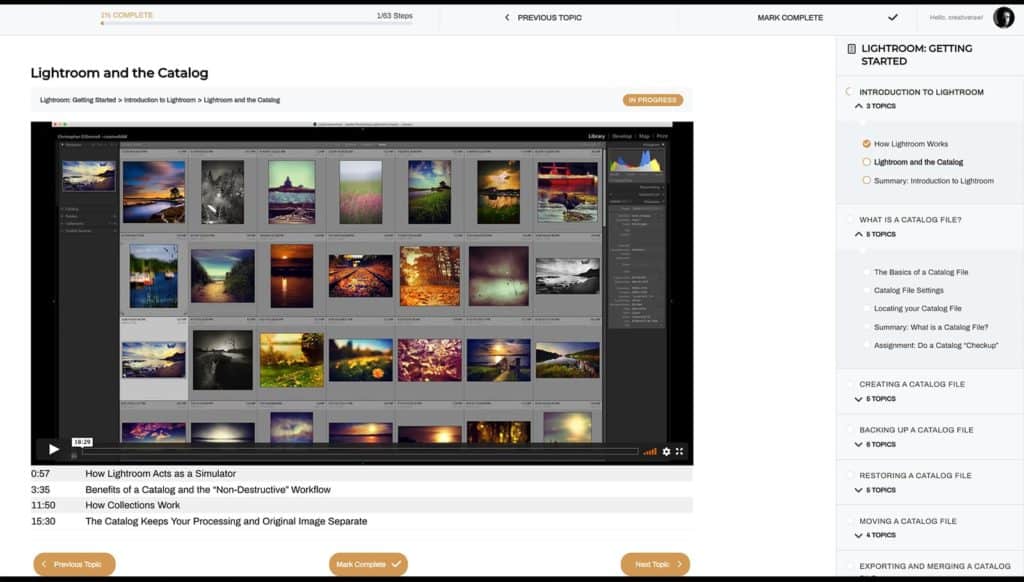
This interface is designed for you to learn without distractions….and you will find many features that allow you to track your progress and move in and out of each lesson with ease.
Navigation
What you’ll notice first are the multiple ways to navigate through the course which contains the lesson or topic you clicked on.
The sidebar shows you a global view of the course structure: the course, lesson, and (if applicable) topic. These are links that can be clicked to jump to a different video lesson.
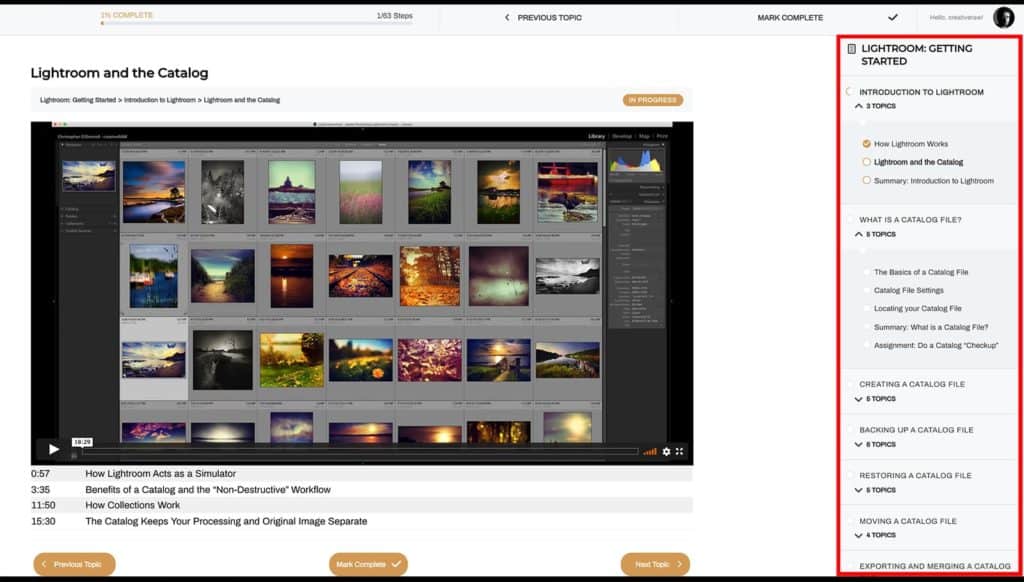
These menus are collapsible so you can see more lesson topics without scrolling, and can be opened to see the content of the entire course.
When looking at a video, the current lesson/topic will be highlighted in bold letters in the sidebar.
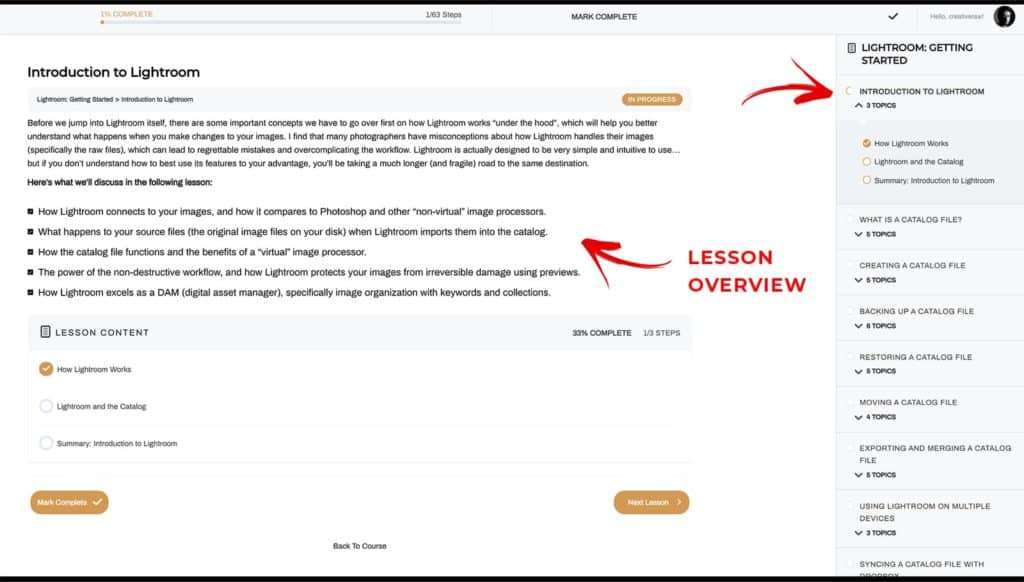
Clicking on the lesson title will often give you a helpful overview of what the specific topics will cover collectively, and an additional list of topics to navigate to.
Note: I would not recommend clicking on the course title as that will only bring you back to where you are.
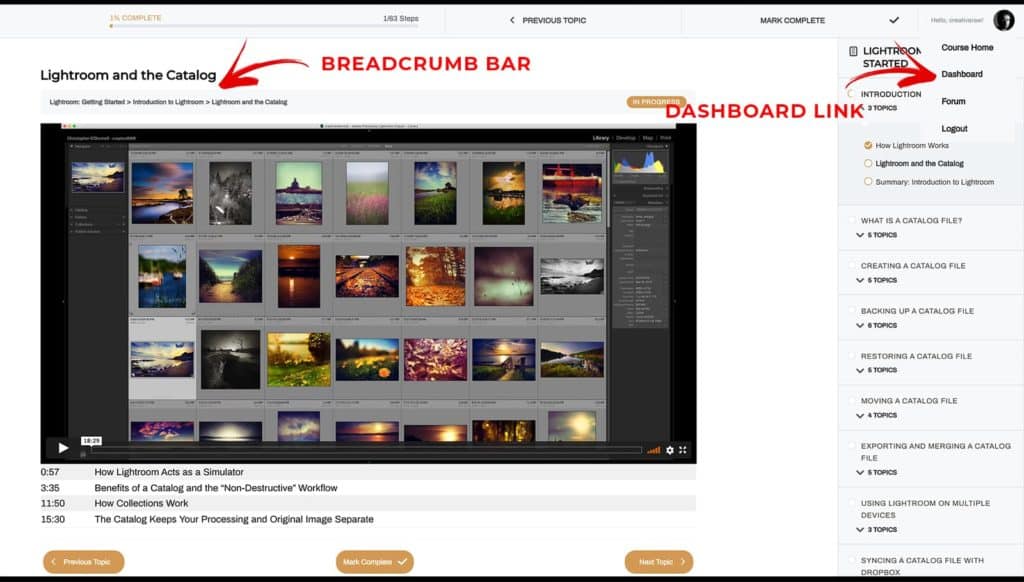
There is also a breadcrumb bar at the top of the page, showing you exactly where you are within the course. These are also clickable if you want to jump back to a lesson overview.
And if you would like to jump back your Dashboard, you can do so via the menu in the top-right corner:
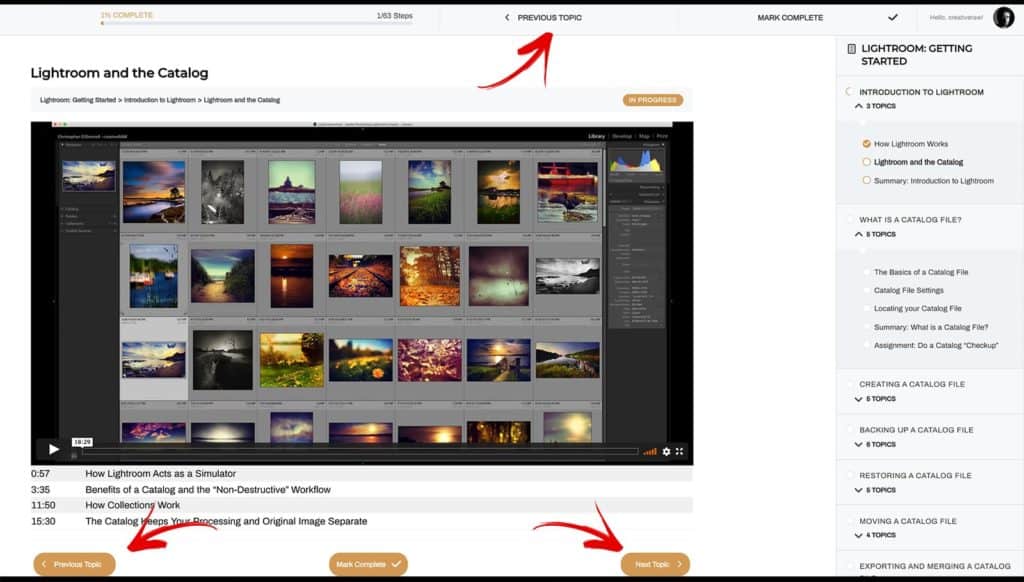
To progress onto the next lesson or topic (or to jump back to the previous one), you can click the Next/Previous buttons at the bottom of each page. There is also a Previous button at the top.
Completing Lessons and Topics
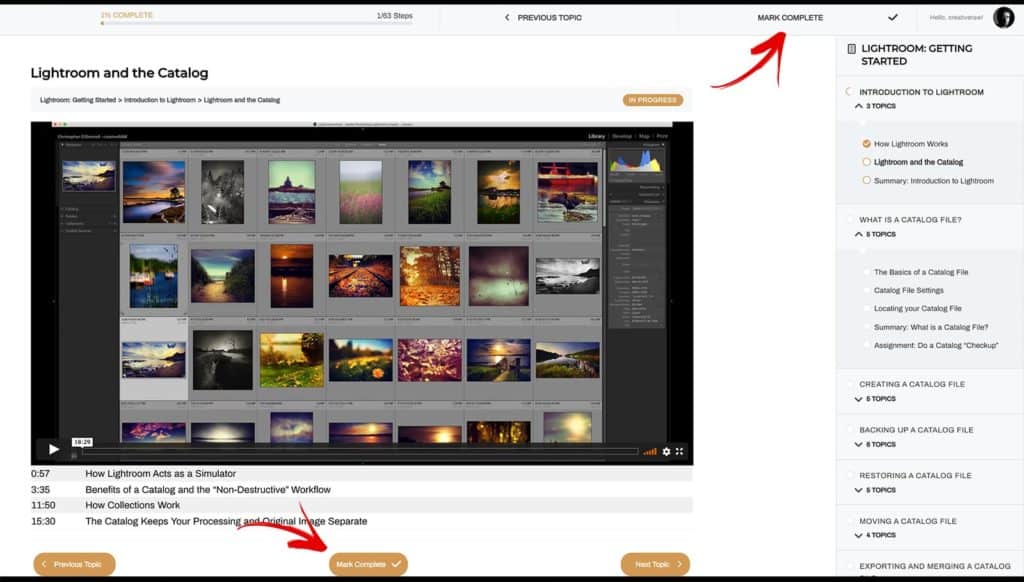
One of my favorite features of this platform is the ability to track your progress through the course. You can mark each lesson or topic as “complete”, which will do two things:
- Give you a visual confirmation that you’ve already watched this lesson.
- Automatically advance to the next lesson or topic.
You can mark a lesson or topic as complete either in the top menu or via the “Mark Complete” button at the bottom of each page.
Note: When a lesson has been marked as complete, all topics within that lesson are completed as well.
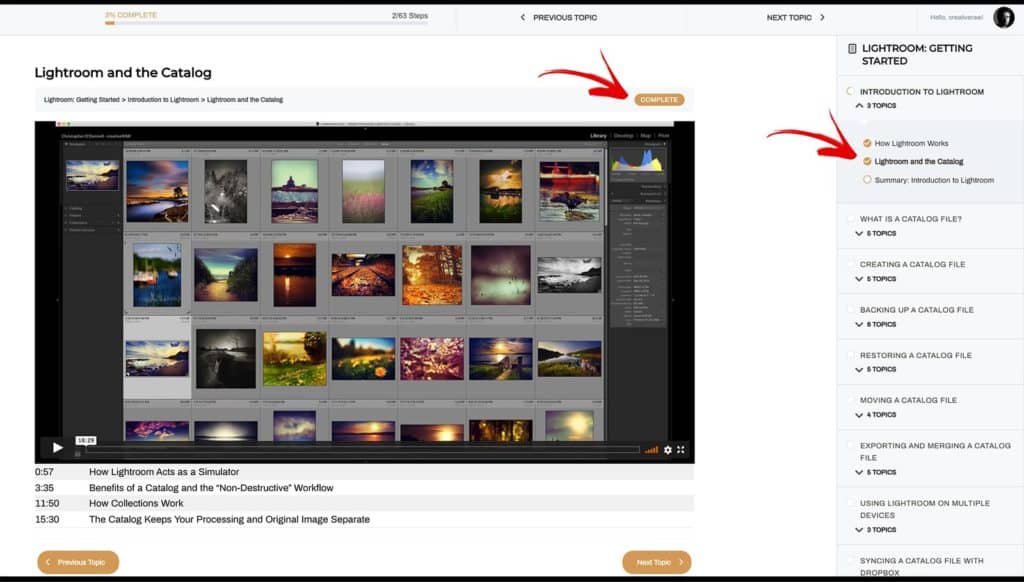
Once it’s complete, you’ll notice that there is now a checkmark next to that lesson in the sidebar….as well as a “Complete” label in the top menu. Also, the “Mark Complete” buttons have now dissapeared.
Note: You can always revisit a lesson or topic after it’s been marked as complete.
Course and Program Progress
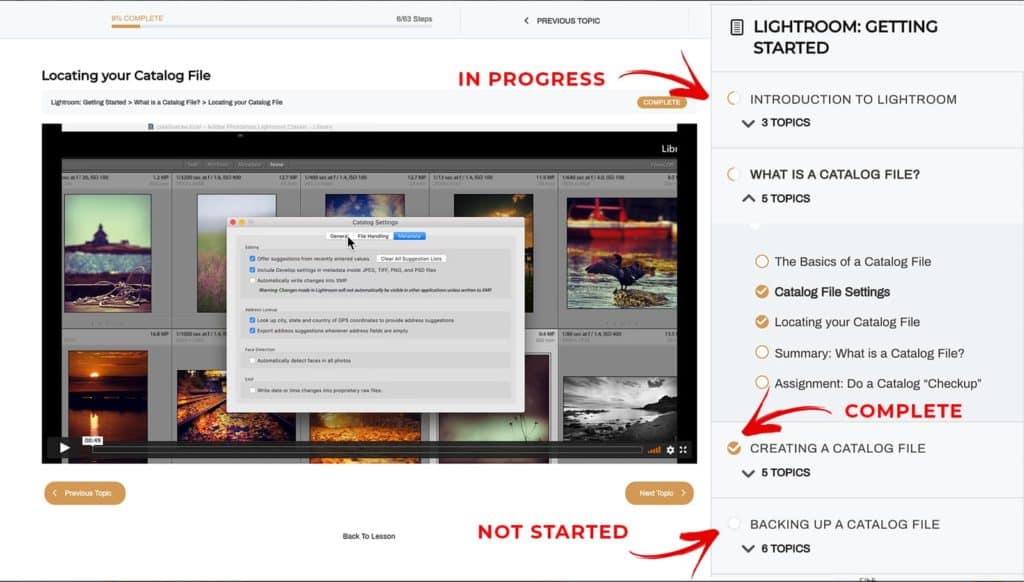
This learning management system tracks your overall progress through each program, with helpful progression bars located throughout based on how many lessons o topics you make as Complete.
When working on a lesson or topic, the progress bar at the top tracks your progression for that specific course..and also shows you how many lessons are left to complete.
The course sidebar also gives you visual indicators on your progress. The circle next to the lesson title will be completely grey if no topics within the lesson have been completed, half full if some topics have been completed , and completely full with a checkmark iif the entire lesson has been completed.
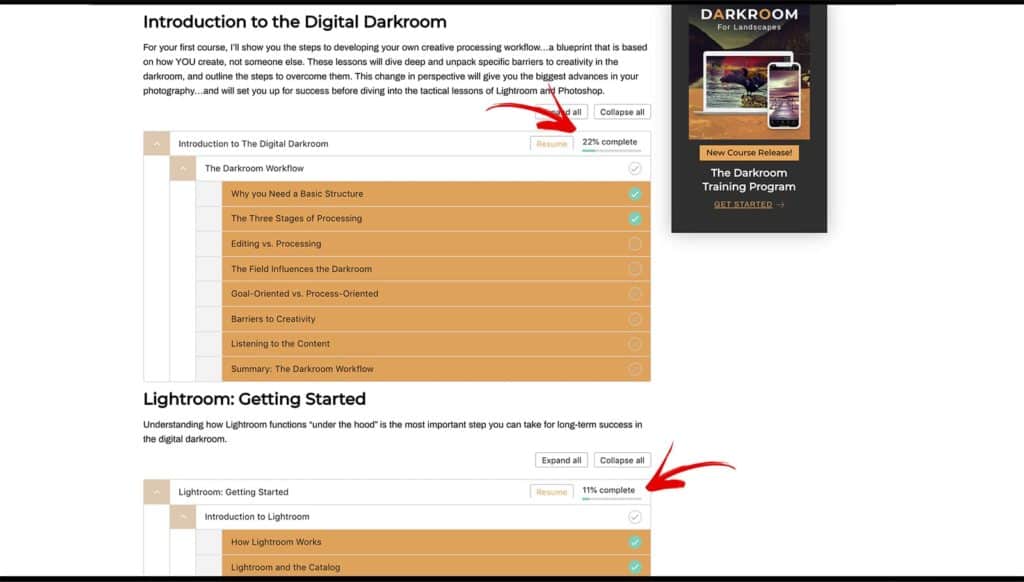
On the program page, you can also see the progress for each course within the program. And at the top, you can see the overall program progress based on how many courses you’ve competed within it:
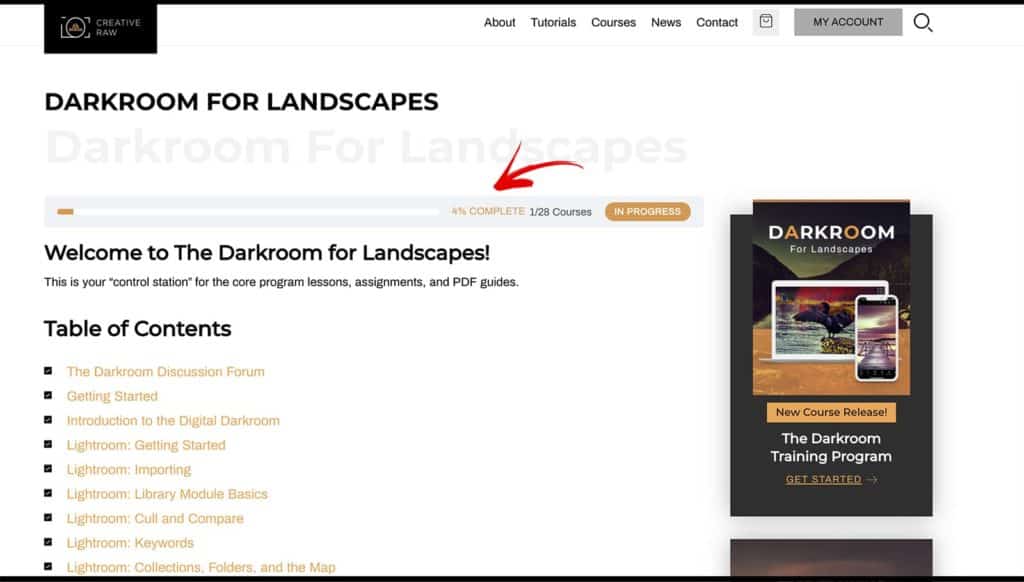
Your overall progression through all programs is tracked as well at the top of your Dashboard. For each course your complete, a certain number of “points” is added to your account:
Video Playback and Quality
When watching the actual video lesson, there are several features to help your streaming experience.
To play a video, you can click on the play button in the bottom-left corner, or click on the video itself. Click again to toggle between play and pause:
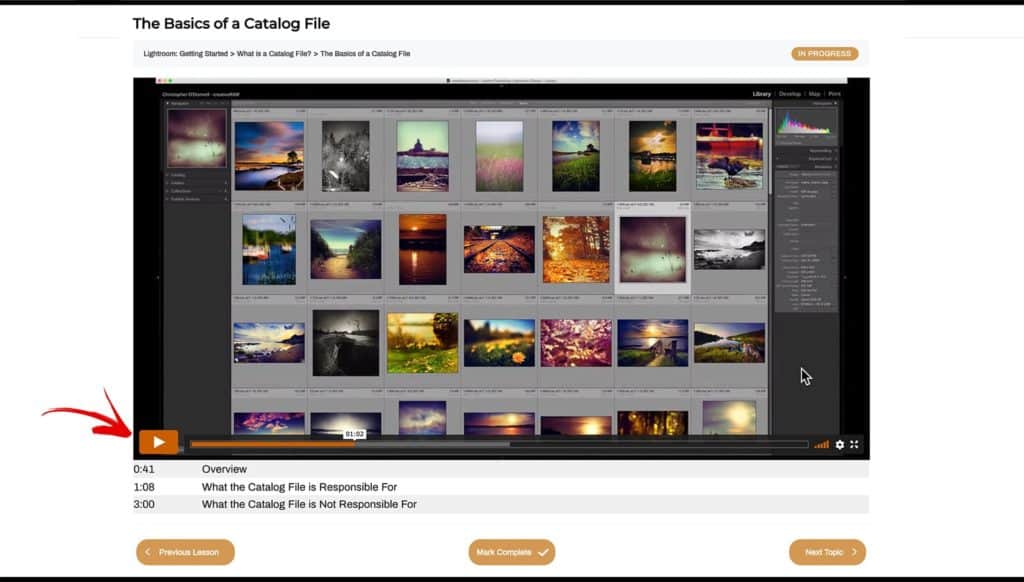
You can also click, hold, and drag the progress bar to “scrub” to a specific point in the video. Some video lessons will have timestamps below that will give you the exact point to scrub to for a specific topic (as seen above).
If you experience playback issues, you can change the video quality in the bottom-right corner of the video player to select a different quality. While Vimeo will automatically adjust the quality depending on your connection speed if set to Auto, you sometimes may have to tweak this manually. This can help your video to load faster and circumvent any buffering issues.
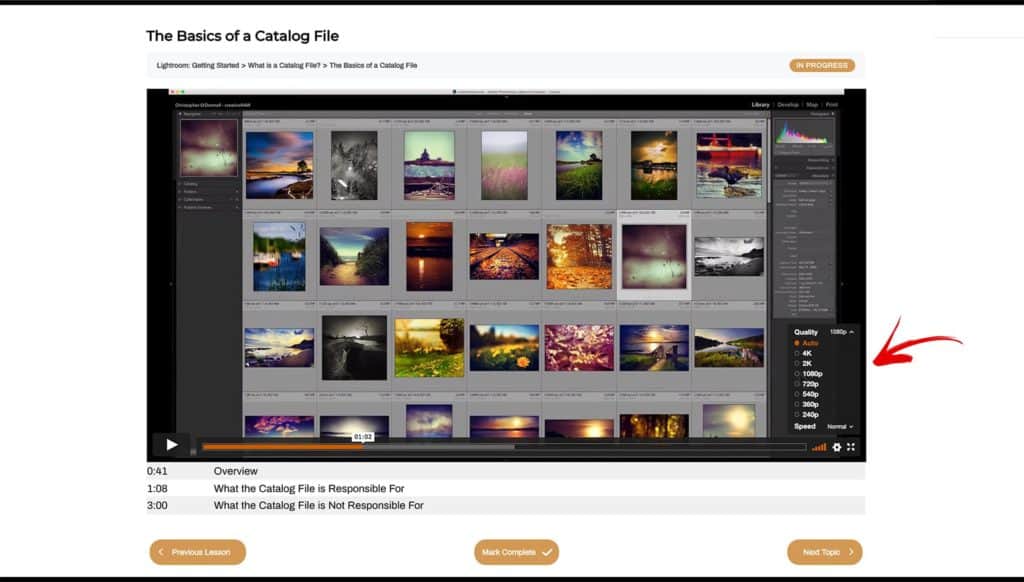
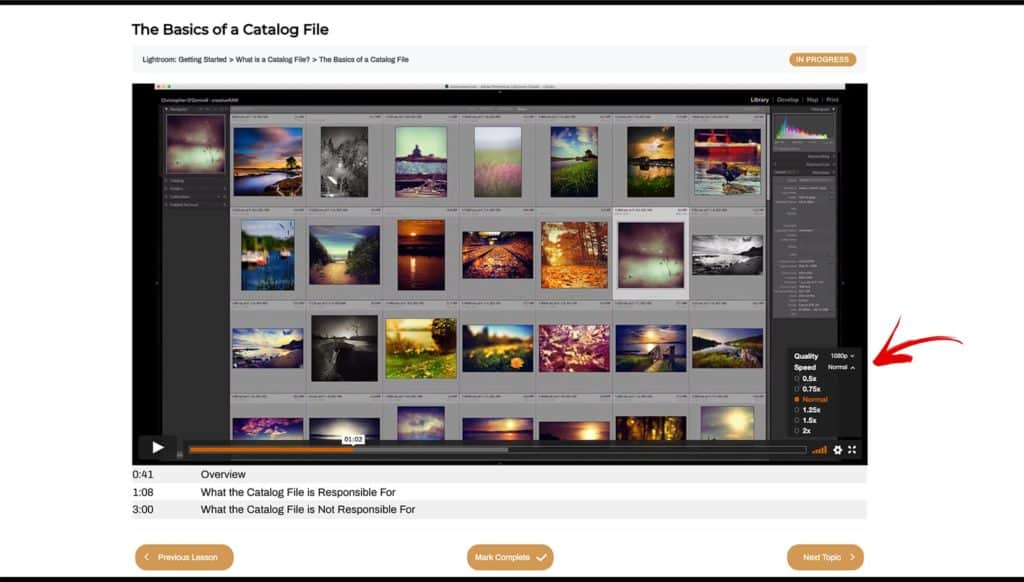
You can also change the playback speed if you want to watch the lesson at a faster pace. I recommend trying this as you can adjust the video speed faster or slower depending on your needs.
And if you continue to have trouble, you can download the 4K video files to watch offline (if available for your account).
Downloading Lessons and Practice Files
If available, lesson downloads will be located within their own “course” for that program. This allows you to keep track of which lessons you’ve downloaded by marking them as complete:
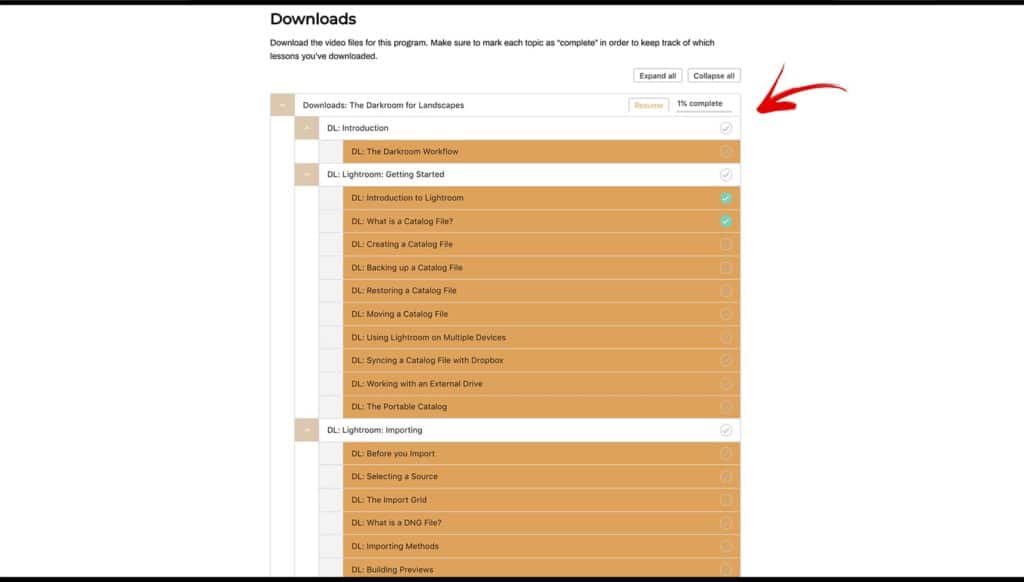
Click on a lesson or topic to access the download link. You can re-download the lesson or practice file even after it’s been marked as complete.
Once a lesson has been downloaded, click “Mark Complete” to auto-advance to the next download link within that program.
Note: Download links will expire shortly after the page loads…so if your link is not valid, reload the page and try again.
Changing your Profile Picture
Let’s go back to your Dashboard to go over some additional account features.
Your profile photograph is based on your Gravatar (a free and universally recognized profile image). \\Your Gravatar is associated with the email address you use to log into your account.

To set up or change your Gravatar photograph, you can do so here.
Changing your Email Address
You can update your email address at any time by clicking on the Account Details tab from the Dashboard:
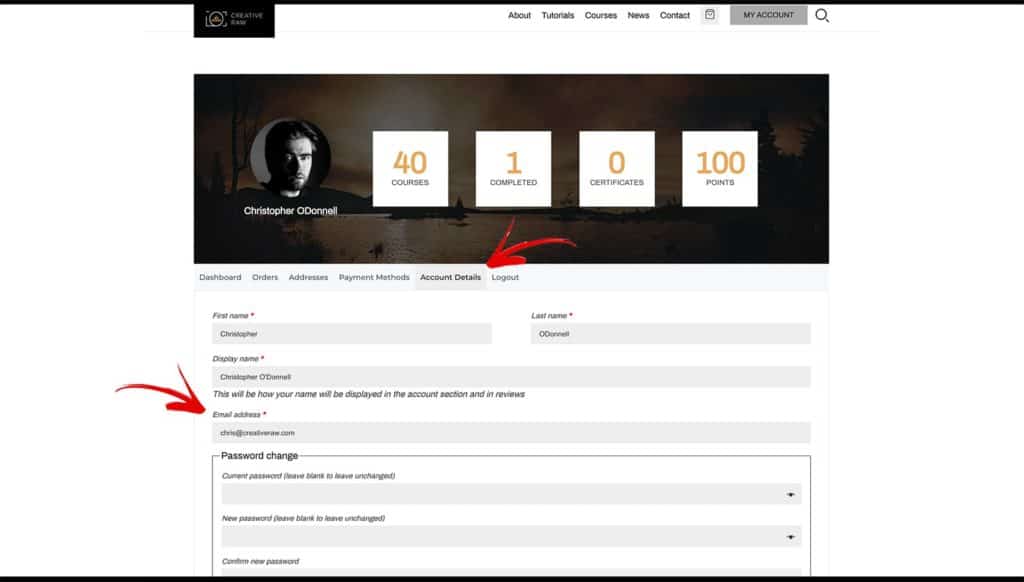
Enter your new email address (make sure it’s spelled correctly!), and hit “Save Changes” to confirm. The next time you log in, use your new email address.
Note: For information about changing your password or logging in, please refer to this article here.
Introduction to Exposure Blending for Landscape Photography
Welcome! In this tutorial, we shall begin our journey into the wondrous world of exposure blending for landscape photography. Blending exposures in Lightroom or Photoshop is one of the most powerful ways to create an extraordinary landscape photograph, so I can’t wait to show you just how easy it can be.
Why You Need to Exposure Blend
As you’ve probably noticed, it can be very difficult to capture the full dynamic range of light in a landscape accurately (especially those with a bright sky) because your camera sensor is limited to one aperture and one shutter speed at a time. And sometimes, your photograph needs different exposure settings across the frame in order to capture all of that detail properly.
This is why that amazing sunset can appear washed out or otherwise lackluster compared to what you actually saw when taking the photo.
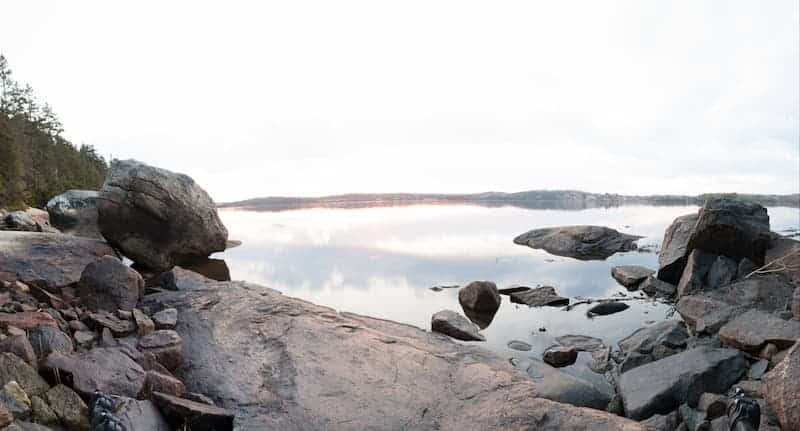
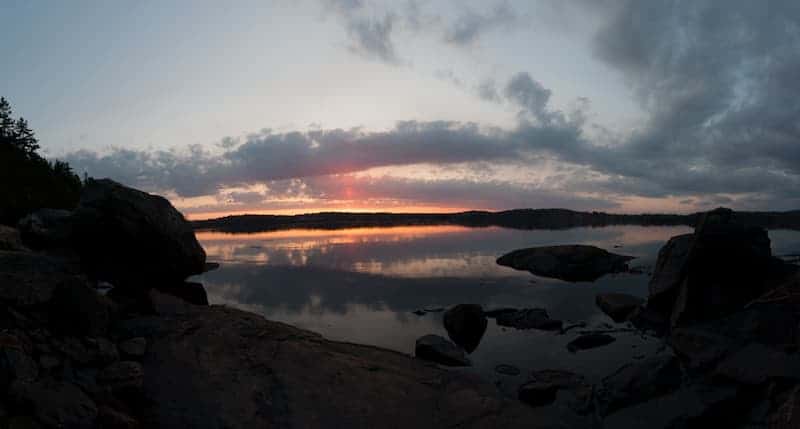
This sunset was an outstanding display of clouds and golden light, but the camera did not pick up any of it. This is because our eyes have a much larger dynamic range than the camera sensor, so we sometimes need to take extra steps in order to accurately recreate what we saw in person.
Exposure blending is NOT about creating an unnatural photograph, but rather piecing what we witnessed back together…and overcoming the limitations of the camera to produce the landscape how it was meant to be seen.
In fact, the results are identical to what can be achieved with a proper GND filter in the field, but exposure blending provides a more accurate, and higher quality image (as explained here).
How Bracketing Works
In order to have a properly exposed landscape with no areas of missing detail, you’ll need to blend multiple shutter speeds together when your dynamic range is wider than the capabilities of your camera.
At a minimum, you’ll need:
- One image exposed (metered) for the brightest tones in your photo (typically the sky). This image will appear underexposed, but the goal here is to make sure there is now blown-out detail and all of your highlights are captured fully (top-right image below).
- Another image exposed for the darkest tones (the ground, usually). This image will appear overexposed, but again…the goal here with this frame is to make sure there are no underexposed shadows (top-left image below).
This is called “bracketing” a landscape since you’re encapsulating the entire range of detail, making sure that no pixel is left outside of this range. You’ve identified the brightest and darkest pixels in your scene and have photographed them properly, essentially creating “bookends” for your dynamic range.
Once you have your two extremes, or bookends, you’ll bring them into Photoshop to cherry-pick the best parts of each bracket and blend them together using layers and masks.
The result? One perfectly exposed landscape.
Exposure blending uses the same principles of HDR photography in the sense that we’re expanding the capable dynamic range for your camera, but blending creates a more natural-looking image – and you retain full manual control over how the final blend looks.
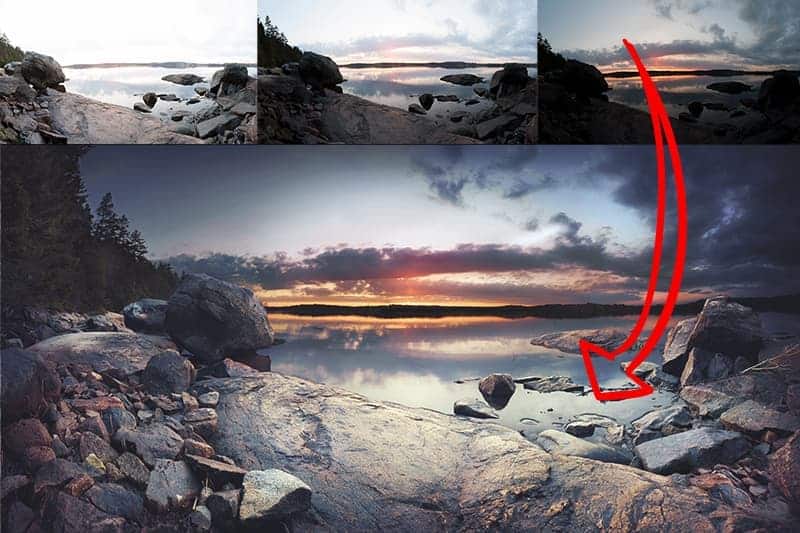
In addition to your fastest and slowest exposures, a middle exposure that’s been metered for the entire image is sometimes needed for any middle ground elements you need to blend in.
In the example above, I had a rather large dynamic range between the slowest (top left) and fastest (top right) exposures. I wanted to make sure that I captured the great detail in the water fully and accurately, which was not exposed properly in my two bookend brackets…so I also took a frame in between these two points (top middle) so. could blend in the water at the highest quality.
I then used Photoshop to combine the best detail of all three brackets to create the final image.
Are Three Brackets Always Enough for Exposure Blending?
Depending on the tonal range of your landscape, you may need to capture more than one shutter speed in between your two bookend exposures in order to ensure you have no blown highlights or underexposed shadows – it’s not uncommon to have 5 or more photos of the same scene at your disposal.
In the example above, the sun is somewhat obscured by the clouds and not particularly bright, so I only required three brackets total. However, if the setting sun was fully visible, I most likely would require an additional bracket at a very fast shutter speed in order to properly render the surrounding detail of the sun.
The range of your exposures will depend entirely on how bright your highlights are and how dark the shadows appear.
When in the field, you can check your in-camera histogram to make sure your brightest bracket (longest shutter speed) has no crushed shadows, and your darkest bracket (shortest shutter speed) contains no blown highlights.
Here’s another example…
As you can see, the setting sun is quite interesting, but the dynamic range was too wide to capture all of the detail in a single exposure. The image where the foreground is exposed well (top-right) has an extremely overexposed sky, while the photo exposed for the sky (bottom-right) has the foreground in complete shadow.
Additionally, the middle ground water is either over or underexposed in both bookend brackets, so I would also need a “base” exposure to blend.
In order to get a proper exposure for the entire dynamic range of light here, I would need to combine these three brackets into one final photograph.
So we’ve now established that there’s a need for exposure blending in order to overcome the limitations of your camera. At this point, you may have a few concerns based on what you’ve heard in the photography world…
“Isn’t exposure blending and HDR fake? I don’t want my images to look unnatural…“
In short, no. Exposure blending is actually the most natural way to capture all of the detail you saw with your own eyes. Unfortunately, blending and other HDR techniques have received a bad reputation due to some photographers taking the method to the extreme. I explain this more here.
“With camera sensors advancing, why would I need to blend exposures? Couldn’t I just pull more detail out of a single raw file? Isn’t this the entire point of raw format?”
While it’s true that camera sensors have come a long way in the past 10 years, they’re still not a replacement for manual exposure blending. You will still get the highest-quality detail and color purity by bracketing in the field and combining those exposures in Photoshop or Lightroom. I dive more into this topic right here.
For the sake of this introductory to exposure blending, let’s agree that blending different shutter speeds together is the ideal way to recreate the extraordinary scene you saw in person. It’s why you chose to photograph it in the first place, right?
So, how does bracketing actually work? It’s quite simple once you learn the technique – and DSLRs have made it a lot easier with automatic exposure bracketing, or “autobracketing” for short.
Autobracketing for Landscape Photography
When you auto-bracket a landscape, your camera will capture three sequential images at different shutter speeds:
- One photo exposed normally based on the metering method you’ve chosen. This is your base exposure.
- One photo exposed for the highlights (dark enough so that your brightest pixel is rendered).
- One photo exposed for the shadows (bright enough so that the darkest pixel is rendered).
Once you tell your camera how wide you want your bracketing range to be, it will automatically adjust the shutter speed as it fires off your three brackets. This is where the term “auto-bracketing” comes from.
This allows you to capture three sequential images of different exposures without having to adjust your settings manually – very fast, and very handy.
One final note: exposure blending is not just for combining bright skies with dark grounds – you can use it in many different ways. You can recover blown highlights in water reflections, use it as a no-damage way to dodge and burn your landscapes, or perform many other editing techniques where you may need different exposures of the same subject.
GND Filters or Exposure Blending
Which is Better for Landscape Photography?
When we photograph a landscape, we are often presented with a large difference in exposure (the amount of light) between the sky and the ground. This is more apparent around early mornings and late evenings.
The sky is naturally brighter than the ground, and oftentimes this will cause problems in obtaining an optimal exposure – most notably blocked shadows (underexposed areas) and blown highlights (overexposed areas) that can not be recovered.
In the image above, you can see that the sky is exposed fairly well…but the foreground is in complete shadow, and lacks detail, color, and texture. This is known as “crushed” or “blocked” shadows, referring to the lack of detail and interest.
If you tried to compensate for this by extending your shutter speed and brightening up the foreground, that will also increase the brightness of the sky…resulting in “blown” highlights.
Here you can see that while the foreground looks much better, the sky now lacks all of that great sunset color and detail that the first image has.
Either way, these areas are highly distracting and can take away much detail from your photo…and lead to a loss of bright and vibrant colors.
The problem is that the sky requires a different shutter speed than the foreground in order to properly “expose” the scene with the correct amount of light onto the sensor, thus rendering your photograph.
Typically, your camera’s light meter will try and compensate for this disparity and “even out” the difference of exposures between sky and ground, settling on the midpoint shutter speed between the two.
While most modern cameras can handle this to some degree, it usually results in an unpleasant combination of both blown highlights and crushed shadows…where your sky appears washed-out and your ground appears too dark.

While the detail in this “middle”, or balanced exposure looks better…there is still not as much detail in the sky and ground as in their respective exposures.
Since your camera can not put two different exposures into one frame – that is, have one exposure set for the brighter sky and another for the darker ground – we need to manipulate how light is entered through the lens before it hits the sensor.
How GND Filters Work to Regulate Your Exposure
GND (graduated neutral density) filters act as a literal pair of sunglasses, tinting a certain portion of your lens. Part of the filter has an ND (neutral density) effect which will reduce your exposure by a specific amount of stops.

In other words, it reduces the amount of light that hits your sensor. The rest of the filter does not have this light-reducing effect (this is where the “graduated” part comes in) and will be completely translucent.
This filter is fantastic for these types of situations as you typically only need to reduce the exposure for your sky – as seen below.

The idea with GND filters is to place the transition zone (where the filter fades from 100% translucent to the “neutral density” part) along your horizon line, since that is typically where the proper exposure requirements change. Since the tinted part will reduce the amount of light entering through the lens, it needs to be placed over the sky. This will allow you to meter for the ground and expose that properly, without overexposing the sky detail.
Since the content along your horizon line differs depending on what your photographing, GNDs come in two different styles – soft and hard.
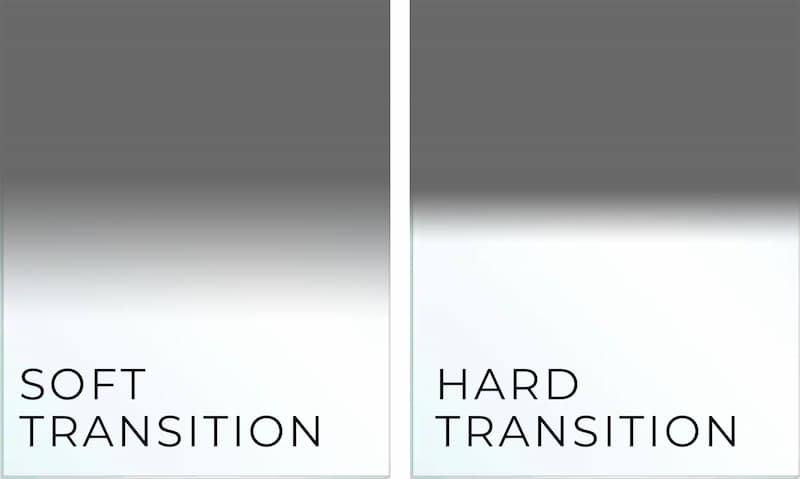
The soft GNDs have a smooth transition between the tinted glass and the clear glass, which is useful for horizon lines that aren’t smooth – such as those with trees, buildings, mountains, and other subjects of varying height.
Alternatively, the hard GNDs have very little room for the transition, which works well for those sharp horizon lines – such as a field of snow or where the water meets the sky. It’s a very popular filter for seascape photography as the ocean’s horizon line is usually flat and unvaried.
Exposure Blending for Landscape Photography
So those are GNDs, but what is exposure blending? It’s a process I use often…and is a revolutionary technique, especially for landscape photography.
Here’s the short version:
You apply the same principles of GND filters, but instead, take several photos of the same scene at different exposures. Typically, you would capture one frame exposed properly for the sky, and another for the ground (like in the two examples above).
Sometimes, if the difference between both exposures is very large (known as the dynamic range), you may need a third exposure between these two shutter speeds.
Then in Photoshop, you use layers and masks to digitally “blend” the proper exposure for the ground and sky together into one image…essentially picking out the best part of both frames and blending them into one photograph. It’s the digital version of using a GND filter.
GNDs and exposure blending are two very different approaches to the same goal: to have an evenly-exposed image with a complete dynamic range…
Meaning that your photo has as much detail as possible that hasn’t been lost to improper exposure.
There are great benefits to each method, so I’ll go over each to help you make a better decision as to what method works best for your photography workflow.
The Benefits of a GND Filter Over Exposure Blending
A drawback to exposure blending different frames together is what we in the HDR photography world call “ghosting” – which is caused by objects that move within your frame between shots.
A tripod helps to stabilize your camera to prevent it from moving in-between frames, but that’s not always possible. Even the most stable tripod can still be subject to “micro-movements”, such as a strong gust of wind or the earth beneath the tripod shifting (i.e. wet sand on the beach is very unstable).
Any kind of movement will cause your images to not line up properly, which will result in ghosting once those brackets are blended in Photoshop. There are processing techniques you can use to remove ghosting, but that is additional work on your part.
Even when your tripod is absolutely rock-solid, ghosting can still be an issue due to subjects in your frame moving in between exposures. People walking by, grass blowing in the wind, and waves moving through your scene can all cause ghosting as you blend your images together.
These differences between each exposure will register as semi-transparent outlines and will make your image seem low-quality and unpolished.

With a GND filter, you’re only taking one photo – not blending different exposures into one – so ghosting is not an issue.
Using a GND filter is also better for long exposures. If you plan on extending your shutter speed for a dramatic effect, it may be time-consuming to take three (or more) separate images for your exposure blending. With a GND, you’re working with only one image which can be much easier than going through three.
If you’re new to bracketing for landscape photography or otherwise not familiar with how to blend exposures in Photoshop, then a GND filter may be better suited for you as it’s “hand-on” and easier to comprehend the concept.
The Benefits of Exposure Blending over GND Filters
While GND filters can make it easier to photograph a large dynamic range of light, exposure blending in Photoshop will give you higher quality results.
First, exposure blending is much more accurate than using GND fiilters. Even if you’re selecting the right transition strength for your horizon line (soft vs. hard GNDs), there are usually still some elements along this line that won’t look right half-shaded – think of trees or skyscrapers along a flat horizon.
With exposure blending, you can use layer masks to draw exactly where you want to change your exposure. You can move between trees, around rocks, and other structures along your horizon line with ease.
In the image below, I aligned my GND filter along the horizon line. However, the mountains extend well above the line, meaning they are also absorbing the GND effect and are rendered darker.
Since the mountains do not require less light to be exposed properly, they are now underexposed and lost much detail and texture.

However, when I blend two exposure together in Photoshop, I can mask out the sky detail separately from the mountains. You can see below that the results are cleaner, with much more detail in the mountains.
Even if you use the GND filter, sometimes you’ll have to use exposure blending anyways to get the best tonal range and remove lost detail.
A GND reduces the exposure by a fixed amount – and all the scenes we photograph won’t conform to that perfectly. You’ll sometimes find that you may be over/underexposing your scene by a stop or two even with the filter, necessitating the need to bracket your image.
This is especially true for sunsets and sunrises (click here for my guide on how to shoot sunsets). When the sun is in your composition, even the sky itself can have completely different exposure needs that a GND can’t fix. While the sky overall can be exposed perfectly with your chosen GND, the area around the sun can be blown out and lose much detail around its circumference.
This is easily reversible by exposure blending an underexposed image just for the sun area.
That is what I did for my image below, where the sun was much brighter than the surrounding storm clouds. I used two different exposures for the sky alone – one for the entire sky, and another exposure taken with a faster shutter speed to blend in the area around the sun.
If I had not, those dark clouds around the sun wouldn’t be as visible and the entire area would be an overexposed “blob”. And if I was using GND filters alone, this wouldn’t be possible.

GND filters are also “destructive” in the sense that you’re stuck with whatever effect that filter has on your image. If the effect is too dark or bright, there’s no way to alter it since it’s bonded to the actual “negative” itself.
With exposure blending, you’re combining separate photographs together using layer masks…which can be amended at any time.
Yes, you can review the results of your GND filter in the field…but with such a small LCD screen, it can be hard to evaluate your image accurately. This becomes especially difficult with ambient light reflecting off the back of your camera. If your filter is crooked or otherwise misplaced, you most likely won’t catch that until you get home and review your photographs on the computer.
It’s also important to mention that GND filters can become quite costly. You want to invest in a reputable brand, and you’ll need several filters to be prepared for whatever environment that nature presents you with.
What is the difference in quality? Which will give me the “better” photo?
The answer is simple – there is no difference.
If both methods are done correctly, you won’t find a difference in quality between a photo taken with a GND filter and one put together in Photoshop by exposure blending. So the key to a high-quality image is not which method you use, but which method can you execute better than the other?
If you’re happy working on your computer and love Photoshop, you’ll be able to blend exposures with great ease.
However, if Photoshop is intimidating to you or you don’t have a firm grasp on how to blend layers, you’ll easily become frustrated. If that’s the case, then GND filters are probably the better way to go, despite their limitations.
I don’t use GND filters – I exposure blend. That’s not to say one is better than the other, but rather that I enjoy working in the digital darkroom and also like the versatility of using masks to selectively decide where I want to adjust my exposure (this is great when working with an uneven horizon line).
Of course, the downfall to this is potential ghosting – especially if there’s a breeze when I’m photographing. But I’ve learned to work around that, and now teach my exposure blending workflow in The Darkroom for Landscapes program.
The point is, there are obvious pros and cons to each method. Don’t choose the one that works the best according to others, but rather the one that works best FOR YOU. If you’re comfortable with your workflow, you’ll find photography much more enjoyable and successful.
Exposure Blending in Lightroom
In this Lightroom Classic lesson, we’re going to take a comprehensive look at how to blend exposures in Lightroom and create the highest-quality image possible.
The ability to expand the dynamic range of your camera without sacrificing quality will open up so many creative doors for you. “Without sacrificing quality” is the key, and is what sets Lightroom apart from the plethora of other programs out there today.
Exposure blending is not about creating an overcooked, over-saturated image for that instant “wow” factor…It’s about creating a higher-quality photograph by pulling in every bit of detail that you saw in the field. If you understand that concept, you’re already way ahead of the learning curve.
(And if you don’t, watch the video lesson above).
Hope you enjoy this, and remember to grab the video download for later reference.
How Exposure Blending can Improve your Landscape Photographs
Reducing Noise for Astrophotography and the Night Sky
Table of Contents
- Introduction: Why is There Noise in my Night Sky Photographs?
- First, What is Noise?
- ISO is Not the Cause of Noise in Low-Light Photography
- Why a High ISO Gives You More Noise in Daylight
- How to Reduce Noise in Night Sky and Astrophotography
- ISO Variant vs. ISO Invariant Cameras
- Other Methods for Reducing Noise in Milky Way and Astrophotography
- Do I Really Need a Wide Aperture for Astrophotography?
- Does a High ISO Setting Affect Star and Night Sky Color?
- What Lens to Buy for Low-Noise Astrophotography
- Reducing Astrophotography Noise in Photoshop
Night and astrophotography (or any other low-light photography) come with an increased risk of added noise as opposed to photographing under ample daylight. This article explains the true cause for this apparent increase, and some simple steps you can take to improve the quality of your low-light photographs.
Without getting too technical…
Noise becomes more visible when there isn’t enough available light to expose your image properly…whether that be the entire frame or only certain parts of it.
This is why many landscape photographers prefer to “expose to the right” (ETTR), so that any deep shadow in their frame is captured with MORE light…which gives you LESS noise and more detail and color.
Even if the highlights start to blow out a little, your overall detail will be of higher quality since you can recover more from highlights than shadows.
Now when photographing under “normal” light (i.e. ample daylight), this isn’t a concern since your shutter speed can be fast enough where there is adequate available light to expose your shadows properly.
However, when the lights go out…your shutter speed slows down in order to capture more light hitting the sensor. And since you’re photographing VERY deep shadows with little light to render that detail, your shutter speed can be quite long to capture a usable image.
And when the sensor is exposed to light for long periods of time, it heats up….and this increased “activity” makes the noise in your image more apparent.
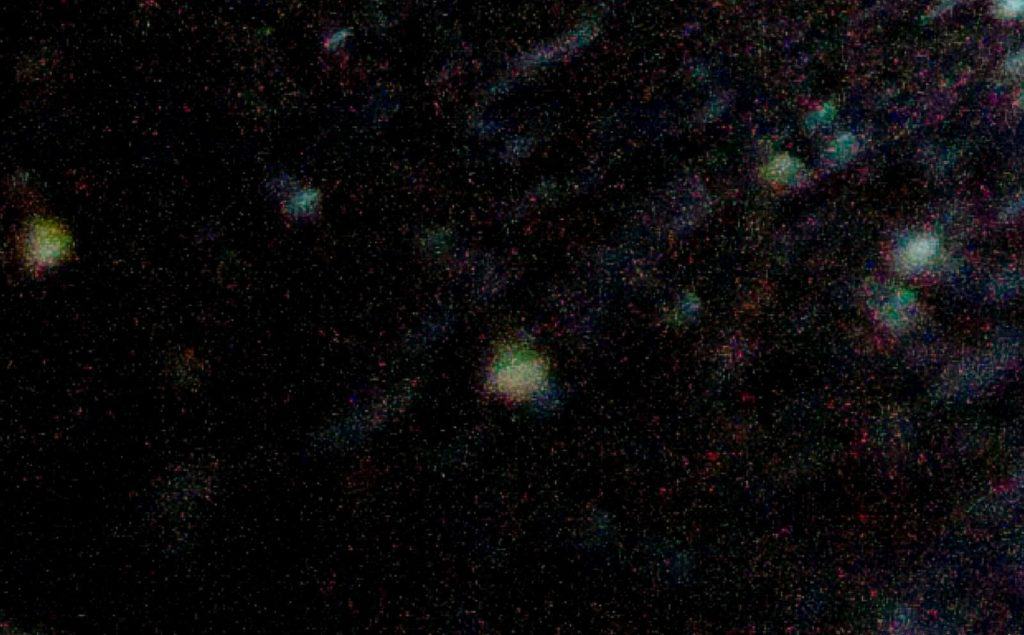
The close-up above shows how much noise is now visible during this long exposure night sky photograph.
So when it comes to night and astrophotography, you’re working in an environment that will introduce a LOT of noise (deep shadows/low light + long shutter speeds).
If you want to reduce the amount of noise in your image, you have two options:
- increase the available light, or
- shorten the shutter speed.
Since we typically have no control over the available light (light painting at night will only affect the immediate foreground), we need to speed up the shutter in order to limit how long the sensor is working…and that is where ISO comes in.
But first, what is noise?
Before we continue, you should read my in-depth tutorial on ISO. There are many misconceptions about (1) how ISO affects noise, (2) the role it plays in the exposure triangle, and (3) your quest to expose your photograph properly…
So unless you’re 100% solid on ISO, please give that tutorial a quick look through.
In a very broad analogy….you can think of noise as static noise, or the “snow” that appears on old television sets when the signal is not strong enough for the set to receive all of the data clearly.
Sometimes, the signal is strong and there’s no visible noise…
And other times, the signal is weak or there is interference that is preventing the television from receiving all of the data. When that happens, static appears…which fills in the missing data. The weaker the signal, the more noise is visible.
When applying this analogy to photography, the “signal” would be the amount of LIGHT – the strength of the detail being received by your sensor (and thus creating your photograph), and the “noise” would be the LACK of available light to render that detail properly for your given settings: shutter speed, aperture, and ISO.
When the light (signal) is low, that noise becomes more apparent…and you have to “tune” your camera settings to compensate and find the right balance for the clearest signal (or balance of light) with the least amount of apparent noise…much like you would with a television antenna.
This is why noise is more apparent in your deeper shadows – the signal, or light, is not strong enough to be clear…so noise will fill in that missing data.
The more available light in the field, the stronger the signal is…which means that you have more leeway with your settings without having to compensate for that distracting noise.
IMPORTANT NOTE: As stated in my beginner’s guide to ISO…increasing your ISO setting does NOT increase the sensor’s sensitivity to light. This is a common misconception that has been widely circulated.
The sensor can not absorb more or less light based on your ISO setting; that’s a static amount and will not change. The only thing you can control is how much light HITS the sensor (the volume of light that enters through the lens).
Instead, when you increase your ISO, you are increasing the brightness of an image artificially. You are NOT allowing more light to hit the sensor, but rather giving it a boost. The trade-off: more noise.
However, contrary to popular belief, the source of this added noise is NOT from increasing your ISO (at least not exclusively).
ISO is NOT the cause of digital noise for low-light photography.
This may be a bit jarring to read, as many think that bumping up your ISO is the actual cause of added noise. In a way, this is correct…but only when working under optimal lighting conditions.
When it comes to night and astrophotography (and extended exposure times), we need to explore the root cause a bit further if you want to find the correct settings for minimal noise.
The real cause is the LACK of available light + a long shutter speed. Yes, the act of increasing your ISO is what makes the noise more apparent since you’re brightening the image artificially… but that’s not the actual SOURCE of your noise.
This difference is especially important to understand for night photography since you will inevitably have areas of deep shadow no matter how long your shutter speed is. If there’s absolutely no light reflecting off of that area, then there’s nothing for the camera to pick up.
The result? Those deep shadows will be VERY noisy when you bring up the brightness in post-processing.
For example, in this image here, the shutter speed was well over 300 seconds due to the lack of available light. It was taken at night, and the moonlight was filtered by a layer of clouds….so there was very little light for the sensor to pick up, no matter how long it was exposed.
Notice how noisy the deeper shadows are (especially in the corners) when looking at the original raw file:
I would have had much better detail if I increased my ISO and sped up the shutter a bit.
So the goal here with low-light photography is to not ALWAYS use the lowest available ISO setting, but rather use your ISO to bring up your shutter speed enough so that you’re not heating up your sensor (and thus amplifying noise).
Correct: More light = less noise.
Incorrect: Low ISO = less noise.
Here’s the takeaway point: You can not apply daylight methods to low-light photography since you do not HAVE to use extended shutter speeds…and thus heat up your sensor and produce noise.
When photographing at night, do NOT keep your ISO at 100. Using 1600 or even 3200 can give you much better results by reducing your exposure time.
So why does increasing ISO for daylight photographs (or when there is ample light) also increase noise?
Here’s the difference.
When you’re photographing during daylight, you are using your ISO to brighten up your imabe so you can (1) use a smaller aperture and/or use a faster shutter speed.
And both those methods actually REDUCE the amount of ambient light that is hitting your sensor.
Going back to the television analogy: you’re weakening the signal coming through.
So when you increase your ISO, your camera needs to balance out the exposure triangle…so it either closes the aperture and/or speeds up the shutter speed.
Both of these adjustments reduce the amount of light entering through the lens…
And as we’ve already learned, less light equates to MORE noise.
Here’s the takeaway point: Increasing your ISO is just a catalyst for more noise. The CAUSE of added noise is the restriction of light.
Brightening the image up by increasing your ISO is just making that added noise more apparent.
At night, however, the conditions are much different…
The goal here is to bring in as much light as possible to properly render the detail…not because you want to increase the shutter speed or use a smaller aperture for creative effects.
Here, you’re simply trying to hit the sensor with more light because you’re already underexposed (by a lot).
And the only way to achieve that is by increasing your ISO…
Which will speed up the shutter and reduce noise caused by heating up your sensor.
You’ll still have noise from the lack of available light, but it will (usually) be much less than if you let the shutter speed dictate your exposure.
How do I reduce noise for night and astrophotography?
Now you know that the goal with removing noise in night photography is NOT to use the lowest ISO setting possible. That’s the most challenging step, since many photographers THINK they’ve taken all of the necessary precautions of reducing noise….without realizing that the low ISO can actually be CAUSING it.
Instead, you need to find a proper balance in your settings to capture enough light to minimize the appearance of noise (tuning in)…and this is based on your camera’s ability to render an image with as little noise as possible given the conditions.
The first step here is to consider your camera body.
Most cameras can be categorized into two different groups: ISO variant and ISO invariant.
Plainly put, ISO invariant cameras handle noise better at lower ISO settings…but that doesn’t mean it’s bad to use an ISO variant camera for night photography. Actually, it can be better! Let’s unpack this a bit.
ISO variant vs. ISO invariant cameras
The level of ISO variance refers to the camera’s ability to process noise – specifically, how the sensor renders an image after it amplifies the light (or the signal) when the ISO is increased.
In other words…
When the light hits the sensor, it needs to amplify that data to make it brighter. At the same time, the sensor needs to translate that data into the raw file – to take the light information captured and change it to a digital format.
That step in the picture-making process is what controls how apparent the noise LOOKS – the visual manifestation of it. And each camera can do this differently.
ISO Varient
An ISO variant camera produces MORE noise at lower ISO settings when photographing in low – light situations. In a very simplified answer…when there is little light (or rather, data) to work with, the camera may not amplify the light enough in order to overcome that digital noise.
There can be a miscommunication during the transformation process, where the camera changes the light information that hit the sensor into that digital photograph.
The result? The light is not strong enough to overpower the appearance of digital noise. And when you increase your ISO during low-light situations, this miscommunication is at its strongest.
Here is where the interesting part comes in, and why an ISO variant camera can be a desired piece of gear for astro and night photographers:
The higher your ISO setting, the LESS problems occur during the translation process because the light is now overpowering the noise…which means that your night image may actually have LESS noise at HIGH ISO settings.
And this completely throws out what we’ve been taught about ISO.
It gets better. As we’ve already learned, extended exposure times will increase noise…
So by increasing your ISO with an ISO variant camera, you are ALSO shortening the exposure time (and thus reducing noise).
Combine this with the fact that higher ISO settings will produce less noise, and you’ve got an optimal environment for producing high-quality night photographs.
This goes to show you that the “rules” of photography are not always set in stone (even the most tried and true ones)….and it will always depend on your unique situation.
ISO Invariant
As the name implies, an ISO invariant camera tends to have a more constant “translation” rate across the spectrum of ISO settings. The amount of noise that comes out at ISO 100 will be relatively close to what you see at ISO 6400.
Whether this is more or less than an ISO variant camera at ISO 6400 will depend on the cameras you are comparing….so it all comes down to performing your own ISO tests (or researching the results of others).
The goal here is knowing that there is a difference between ISO variant and invariant cameras, and sometimes, the ISO invariant cameras may perform better.
Here’s the takeaway point: camera bodies do not perform similarly at the same ISO setting – some will produce more or less noise for a given situation.
And some cameras will actually perform BETTER at night when using a high ISO.
Also note that a camera that has been said to perform badly with ISO might be adequate for night photography…as long as it is an ISO variant model.
Remember: it is not always about picking the RIGHT camera (or any piece of gear). It’s about understanding the unique strengths and weaknesses, and leveraging those strengths to create the image you want.
Whether your camera is ISO variant or invariant, you can still create a fantastic night photograph. It’s all about (1) understanding the gear you’ve got and (2) knowing how to work with it, not against it.
Frequently Asked Questions…
How do you reduce existing noise in Milky Way and night sky pictures?
As mentioned above, the best way is to reduce noise is to create an environment where noise is the least apparent. This is the ultimate goal.
You can always reverse noise in processing, but this will result in softer detail…so it’s always better to eliminate noise at the source. While this can be a difficult task when photographing at night, it’s not impossible.
So the goal here is to increase the amount of light that hits the sensor, which will reduce the exposure time needed to capture enough useable detail…
Which, in turn, will help to prevent your sensor from heating up due to the long exposure environment.
Taking proactive steps like this to reduce your exposure time will make a significant difference in noise visibility and overall image quality.
The first step is to understand how ISO affects the appearance of noise. All images have noise, so the goal here is to minimize how obvious it is.
Generally, you’ll want a very fast, wide-angle lens. Wide angles not only allow you to capture more of your environment, but they are better at low-light performance….which means less native noise.
Personally, I would recommend 24mm, but no wider on a full-frame sensor.
Sidenote: A full-frame sensor will greatly reduce the appearance of noise. The smaller the sensor, the more apparent noise will be. This is explained in more detail here.
There is a common misconception that “the wider, the better” when it comes to night and astrophotography, but that comes at a great cost: loss of detail. Ultra wide-angle lenses (wider than 24mm) tend to have aberration, loss of sharpness (especially in the corners), and other side-effects that all chip away at image quality.
And ideally, you want a VERY strong image in-camera in order to give you enough leeway when you bring it into Lightroom or Photoshop.
Do I really need a fast (wide) aperture for astrophotography?
In short, yes!
Another reason why you should not go ultra-wide with your focal length is that it’s difficult to find lenses with an aperture wider than f/2.8 (and if you do find one, it will be incredibly expensive). You need that wide aperture to collect more light and thus reduce noise and other degradations in image quality.
There is a BIG increase in the amount of light let in by an aperture set at f/1.8 vs. f/2.8 when it comes to low-light photography, and this seemingly small jump can be the deciding factor between an average shot and an extraordinary astrophotograph that is full of color and detail.
If you need to brush up on how aperture affects shutter speed, you can read up on that here.
Remember: increasing ISO only amplifies light artificially…it does NOT make the sensor absorb more light. The trade-off for this light “boost” is that the existing noise in your image is now more apparent. Specifically, the dynamic range of your image has been reduced. So when it comes to night photography, you need to pull in as much light as possible to get a high-quality image.
My 24mm f/1.4 lens has given me excellent night sky images, and is my all-around favorite landscape photography lens. I am also a big fan of the Zeiss line.
If you want to greatly improve the color and detail of your night sky photographs (as well as reduce noise), I would recommend investing in a 24mm lens capable of f/1.8 (or wider).
Even if you don’t require f/1.8 to get a usable image, it’s still a good idea to have a lens with that capability in order to improve corner sharpness and vignetting, aberration, and overall image quality. When working with wide-angle lenses, these side-effects are most apparent when your aperture is set to the widest setting…so an f/1.8 lens set at f/4 will give you a significantly better image than an f/4 lens can.
Does a high ISO setting affect star and night sky color?
Another reason why you should consider a faster lens for astrophotography is to maintain color purity. If you increase your ISO above 2000 (give or take), you increase the risk of removing the color from your stars….and instead, will just have hot, white pixels.
As explained in my ISO article, increasing your ISO does NOT increase the “sensitivity” of your sensor to light. Your sensor’s ability to absorb light is static. Instead, raising your ISO will artificially increase the brightness in exchange for image quality (i.e. more noise).
Specifically, your dynamic range will be condensed, and this loss of information will result in clipped highlights…
And when your highlights are clipped, you also lose any color information…
And since stars are highlights, this means that the majority of your stars will be white and you’ll lose that vibrant night-sky color in the surrounding detail. If your night sky color seems dull and bland and your stars are all a bright white, a high ISO setting may be the cause.
A faster lens will allow you to let more light hit the sensor, thus let you lower the ISO.
Which lens should I buy for low-noise astrophotography?
Investing in higher-quality glass can greatly reduce the appearance of noise compared to budget lenses. However, the specific lens you choose will entirely depend on your unique goals in astrophotography. There are dozens of high-end choices (and hundreds of in-depth reviews), but the one you choose will have to tick all of your boxes.
If you’re just starting out in night sky or astrophotography, then I suggest NOT investing in an expensive lens because “you don’t know what you don’t know”. Wait until you get comfortable with the technique and figure out your unique likes, dislikes, and goals.
As an aside…investing in a proper star tracker will (most likely) give you a higher-quality image than any new lens. Alternatively, you can stack exposures to reduce noise and sharpen up detail.
That being said, I think the Zeiss line offers a great balance between price and quality.
How do I reduce astrophotography noise in Photoshop?
While there are plenty of programs out there that do an excellent job of reducing noise for the night sky, the goal is to do so without affecting the stars…which can be a challenge.
When it comes to noise reduction, Photoshop will always provide the best results simply because there are so many tools and techniques at your disposal that you can leverage to address the specific requirements of your image. Specifically, the ability to mask out the noise removal and protect the integrity of your stars.
However, unless you are comfortable with layers and masks (specifically, luminosity masks) you may not have the ability to use the program effectively…which makes it useless for reducing noise in astrophotography.
I’ve put together a free Photoshop video course that walks you through everything you need to know about layers, masks, and luminosity masks…made just for photographers. You can download that right here.
An excellent alternative is Topaz Labs DeNoise, which I find particularly powerful for astrophotography. Yes, the quality will still be better in Photoshop…but if you’re a Photoshop novice, then you need a program that will actually get you results. The controls are simple and straightforward with Topaz, and the quality is quite good for most images.
The Practical Use of the Exposure Triangle
If you are just stepping into the realm of landscape photography, you’ve probably heard the term “exposure triangle” come up in conversation. In its simplest form, this refers to the co-dependent relationship between your three manual camera settings (aperture, shutter speed, and ISO), which control how your photograph is created…specifically, the amount of light needed to expose your photograph properly.
While the graph below may seem a bit overwhelming, it’s actually quite simple once you understand your three manual settings individually. Before moving on to the exposure triangle, make sure that you have a basic understanding of how aperture, shutter speed, and ISO control how light is rendered by your sensor.
Now, if there is one thing you could do right now to make a monumental advancement in your skills as a photographer, it’s to understand the basic principle of the exposure triangle..which is how your camera settings influence one another.
This knowledge will directly enhance your ability to create the photograph you want…and free up much time in the field guessing which settings will unlock your desired image.
What is the Exposure Triangle, Exactly?
The first thing to understand is that the exposure triangle isn’t an actual “tool” you use in the field; it’s a visual aid to help you understand a concept…and that concept is how these three variable settings influence one another when one is changed.
Each side of the exposure “triangle” represents the three camera settings that control your exposure: aperture, shutter speed, and ISO. The goal here is to balance these three settings harmoniously in order to properly expose the scene in front of you based on the amount of available light.
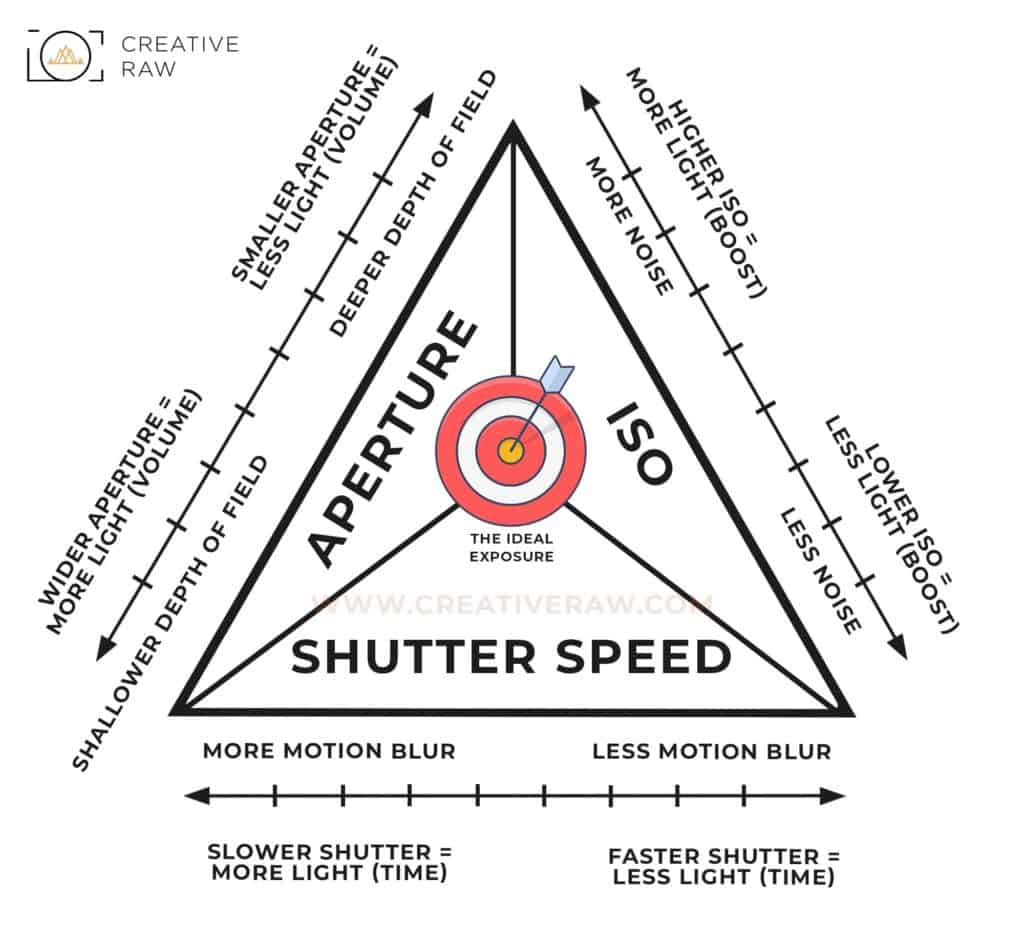
In other words…the aperture, shutter speed, and ISO need to work TOGETHER to get your photograph in the “bulls-eye” zone, which represents the correct amount of light needed for adequate exposure.
This “zone” has some leeway depending on the dynamic range of your scene (how bright and dark the tones are) and the dynamic range of your sensor…but generally, this bulls-eye zone is pretty limited.
As you can see from the chart, adjusting any one of the three manual settings for a specific creative effect will have consequences. For example, if you increase your f/stop to make your aperture smaller for a deeper depth of field, the volume of light entering the lens will be less…resulting in a darker photograph.
So these consequences need to be counterbalanced by your other two settings in order to maintain the same exposure and maintain the proper balance of light.
If a deeper depth of field results in an underexposed image (less light), then you would need to increase your ISO and/or slow down your shutter speed by the same amount of stops. This will bring more light into the photograph and make up for the light lost by using that smaller aperture.
The point of the exposure triangle is realizing that when you make a change to one of these settings, you will need to adjust your other settings in order to compensate for the new volume, time, and/or boost of light.
There is no hard and fast rule when it comes to the specific settings needed for a properly-exposed photograph. This is why general setting recommendations for a certain type of photograph (i.e. f/8 at 1/2000th for noontime sun) are typically incorrect as there are too many variables at play.
The exposure triangle shows you the need to be flexible to adapt to the light available so that you can make suitable changes.
Heres another example:
Let’s say that the ideal exposure for a given scene is at the settings circled below. I did not label the increments with a specific value since that can vary based on your camera and lens, so feel free to imagine your own specific settings. The idea here is to simply recognize that there is a set range for your aperture, shutter speed, and ISO from lowest to highest.

Now, let’s say I want to increase my shutter speed in order to freeze movement and/or reduce motion blur. According to the chart, the consequence of that is a darker image since the time that the sensor is exposed to light has been reduced.
If you only increased the shutter speed without counter-balancing this reduction of light by widening your aperture and/or increasing your ISO, then this will result in a darker (underexposed) image.
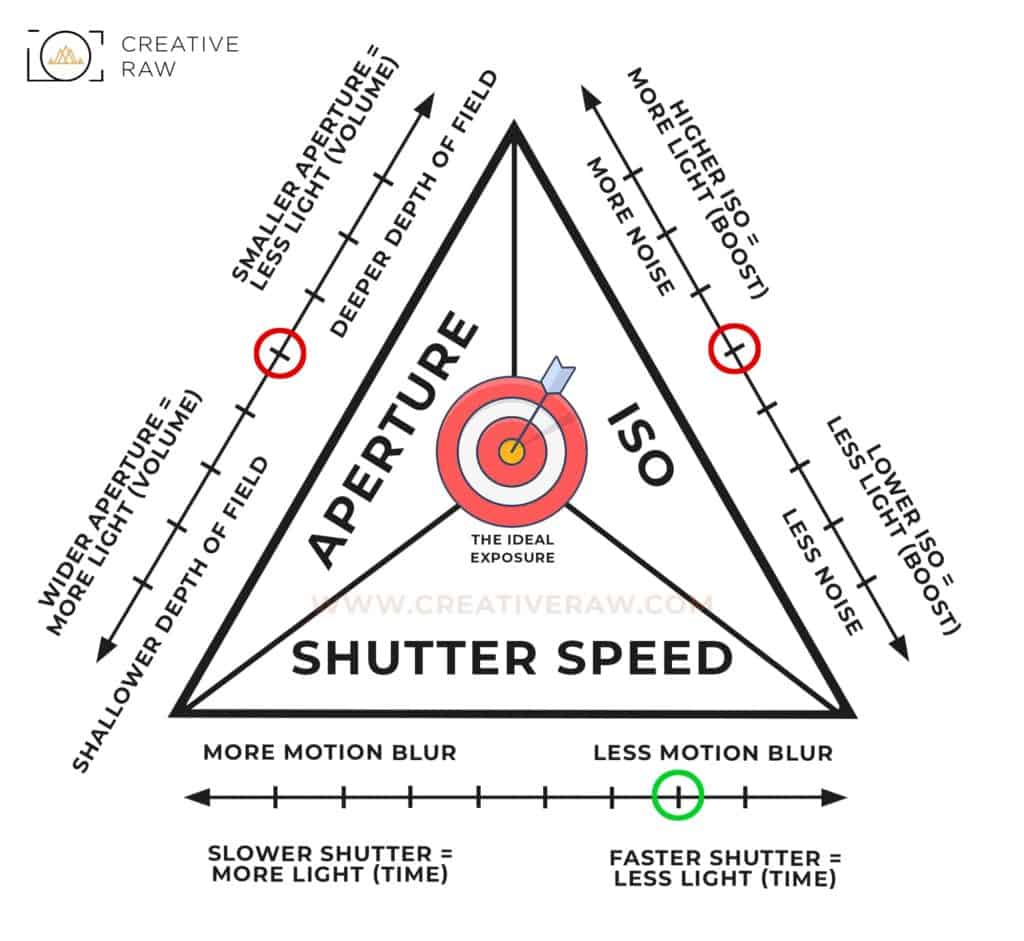
And depending on (1) how much the shutter speed has changed and (2) the dynamic range of light for your environment (whether or not the brightest highlights and darkest shadows are close to being clipped), your exposure may fall outside of the “bulls-eye” zone. That’s what you need to keep in mind when changing your settings in the field.
Using the Exposure Triangle to Balance Light and Content
The exposure triangle is particularly helpful for when you are at the lowest/highest increment for a particular setting (for example, at your fastest shutter speed) and you need to increase/decrease the amount of light beyond that point in order to (1) get your exposure within the bulls-eye and (2) render the content you want.
For example, if you were at the highest (fastest) shutter speed for your particular lens in order to freeze fast-moving action (such as raindrops) but your image was too dark, you would increase your ISO and/or use a wider aperture. This would increase the amount of light so that your photograph is not underexposed, and you can maintain the fastest shutter speed in order to freeze action.
However, you need to keep in mind that the exposure triangle is not JUST about light. As you can see from the chart, adjusting your manual settings will have other consequences (such as motion blur or noise)…and depending on your creative intent, you may need to use a different combination of settings in order to (1) obtain a proper exposure and (2) your desired content.
In the example above, I wanted a fast shutter speed to freeze moving action, so I adjusted my ISO and aperture to increase the amount of light. However, what if I wanted to freeze action AND have a deep depth of field (small aperture)? In this case, I would need to increase my ISO substantially to make up for the reduction of light from both the fast shutter speed AND small aperture opening.
In the end, it’s the same exposure (amount of light)…but the content has changed to reflect my creative choices.
The Fourth Variable: Light!
Light, in essence, is a fourth variable to the exposure triangle as it directly influences your manual settings…and will determine your settings in the exposure triangle. I am not trying to convert it into “exposure square”, but rather bring attention to the fact that any change in light will require a change to one or more of your manual settings.
For example…if your environment becomes brighter, you would need to (1) use a smaller aperture, (2) use a faster shutter speed, and/or (3) decrease your ISO if you want to maintain the same exposure.
Light controls, or fuels, the exposure triangle…and whether or not your image is still within the “bulls-eye” will depend on (1) how much the light has changed and (2) if you properly adjusted your settings to compensate for this change.
The Practical Use of the Exposure Triangle
With modern-day digital photography, the exposure triangle isn’t used to calculate the proper exposure anymore, but rather is about simply understanding that your manual settings are directly influenced by one another…
And that adjustments need to be made in order to (1) achieve the desired change in detail (such as a wide aperture for a shallow depth of field), and (2) maintain the proper exposure (level of light) that’s within the bulls-eye range
Typically, you’ll be using a semi-auto mode (aperture priority or shutter priority), which allows you to have full manual control over one setting, while letting the camera automatically adjust the other to obtain the best exposure based on your metering mode and exposure compensation (if any).
Aperture Priority (A), as the name suggests, allows you to control the size of your aperture opening (and thus your depth of field) but it frees you from changing the shutter speed, which is automatically calculated by the camera.
Whereas, Shutter Priority (S) allows you to control the shutter speed of the lens, while freeing you from the calculation of aperture as you change your shutter speed in order to maintain the same exposure. Since motion blur is (mostly) controlled by this setting, you would use this mode for when you want to freeze or intentionally blur moving subjects.
ISO is then typically adjusted separately as the last resort, when you can not adjust your shutter speed and/or aperture any further…as explained in my guide to ISO.
You would then use the concept of the exposure triangle to make adjustments as needed…until you find a suitable balance between the (1) optimal “bulls-eye” exposure and (2) your creative intent.
Also keep in mind that you can incorporate other methods into your workflow for when you can not settle on an adequate balance. For example, if your image is still too bright for your desired settings, you can add an ND filter to cut down on the amount of light entering through the lens.
And if you’re constrained by the dynamic range of your environment (when there is a large gap between your brightest highlights and darkest shadows), you can always bracket your scene and exposure blend in post process.