Speed Up Your Lightroom Import
Speed Up Your Lightroom Import
Lightroom is known for its easy to use interface and seamless workflow capabilities, but it may not seem that way when you begin your import. The window is a bit intimidating, and those important shortcuts to a smoother import aren’t exactly highlighted with neon signs.
Automation is the KEY to a streamlined workflow in LR. The entire program was designed to automate those redundant tasks you perform over and over, and Lightroom has some fantastic tools for performing those repetitive steps you do at each import.
I’d like to share some tips that I find to streamline my imports so I can get to my images as quickly as possible, while also shaving some time off spent in the Library and Develop module.
And if you have an import question of your own, feel free to leave a comment here or jump over to the creativeRAW Facebook group and ask away!
1. Cull your images during import.
Why import images you know you will NEVER use? It’s habit for most of us to just import the entire memory card and cull them in the Library module, but the import window has a handy grid view for you to use – which makes it easy to decide which images belong in the trash bin.
Don’t spend too much time deciding; that’s what the Library module is for. When culling images during import, only discard those that you KNOW will serve you no purpose: test shots, misfires, duplicates, out of focus, and so on. This is not the place for more subjective decisions like composition, orientation, depth of field, etc.
2. Import from your memory card first.
By importing your images directly from your memory card and onto your computer (or hopefully your external drive) BEFORE jumping into Lightroom, the import will go faster.
Using the Lightroom importing window to simultaneously add your images to the LR catalog AND copy those raw files to another location can take a lot of time, so best to segment this process into two steps so that you can move through the Lightroom importing process a bit quicker….and avoid freezing up.
It also gives you the chance to check that your raw files have been copied over from your memory card properly before deleting them.
3. Develop Presets: They’re not just for color processing.
When we hear the words “Lightroom presets” we typically think of color grading automations named “Mountain Mist” or some other creative technique.
However, presets can do MUCH more than adjust our hues and tones. They’re the key to a super-streamlined workflow, from import to export.
Applying your develop presets right in the import window an save you a LOT of time performing repetitive steps in the Develop module. Think about your own workflow and the adjustments you do over and over again once you jump over to process an image: lens corrections and chromatic aberration are big ones for me.
With the Apply During Import panel, you can assign a specific preset to be applied as you import, saving you the annoying task of applying it later. Also, it’s nice to see your images in the Library module with some basic corrective edits already applied.
Of course, if you need to tweak these adjustments later on, you can always do that too.
Remember: Lightroom is completely non-destructive, which means you can do pretty much anything to your photos and will always have the option to adjust and/or remove your changes without affecting the original raw file.

4. Add Images to a Collection
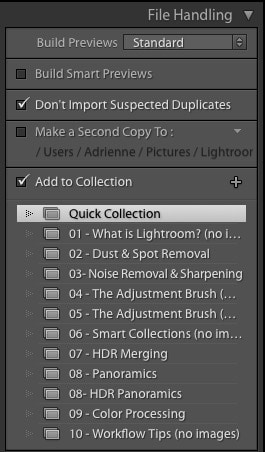
If you use regular collections and know that you are putting all of your images into an existing collection, simply choose it from the dropdown menu under the File Handling panel.
You can also create a new collection from this window by pressing the + sign next to the “Add to Collection” checkbox, saving you yet another step in your organization workflow.
5. Create an Import Preset
After you’re done tailoring your import and it’s time to bring those images into Lightroom, save yourself some future headaches and create an import preset. Lightroom is full of these “hidden” presets where you can automate so many redundant tasks, and I find myself constantly using import presets to automate.
Even if you deter from the exact import workflow here, chances are most of your options will remain the same. When you load an import preset, you can always customize it to your current group of images.
Need to save your raw files to a new location or want to apply a different develop preset? Simply load your standard import preset and just change the options you need to; it’s still much easier and faster than selecting all of your options over again.
If your import workflow is COMPLETELY different this time, just create another preset (you can create as many as you want). Creating these presets as you go along will definitely save you a LOT of time in the future. It has for me.
Like with most things in life, a bit of prep now can save you countless hours of unnecessary work in the future. Lightroom is no exception to this rule; in fact, LR embraces it. You’ll find many of these time-saving features throughout every module, with each one designed to automate those boring tasks that don’t require your unique touch.
Hope these tips help! Still have questions about the Lightroom importing process? Head on over to the creativeRAW Facebook group where you’ll find some very helpful folks (including me) to answer your LR questions.
Not on Facebook? No worries! Simply reply to this post…or if you’re a Lightroom for Landscapes member, comment on a course lesson and I’ll get right back to you.
Thanks for reading!
Chris
