How to Create Crisp Sunstars and Sun Rays
How to Create Crisp Sunstars and Sun Rays
Us landscape photographers have little control over the environment we photograph…so we often rely on our camera skills to create the image we want by manipulating how the scene is rendered. One powerful way to enhance interest and create a compelling focal point is to transform light sources (usually the sun) into a “sunstar”.
Sunstars (sometimes called “starbursts”) refer to when you can literally see rays of light emanating from the sun (like in the image above).
Actually, any light source can potentially become a sunstar…the moon, street lights, and even reflected light, and is a technique often used to add another dimension of interest in night photography since there are so many potential light sources.
Unfortunately, creating a sunstar is not as simple as flipping a switch. Just like most techniques in our craft, there are certain conditions that need to met in order to produce this wonderful effect…both environmental and technical. Even if you’re able to create a sunstar, sometimes the rays are blurry with lots of flare…making it more of an eyesore than an enhancement.
The good news is that it’s quite simple to create a crisp sunstar…you just have to know the proper steps to enhance the clarity, sharpness and “pointiness” of those magical rays of light.
What Causes the Sunstar Effect?
To improve the quality of your sunstars, you need to know how your camera creates them in the first place.
Here’s the short version: the points of light you see are created by the aperture blades in your lens. When photographing light sources that are significantly brighter than the surrounding areas (such as the sun vs. a deep blue sky), the light that passes through where the blades intersect and create an angle will be rendered as a point. This is where diffraction comes into play (how light is altered as it passes through a small opening) and the light spreads out to create these “rays”, giving your light source a sunstar effect.
However, not every lens is created equal…some will produce spectacular sunstars, while others will be soft and weak. So let’s dive a bit deeper as to how your aperture manipulates light.
Since a sunstar is the effect of light diffraction as it passes through where your aperture blades intersect, the shape of your blades control how your sunstar looks…particularly, how sharp the angle is where the aperture blades intersect.
Smaller apertures will produce stronger sunstars since they meet at a sharper angle than wider apertures. When your aperture opens, the blades spread out and create a rounder opening to let more light in….but that means they intersect at a lower angle and will produce softer points of light.
Let’s take a look at the difference:
This image was taken at f/16, which rendered the sunstar quite distinctly despite being partially hidden by the clouds.

Here, my aperture was set to f/1.4, which is far too wide to create those points of light. Even though my focus is set on the foreground, the result would be quite similar here if I pushed the slice of focus to the back.
Using the smallest aperture will not give you the best sunstar though…
Following the above logic, a higher f/stop should give you the pointiest sunstar. However, shooting at f/32 is not a good idea since the light diffraction will degrade the overall quality of your photograph.
Lenses are typically their sharpest between f/8 and f/16…each lens has their own “sweet spot” so you’ll have to do your research and testing. When your f/stop goes outside of this range, the overall sharpness and clarity will drop off. This is more apparent when you use smaller apertures (higher f/stop number) as opposed to wider apertures.
This is when your personal taste and creative freedom comes into play: how sharp do you want your sunstar in exchange for image quality? Is a slightly softer image worth those crispy points?
Your decision here entirely depends on how big of a role the sunstar plays in your overall composition, and also the quality of your lens….but generally, I would not go smaller than f/22 as you’ll lose too much sharpness. Knowing your lens and how it performs at different apertures will greatly help you in setting your limit.
Keep in mind that smaller apertures will prolong your shutter speed, so make sure to use a tripod and follow the typical stabilization workflow to ensure a tack-sharp image. My guide here on stabilizing your camera will show you how.
TIP: When using a tripod, turn any “image stabilization” or “vibration reduction” off – this is only useful when your camera is handheld and can actually do more bad than good if you’re using a tripod.
So now that you know how sunstars are created, let’s go over a few important tips that will greatly improve the clarity and quality of your light.
1. Your Lens Matters – a Lot
Personally, I’m not that big of a gear nut. I only buy a new lens when I absolutely need it to achieve a certain look…and sunstars will definitely benefit from a higher-quality lens.
One way to produce crisper sunstars is to reduce the amount of lens flaring since that will soften detail and wash out color and contrast…which makes your sunstar appear soft and hazy.
Of course, you could remove flares in post-processing, but that still will not give you sharper points of light.
Higher quality lenses tend to have multi-coatings and overall better glass to reduce flaring at the source, which will give you crisper, cleaner sunstars.
The internal components of your lens will also control how many points of light are created.
Each lens has a specific number of aperture blades (typically 5 to 8) which directly correlate to how many spikes of light your image will have.
However, more aperture blades do not necessarily mean more spikes…
As we learned earlier, sunstars are created where the blades intersect (or overlap) as they open and close to control how much light is let into your camera. When you have an even number of aperture blades, the diffraction spikes are directly across from one another and cancel each other out. So a six-blade aperture produces only six points – not very good for a strong sunstar.
However, when you have an odd number of aperture blades, the diffraction points do not line up perfectly and will produce double the number spikes per aperture blade. A 5 blade aperture produces 10 spikes, and a 7 blade aperture will produce 14 spikes.
Let’s look at a few examples:
This lens has an even number of aperture blades (8), so only eight points of light in this sunstar.
This sunstar looks quite different with the additional sun rays. My lens here had a lower amount of aperture blades (7), but since that is an odd number, the diffraction points do not line up perfectly. This translates into 14 sun rays for a more powerful focal point.
Most camera retailers will list the number of aperture blades for each lens so you can make an educated decision before a purchase. You can also do a quick Google search for a particular lens to see what kind of sunstars it will produce.
This was one consideration I had when I bought my new Canon 17-40mm wide angle lens. Aside from its wide-angle capabilities and overall better quality glass, I wanted an odd number of aperture blades to produce sunstars with more diffraction spikes.
The shape of your aperture blades can also affect how your sunstar is rendered. Straight blades will give you sharper sunstars than rounder ones.
This article here compares several popular lenses and goes into more technical detail of the aperture/sunstar relationship.
2. Remove your Filters and Clean your Glass
As light passes through filters and hits the glass of your lens, additional flares and overall softening of the light source can happen…so it’s best to remove any filter (including UV filters) prior to composing your image.
Additionally, a dirty lens and/or sensor can give you a lot of extra flare removal work in Photoshop. This is especially true when working with small apertures, so make sure your glass is smudge free.
3. Compose with Contrast
There’s a reason why sunstars tend to look better at night or during the golden hours: when the contrast is stronger between the bright light source and surrounding detail, the more prominent your sunstar will be the longer your spikes will appear.
If, however, you’re photographing the sun against a bright white-ish sky (or slightly overexposing your frame), your sunstar will appear softer and smaller.
I’ll often photograph during the golden hours when the sun is close to the horizon, so strong sunstars are much easier to create. Deep blue skies will also give you more robust sunstars as opposed to those hazy white summer days.
4. Search for Hard Edges
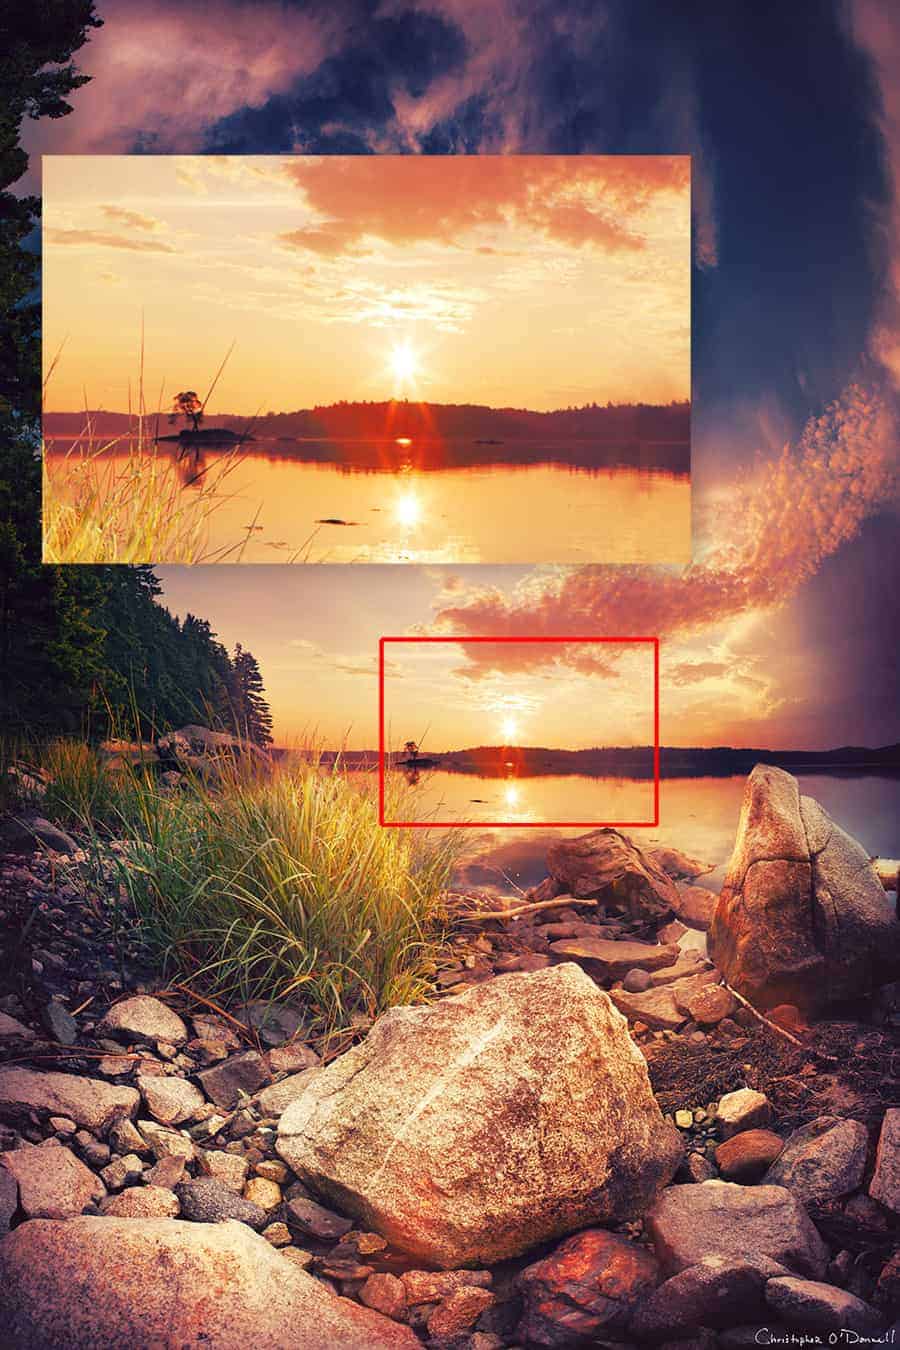
Another way to increase the contrast between your light source and environment (thus producing a crisper sunstar) is to compose around a hard edge…such as a tree, building, or the horizon line. This tends to elongate the rays of light and make the sunstar appear more prominent.
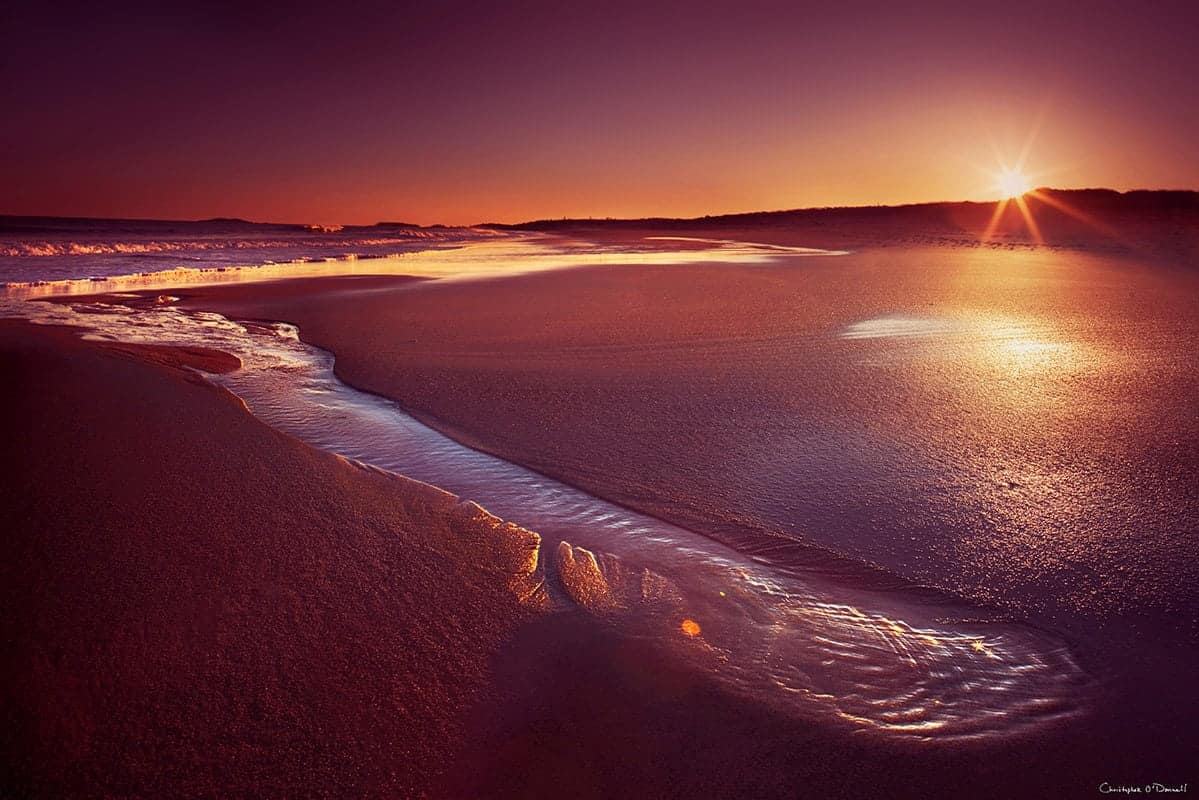
In this image, notice how the sunstar appears much stronger and crisper on the bottom than the top, although the actual sun rays are very similar in size and quality. The contrast against the horizon line helps the sun rays stand out.
You can also use hard edges to control the “weight” of your sunstar, which can often overpower your composition. Light sources are generally very strong focal points that can be difficult to counterbalance…and when you add the interest of a sunstar, they can completely overhwelm the rest of your frame.
I typically use a full-on sunstar when I need to dramatically shift the balance in my composition, like when the sky is completely empty against an interesting foreground (as seen in the image above). This helps to pull some weight towards the top of my frame. However, the sky is not always empty…so we need to think of other ways to reduce the power of a sunstar when needed.
Instead, you can compose your image so that the light source is partially hidden by a tree, horizon, or any other hard edge….which will make it less alluring to the eyes.
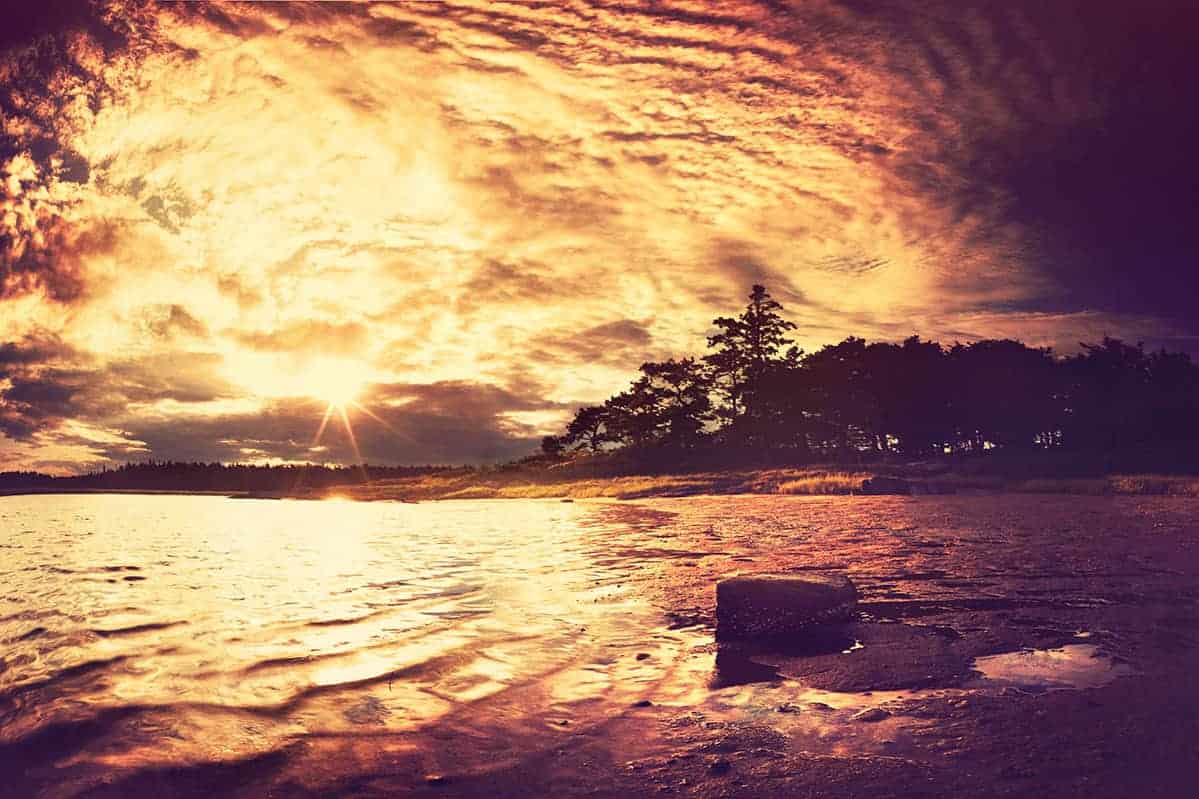
In the image above, I waited until a dark cloud moved in to partially obscure the sun.
You can also use high-contrast edges to elongate rays of light across your frame. When you compose your image so that one side of the sun is against a dark foreground (like trees), the points of light tend to stretch across those darker elements…but in a very soft, complimentary way as opposed to being an eyesore.
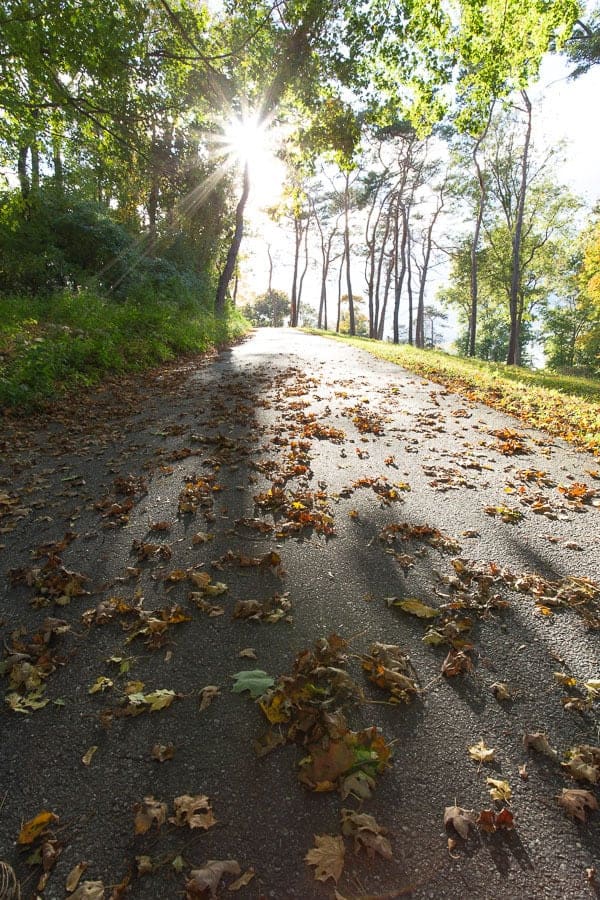
In this image, you can see that the sun is lined up behind a hard edge (the tree). The sun rays on the right-hand side are nearly non-existent because the background sky is quite bright. However, the sun rays on the left side are elongated and soft, which provides some needed interest against the textured foreground. The diffraction points are more prominent on the left side because the light is cascading across a darker background.
5. Widen your Frame for Better Balance
Sunstars are fantastic for when you want to create a strong focal point and greatly enhance the interest…but this can be a dual-edged sword. Oftentimes, the power of a full sunstar can overwhelm pull all of the attention away from the rest of your composition. This is especially true when photographing the sun full on.
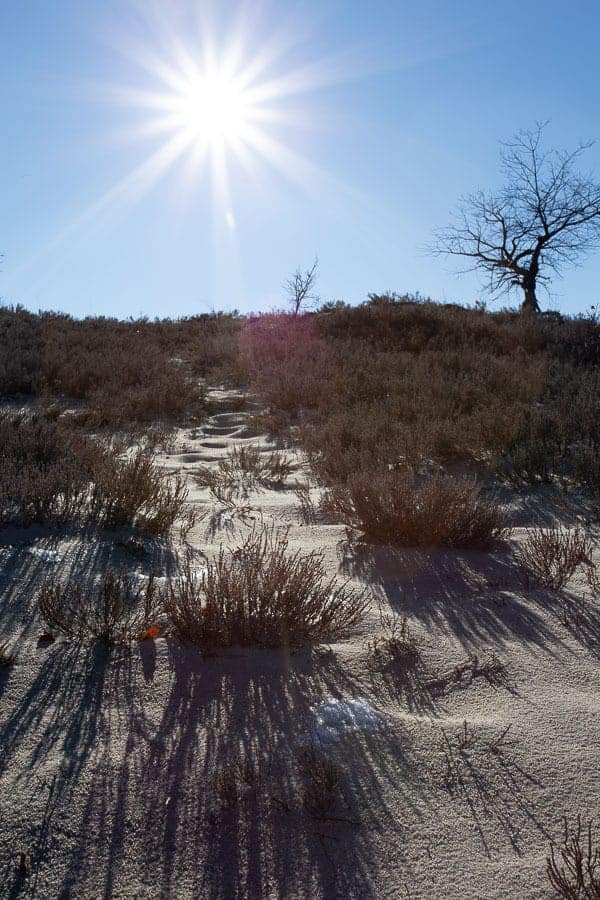
In the image above, the size and strength of the sun star is too great and completely overpowers the rest of the frame, despite the foreground being incredibly busy.
When you can’t partially mask the sun to filter out some of the strength (as seen above), simply widen your frame to render the sun smaller in your overall composition. Your sunstar will still be a prominent focal point, but not as overwhelming.
This will also help to convey depth in the image, especially when photographing multiple light sources (such as a city at night): sunstars in the foreground will be larger than those further in the background.
Wider focal lengths also tend to produce better sunstars; the larger your light source is rendered, the hazier and “broken up” the diffraction points will appear. Smaller light sources tend to give you cleaner and crisper rays of light.
In the image above, the very large sunstar is quite streaky and soft, despite photographing against a nice blue sky and following the above-mentioned tips (i.e. small aperture, high-quality lens, etc.).
However, the photo below has the sun thrown quite a ways in the distance….which resulted in a crisper sunstar (despite a little interference from the slightly hazy sky).
You can use a wider angle lens to exaggerate your distances and make the sun seem further in the distance…but this does not always work for the rest of your composition as it rebalances everything. Instead, what I often do is turn my image into a panorama.. capturing a few frames around my main subject and stitching them together later (like in the image above).
6. Focus Blending for Cleaner Sunstars
Focus blending is a fantastic way to overcome any variations in image sharpness…and is especially beneficial in landscape photography when we often work with wide-angle lenses and deep depths of field. By taking multiple frames of the same scene with the point of focus set on different subjects (usually one frame for the foreground, middle ground, and background), you can ensure that your image is tack-sharp from front to back.
As mentioned earlier…the smaller the f/stop, the sharper and cleaner your sunstar will appear. This often means shooting at f/22, which can also soften your entire frame due to the diffraction of light. With focus blending, you can overcome this compromise by capturing one frame for the sunstar at f/22, and blend that together with another frame set at your “sweet spot” aperture for ultimate sharpness (usually f/8 or f/11).
Just make sure to compensate for the wider aperture by increasing your shutter speed in order to match the exposure for the sunstar.
In my membership courses, I show you exactly how to blend multiple exposures together using luminosity masks…which provide the cleanest (and easiest) results.
8. Photograph Under Clear Skies (if possible)
No matter how small your aperture is, a sunstar can be completely eliminated if there are any atmospheric elements at play…such as fog, humidity, or a thin layer of clouds. The photograph below was taken at f/16, but the thin layer of clouds affected the sunstar considerably.

9. Use Live View (if possible)
It can take a few moments to accurately compose and set your focus on the sun, so it’s best to not look through your viewfinder….make sure to use your camera’s live view function instead. This will also give you a general idea of what your sunstar will look like if you’re using a depth of field preview as well.
Is photographing the sun bad for my sensor?
Many have heard that exposing your sensor to the sun for long periods can burn it out, but that’s not typically an issue in landscape photography. The sun is quite small compared to the rest of your frame (especially when using wide-angle lenses), so it makes little difference.
However, if you use a telephoto lens and fill your entire frame with the sun (such as photographing an eclipse), that can certainly burn out your sensor.
Can I produce sun stars at night?
Absolutely! The sunstar effect is just as popular for night photographers (especially night cityscapes) since there are so many light sources to photograph…and the darker environment makes those points of light even stronger.
Additionally, longer shutter speeds tend to produce crisper, larger rays of light…so night photography is the perfect environment for sunstars and can add much interest to an otherwise boring scene.
Bonus tip: Don’t forget about reflected light sources!
Any light source can produce a sunstar…even reflected light. Macro photographers will often incorporate sunstars in their images by composing at an angle where the sun is reflected by dew drops, producing a sea of mini-sunstars throughout the frame that simply compliments the image rather than being a powerful focal point.
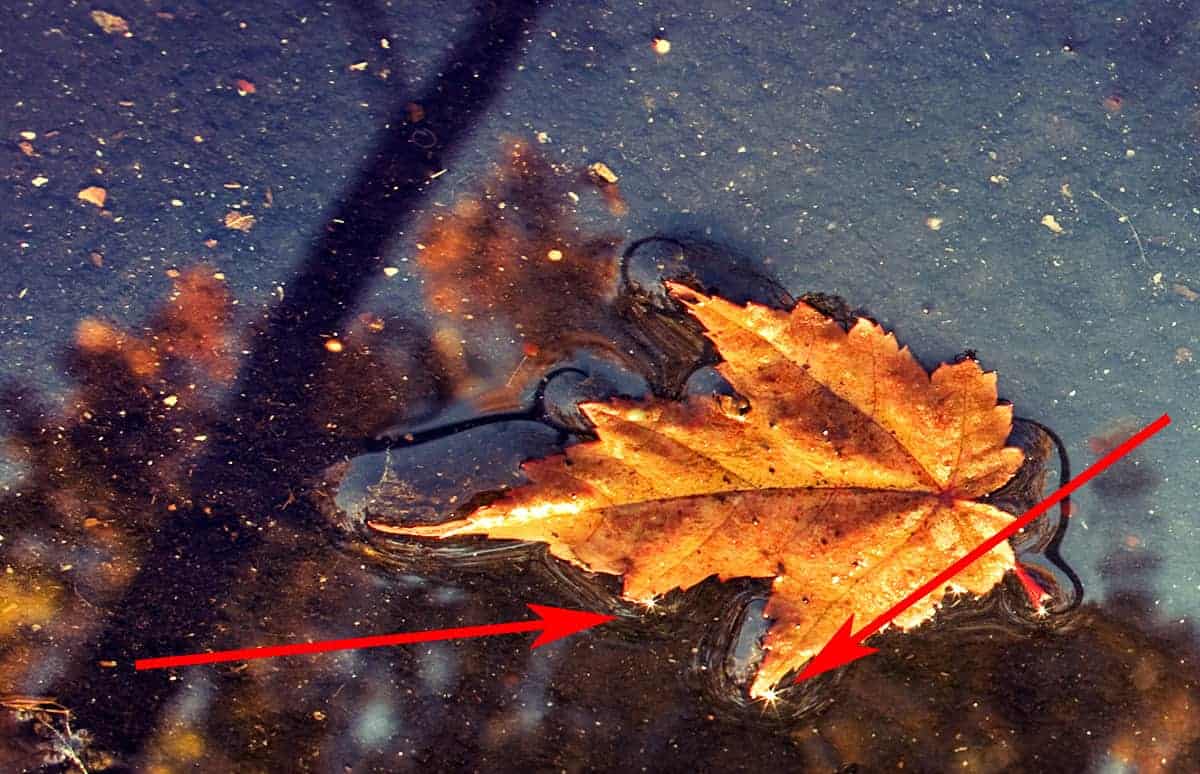
In this image here, the small sunstars reflected in the water are barely noticeable by themselves, but provide some additional interest and enhance the overall atmosphere. This is quite different than the earlier images where the sunstar is typically the most powerful focal point.
Can I create or enhance sun rays in Photoshop?
You bet…but like most techniques in Photoshop, some will produce better results than others. The key to natural-looking sun rays is to use luminosity masks to tailor the result to the tonal value of your image. This prevents the sun rays from washing out your tones and colors and looking like a bad filter. I teach this technique in my membership courses.
Thanks for joining me and if you have any questions, feel free to leave a comment below for me to answer!
The 5DayDeal $10,000 Photography Giveaway is coming up!
It’s almost October, which means the 5DayDeal Complete Photography Bundle is coming up fast! To celebrate, they are pulling out all the stops and running a HUGE photography giveaway where you can win some incredible photo gear and prizes.
In a few weeks, you can throw your name into the hat for a (pretty good) chance of winning. It’s completely free to enter, and absolutely no hoops to jump through.
I’ll let you know when the doors open, so keep an eye out for another email from me…because you only have a few days to enter.