How to Avoid the “HDR Look” when Exposure Blending
How to Avoid the “HDR Look” when Exposure Blending
Exposure blending in Photoshop is a revolutionary processing technique that can transform boring, lackluster landscapes into extraordinary works of art. More importantly, this workflow can overcome the limitations of your camera’s sensor so you can recreate the exact scene you witnessed in the field.
However, exposure blending makes it very easy to overprocess your image if you don’t know what to look out for. There’s a fine line between “overcooked” and natural-looking when it comes to landscape photography, so a delicate balance is needed in order to avoid the dreaded “HDR look”.
No worries! I’m here to help guide you through the murky waters of exposure blending with my best tips for creating exceptional landscape photographs without the over-processed, cartoonish look that HDR photography is unfortunately associated with.
The first topic we’ll cover in this comprehensive tutorial is where the “HDR look” originated…and why exposure blending is incorrectly lumped into the same category. Once I explain why all HDR landscapes are not created equal, I’ll give you some of my best practical tips for avoiding that overcooked look when exposure blending….so you can use this fantastic technique to create extraordinary, natural-looking images that are full of detail….but without the “over processed” appearance.
What is HDR exactly and how does this benefit my landscape photography?
Many photographers are mistaken with their definition of “HDR landscapes”….which can affect how you view and approach your exposure blending. So unless you are 100% certain about what HDR photography is (and isn’t), make sure to give this section a read through.
When HDR (high-dynamic range) first became popular in the digital photography world, the excitement was well justified. Finally, there was a quick and easy solution to a huge problem for photographers: the ability to recover missing detail that your camera sensor could not pick up on.
This was especially celebrated in the landscape photography world since we have very little (if any) control over the natural light. For example…a dramatic sunset scene with intense highlights and shadows was captured with a blown-out sky and blotches of black in the foreground; a lackluster representation due to the limitations of the camera – not the photographer.
This is because the camera’s sensor is not as dynamic as the human eye, which explains why our landscape photos will often misrepresent the beauty we saw in person.
HDR photography was the answer to this overwhelming roadblock!
In the early days of digital photography, the learning curve of proper exposure blending in Photoshop was quite high for the novice digital photographer…and the technique was very tedious. This required a lot of prerequisite Photoshopping knowledge that was difficult to learn….back in the days when online Photoshop classes were few and far between (and usually of low quality).
Remember: this was back in a time where many photographers had not jumped into the world of Photoshop or advanced digital processing, and before helpful panels and actions were available to streamline the HDR workflow.
The was an overwhelming need for a simple and effective method for recovering blown highlights and crushed shadows….and third-party programs like Photomatix cropped up to fill this void.
These programs quickly became the go-to tools for putting that beautiful detail back into a photo….and they were a quick, easy, and fun solution to one of the most challenging aspects of landscape photography – capturing every detail in the highlights and shadows that you saw in the field.
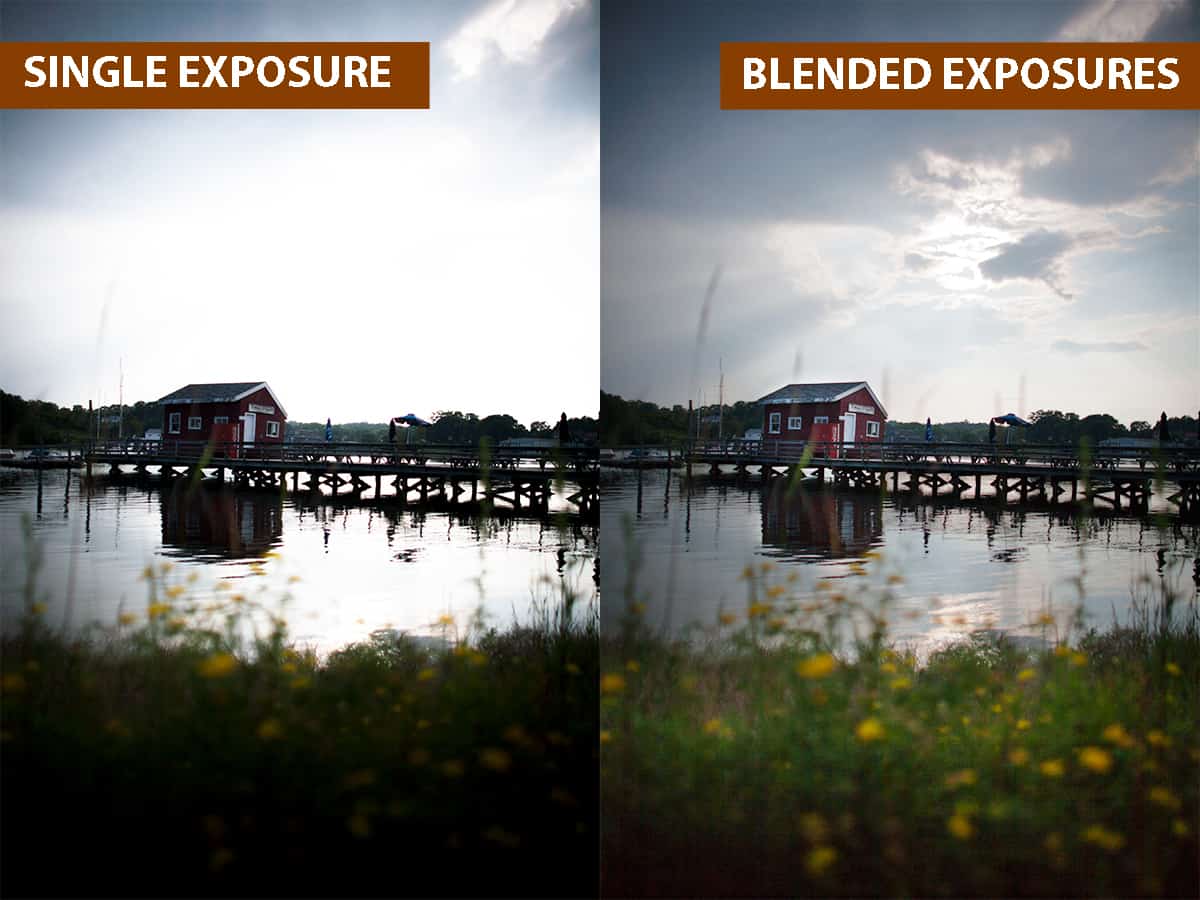
As you can see, the single exposure missed out on some extraordinary sky detail that the blended image was able to recover. It seemed like the best of both worlds…no need to choose between exposing for the highlights or shadows anymore!
Unfortunately….not all blended images look as natural as the example above.
It’s easy to go overboard with a new photography technique, and these simple-to-use programs were no exception. Anyone with a basic understanding of computers was now able to create their own HDR images…and many got caught up in the excitement of how simple it was to overcome the limitations of the camera.
Photographers became so overwhelmed with the initial “wow factor” that they misplaced their sense of aesthetics when creating HDR images with these third-party programs….and oversaturated the internet with high-contrast, grungy, cartoon-like landscape images.
After the novelty wore off…HDR photography became synonymous with overcooked, super saturated, and all around awful-looking photographs.
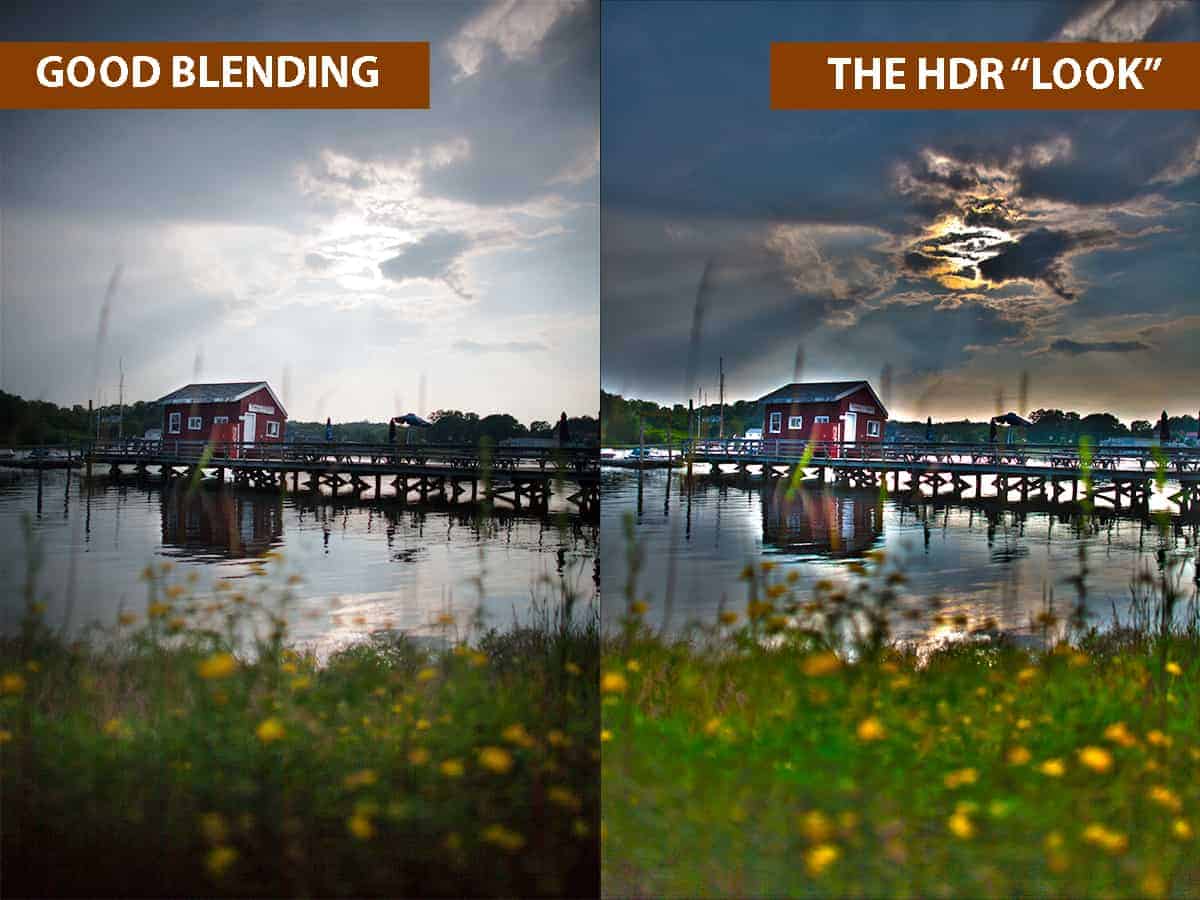
Although many landscape photographers now agree that examples like above are quite horrifying, it’s very hard for HDR photography to shake that negative reputation. Even today, many associate the term “HDR” with the undesirable, overcooked appearance that photographers now run from. It’s now a pariah among the photography community and many avoid this style altogether in fear of their work being labeled an “HDR photo”.
The “HDR look” is one BIG misunderstanding.
Unfortunately, the reputation of the HDR look has deterred many photographers from exploring the fantastic world of (good) HDR processing…and that is a true shame.
What if I told you that the images you see below are both a result of HDR processing?
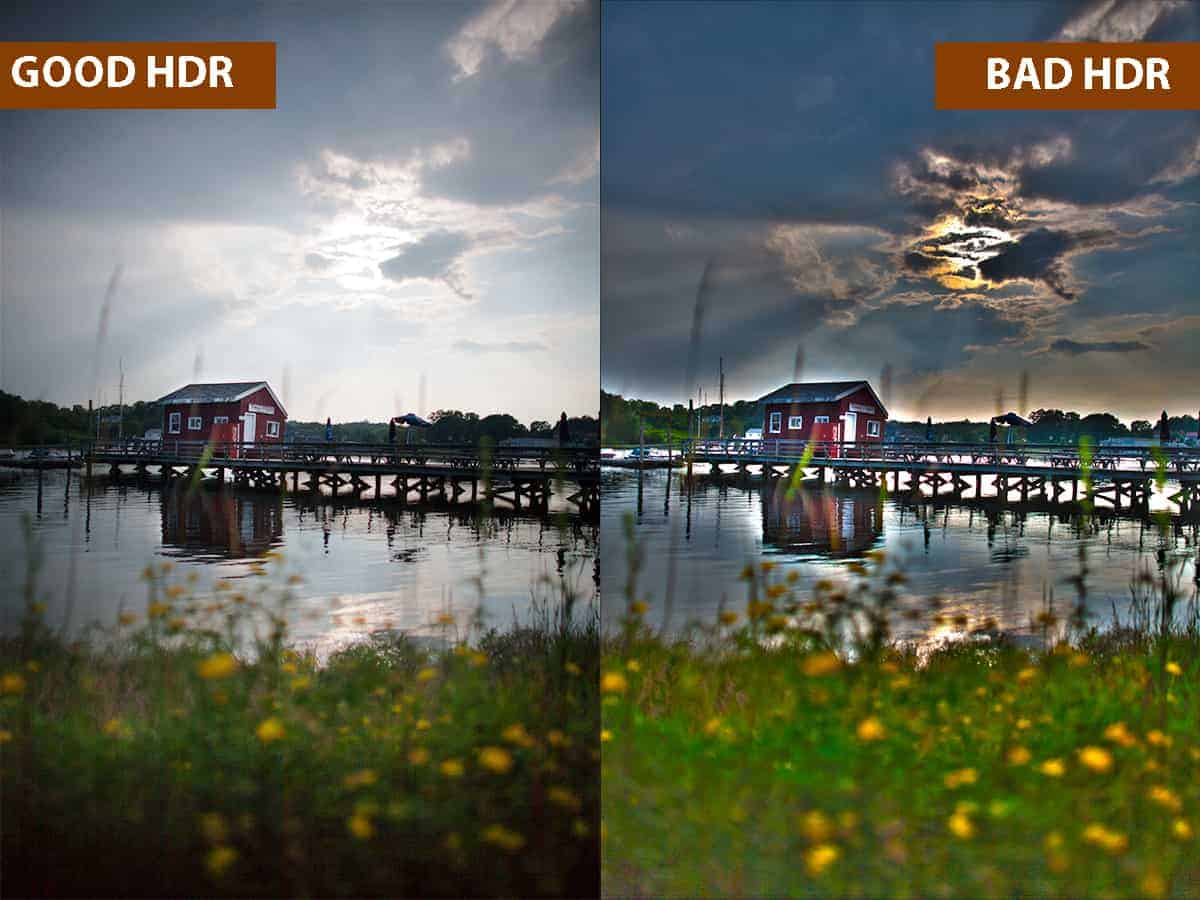
Two entirely different results from using the exact same tool.
I have good news for you! The HDR look is not synonymous with HDR photography, and you can absolutely create stunning, natural-looking landscape photographs by using solid and accurate HDR blending techniques.
I’ve outlined my very best tips for seamless HDR processing below… but first I want to go over the key difference between “good” and “bad” HDR photography so you know what to strive for when processing your landscape photographs.
The two images above are both HDR images…but the workflows used to create them are entirely different.
The image on the right was created by tone-mapping the scene, which uses algorithms to blend in highlights and shadows from multiple exposures and recover detail. There’s a much more technical explanation for tone-mapping, but that is the gist of it.
As you can see in the “bad HDR” image above, it often produces unnatural results….and even the most carefully tone-mapped image will have an artificial look to it, also known as the “HDR look”. This process is what most third-party programs like Photomatix use and why this cartoonish quality to landscape photographs became so popular.
In contrast, the image on the left was created by exposure blending in Photoshop….which uses a completely different workflow to achieve what HDR processing was meant to do: recover any blown highlights and crushed shadows that your camera sensor missed, while retaining a natural appearance that is full of detail and interest.
In other words, to accurately recreate the beauty you photographed in the field and to overcome the limitations of your camera.
Both tone-mapping and exposure blending are categorized as HDR techniques….but obviously, give you two entirely different results.
The additional manual control you have with exposure blending is absolutely phenomenal and is why most professional landscape photographers will choose exposure blending in Photoshop over tone-mapping any day.
So what is HDR photography exactly?
Here’s the confusing part and why some photographers mistakenly lump exposure blending and tone-mapping together in the same category: HDR is not a specific technique, but rather a broader term that covers several different ways to expand the dynamic range of your camera sensor. It is neither good or bad, and the result can be perfectly natural…or completely horrifying.
HDR photography is simply the ability to bring back lost detail by expanding the dynamic range of your camera sensor (hence the term “High-Dynamic Range”).
In other words, the goal of HDR photography is to remove unwanted blown highlights and crushed shadows. It’s nothing more than a broad subject that means you are bringing back detail that your camera sensor could not capture. That’s all HDR means!
“Tone-mapping” and “exposure blending” are two entirely different methods.
But they are often lumped into the same category and are negatively referred to “HDR”, which leaves professionally exposure blended photos with a distasteful reputation.
Many people associate HDR as a whole with tone-mapped images, which is like mistaking fast food for cuisine. Technically it is a correct statement….fast food IS cuisine, but not good cuisine. And even worse, fast food and fine dining share the same “cuisine” category….which is a lot like exposure blending and tone-mapping being part of the same category.

Nowadays, most photographers know that programs like Photomatix will produce overcooked and over processed images, which is really off-putting for landscape photography. It also helps that the learning curve of Photoshop is much less intimidating than it was years ago, with helpful panels and actions that assist with the exposure blending process….and new, innovative Photoshop tools that streamline this workflow. This helps to lower the bar for any landscape photographer to jump right into exposure blending the proper way with a very limited background in Photoshop.
Speaking of exposure blending in Photoshop…I actually show you how to blend this image above in my exposure blending course, which is part of the creativeRAW lifetime membership program. Click here to read more about the Lightroom and Photoshop courses included with membership!
So to sum this up….HDR Photography is not a bad thing then?
Absolutely not! The only bad part about HDR photography is when it is poorly executed…typically from tone-mapping, but any HDR technique can produce cringe-worthy results if done incorrectly.
Here’s the key point to remember: HDR photography techniques are simply tools, not a style. The quality of your HDR image is entirely dependent on your execution and how effective you are at using these tools….and when you use them properly, you can create extraordinary, natural-looking landscape photographs.
Which technique should you use to create HDR photographs? I’ve been through them all and can confidently say that exposure blending in Photoshop is the best technique for creating high-quality HDR landscapes. You can easily create refined, top-quality images that are exploding with detail…and without any of the awful, overcooked side effects that tone-mapped images are known for.
Automated programs like Photomatix make the HDR blending process ridiculously easy but at the price of quality. However, when you blend images together manually in Photoshop, you’re in full creative control over your blending.
This is why exposure blended images are of the highest quality and why professional landscape photographers rely on this technique: you are in total control of the process 100% of the time. No guesswork or hoping that the computer will produce a quality image for you….you are in the driver’s seat of your photography, as you should be.
The good news is that exposure blending in Photoshop is now MUCH easier to do than it was years ago, thanks to some new tools and a more streamlined approach.
Let’s go over some of my best tips for avoiding the “HDR look” when blending exposures in Photoshop so you can produce quality landscape photographs.
One size does not fit all in Photoshop.
Photoshop is (likely) the most versatile photo editing program available today, which is why professional landscape photographers love using it.
This means that there are several outstanding workflows you can choose for exposure blending….and which technique you settle on is entirely dependent on (1) your desired result and (2) the content of your image (i.e. the luminosity value, which areas you want to blend together, how many brackets you have, etc).
In other words, there needs to be a logical reason why you’re using a certain blending technique rather than just randomly selecting one.
I see many photographers get extremely frustrated when a certain blending technique isn’t working the way they had planned. What looks extraordinary on one image can be absolutely awful on another…which leads them to incorrectly believe that either their execution is poor, or the technique is flawed. In reality, the method is most likely just a poor match for your image and your desired result.
There are several different exposure blending methods designed to accommodate certain situations…ranging from the quick and simple to the advanced for complicated blends.
To summarize: one blending technique is not generally better than the others, but rather one technique is usually better than the others for a particular image.
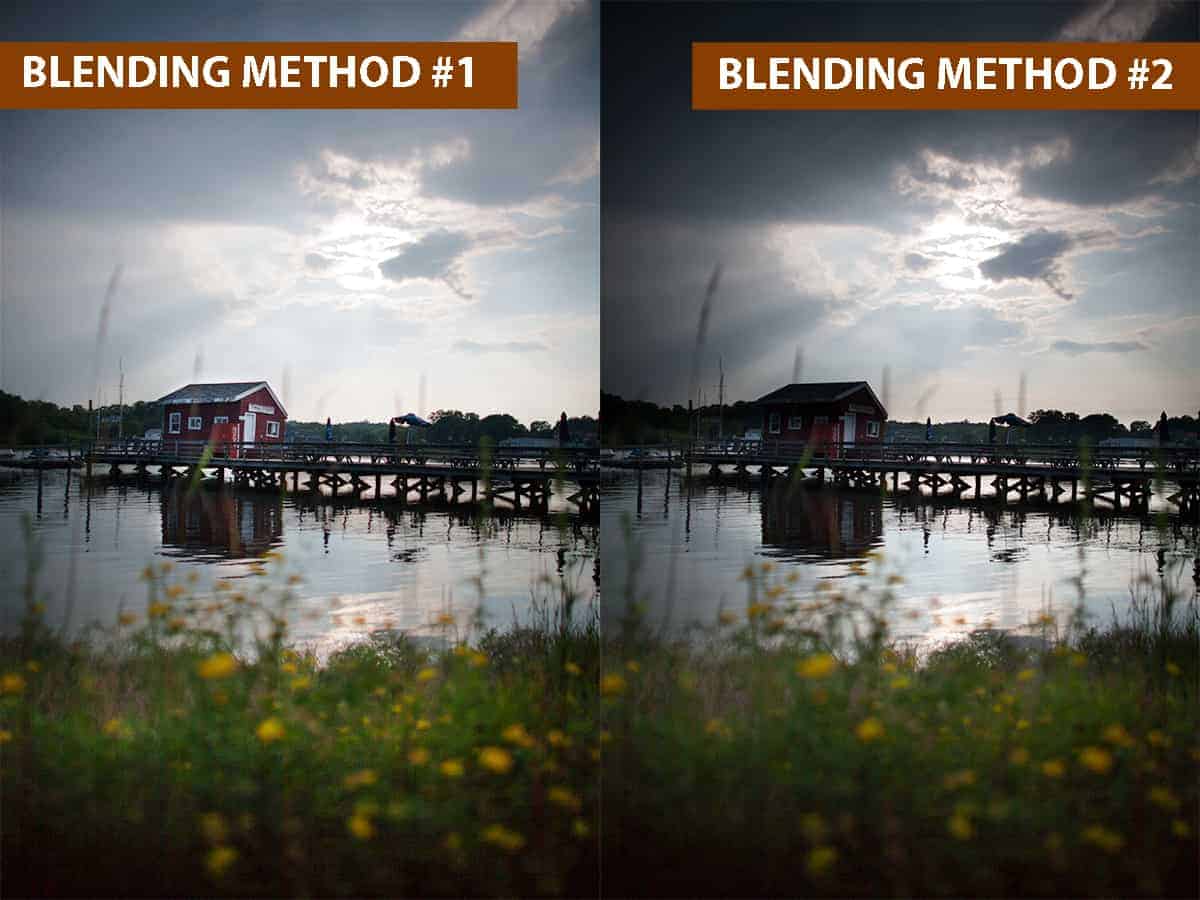
The image on the left was the result of using a technique that was a good match for the photo…while the image on the right shows what happens when you try to blend the same photo using a technique that is not a good match.
You wouldn’t use a power washer to clean your dishes or use a spray bottle to clean your driveway. The same mindset applies with exposure blending – the tool (or exposure blending method) you choose to use will depend on what you are blending and your desired result.
In my exposure blending course, I examine and compare several blending techniques (ranging from simple to advanced) so you can make an educated choice on which method will suit your particular image better.
Tips for avoiding the “HDR Look” when you’re exposure blending.
Now that you have a firm grasp of what HDR photography is and how much this technology can enhance your landscape photographs, let’s go over some of my best tips for avoiding the dreaded “HDR Look” altogether.
1. Adjust your highlights and shadows in a balanced manner.
Exposure blending can be extremely powerful…and much like with tone-mapping, you can get overzealous with your blending and create an unnatural looking image.
The goal of exposure blending is to bring back any missing detail that your sensor missed so you can have the best possible foundation to create your vision on. Sometimes, you can over-correct your highlights and shadows and create an unbalanced image.
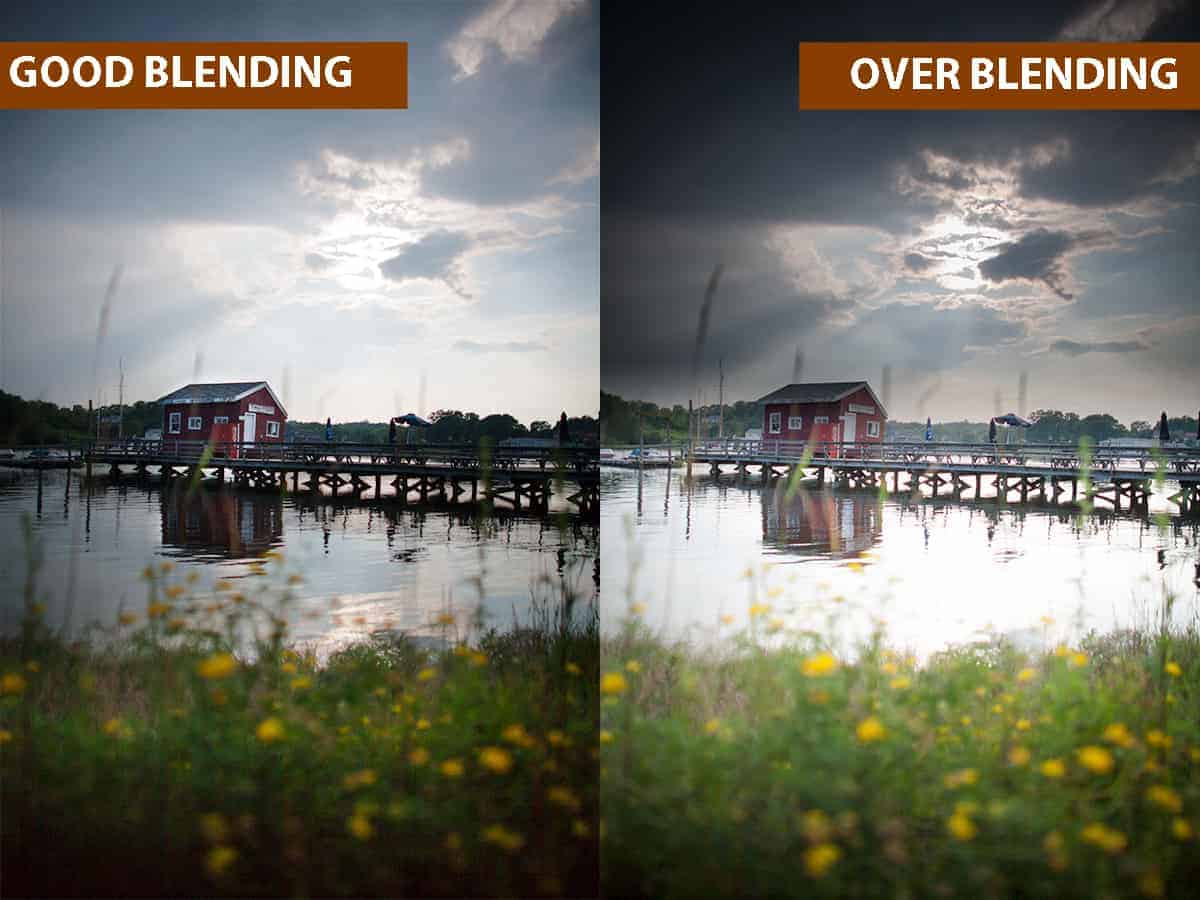
In this example, the highlights in the sky were brought down a tremendous amount to recover the great sky detail of the approaching storm. However, this is unbalanced when compared to the foreground water and ground and looks entirely unnatural. The highlights were brought down too much and shadows were brought up too much….and while technically speaking the image is solid (no crushed shadows or blown highlights), this over-correction is an inversion of light and just screams bad HDR.
2. Watch your contrast
Over correcting your highlights and shadows is not just about creating an unbalanced image (like above). You can also inadvertently remove too much contrast, leaving you with flat tones and an overall uninteresting image.
It’s very easy to get tunnel vision when exposure blending…and get carried away with the desire to eliminate those shadows and highlights, which can remove some stellar contrast that enhances the atmosphere.
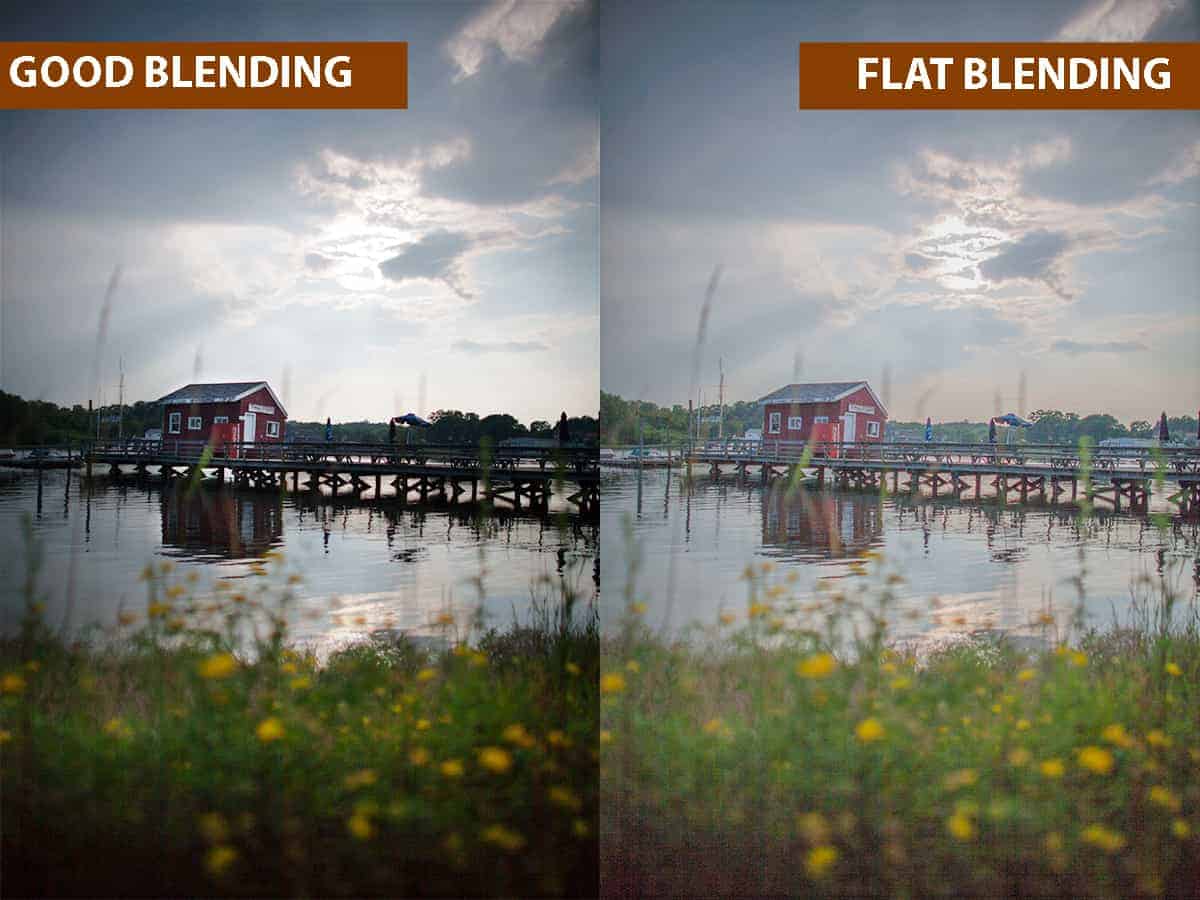
The image on the right is what happens when you take the opposite ends of the histogram (darkest shadows and brightest highlights) and push them towards the center….which results in an image that is flat and not as compelling.
When you compare this to the image on the left, you can see that the darker shadows and brighter highlights give this scene depth and drama.
Exposure blending is simply about recovery…bringing back any lost detail from blown highlights and crushed shadows. It’s not about eliminating them entirely, which will give your landscape a cartoony appearance.
Bonus tip: Water should (almost) always be darker than the sky!
Scientifically speaking….the reflection of a sky is darker because water will absorb some of the light. However, this is often overlooked when exposure blending since we are typically blending along the horizon line….combining a shorter exposure for the sky with a longer one for the foreground. If that foreground includes water (such as lakes, oceans, etc.) then the water (and reflection) will inadvertently be brighter than the blended sky.
I see this ALL the time with HDR landscapes, and this imbalance is a dreaded trademark for the “HDR look”.
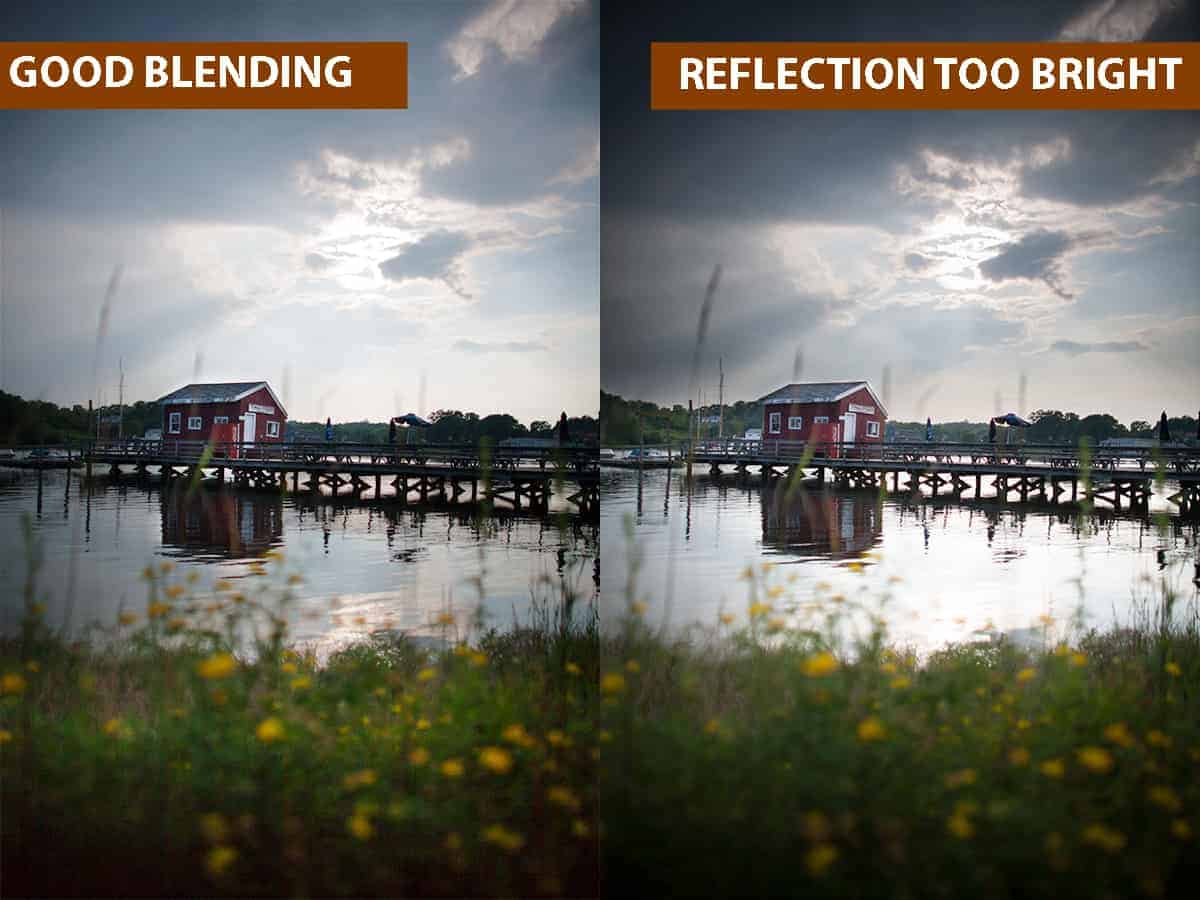
Now there are very rare instances where the water may be of the same luminosity value as the sky – or even brighter, depending on your perspective and where the sun is in relation to your camera.
An easy guideline to follow is to take a look at your original, unblended raw file …is the luminosity value of your sky darker, similar, or brighter than your water? Make sure to keep this balance when blending for a natural-looking result.
3. Scale back on any added saturation.
This is more of a general Photoshop guideline than one exclusive to HDR….but I felt it was important to mention since the “HDR look” typically includes overpowering saturation to the point of surrealism. While this may give your image some added punch, this over-saturation will also introduce color clipping, banding, and noise in the process.
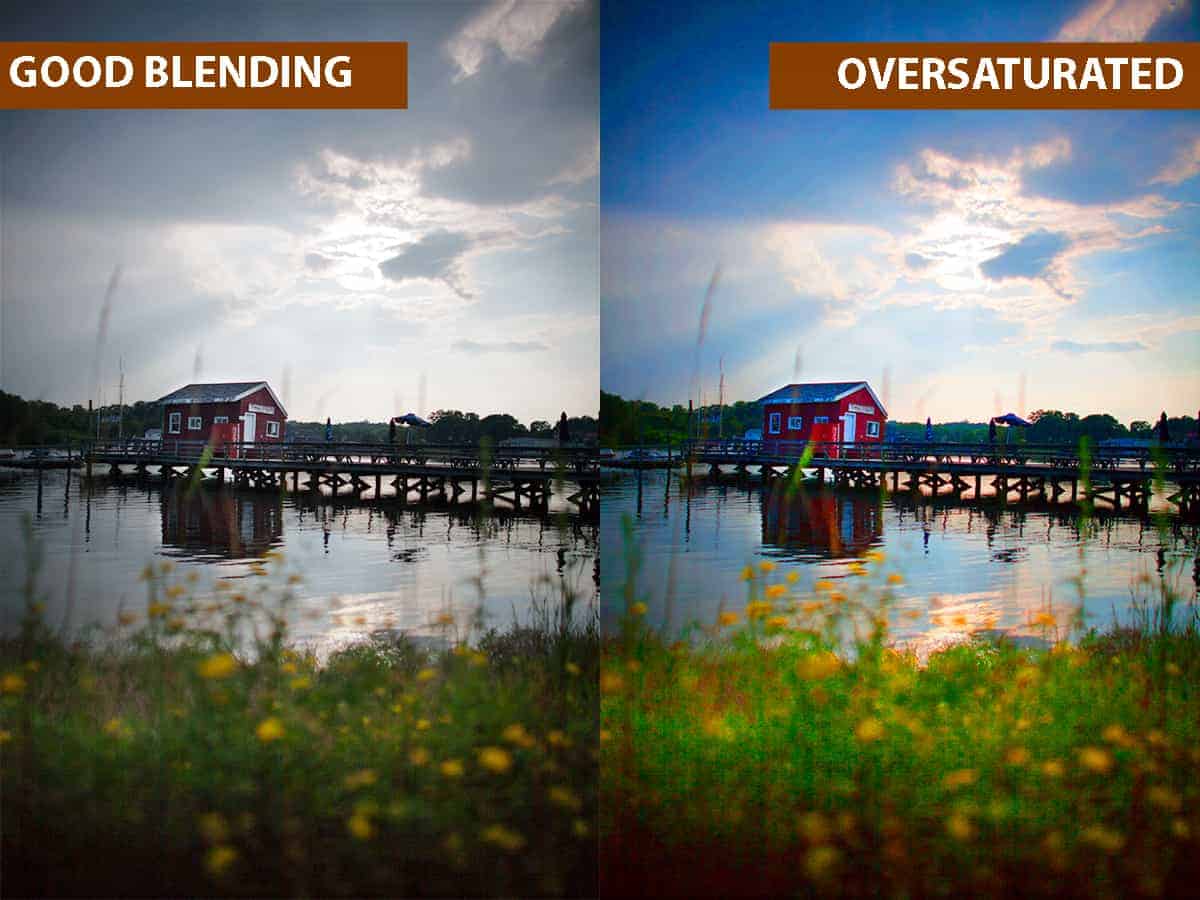
In the image above, you’ll notice some banding in the upper-left corner of the sky, and a dramatic increase in foreground noise…both unwanted and easily-avoidable distractions. Not only does this bring down the image quality, but it contributes to the overcooked look.
4. Avoid the brush tool when blending.
Unless you’re really keen on wasting a lot of time for poor results.
When some photographers bring their brackets into Photoshop for blending, the most obvious way to blend them together would be to use the brush tool and a layer mask. This works well for other creative methods, so why not with blending exposures?
Unfortunately, an unrefined brush tool and exposure blending do not mesh well….it is incredibly difficult to “paint within the lines” of where you want to blend, no matter how careful and deliberate you are with your brushstrokes.
This often results in a very distracting side effect called “halos”…which looks like a bright outline along where you have blended your exposures together.
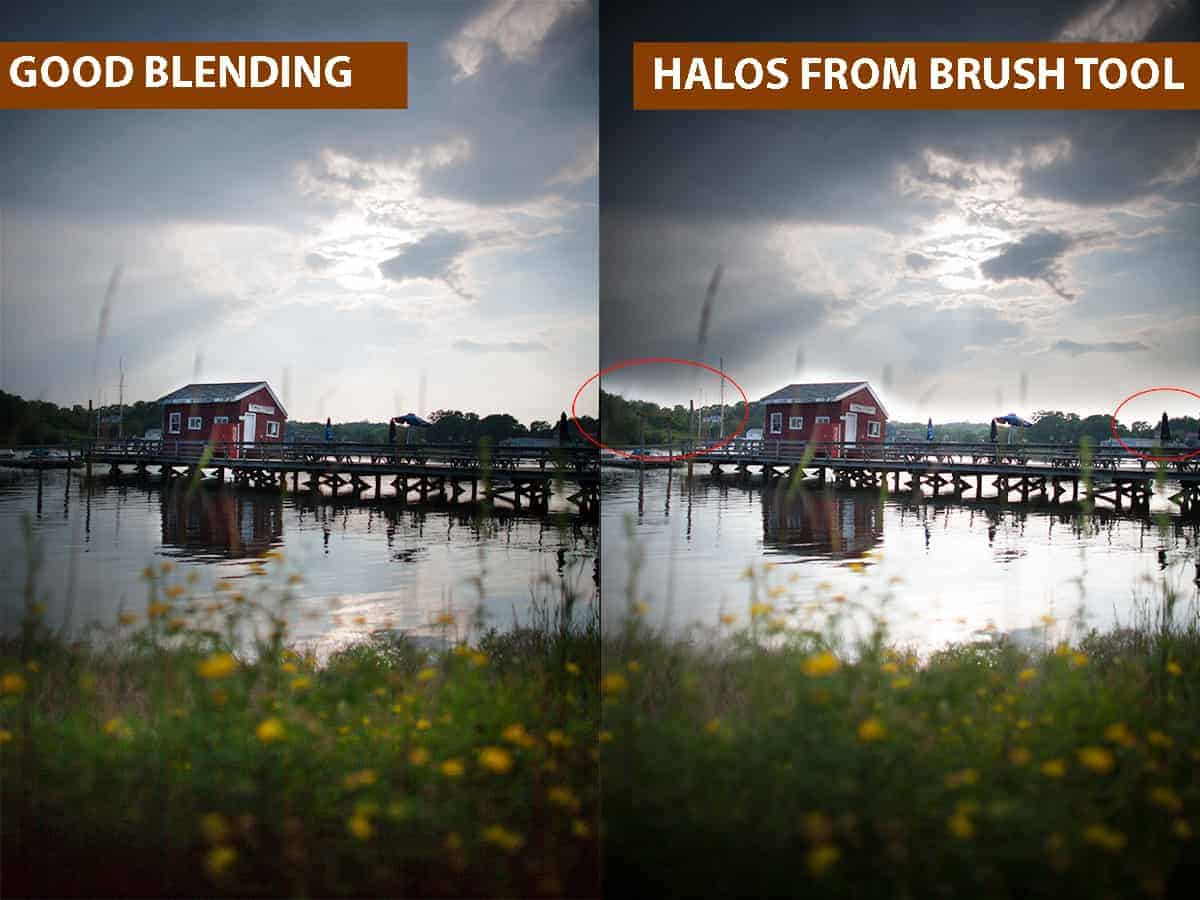
Notice how it seems as though the tree line is glowing where I’ve circled? Those are halos…and not only do they look unnatural and distracting, but are synonymous with the HDR look.
I go over halos (and how to avoid them) in my exposure blending course, but here’s the short and simple: your freehand brushstrokes are not able to paint within the very fine line along the horizon (or wherever you are blending your exposures), and you inadvertently spilled over and blended in a bit of the overexposed sky.
This can also happen in the reverse: instead of your brushstrokes being too broad and spilling over onto the sky, you can mistakenly blend in some of the underexposed foreground for a burnt appearance.
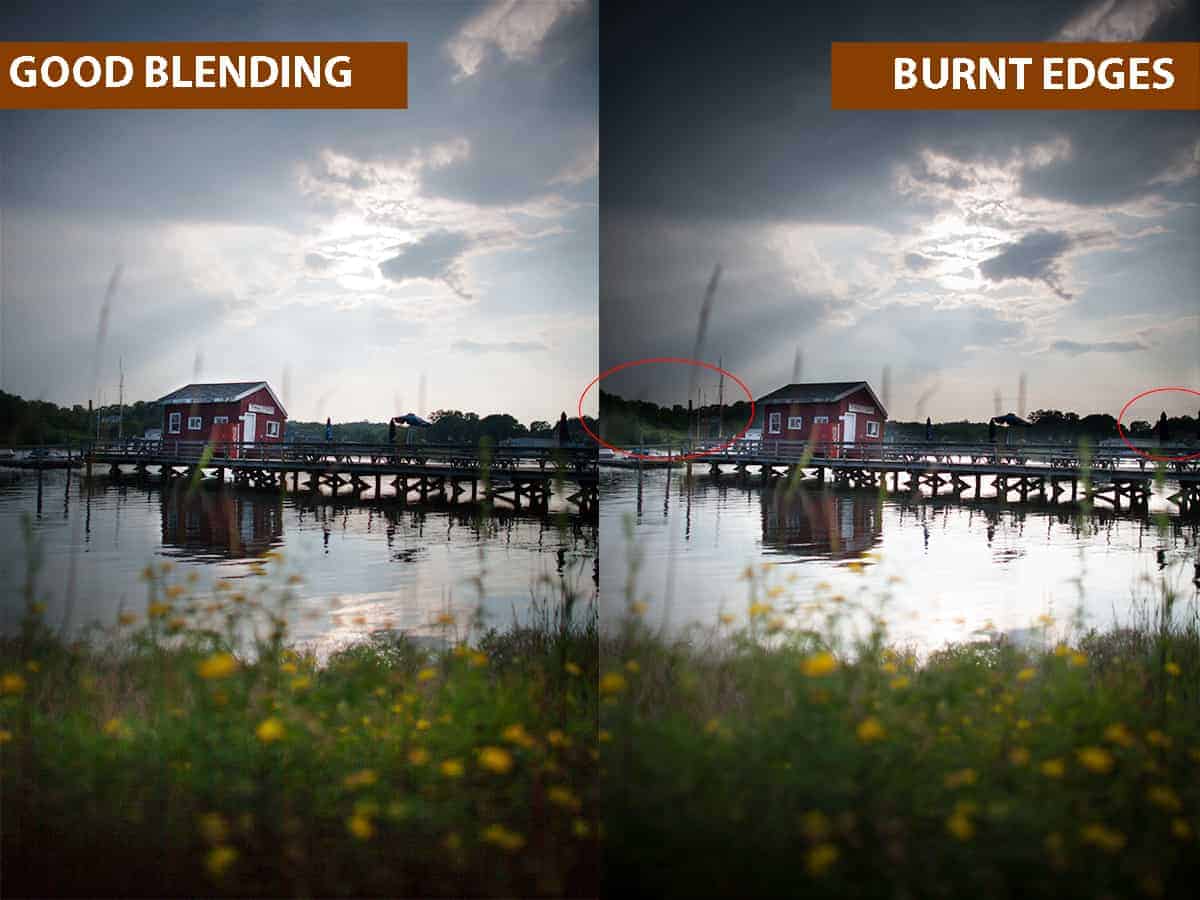
Either way, it’s very difficult to blend in exposures precisely with the brush tool, and the resulting halos or burning is a signature side effect of the HDR look.
What a landscape photographer requires is a stencil that hugs every contour, nook, and cranny of where you want to blend so that you can combine the best parts of your exposures without trying to color within the line. This is near impossible to do without hours of painstaking work for subpar results.
Photoshop is an incredibly powerful program…and has more refined, dynamic tools for blending than what the brush tool has to offer.
Luminosity masks (something I teach you more about in the creativeRAW lifetime membership program) can act as this stencil, and you can literally generate these customized masks with only a few clicks.
In the example above, the image on the left was blended together with a luminosity mask…and as you can see, the results are much, much cleaner than what can be achieved with the brush tool alone.
5. Gradient blending should only be used for flat horizons.
When exposure blending, we are typically blending in a longer exposure (brighter) for the foreground with a shorter exposure (darker) for the sky in an effort to capture the best detail of both highlights and shadows. This means that our transition zone between these exposures is usually located along the horizon line.
One of the easiest ways to exposure blend in Photoshop is to use a simple gradient to create a smooth transition between your brackets. It exactly mimics the effect of a GND filter in the field, and your creative capabilities with a gradient in Photoshop will far outweigh the limitations of a GND filter….which is why many landscape photographers have packed their GND filters away.
However, I see many photographers blending their exposures improperly by dragging their gradient over objects that protrude into the sky…such as trees, buildings, mountains, or anything else that interrupts a flat horizon.
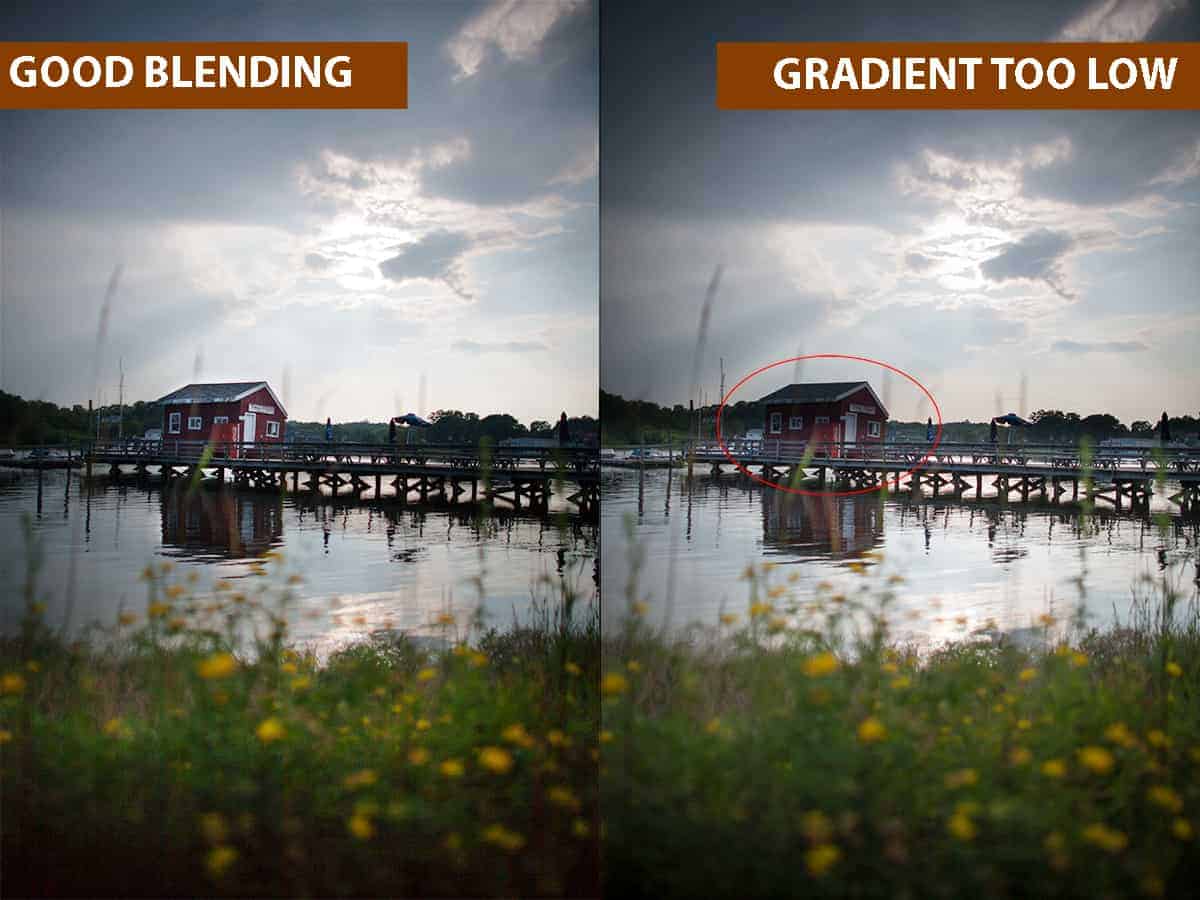
Much like with the brush tool, a gradient can not accurately take the unique contours of your image into consideration. In the example above, you can see that the gradient has been brought down over the fishing shack because the roof is higher than the horizon (the transition line between exposures)….which gives it a burnt appearance.
When you are blending exposures along an uneven line, your results will be much cleaner with a more tailored approach using luminosity masks (as seen with the left image).
The devil is in the details when exposure blending. The more manual control you have over your blending workflow, the better your final image will be.
6. Don’t skip the middle bracket.
The dynamic range of camera sensors have come a very long way since the early days of auto bracketing…but don’t be tempted to skip that middle bracket when you’re in the field!
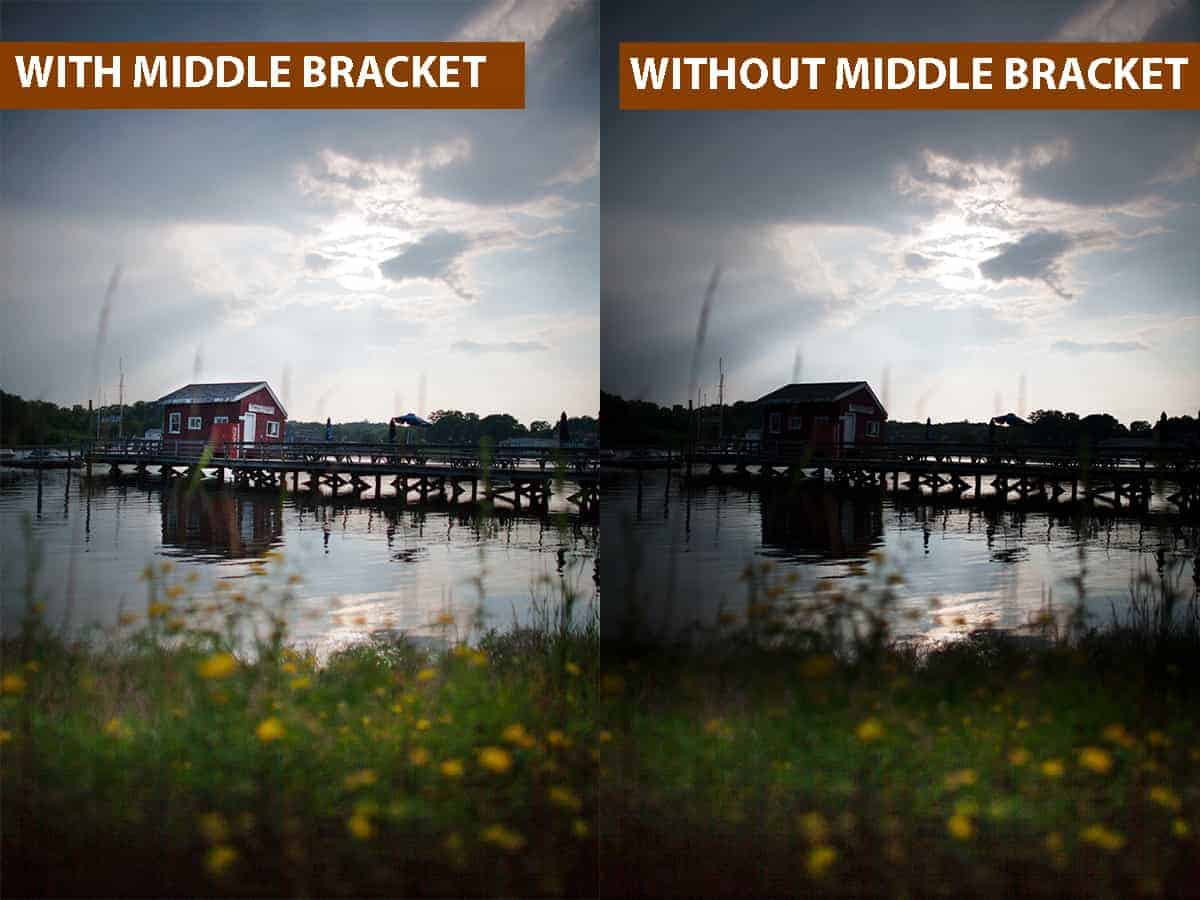
Exposing for only the shadows and the highlights can skip a lot of important detail, especially for high dynamic ranges like this image:
Notice how underexposed the middle ground tree line and cabin are, leaving out some fantastic detail…which also contributes to an unnatural looking image.
However, the photograph on the left shows you how much interest is added when your middle bracket bridges that gap between the brightest and darkest exposures….and creates a much more pleasing final image.
Shorter dynamic ranges can get away with using only two brackets….but always make sure to capture at least three shutter speeds in the field just in case you need that base exposure!
7. Keep an open mind to single raw file blending.
Although I always advocate for blending together genuine brackets (2-3 exposures taken at different shutter speeds) for the highest quality image….there are some important reasons why you would only use a single raw file and create artificial brackets.
For example, if your scene is filled with fast-moving subjects (such as trees blowing in the wind or storm clouds), then it may be extremely difficult for the novice exposure blender to combine these brackets without an overwhelming amount of ghosting. In that case, it makes more sense to take a small drop in image quality (i.e. how much highlights and shadows you can recover accurately) rather than to try and blend an image outside of your Photoshop capabilities.
And this technique gets even more powerful when you combine it with luminosity masks (especially when working with moving subjects)…the results are truly incredible.
8. Blend at the beginning of your workflow.
I can not stress this one enough! Blending before any creative work will save you much frustration, trust me.
Developing a logical processing workflow (creating a roadmap of which techniques you should perform first) is one of the biggest favors you can do for your landscape photography as it will save you a lot of time fumbling around Photoshop….and that workflow should put all of your corrective edits before any creative processing.
Exposure blending at the beginning of your workflow, before any global color and tonal work, will ensure that your final image will look more uniform and your blending seamless.
And finally, the number one way to get better exposure blending results and totally avoid that trademark HDR look…
9. Improve the quality of your brackets!
Seems simple and obvious, right? Unfortunately, many photographers find the fault in their exposure blending results in Photoshop, when the real source of their lackluster images are the brackets themselves.
Like with any aspect of photography, you can’t improve on something that is fundamentally flawed…and that includes the quality of your brackets. If you capture poor exposures in the field, then your blending work will be nothing more than papering over the cracks.
The biggest step you can take to avoid the HDR look and create top-quality landscape photographs is to strengthen your brackets so you can blend on a rock-solid foundation.
Small changes in your field work can make a monumental difference in quality once you bring your brackets into Photoshop.
For example, making sure that your camera mount is sturdy will ensure that your brackets are aligned perfectly…which will give you a sharper final image. There are many factors that can affect the stability of your camera mount, so it’s imperative that you do not overlook this important step.
Another field tip of mine is to ensure that your camera settings are consistent between each bracket, such as aperture and ISO. Otherwise, you’ll have a very difficult time blending your images together.
There are many small, but crucial steps to capturing perfect brackets in the field, which is why I created a free HDR Field guide.
If haven’t grabbed that already, you can download it right here for free.
[fl_builder_insert_layout slug=”hdr-optin”]
This PDF guide will show you how to master HDR field techniques (such as auto bracketing and proper camera stabilization for tack-sharp images) that are necessary for creating extraordinary (yet natural-looking) landscapes.
Final Notes
Photoshop is a powerful program with many hidden gems that can give you outstanding results for very little effort…and is well worth your time if you are serious about improving your landscape photography. Most of the frustration and difficulty with learning Photoshop stems from inadequate and incomplete teaching…not from the program itself. It’s actually a fun, dynamic, and powerful program that any photographer can easily learn!
All you need is a knowledgeable instructor who is ready to steer you in the right direction….and that is why I have created these free articles and mini-courses.
Thanks for reading!
