The Complete Guide to Photoshop Smart Objects for Landscape Photography
The Complete Guide to Photoshop Smart Objects for Landscape Photography
Welcome to the wonderful world of smart objects for Photoshop! In this comprehensive guide, we’re going to turn smart objects inside out and break them down into simple terms. You’ll discover exactly how smart objects protect your image from permanent damage and allow you to maintain a completely non-destructive workflow, and more importantly why this is necessary if you’re serious about image quality.
We’ll also go over several practical uses of smart objects specifically for landscape photography…which will give you more flexibility with your processing and speed up a few redundant steps.
Smart objects are best learned when taught visually, so I’m sharing a video lesson from my membership program. However, a video is not always the most convenient way to learn, so I’m also including the full written tutorial below.
If you’re pressed on time, make sure to download the video lesson so you can watch around your own schedule. Just fill out the form below the video and you’ll be sent a download link.
[fl_builder_insert_layout slug=”smart-objects-optin”]
Special note: In order to understand smart objects fully, you need to be familiar with layers and layer masks. If that’s you, click here to watch my tutorial on layers before continuing on….because smart objects will make much more sense.
Why we use Smart Objects
If you’ve gone through my other tutorials, then you’ve heard me talk about the “non-destructive workflow” and how important that is to maintaining the highest quality image. Each time you change your photo in Photoshop, you chisel a bit of the original quality away. For example, if you punch up the saturation, you’re going to lose a bit of detail (no matter how lightly you increase it). The same thing applies to adding contrast: you’ll start to clip some highlights and shadows at some point.
So in short, you’re exchanging image quality for added visual interest. The goal is to five your photo enough processing leeway so you can create the image you want without the side effect.
This where the non-destructive workflow comes in because it does two important things:
(1) Separates the edits from your original image so there is no permanent damage to your colors or tones.
(2) Maintains full and easy access to the original raw file (your digital negative) so you can easily bring back any detail that was lost through your processing… and/or pull in more detail that has been hidden away in the raw file.
There are a lot of moving parts to the non-destructive workflow, but they all have one thing in common…
You guessed it! Smart objects….which allow you to connect your photo layer to the original raw file when working in Photoshop. This is an amazing benefit, and I can’t wait to show you how this works and why so many photographers swear by them.
When in Lightroom, you’re already in a non-destructive environment because Lightroom is a virtual processor. In other words, the processing you do in the develop module is not permanently bonded to your photo. For example, if you crop your image or add sharpening, you can always go back and easily alter the intensity or remove the change altogether without any consequence.
However, if you do the same kind of processing over in Photoshop, and that layer has not been converted to a smart object…those changes will be permanent.
This can be a huge bottleneck in your workflow as it makes you process in a linear fashion. In other words, it forces you to perform certain techniques before others since you can’t go back and change what you did.
This is where smart objects come in because they provide a protective barrier between the original raw file and the changes that you make to it, and allows you to instantly access the full detail of that raw file if you ever need to make changes in your exposure, white balance, etc.
We’ll get into the details of how that works in a minute, but first I want to make sure you understand how important it is to use a genuine raw file for processing (which smart objects allow for you to do) as opposed to a regular, rasterized layer.
Why it’s Best to use a Raw File vs. a Rasterized Layer in Photoshop
Many are confused as to what exactly happens with their raw file once they open it up in Photoshop, which can lead to some unfortunate side effects…specifically, a lower-quality image. With this in mind, it’s important to first know exactly how Photoshop handles your raw files.
When you open up an original raw file in Photoshop, you’ll automatically jump into Adobe Camera Raw (ACR)…which is Photoshop’s version of a raw viewer and processor. This works just like the Develop module over in Lightroom (actually, Lightroom was based on ACR) and allows you to make authentic raw changes to your image (such as exposure, contrast, etc.) at the highest quality possible.
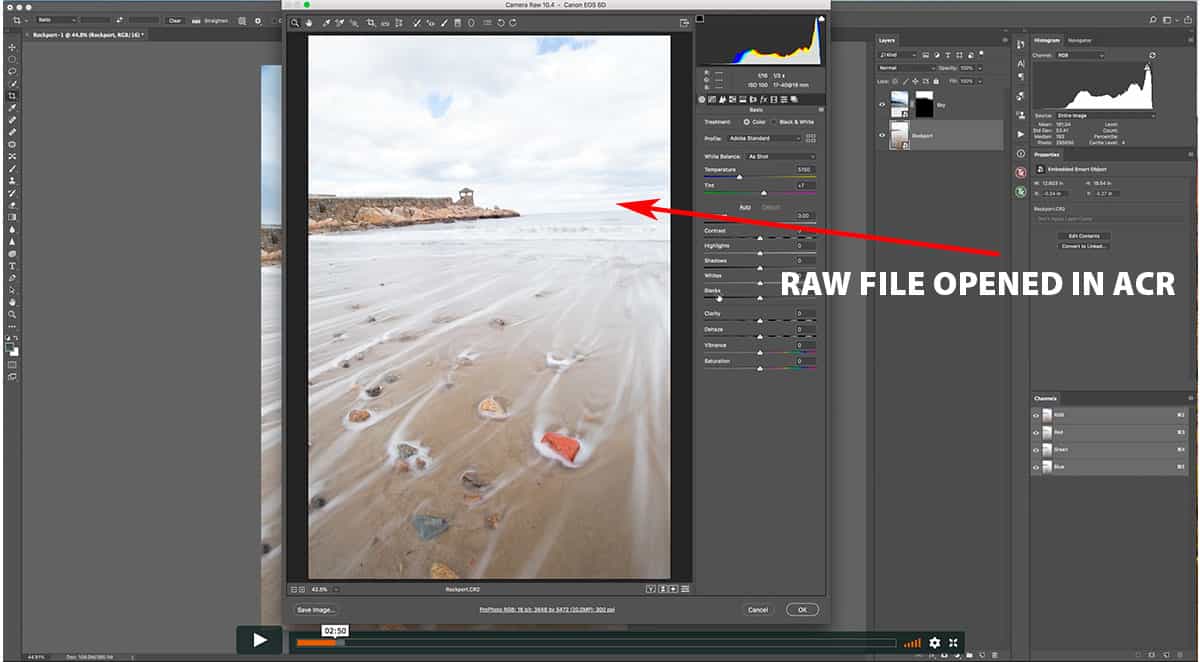
ACR is a pass-through between your raw file and Photoshop proper. When you’re finished working with your raw file, it then gets sent over to Photoshop so you can take advantage of more advanced tools and finish processing your image to prepare for export/print.
This is where photographers get confused because they incorrectly think that they are still working with the original raw file…like you would be in Lightroom. However, unless you specifically use a smart object, your image is transformed into a lower-quality, rasterized copy of that raw file.
By default, Photoshop does not let you process with the original raw file, which means that it will instantly apply any changes to the image you are working with. Lightroom and ACR are virtual processors, which means that the changes you make aren’t actually applied to the raw file…but rather are “virtually” applied so you can see them on your computer. Either way, the original raw file remains untouched.
However, smart objects provide a protected environment that allows you to process with the full data of a raw file in Photoshop, which is incredibly powerful.
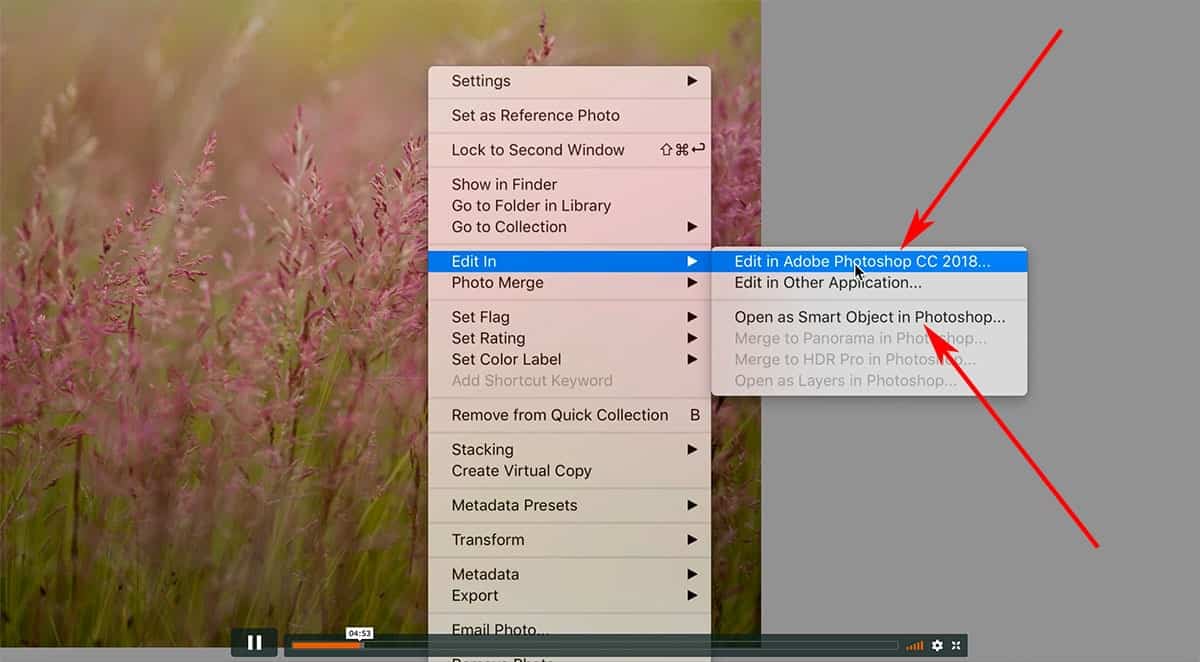
If simply press Open (and not “Open as Object”) when working with a raw file in ACR, then your image will be copied as a regular rasterized layer and opened in Photoshop proper. This means that you’re instantly severing the connection to your raw file and will lose all of the benefits of working with a digital negative. At this point, you might as well be working with a simple JPG.
The same also happens when you send an image over from Lightroom: if you choose “Edit in Adobe Photoshop” as opposed to “Open as Smart Object”, you’re sending over that lower-quality copy to work with: not ideal.
Before we get into how a smart object allows you to process with a raw file outside of ACR/Lightroom, first I want to make sure you know the “why”. Specifically, how much better the quality is when making tonal adjustments to the original raw file as opposed to this rasterized copy.
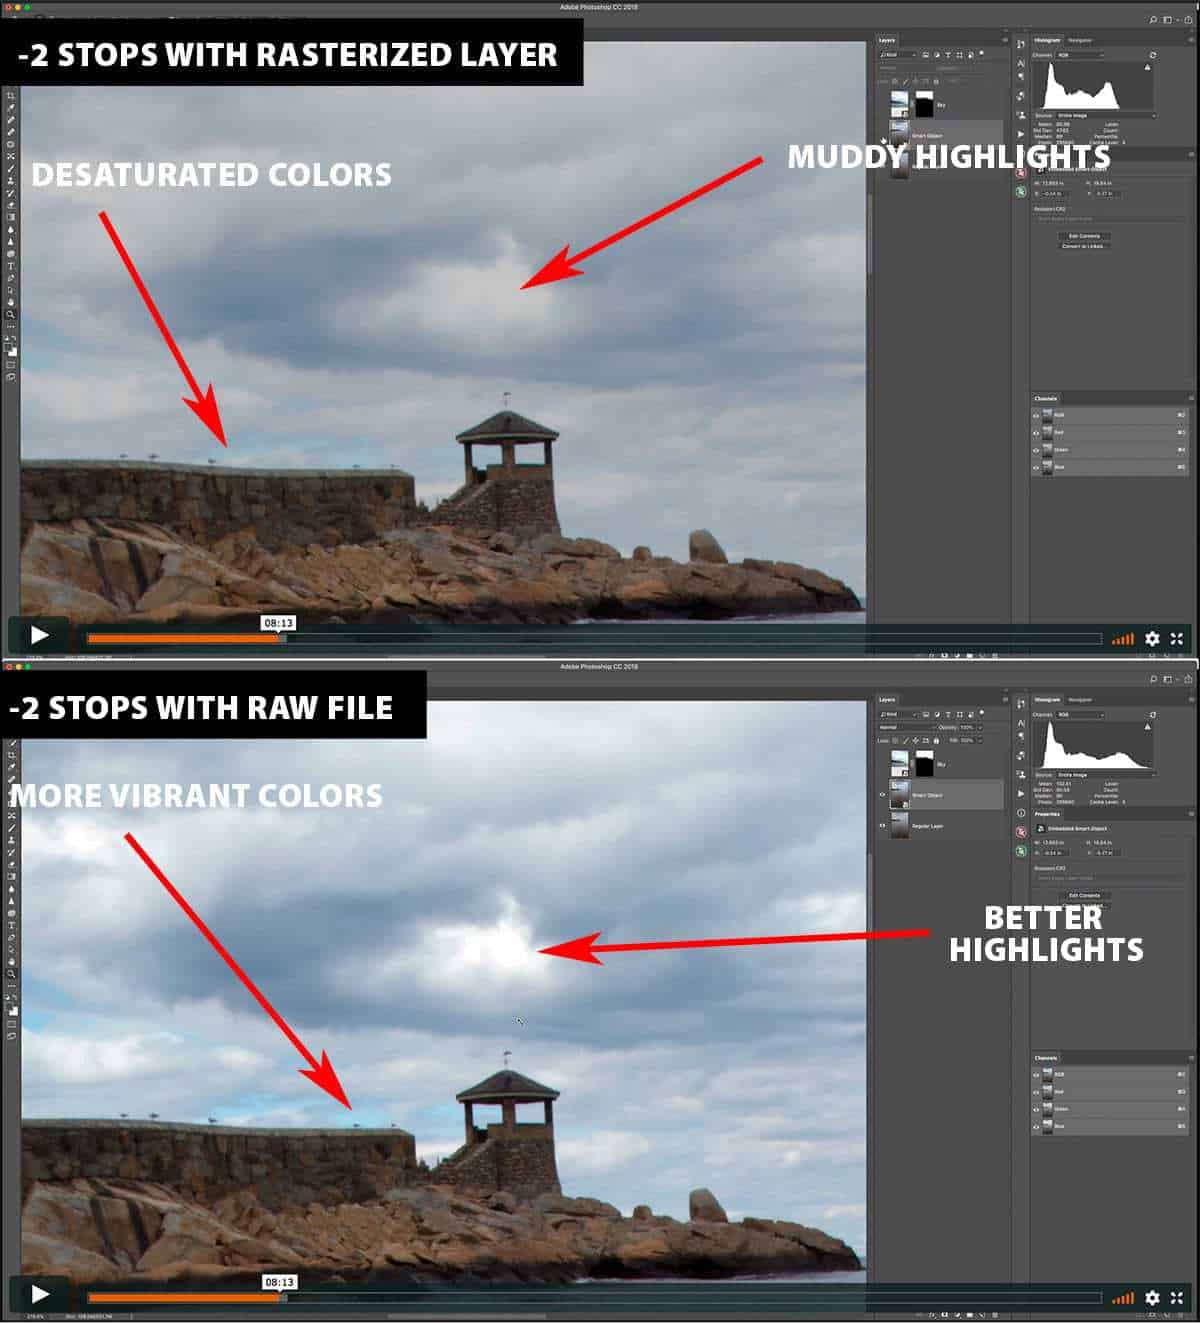
In the image below, I made a two-stop reduction in exposure to the same photo…the first being a rasterized layer (top image) and then to a smart object, which lets you access the original raw file (bottom image).
As you can see, the exposure shift done with the smart object resulted in more vibrant colors, less muddy highlights, and just an overall better appearance and larger dynamic range.
This is the point of using smart objects…
When you process your image as a regular, rasterized layer, what you see is what you get. You can’t access that extra information that is hidden inside of the raw file anymore, which severely limits how far you can push your photo in processing.
However, when you use a smart object to connect your image layer in Photoshop to the original raw file, you can pull out those additional tones and colors at any time during your workflow. Not only does this result in a higher quality image, but streamlines your workflow by allowing you to adjust your raw file at any stage.
If you’re familiar with film photography, I have a great analogy for you…
It’s like taking a picture of a film negative and trying to process that on your enlarger as opposed to the original negative itself. The quality is always going to be better when working with that original negative because you can pull so much more detail out of it with dodging and burning as opposed to a print. That’s like opening your raw file – your digital negative – as a smart object instead of a rasterized layer.
How a Smart Object Connects to your Raw File
The role that a smart object plays in retaining this non-destructive environment is that it acts like a protective, invisible container that you can place your raw file inside of. This means you can open this container up at any time to access that original raw file, make any changes you want to it, then close that container back up so you can continue processing in Photoshop.
When you send your raw file over to Photoshop as a smart object (either from ACR or Lightroom), what Photoshop will do is place a copy of your original raw file inside of that smart object “container”. This allows you to instantly access the full dynamic range and pull out any detail hidden inside of that raw file. This gives you the best of both worlds: the advanced tools of Photoshop combined with the processing leeway a raw file provides.
However, smart objects let you do much more than simply access your raw file….so let’s dive a bit deeper into what smart objects are really capable of.
Using Nested Smart Objects to “Merge” Layers Non-Destructively
So we know that smart objects are like invisible containers that you can put your raw file inside of…but that’s not all you can put inside of that “container”. Not only can you place other layer types (rasterized, adjustment, text, etc.) into a smart object, but you can also place multiple layers within the same smart object so that they can be manipulated as one cohesive layer. Without smart objects, you would have to merge your layers together in order to achieve this capability…which is a permanent, and destructive change.
This is extremely powerful, especially in landscape photography.
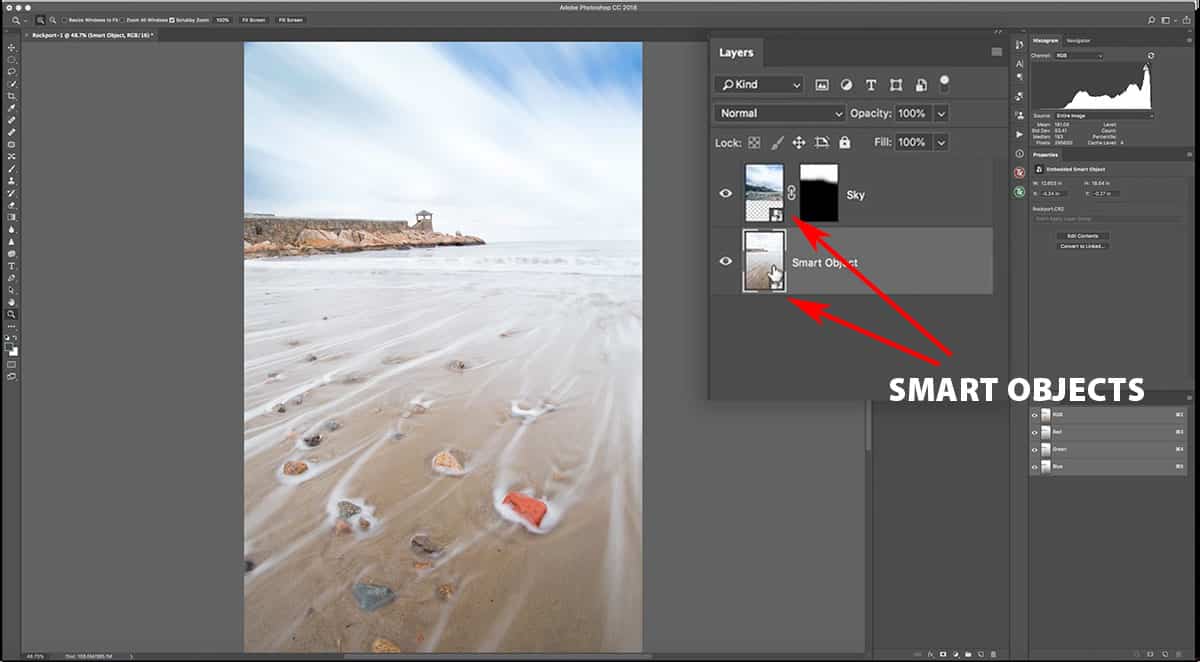
For example: in this document here, I have two layers that are smart object, and each one is linked to their respective raw files. You can tell they are smart objects and not regular layers because they each have the smart object icon in the bottom-right corner of the image thumbnail. I’ve (roughly) added a layer mask in order to blend the sky of the top layer with the ground of the bottom layer…which is a typical workflow for landscapes.
Let’s say we want to warp this frame in order to redistribute some focal points and correct for any lens distortion, a bowed horizon line, etc. Unfortunately, you can’t warp more than one layer at once, so you would have to merge these two layers together in order to manipulate them as a single unit. If you didn’t, then one layer would be warped separately from the other…which will result in your layers not lining up perfectly with the mask and will ruin any blending.
However, this merging of layers will cause three very big problems:
(1) Merging smart objects together will rasterize them, meaning you will sever the connection to their raw files.
(2) This is a permanent change, so you will not be able to access these layers individually anymore…meaning you will lose your layer mask and surrender control over how these two layers are blended together. Since you’re basically fusing these layers together into one, you’ll be stuck with what you have at the time of the merging.
(3) Any warping or transforming you do to this layer is destructive, meaning you will not be able to reverse it later.
So this is obviously not ideal…and will cause a lot of problems later on if you decide you need to make changes (which you’ll often do).
This is where smart objects come in to save the day. Instead of merging these layers together, we’re going to place them inside of their own smart object – or protective container, which will give us the best of both worlds: being able to manipulate these layers as one, and retain full access to the individual layers and original raw files.
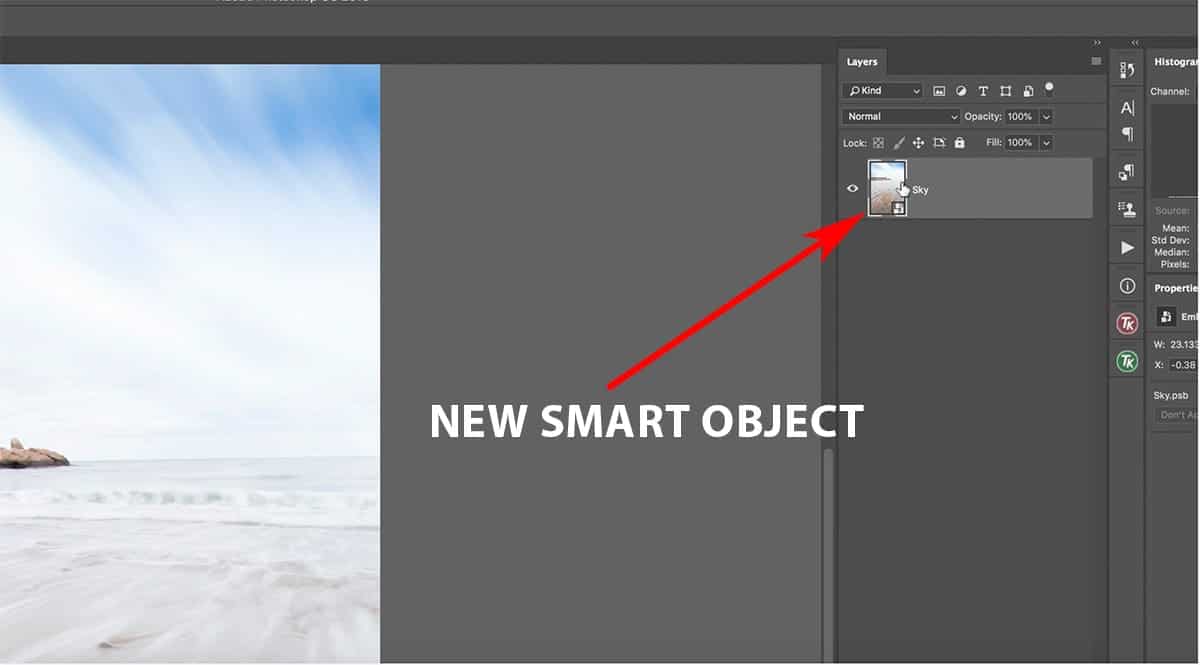
Select both layers in the layers palette, right-click on either layer name, and select Convert to Smart Object. When finished, you should have one layer in the palette, which will have the smart object icon in the corner of the thumbnail.
What you’ve done here is virtually fuse your layers together by placing them inside of a single smart object – or inside of an invisible protective container. This “container” can then be manipulated as a single layer as if you had merged them.
However, the difference here is that you can always open up this container to reveal the original smart objects and layer mask bhy double clicking on the smart object itself. Doing that will open a new Photoshop document, allowing you to view the original content.
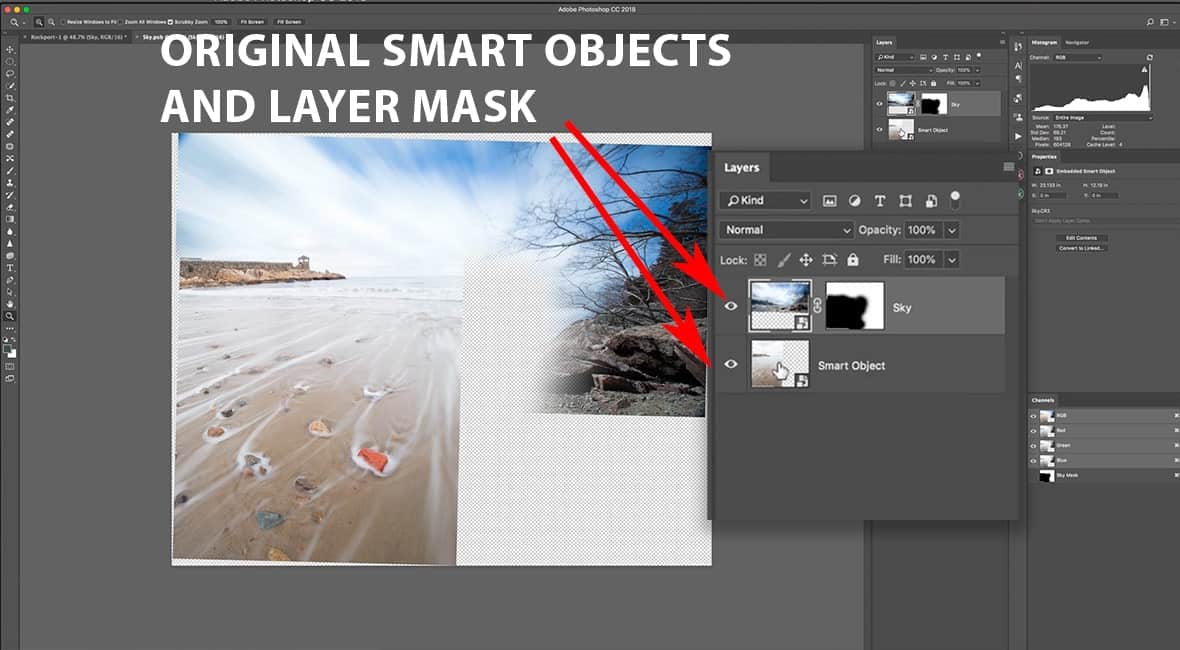
Important Note: These smart objects now look a bit different from the originals we were working with before packaging them into their own smart object. I had originally cropped out the excess detail of the raw files and did a bit of transforming and rotating. Those pixel-based changes have now been adopted by the containing smart object…and when we open that up to reveal our original smart objects seen above, we are now looking at their true original state.
So what we’ve done here is nested our smart objects in the following manner:
(1) We have our top-tier smart object, which we can open up to reveal two smart object layers blended together with a layer mask.
(2) These smart objects contain the original raw files, which can be opened up at any time to make true raw adjustments as needed.
The result: a completely non-destructive environment for as highly versatile workflow at full quality.
Here’s another real-world example of why this workflow is so powerful…
Let’s say you’ve applied some warping to the top-tier, containing smart object. However, you now notice that the blend between the sky layer and the ground layer is not 100% accurate and you can see some ghosting. Since this is a non-destructive environment, you can easily open up this smart object to reveal the original two layers and tweak the layer mask as necessary (as seen in the screenshot above).
If you were working with a merged layer, there would be absolutely no way to do this without starting over from scratch.
So not only do smart objects save you a LOT of time, but eliminates the stress and pressure to get “things right” from the beginning…you can always go back and easily adjust the original raw files and how your layers interact with one another.
Here’s another example that is typical of a landscape photographer…
Let’s say that at the very end of our workflow – after warping, color grading, sharpening, and you are completely ready to print – we notice that the sky has some blown highlights. This happens often since our color and tonal work can alter the exposure. As we know, recovering detail is best done with an original raw file…and since we are using smart objects here, I can easily double-click on the containing smart object, and again on the sky smart object to jump into ACR and recover those highlights at full quality.
Again, this would never be possible with a merged and/or rasterized layer…and we haven’t even started to explore the possibilities with adjustment layers yet.
We’ve barely scratched the surface of smart objects, but I think you understand the basic concept: for a little bit of extra work, you can create a completely non-destructive environment and retain the highest quality image possible. You can really have the best of both worlds: the full flexibility of processing your layers individually, but also be able to manipulate them as one piece.
The little extra time it takes to create your smart objects is a smart investment, because it can actually save you more time in the long run. When you work non-destructively, it’s very simple to reverse or alter your processing steps…where with rasterized layers, your workflow is more linear, so you would have to repeat a lot of steps if you wanted to change anything.
How to Save Nested Smart Objects
When you work with nested smart objects (the containing smart objects that house multiple layers), Photoshop will open up an additional document to show you the content of that smart object separate from your master file. In a way, it’s like the smart object contains another Photoshop document.
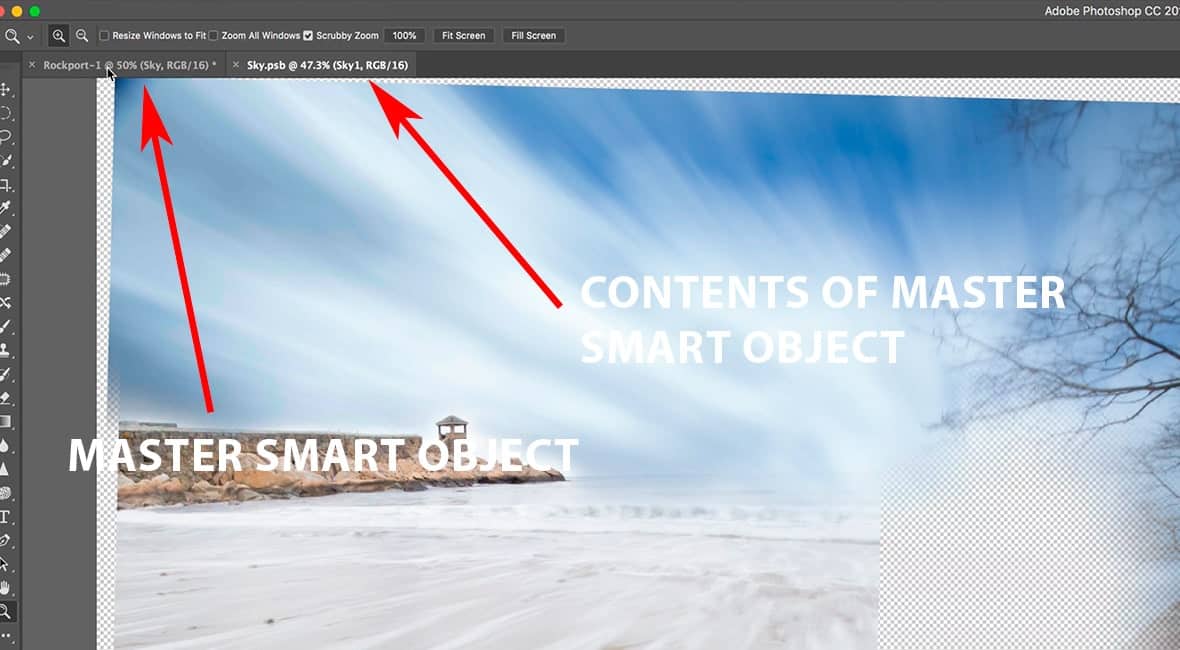
This allows you to make any changes you want to the contents of a smart object as if it was its own document…which gives you the ability to save or discard those changes completely.
When finished, simply press File > Save to confirm that you wish to keep the changes you made. This will push any work you’ve done to the content inside of the smart object back over to the master file.
If you’re not happy with your changes, simply close out of this document without saving which will discard any work you did here.
Need a break? Download the full video lesson of this tutorial below.
[fl_builder_insert_layout slug=”smart-objects-optin”]
How to Properly Copy Smart Objects
When you copy a smart object, it behaves a bit differently than copying other layers. Creating a copy by pressing CMD + J (or drag your layer over the “new layer” icon in the palette) will not give you an independent smart object to work with. Instead, each copy of that smart object will be linked to the same source file (whether that is another smart object, a raw file, or other layers). This means that any change you make to the content of any smart object copy will affect all copies in your document (I demonstrate this in the video, which you can download right here).
This is where photographers can make a mistake since this is not what they intended. For example, let’s say you’re working with a raw file and you want to use exposure blending to recover some blown highlights…but you only have a single raw file to work with (no brackets). You would copy the smart object, open it up in ACR, reduce the exposure, then use a layer mask to blend in those recovered highlights.
However, if you simply copy the smart object like a regular layer, you’ll be reducing the exposure of both layers…which is not what you want.
To properly copy a smart object so that it is not connected to one another, right-click on the smart object you wish to copy (on the layer name, not the thumbnail) and select “New Smart Object via Copy”.
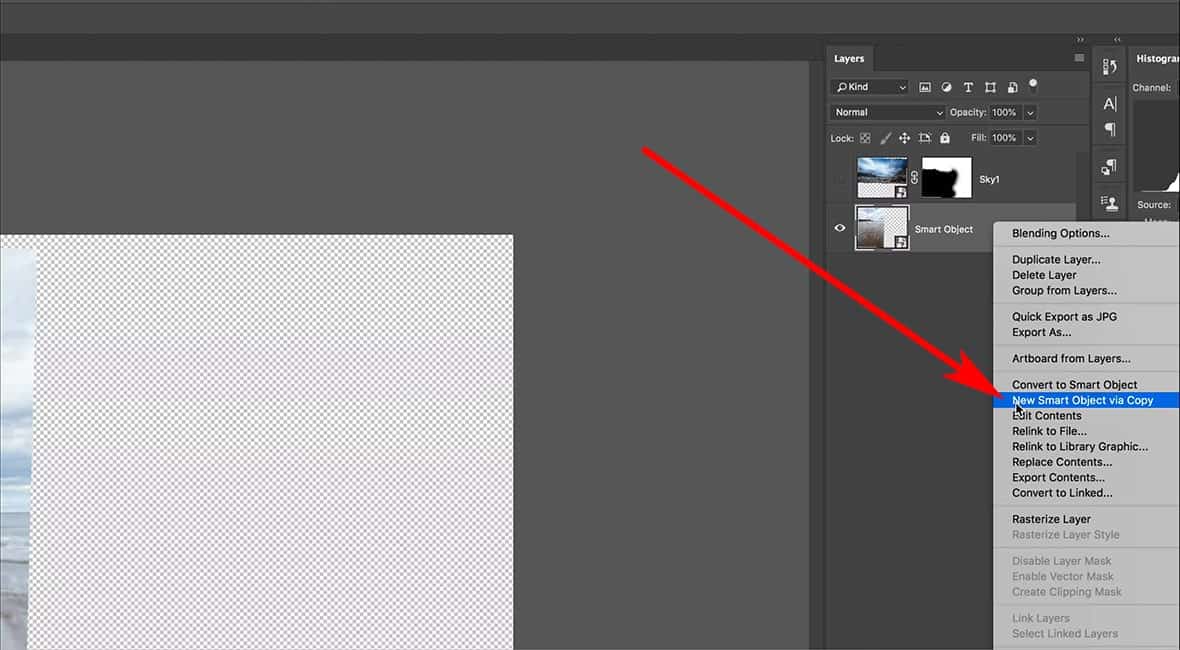
This will duplicate not only the smart object, but also the content inside of it…which will give you independent source files. In the example above, this would duplicate the raw file and place that copy inside of your new smart object…so you are now working with two raw files independent from one another.
Going back to the exposure blending example: this means you can reduce the exposure of one smart object and blend in those recovered highlights using a layer mask.
However, there are situations where you would want to create multiple smart object copies linked to the same source file. For example, let’s say I wanted to add some falling leaves to my photo. If I were to create 20 copies of this leaf, rotate and transform each one differently, and then later decide I wanted to make a color adjustment…it would be quite laborious to do that to 20 independent layers. However, if I convert the first copy to a smart object and then copy that layer multiple times…I can easily make global changes in color to all renditions. All I would have to do is open up any smart object, make a color adjustment, save it, and watch that change be applied to all of the smart object copies in my document. I also demonstrate this workflow in the video lesson you can download right here.
Here’s the “big picture”: smart objects are quite versatile, so choose the copying method which works best for the results you want
Resizing Layers with Smart Objects
Another great benefit of smart objects is that it will protect the original quality of your layer when resizing, cropping and transforming. Each time you resize your image or use the transform/warp tool, you chip away at the image quality and clarity. However, if you placed your image inside of a smart object before you start to manipulate it, you’ll provide a protective barrier between your photo and any permanent damage.
Using Smart Filters with Smart Objects
Another amazing benefit of smart objects is that they allow you to use smart filters, which gives you the best of both worlds: you can perform pixel-based changes that would otherwise permanently change your image (like Gaussian blur, sharpening, and the other tools you find under the Filter menu) within the protective boundaries of smart object. In other words, you can come back and delete, hide, or alter your filters without any permanent changes to your image!
This is incredibly powerful…but often overlooked.
For example, if you’ve ever used the Gaussian blur, you know that this is a permanent change to your layer…which is why many photographers will duplicate their image layer first so they can “save” the original and revert back to it if necessary. However, if you use a smart filter, you can bypass all of that extra work because the smart object will keep your filter completely separate from the image layer itself.
It’s like adding the flexibility of adjustment layers to your filters.
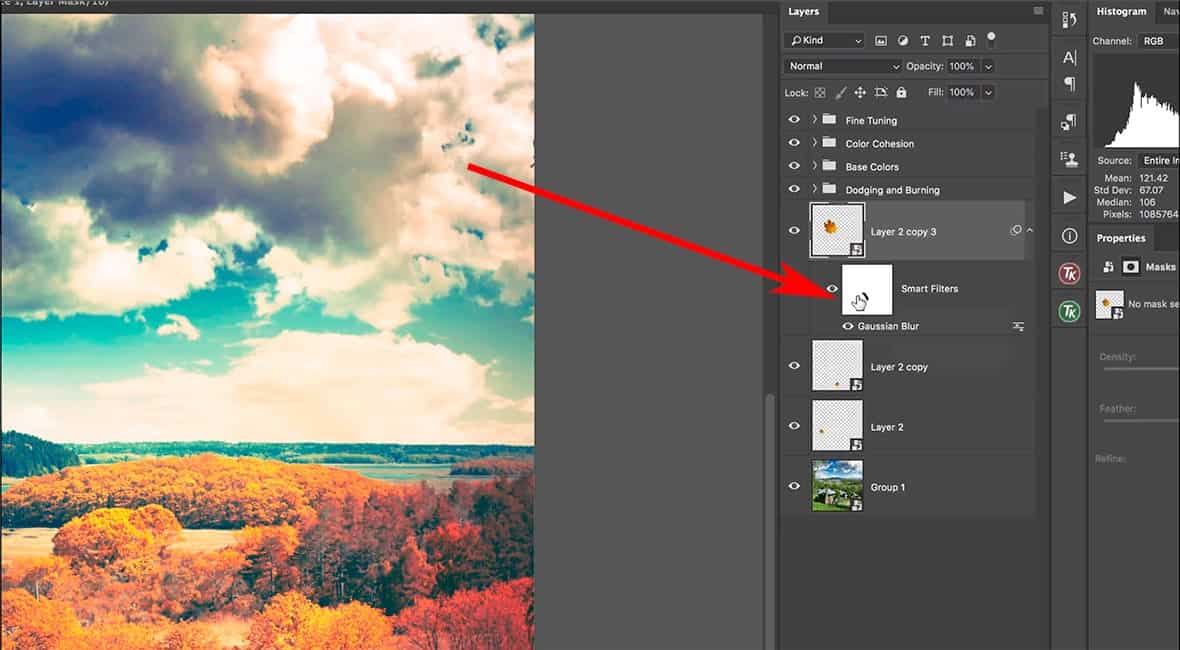
In the screenshot below, you can see that my Gaussian blur now has its own separate layer and a mask for fine-tuning…which comes with all of the added benefits of an independent layer (such as opacity and visibility control). You can also re-enter the filter at any time to adjust the strength, which is not possible without smart objects and smart filters.
Using the Clone Stamp (and other Pixel-Based Changes) with a Smart Object
Unfortunately, there are some downsides to using smart objects. Since they protect the original image (or any layer you place inside of it), it means that you can not make any pixel-based changes since that defeats the purpose of using a smart object. We can use smart filters as demonstrated above, but tools like clone stamping, healing brush, content-aware, and the patch tool all require a special workaround in order to keep those changes separate from the image and preserve the original quality and content of that smart object.
Let’s use the clone stamp tool with a smart object as an example. The first step is to add a new, blank layer above your smart object. This will be used to place our clone stamping onto since we can not stamp on the smart object itself.
Under the clone stamp options, make sure to select “Current and Below” from the Sample drop-down menu…which tells Photoshop to also sample content from any visible layer below this new blank layer. If this wasn’t selected, then Photoshop would only sample from the blank layer, which is not helpful.
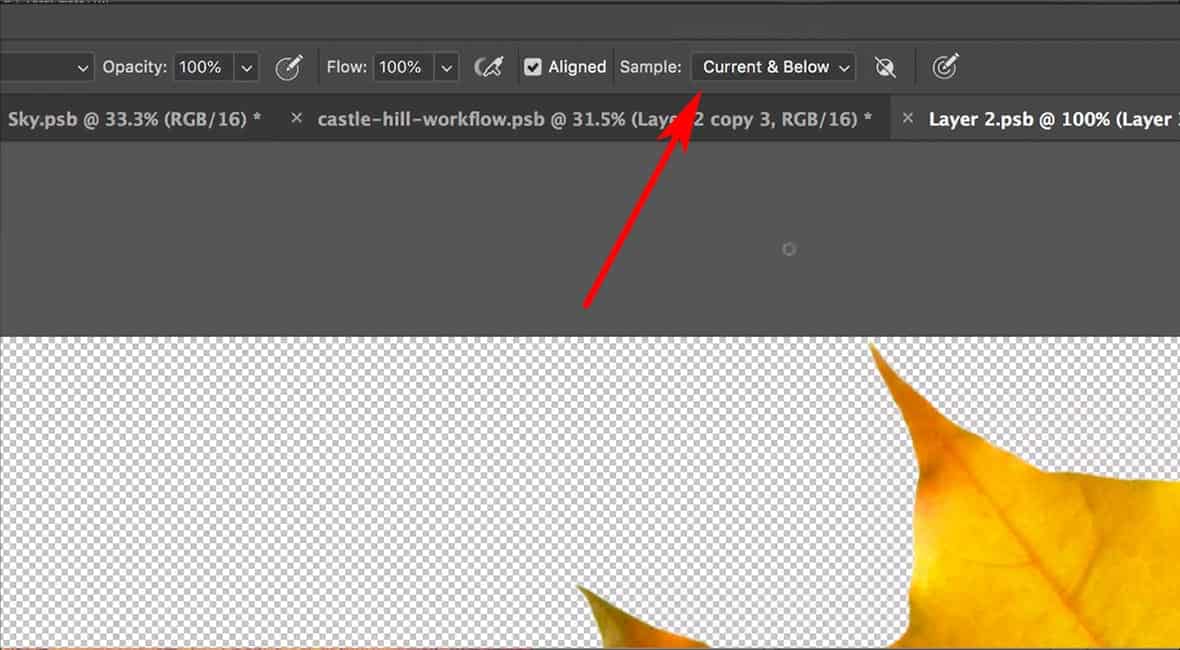
This tells Photoshop to sample the all the visible layers underneath…but to stamp it onto this blank layer, making it completely separate from the smart object. In other words, you’re telling Photoshop to pull in the content of any layer below it, but to paint it onto this new blank layer.
This set up will allow you to do two things:
1. Clone stamp a smart object by keeping your stamping on a completely separate layer.
2. Be able to alter or remove your clone stamping at any time since it is independent of your image.
Personally, I see this roadblock as a benefit since we are retaining the non-destructive environment that smart objects provide. If the clone stamping was not on a separate layer, we could be stuck with whatever stamping we do. You can now do all the great things you can with a layer (hide, delete, mask), but with your pixel-based work.
Now you could just create a rasterized copy of your image and use that for your clone stamping (many photographers do this), but that will increase your file size by quite a bit. Typically, it’s not necessary to copy the entire image layer since you’re only stamping a small portion of it.
Smart Objects and File Size
Speaking of file size, smart objects will make your image file bigger. Since you’re placing a copy of the raw file inside of your Photoshop file here, that’s going to make a difference.
When you’re working with a single frame, that’s really not a big issue. However, if you’re processing a panorama or an image with an exceptionally high megapixel count, and you have several smart object image layers…your file can easily get above 2 GBs. The size of the file isn’t the problem, but rather the performance of Photoshop will begin to stall…so that’s a consideration to keep in mind. It might be best to forgo smart objects, especially if you’ve already optimized your performance by increasing the memory and cache.
The “Big Picture” Idea Behind Smart Objects
The big idea behind smart objects is to eliminate that point of no return and allow for you to make retroactive changes to your raw file or any individual layer. Without smart objects, you have to follow a very linear workflow in Photoshop. However, once you add smart objects to your workflow, you can go back to any layer (at any time) and change it as necessary…and at full quality.
I hope you enjoyed this tutorial and found it helpful in explaining the practical use of smart objects in landscape photography. Don’t forget to download the video and practice files for offline learning!
[fl_builder_insert_layout slug=”smart-objects-optin”]
Related Products
Related Products
-

Golden Hours eBook
$ 19.00Learn how to capture the extraordinary light of sunrises and sunsets with this free eBook. I'll show you…
Add to cart -

HDR Field Guide
$ 19.00A necessary part of landscape photography is to capture the full dynamic range of the natural light, which…
Add to cart -

Lightroom Cheatsheet
$ 0.00Discover how to work faster and smarter in Lightroom Classic with this simple-to-follow workflow from import to export.…
Add to cart