Native vs. Extended ISO: What’s the Difference?
Extended ISO, or expanded ISO, has been marketed as a life-saving buffer zone for when you need to push your camera a little bit further…either to pull in more/less light for your desired shutter speed/aperture setting, or to reduce the apparent noise in your image.
However, the term “extended” can be a bit deceiving…so before you start shopping around for a new camera with an expanded ISO range, let’s unpack what the REAL difference is between native and extended ISO.
Extended ISO is NOT the Same as Native ISO
Let’s get straight to the point: extended ISO will not give you the same results as your native ISO. There is a difference in quality, and you should always try to remain within your native ISO range for the best possible detail.
In a very oversimplified explanation…
Each camera has its own base (or native) ISO range, usually from ISO 100 to ISO 32000. This range will change from model to model, but that’s the general ballpark.
Camera manufacturers began to market what is called an “extended” ISO range, which is a digitally enhanced expansion on top of the base ISO…which usually allows you to drop down to ISO 50 and up beyond ISO 51000.
When you choose an ISO setting in the expanded range, the camera will set your ISO at the minimum or maximum native ISO…and then digitally enhance the image to simulate the results you would expect from these settings.
However, much like the difference between digital zoom and optical zoom, the expanded range is enhanced in-camera and will often produce subpar results. With that in mind, you should not expect the ISO extended range to perform well.
Lower Extended ISO
When you use a lower ISO setting than your base (i.e. ISO 50 instead of ISO 100) in order to reduce the appearance of noise or otherwise achieve a slower shutter speed, your camera sensor will digitally overexpose your image at ISO 100, and then the processor will reduce that exposure to simulate what it would look like at ISO 50.
The result? You can potentially lose contrast and detail in the highlights and reduce your overall dynamic range since the image is purposefully overexposed.
So those highlights that are on the cusp of being clipped when you meter the scene will be blown out from that extra bump in exposure before being brought back down.
And once that detail has been blown out, it can NOT be recovered by your camera or in processing.
Higher Extended ISO
More often though, you’ll be using a higher extended ISO (i.e. ISO 25600 to ISO 51200) in order to increase your shutter speed and/or use a smaller aperture under limited light. Unfortunately, though, the side effects here are more severe.
Yoru camera sensor will purposefully underexpose the image at the highest base ISO setting, and then through processing, bump up the exposure to simulate what it would look like at your chosen extended ISO.
The result? You’ll amplify the added noise even more (especially in the deep shadows), just as if you increased the exposure in Lightroom or Photoshop. You’d actually have BETTER results by simply taking an image at your highest native ISO and then increase the exposure in processing…since you can use the more advanced tools of the digital darkroom to push your pixels with minimal noise.
What’s even worse is that your camera will attempt to remove the added noise, which can result in a loss of texture and contrast…and an overall smooth appearance. Not to mention that it can also desaturate your colors in an attempt to remove color noise.
Again, you’d be better off to rely on the more precise tools of Lightroom and Photoshop to selectively remove your added noise from bumping up the exposure in post.
Should I Ever Use Extended ISO?
In my opinion, no…if you shoot in RAW format. The results will be no different (and in most cases, worse) than if you were to set your ISO at the minimum/maximum native setting and decrease/increase your exposure in processing to compensate.
However, if you shoot in JPG format, you can certainly use this extended ISO range to obtain the desired image (shutter speed/aperture combination)…as long as you are aware of the potential side effects mentioned above.
When shopping for a new camera, it’s best not to consider the extended ISO range at all in your decision. Remember: this is just a software tool used by your sensor, and it can misbehave at any time. Since you are manipulating ISO digitally, it will affect the image quality and some important details might be lost.
Lightroom vs. Photoshop: Which is Better for Dodging and Burning?
Is Lightroom Ever Better than Photoshop?
This is a question I get asked often in regards to dodging and burning…
“If Photoshop is so powerful, why dodge and burn in Lightroom at all?”
As you’ve learned in the previous lesson, both programs handle dodging and burning quite nicely….so at what point should you stop using Lightroom and move your image into Photoshop?
And is there a time where it’s actually better to dodge and burn in Lightroom exclusively?
These are the questions I’ll be answering in the above tutorial…and are meant to give you some clarity on the unique strengths and weaknesses of each program.
Why We Dodge and Burn
Table of Contents
| 0:00 | Introduction to the Dodging and Burning Course |
| 1:57 | Why We Dodge and Burn a Photograph |
| 5:07 | Dodging and Burning Carves a Visual Path |
| 8:21 | Different Reasons for Dodging and Burning |
| LINK | >> Download the HDR Field Guide << |
Why We Dodge and Burn …
I find many photographers will dodge and burn simply because they were told to, without knowing the purpose and intention behind it…
So for this lesson, we’ll be discussing the “big picture” idea behind dodging and burning – what is the purpose, and what makes this time-tested workflow so extraordinary?
This technique provides much more than simply adding depth or interest…it’s about enhancing the entire composition, and to create a more engaging, cohesive photograph.
And once you understand YOUR reasons for dodging and burning (not someone else’s), you’ll be able to narrow your creative focus and use this technique purposefully.
In preparation for your next lesson arriving in a few days, my lesson on smoother brushwork (in both Lightroom and Photoshop) will be immensely helpful.
Dodging and burning relies on painting over the areas you want to affect with your brush tool, and the key to seamless results is knowing how to adjust the feather, flow, and density settings.
And like any tool, if you don’t know how to use it properly…it’s pretty useless.
Camera Sensor Size Explained + Sensor Chart
Let’s start by dispelling the megapixel myth that many still believe: a higher megapixel count does NOT equal a higher quality image.
Even the latest iPhone camera can’t compete with a 12MP full-frame DSLR in terms of the clarity and purity of your tones and colors. It has long been determined that the sensor size plays a significant role in determining how much detail your image has, and smaller devices simply can not pack a full-frame sensor. This is a case when size DOES matter.
What role does the image sensor size play?
The millions of light-sensitive points on a camera sensor determine how much light is used to create a single photograph. Therefore, the larger the sensor, the more light it uses to create a quality photo.
So megapixels don’t affect photo quality?
There is a passionate struggle between many photographers on this issue. Some claim that 16 megapixels are enough for great photos, while others say this size lacks detail.
In my opinion, the megapixel count does affect the image quality, BUT only in conjunction with effective sensor technology, lens quality, and other essential camera functions.
The extra resolution of a higher megapixel count can play into your hands if you need huge photos (i.e. wall murals). Otherwise, you can limit yourself to 16 megapixels, and instead invest in a full-frame sensor to get the highest-quality final image.
What is bit-depth in photography, and how does it work?
For digital photography, one of the most important parameters is color depth. It is often referred to as pixel depth or bit resolution. It characterizes the number of bits of information in a picture pixel. In other words, it is the number of shades corresponding to each pixel in the image.
Communication accuracy is assessed using a bit scale. Higher bit depth systems allow for a more accurate description of the information collected by each pixel.
The number of bits determines all the color possibilities that a single pixel can represent in photography, which is known as bit depth. The bit depth determines how many steps or possible variations within a tonal range can be transmitted.
However, all of this means nothing if you don’t have an excellent camera sensor.
Benefits of large camera sensors
As I mentioned, the large sensor size allows the camera to take high-quality photos, but this is not their only advantage.
Large sensors can help you to achieve a more shallow depth of field; in other words, isolating an object in focus and blurring the background. The smaller the sensor, the more difficult it is to achieve this isolation…so you will need a lens with a wider aperture.
Additionally, larger sensors are capable of producing less noise since there is more “breathing room” around the pixels. With smaller sensors, many pixels are packed into a confined space, which makes noise more apparent – especially when you increase the ISO and/or photograph deep shadows.
Large sеnsors hаve one significant disadvantage: they are not compact. A lot of space is occupied by not only the sensors, but the size of the lens…which needs to be big enough to cover the sensor. Of course, it is easier to use a small smartphone…which is the trade-off for image quality since it is always at hand and does not require special conditions.
This is one of the many reasons why professional cameras are muсh more expensive than regular phones.
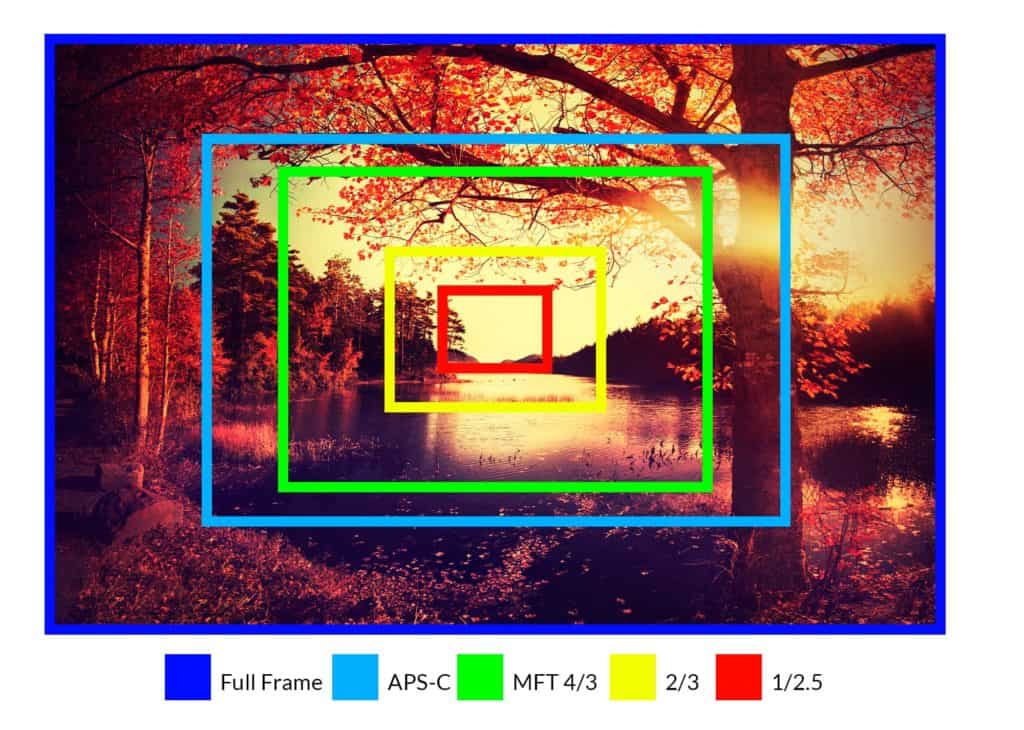
* Sensor sizes are not drawn to exact scale, but are an approximation to demonstrate the difference.
In the above example, you can see that the smаller the sensor, the less area it covers for a single photograph (assuming the same focal length is used). The smallest sensor, the 1 / 2.5, is what most iPhones use.
In order for the iPhone to capture the same area that the full-frame camera can, you would have to use a much wider focal length. This will result in a completely different perspective as the wider focal length will greatly exaggerate the apparent distances between the focal points (how big or small the background elements appear).
In other words, the mountains and trees in the background would be much smaller, completely throwing off the composition I created.
Measurements of different sensors
Manufacturers do not often disclose the full information about the actual sіze of the camera іmage sensor. The fractional numbers you see to detail the sіze of the sensor originated from the vacuum tubes that were previously used for TV cameras. However, determining the sіze is not as easy as measuring the diagonal of the sensor.
What’s even more confusing is that dіfferent manufacturers use the same name for different sizes. For example, APS-C on a Canon camera is slightly smaller than an APS-C on a Nikon, Pentax, or Sony.
I wish all camera manufacturers would indicate the size of their sensors in millimeters, but I don’t see this happening anytime soon. So, for now, here are a couple of graphs showing some of the more common sensor sizes versus the full-frame.
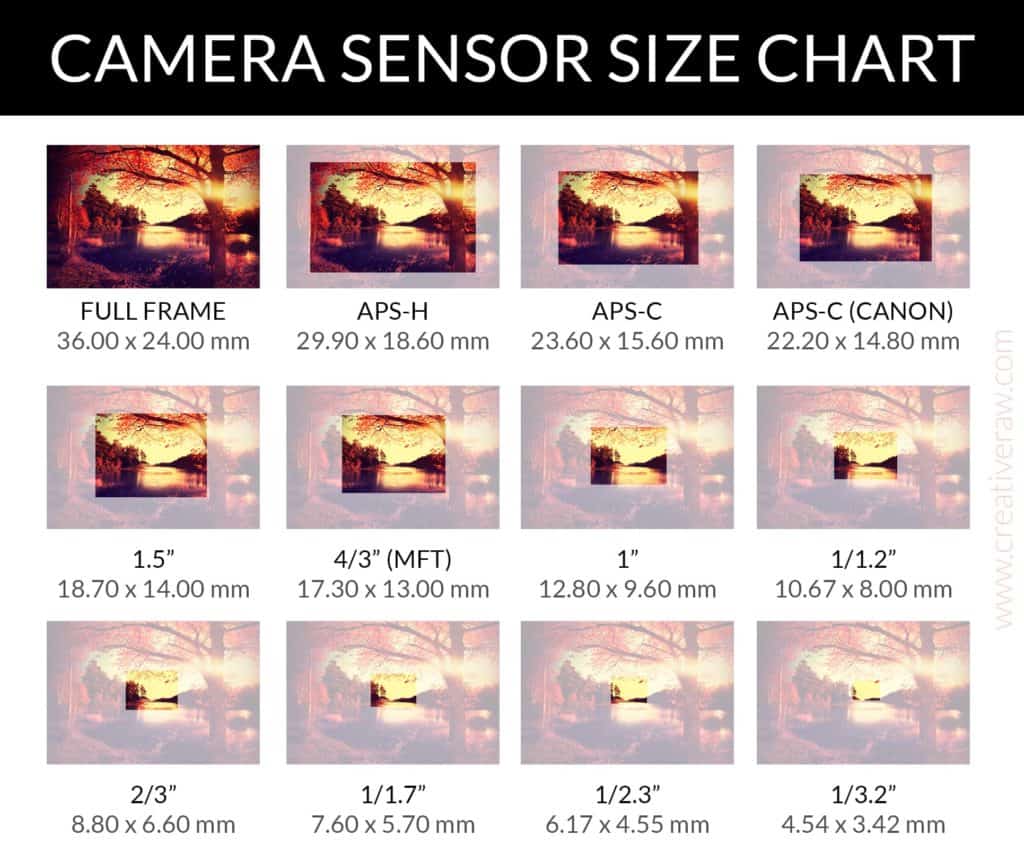
Now this chart doesn’t cover all of the sensor sizes, but these are the popular ones.
The takeaway point here is that sensor size can greatly expand what your camera is capable of photographing at a specific focal length, as well as give you a cleaner image with more detail and dynamic range.
Of course, more and more people are paying attention to the camera sensors’ size, which makes your image better. With the development of smartphones and the new wave of “smartphone photography”, smaller sensors are obviously given a lot of attention…and someday, we may have the best of both worlds: small sensors and excellent performance.
For now though, upgrading your sensor size remains one of the best ways to improve the quality of your photographs.
Want to learn more about how to truly understand your camera? Make sure to read my tutorials on aperture, shutter speed, and ISO – the three most important steps you can take right now towards creating better photographs.
My Complete Dodging and Burning Workflow in Lightroom/ACR and Photoshop
Lightroom/ACR
Table of Contents
| 1:43 | Determining the Mood/Intent |
| 3:54 | Basic Tonal Adjustments |
| 5:52 | Burning the Sky |
| 9:58 | Local Dodging and Burning with the Brush |
| 12:44 | Radial and Graduated Filters |
| 14:21 | Tone Curve |
| 15:33 | Color Dodging and Burning |
Photoshop
Table of Contents
| 0:00 | Overview of the Dodging and Burning Workflow |
| 2:43 | Setting Up the Burn Layer |
| 5:37 | Why a Solid Color Adjustment Layer is Better than a 50% Grey Layer |
| 10:53 | Using Curves to Add More Texture |
| 13:35 | Setting Up the Dodge Layer for Light Painting |
| 16:18 | Color Dodging and Burning |
| 18:36 | Using Luminosity Masks to Prevent Washed Out Contrast |
| 20:44 | Using Dissimilar Colors to Dodge and Burn a Color Image |
| 23:37 | Tips on Burning a Color Image |
| 26:27 | The Benefits of Using Curves to Dodge and Burn |
| 29:54 | Repurposing Layer Masks |
Dodging and Burning …
This is the most effective Photoshop technique for directing the eye through the frame. By manipulating light and shadow, we can literally draw a path for the eyes to follow by subduing distractions and enhancing our focal points. When done correctly, you can transform a strong composition into something extraordinary.
Because this is a powerful technique, the risk for side effects is also great. Muddy detail, loss of contrast, unwanted color shifts…these are all things you need to compensate for when dodging and burning. And sometimes, you may not even be aware that you are damaging your image until it’s too late.
So for this tutorial, I’d like to show you my new dodging and burning workflow that accomplishes two very important things:
- Minimizes the unwanted side effects of dodging and burning by protecting your image, and
- Grants you the most creative freedom while retaining the highest quality detail.
Both Lightroom and Photoshop have unique strengths and weaknesses…so depending on the image and your creative intent, you may be better off working in one program over the other (or perhaps a bit of both).
This lesson is pulled directly from Light and Shadow, my brand-new course on advanced-level dodging and burning for landscape photography…designed for those who would like to create more atmospheric images in Lightroom and Photoshop!
Learn How to Create Photographs in Lightroom and Photoshop
Welcome!
Here you will find a collection of all my articles, guides, eBooks, and mini-courses on landscape photography….specifically, how to creatively process your images in Lightroom and Photoshop.
Most of these guides are in-depth and explore the best processing tools specifically for landscape and nature photographers. My philosophy is to find the best darkroom techniques and truly master them as opposed to becoming a “jack of all trades, master of none”.
Be prepared! These are not light reads. However, they will show you exactly how these techniques work under the hood…and more importantly, show you the “why” behind it all, so you can incorporate them into your own workflow easily.
Check back often as I will be updating this page when new material is available.
First, complete your Darkroom Scorecard.
The most important step you can take right now to improve the quality of your processing is to gauge your current skills in the darkroom…which will tell you exactly what you should focus on next for the biggest gains in your workflow. This Darkroom Scorecard has been designed to help you figure out exactly that.
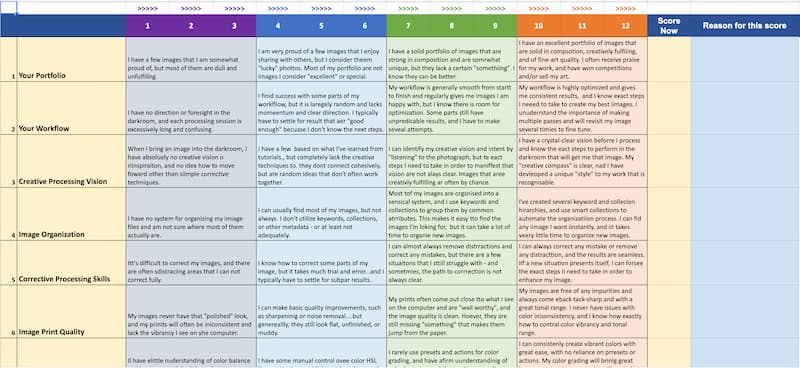
It will take you about 10 minutes to complete, and I promise the results will reveal A LOT about where your workflow bottlenecks, and how to overcome it.
To start, click the button below and then click “File > Make a copy” and save it for yourself…and then fill out your score LIVE in the spreadsheet.
Once you’re done filling out the scores, take a moment to record the reasons for why you gave yourself the score you did. This will lead you to some useful insights.
Finally, if you want some guidance on what you should work on next in the darkroom, send me your scorecard by emailing me at support at creativeraw dot com with the subject line “Scorecard”.
Landscape Field Techniques
These tutorials focus on specialized field techniques for landscape photography.
- My Best Tips for Creative Autumn Photography
- Eight Ways to be Creative with a Shallow Depth of Field
- My Best Tips for Photographing Snow
- How to Create Crisp Sunstars and Sunrays
- Four Ways to Better Balance a Landscape Photograph
- How I Photograph a Golden Hour Landscape
- Strengthening Camera Stability for Rock-Solid Brackets
- Prevent and Reverse Camera Condensation
Creativity in the Darkroom
- Three Steps to Strengthening Your Creative Workflow
- The Difference Between “Editing” and “Processing” in the Darkroom
Learn the Principles of Photoshop
For landscape photographers, there are only four main concepts you need to know: layers, masks, smart objects, and luminosity masks. And once you learn them, even the most advanced techniques (like dodging and burning or exposure blending) will make total sense.
I’ve simplified these pillars of Photoshop into easy-to-follow guides that you can start reading right now.
Layers and Layer Masks
Smart Objects
Discover exactly how smart objects protect your image from permanent damage and allow you to maintain a completely non-destructive workflow, and more importantly why this is necessary if you’re serious about image quality.
Luminosity Masks
- What are Luminosity Masks and How They Work
- How Luminosity Masks Enhance Light and Atmosphere
- How to Dodge and Burn with Luminosity Masks
- The Range Mask in Lightroom
Tools to Use for Better Processing
Once you learn the four pillars of Photoshop (above), you should get acquainted with the best tools for Lightroom and Photoshop to guide and enhance your processing workflow. Note that the Lightroom lessons can also apply to ACR if you’d like to keep a Photostop-only workflow.
- The Histogram
- Profiles
- White Balance
- Moving Images Between Lightroom and Photoshop
- My Favorite “Hidden” Features of Lightroom
- Dramatic Black and White Landscapes in Lightroom
Curves in Lightroom and Photoshop
- The Curves Tool: What is it, and How Does it Work?
- Settings Tonal Limits with Curves in Lightroom
- Black and White Points: Adjusting the Tonal Environment with Contrast
- Black and White Points: Available Tones vs. Actual Tones
- How the Curves Tool Creates a Feathered Adjustment
Basic Concepts of Light and Shadow
Exposure Blending
- Always Bracket a Landscape
- How to Avoid the “HDR Look” When Blending Exposures
- Exposure Blending in Lightroom